PRINCESS HOUSE VIDASANA Guide
CARE & USE MANUAL
MY PRINCESS HOUSE CONSULTANT
PHONE NUMBER
C5157 7/19
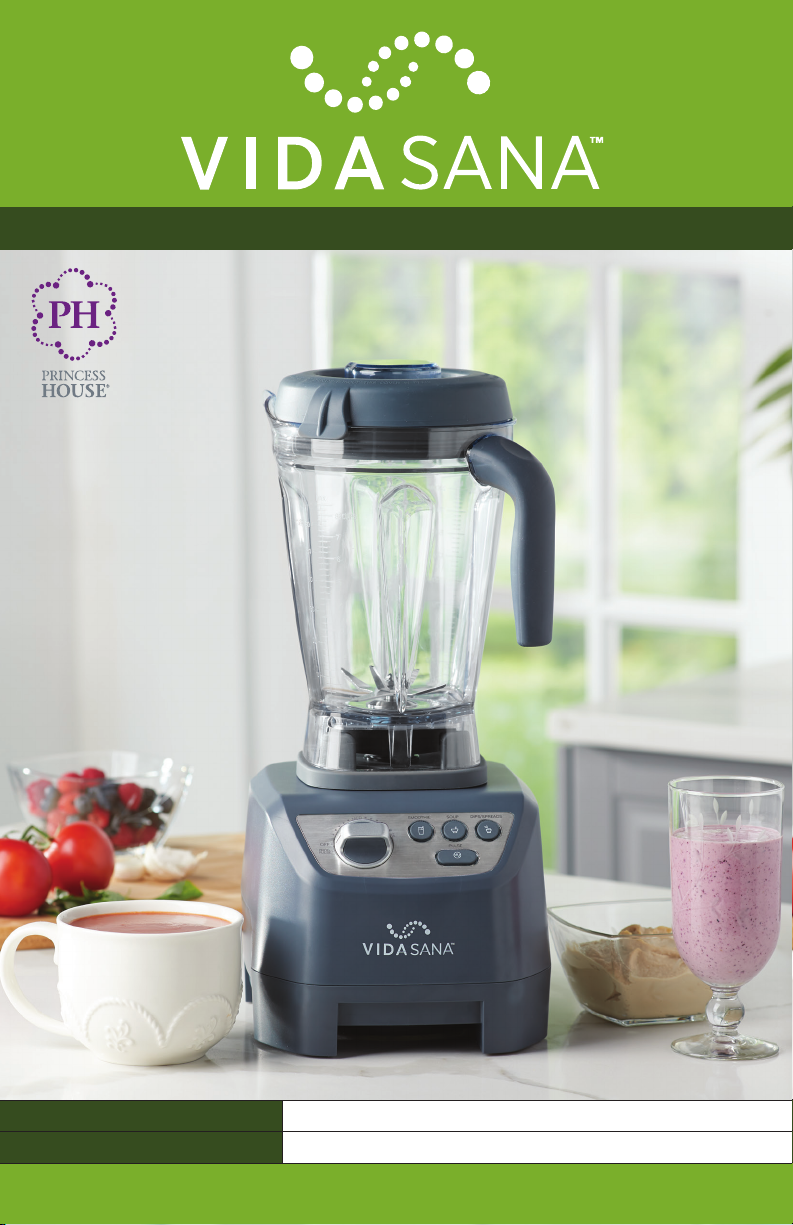
High-Power Blender

TABLE OF CONTENTS
Important Safeguards.............................................................................................................. 2-3
Components and Features...........................................................................................................4
Operating Instructions............................................................................................................. 5-6
Hints & Reminders.......................................................................................................................7
Cleaning and Maintenance..........................................................................................................7
Troubleshooting ..........................................................................................................................8
Recipes .........................................................................................................................................9
One-Year Limited Warranty.......................................................................................................10
INTRODUCTION
The Vida Sana™High-Power Blender offers the latest innovation in fast, efficient and precise
blending and mixing with a powerful motor and durable construction, ideal for preparing a variety
of foods and recipes including smoothies, soups, juices, dips, nut butters, salsas, batters, and more.
This exclusive High-Power Blender is your tool for everyday use with its 1500 watts of power and
68 oz. Jar capacity.
IMPORTANT SAFEGUARDS
When using your Vida Sana™High-Power Blender, basic safety precautions must be taken,
including the following:
1. SAVE THESE INSTRUCTIONS.
2. READ ALL INSTRUCTIONS BEFORE USING BLENDER.
3. FOR HOUSEHOLD USE ONLY.
4. Use only with 120V AC Power outlet. Note that this appliance has a polarized plug. One
prong is wider than the other. To reduce the risk of electric shock, this plug will fit into a
polarized outlet only one way. If the plug does not fit fully into the outlet, reverse the plug.
If it still does not fit, contact a qualified electrician. Do not modify the plug in any way.
5. Remove packing materials and all components. CAUTION: Sharp blades are located
inside the Jar.
6. Keep this appliance and cord out of reach of children.
7. Do not operate this blender with a damaged cord or plug, or after the appliance malfunctions
or is dropped or damaged in any manner.
8. Do not let the cord hang over the edge of table or counter, or touch hot surfaces.
9. Children must be supervised when near this appliance.
10. This appliance is not intended for use by people, including children, with reduced physical,
sensory or mental capabilities, or lack of experience and knowledge, unless a person
responsible for their safety provides close supervision or instructions concerning use of
the appliance.
11. Always unplug the blender from the outlet when not in use, before putting on or taking
off parts, and before cleaning or removing contents from the Jar.
12. Never put hands into the Jar or touch the Blades while the appliance is plugged in. Always
unplug the blender before cleaning or removing contents from the Jar.
13. To protect against electrical hazards and permanent damage to unit, do not submerge
the base of the blender in water or other liquids.
2

14. Do not use carbonated liquids in the Jar as this may result in injury.
15. Do not pour boiling water or any hot liquid into the Jar.
16. Do not blend any liquids for more than 7 minutes, as the motor is designed to shut off after
that time to allow for cooling.
17. If food stops circulating, you may need additional liquid. Press the button of the function you
are using or turn dial to OFF. Remove Jar from Base, use a spatula to move food away from
blades, and add more liquid if needed. Return Jar to Base, replace Lid, and continue blending.
18. This blender can be used outdoors if under a patio roof or other enclosure to prevent any
rain, snow or moisture from coming into contact with it. Do not leave the blender outdoors
when not in use.
19. Always operate blender with Lid and Cap firmly in place. The Measuring Cap should be
removed only when adding ingredients or to use the Tamper.
20. The Tamper provided should only be used with the Lid in place.
21. Always operate blender with Removable Jar Pad properly in place.
22. Do not fill Jar above MAX LINE.
23. If the Jar overflows during blending, stop the blender and remove liquid/ingredients to below
MAX LINE, then continue blending. Do not operate if the Jar is overflowing.
24. Do not operate your appliance in areas with unfinished walls and exposed electrical cords.
Doing so could create a risk of fire.
25. Ensure the bottom of the Jar is aligned and engaged with the motor coupling before
operating. If unable to engage, remove the Jar and try again.
26. The motor coupling may be hot after running – do not touch.
NOTE: When using preset buttons, the blender needs to cool off for 5 minutes between cycles.
Example: SOUP function runs for 7 minutes. Allow blender to cool before using it again.
TO RESET THE UNIT
Your blender is equipped with a Thermal Protector to protect the motor. If the motor shuts
down, unplug the blender. Let the blender rest for approximately 15 minutes. Plug the power cord
back into the outlet; if LED lights do not come on, press the Main Power Button located on back
of Base. LED lights will illuminate on the front panel, and then you may continue blending.
Please Note: LED lights will only illuminate when the blender dial is in PROG MODE and Jar
is placed on Base of blender. Lights do not illuminate if dial is in Manual Mode, turned to OFF
position, or when Jar is not on Base.
If your blender does not function properly following this procedure, contact Princess House
Customer Service at 508.823.6800 for additional information.
3

4
COMPONENTS AND FEATURES
1. Main Power Button: Located on the back of the
Base. Press Button toturn blender on
(it will illuminate).
2. Measuring Cap: Insert through the lid and
secure by turning clockwise. Remove it to add
ingredients and to use the Tamper. Can be used
to measure up to 2 ounces of ingredients.
3. Lid: Always use the Lid and Measuring Cap
when the blender is in operation.
4. Blender Jar: BPA-free Jar has a 68-oz. capacity,
with marks for MAX capacity, ounces, cups,
and milliliters.
5. Blade Assembly: Blades come assembled in the Jar.
Designed to blend wet and dry ingredients.
6. Removable Jar Pad: Securely seats over motor
base and allows the Jar to stay in place during use.
7. Motor Base: Control panel is located on the
front of the Base. Main Power Button is on the
back of the Base.
8. Tamper: Helps accelerate the blending and/or
mixing of thick and/or frozen ingredients by preventing
air pockets from forming. Only use Tamper included.
FRONT PANEL
Manual Dial: Blending speed can be adjusted from the OFF
position to HIGH by turning the knob clockwise.
PROG Pulse: When knob is in this position, you can select one of the 3 Preset functions for
Smoothie, Soup, or Dips/Spreads, plus the Pulse function.
Smoothie Button: Pre-programmed to blend smoothies and frozen drinks. Turn dial to
Prog Pulse position, then press Smoothie button to operate. It will stop on its own or by
pressing the button again.
Soup Button: Pre-programmed to blend soups, creams, even baby food. Turn dial to
Prog Pulse position, then press Soup button to operate. It will stop on its own or by pressing
the button again.
Dips/Spreads Button: Pre-programmed to blend dips, hummus, and spreads. Turn dial to
Prog Pulse position, then press Dips/Spreads button to operate. It will stop on its own or by
pressing the button again.
PULSE: Turn dial to the PROG Pulse mode and press and hold the Pulse button. Release button
to stop blending.
2.
3.
4.
5.
6.
7.
8.

5
OPERATING INSTRUCTIONS
Place the Motor Base of the blender on a flat, sturdy surface. Plug the power cord into an electrical
outlet. Make sure the Dial on the front panel is on the Off position. Press the Main Power Button
located on the back of the Motor Base before first use.
Start filling the Jar with ingredients. Make sure ingredients do not exceed MAX LINE. See Filling the
Jar instructions below.
Place Jar securely on the Motor Base and cover with the Lid, making sure the Measuring Cap is
inserted. Push down on the Lid to ensure a tight seal.
To operate the blender, you can select either Manual Mode or PROG MODE. When you turn the
dial to PROG MODE, all of the buttons on the front panel will illuminate blue for 30 seconds or until
you press the Program button.
FILLING THE JAR
• Add softer ingredients and liquids first, and then
add harder ingredients like ice and frozen fruit into
the container last, farther away from the blade. Be
sure to add harder ingredients gradually to ensure
proper blending.
• We recommend that you cut food into ½ to 1 inch
pieces to ensure the best results.
• Do not fill Jar beyond the MAX fill line.
• Do not overload Jar. It is better to mix things in
batches than to overload the Jar, which may
potentially harm the motor.
• If food is not blending, you may need to add more
liquids and/or use Tamper to help blend foods. DO NOT ADD HOT LIQUIDS.
• To add more ingredients, Stop blender, remove Measuring Cap from Lid and add them. Make
sure to secure Measuring Cap in place by turning clockwise on top of Lid before restarting.
MANUAL MODE
Use the highest setting called out in recipes for as much of the processing as possible. Blending
foods too long at too low of a speed could overheat the blender and cause the automatic Thermal
Protector to stop the blender from operating. Blending at higher speeds for shorter periods helps to
avoid overheating.
Turn dial to desired speed by turning it clockwise from OFF Position up to HI Position. This function
is ideal for blending fruits and vegetables for juice, baby food and more. Make sure to start at the
lowest speed and then increase it to desired speed. To stop, turn dial counterclockwise to the OFF
position.
PROG MODE and Pulse do not work when blender is on Manual Mode. LED lights will not illuminate
in Manual Mode.
Your blender can be used to blend dry ingredients like herbs, spices, and dry chiles. Grinding these
types of ingredients may cause the Jar to retain odors and discolor. NEVER blend dry ingredients
for more than 60 seconds as it could damage the blender.

6
PRESET MODE
The blender comes with three automatic preset modes for Smoothie, Soup, and Dips/Spreads for
consistent results. It also comes with Pulse mode to help fine tune the texture of any recipe.
To operate, turn knob to PROG MODE. Preset and Pulse buttons will illuminate. Press desired
button to select.
For SMOOTHIE: Press the SMOOTHIE button. Be sure contents in Jar do
not exceed the MAX LINE. Blender will run for 1 minute. When function is
completed, blender stops automatically or press the SMOOTHIE button again to
stop it. Frozen fruit and/or ice MUST be used to make smoothie cold.
For SOUP: Press the SOUP button. Be sure contents in Jar do not exceed
the MAX LINE. Blender will run for 7 minutes. When function is completed,
blender stops automatically or press the SOUP button again to stop it.
For Dips/Spreads: Press the Dips/Spreads button. Be sure contents in Jar do
not exceed the MAX LINE. Blender will run for 1 minute. When function is
completed, blender stops automatically or press the Dips/Spreads button
again to stop it.
Pulse: Turn dial to the PROG PULSE mode and press and hold the Pulse button.
Release button to stop blending.
USING THE TAMPER
The Tamper allows you to accelerate the process of blending thick and/or frozen mixtures that
cannot be processed with just regular blending. Using the Tamper maintains food circulation by
preventing air pockets from forming.
• Only use the Tamper included with Vida Sana™ High-Power
Blender.
• Blender’s lid must be securely in place and Measuring Cap
removed when using the Tamper.
• The Tamper’s disk and the Blender’s lid prevent the Tamper
from hitting the Blades when in use.
• Blender’s Jar should be no more than 2/3full with ingredients when using the Tamper
for blending.
• If foods do not circulate, there may be air trapped in the Jar. With the blender off and the
Lid on, remove the Measuring Cap and insert the Tamper through the Lid’s opening. You
can also do it at a low speed, always with the Lid on. If necessary, point the Tamper toward
the sides and corners of the Jar, always with the lid on, and the Measuring Cap off.
• Do not use the Tamper for more than 30 seconds at a time to avoid overheating
the blender.
• Do not try to force the Tamper deeper into the Jar as this may damage the Blade assembly
and other components.
• When blending, place liquid ingredients into the Jar first, followed by the softest ingredients.
Ice or frozen fruit should be placed in the Jar last. Be sure to add harder ingredients gradually
to ensure proper blending.

7
HINTS & REMINDERS
• Blender will not function unless Jar is placed securely on Base.
• Lid should always be secure while the unit is in operation. Always use the blender on a clean,
sturdy and dry surface.
• Secure the Measuring Cap on the Lid by twisting it clockwise.
• Once the Lid is in position, additional ingredients can be added during blending by
removing the Measuring Cap, adding ingredients, and replacing it. Turn the Cap to secure.
• Do not remove Blender Jar before blender has stopped running.
• Do not attempt to blend hot or boiling liquids as this may cause liquids to splatter,
overflow, and cause burns.
• When making and blending nut butters or oil-based foods, do not process for more than
one minute after the mixture starts to circulate in the container. Processing for longer
periods can cause dangerous overheating.
• When blending, place liquid ingredients into the Jar first, followed by the softest ingredients.
Ice or frozen fruit should be added gradually to ensure proper blending.
• Blending hard ingredients and spices may cause some clouding and/or scratches to appear
on the inside of the Jar. This does not affect blender performance.
• Certain foods and spices — such as carrots, tomatoes, curry, spinach and others — may stain
the interior of your Jar.
• Clean Jar thoroughly when you are finished using it and do not store food or liquids in it.
• Use Pulse function for maximum power to break up hard ingredients.
• Do not exceed the MAX LINE when adding food or liquid to the Jar.
• Make sure the Jar is completely dry before crushing ice, or chopping fresh herbs, garlic,
onion, zest, breadcrumbs or nuts and spices. This will help ingredients to blend more uniformly.
• Never use carbonated liquids in Jar. Using carbonated liquids in the blender may result
in injury due to excessive pressure inside the Jar.
• Use a plastic or silicone spatula if needed to remove ingredients from sides of the Jar, only
when the blender is turned off. Always unplug the blender before reaching into the Jar.
• Never use metal utensils inside the Jar, as damage may occur to the Jar or Blades.
• If the blender has been running for 7 minutes, it will automatically shut off unless it is in
SOUP mode, which operates for 7 minutes. This is a safety mechanism designed to protect
the motor of the blender. Allow the blender to rest for 5 minutes before reusing.
• Never allow motor to run if contents are not circulating properly.
CLEANING AND MAINTENANCE
• Never submerge Base in water or other liquids.
• The Jar must be cleaned and dried after each use or when the blender has not been used
for an extended period.
• Your Jar is self-cleaning. We recommend cleaning by adding a few drops of dish soap and
a cup of water, covering with Lid, and running blender on Manual Mode at low speed.
Discard water and repeat with clean water to rinse.
• Wash the Lid and Measuring Cap in warm, soapy water and rinse thoroughly.
• To clean the Blender Base, wipe the exterior with a soft cloth dampened with cleaning
solution. Do not submerge the Base in cleaning solution or water. Wipe with a dry towel
and be sure the base is completely dry before using.
• Be sure that the Blender Base and Jar are thoroughly dry and properly assembled with the
Removable Jar Pad in place before operating.
CAUTION: Blades are sharp. DO NOT put hands, spatulas, etc. in the Jar while the Blender is running or while the Jar is still on the base.

TROUBLESHOOTING
8
PROBLEM SOLUTION
Motor doesn’t start or Blade
doesn’t rotate
• Check to see if the unit is plugged into a working outlet.
• Press the Main Power Button, located on the back of the base; LED lights will flash in
control panel to indicate it is ready if the dial is in PROG PULSE.
• Check Jar is engaged with Base.
Motor doesn’t start
immediately after completing
a previous function
• Blender needs to be off for 5 minutes to cool down after blending on max speed.
• After running any of the other preset functions for two continuous cycles — for example,
Smoothie or Dips — the blender motor needs to cool down for 5 minutes.
Why did the blender stop
working while it was
blending?
• The motor may have overheated.
• If overheating occurs, turn blender off, remove Jar, and wait at least 15 minutes to allow
the motor to cool down or reset.
How can I prevent blender
from overheating?
• Use correct speed: Blender performs better on high speed to pulverize foods and process
thick mixtures.
• Check food amounts: Blending cooked foods like potatoes, rice, or beans create a heavier
than normal load on the blender. Reduce the amount of foods, blend it in batches, and
add a small amount of liquid when needed.
• Filling the Jar in the correct order: Liquids first followed by dry ingredients. Leafy greens,
fruits and veggies, and ice/frozen ingredients last.
• Use Tamper: If ingredients are not freely circulating, the Tamper can be used to help with
the flow of food. While blender is running and with the lid firmly in place, remove
Measuring Cup, insert Tamper through the Lid’s opening, and hold it in one side of the
Jar. As foods travels, it will hit the Tamper, eliminating air pockets and creating a
continuous flow of food through the blade.
Food sticks to Jar and Blade • Make sure Jar is completely dry before crushing ice, chopping fresh herbs, garlic, onion,
zest, breadcrumbs or nuts and spices. This will help ingredients to blend more uniformly.
• Mixture may be too thick. Add more liquid to the ingredients and/or try using a lower
speed for blending. See page 8 for Hints & Reminders.
Food is unevenly chopped or
blended
• You may be using too much food at once. Try blending in batches for more uniform
results.
Food is chopped or blended
too finely or is too watery
• Try blending for a shorter periods. Use the PULSE function for better control.
Jar is showing scratches or it
looks cloudy
• Blending hard ingredients, including ice and spices, can cause scratches and clouding of
the Jar. This is normal and doesn’t affect the performance of the blender.
Jar is showing stains and/or
discoloration
• Certain foods and spices — such as carrots, tomatoes, curry, spinach and others — may
stain the interior of your Jar.
• Clean Jar thoroughly after blending. Do not store foods in Jar to avoid discoloration.
Foods stop circulating inside
blender
• You may need to add more liquids.
• Press the button of the function you are using or turn dial to OFF.
• Remove Jar from base, use a spatula to move food away from blades. Add more liquid.
• Return Jar to Base, replace Lid, and continue blending.
Can I place hot liquids in my
Blender?
• Your blender is capable of heating soups to a warm temperature, so we do not
recommend adding hot liquids.
Why does my blender smell
like it is burning?
• Although all motors on our High-Power Blenders are tested at the factory, heavy use
will cause further curing of the motor components in new machines. This curing gives off
a burning smell, and while it is typical for this type of motor, the smell will quickly
dissipate after a few heavy uses.
• The motor is designed with a Thermal Protector feature to protect itself from
overheating. If motor should overheat, it may emit a burning smell.
• If overheating occurs, turn blender off, remove Jar, and wait at least 15 minutes to allow
the motor to cool down or reset.

9
FOOD QUANTITY MODE TIME
Coffee Beans 1 cup Manual Add coffee beans to Jar and put Lid
on. Turn dial from OFF position to
Medium to grind for 7-12 seconds
total. Turn dial to OFF.
Sugar Cookie Dough • 1 cup butter
• 1 cup plus 1 teaspoon
sugar
• ½ teaspoon vanilla extract
• 1 large egg
• 2⅓ cups all-purpose flour
• ½ teaspoon baking soda
Manual & Preset
Mode PULSE
Add butter, sugar, vanilla extract and
egg into Jar and put Lid on. Turn dial
from OFF position to Medium to mix
for 15 seconds total. Turn dial to OFF.
Remove Measuring Cup from Lid,
turn dial to PROG PULSE and begin
pressing Pulse as you add in half of
the flour and baking soda.
Turn dial to OFF position, open Lid
and scrape the Jar.
Add remaining flour and baking soda.
Place Lid back with Measuring Cup
on and press Pulse until combined.
If dough becomes too thick, scrape
sides again.
Pancake Batter • 2 cups buttermilk
• 2 large eggs
• ½ teaspoon salt
• ¼ cup granulated sugar
• 1 cup all-purpose flour
• 1 cup whole wheat flour
• ½ teaspoon baking soda
• 2¼ teaspoons baking
powder
Manual Mode Add buttermilk, eggs, salt, and sugar
into Jar and put Lid on. Turn dial from
OFF position to Medium to mix for
5-10 seconds total. Turn dial to OFF.
Remove Measuring Cup from Lid,
and add in flour, baking soda, and
baking powder.
Blend at Low Speed for 15 seconds
more to create a light, fluffy texture.
RECIPES

10
FIVE-YEAR LIMITED WARRANTY
Princess House offers the original purchaser, from the date of purchase, a five-year performance
warranty to replace the Vida Sana™ High-Power Blender, if found defective in material,
construction or workmanship when the product is used in normal domestic household use and
in accordance with the care and use instructions provided. Princess House shall have the right to
determine if the item is defective and, at its option, replace it with a similar or equivalent item,
or provide a refund of the purchase price. In order for a replacement or refund to be made,
the defective product must be returned at customer’s expense to Princess House with a brief
explanation and proof of purchase.
THIS WARRANTY DOES NOT COVER DAMAGE FROM IMPROPER USE AND FAILURE TO
FOLLOW THE CARE & USE INSTRUCTIONS ENCLOSED WITH THE PRODUCT.
Exclusions from warranty:
• Discoloration and deterioration of any of the components by improper cleaning after
each use
• Stains, discolorations or scratches on the inside or outside of Base, Jar, Lid, Measuring Cap,
Blade Assembly, Removable Pad or Tamper
• Damage caused to the Base, Jar, Lid, Measuring Cap, Blade Assembly, Removable Pad or
Tamper by use of metal or sharp utensils
• Damage caused to the Base, Jar, Lid, Measuring Cap, Blade Assembly, Removable Pad or
Tamper by scouring pads, steel wool, abrasive cleaners, bleach and the like
• Damage caused by any accident, fire, flood, etc.
• Damage caused by misuse, abuse, and/or negligence (including overheating)
• Damage resulting from repairs or manipulations carried out by unauthorized or non-
qualified repair/service personnel
This warranty is available to the original purchaser only and is void when the covered product is
used for any reason other than for personal, family or household purposes.
THIS WARRANTY IS IN LIEU OF ALL OTHER WARRANTIES AND REPRESENTATIONS, EXPRESS
OR IMPLIED, AND ALL OTHER OBLIGATIONS OR LIABILITIES ON PRINCESS HOUSE’S
PART. ANY IMPLIED WARRANTIES THAT MAY BE IMPOSED BY LAW ARE LIMITED TO ONE
YEAR, OR THE SHORTEST PERIOD ALLOWED BY APPLICABLE LAW. SOME STATES DO
NOT ALLOW LIMITATIONS OR EXCLUSIONS ON HOW LONG AN IMPLIED WARRANTY OF
MERCHANTABILITY OR FITNESS LASTS, SO THE ABOVE LIMITATIONS OR EXCLUSIONS MAY
NOT APPLY TO YOU.
THIS WARRANTY IS LIMITED AND EXPRESS TO THE TERMS AND CONDITIONS SET FORTH
HEREIN. THIS WARRANTY EXCLUDES ALL INDIRECT, CONSEQUENTIAL OR INCIDENTAL
DAMAGES. SOME STATES DO NOT ALLOW LIMITATION OR EXCLUSION OF THESE
DAMAGES SO THESE EXCLUSIONS MAY NOT APPLY TO YOU.
IF APPLICABLE, THESE DISCLAIMERS CONTINUE AFTER EXPIRATION OF THE EXPRESS
WARRANTIES SET FORTH ABOVE.
This warranty gives you specific legal rights and you may also have other rights which vary from
state to state.
Table of contents
Other PRINCESS HOUSE Blender manuals


