Princess 182065 User manual

Aerofryer Oven
01.182065.01.001
Aerofryer Ov
01
.1
82
06
5.
01
.0
EN Instruction manual
NL Gebruiksaanwijzing
FR Mode d’emploi
DE Bedienungsanleitung
ES Manual de usuario
PT Manual de utilizador
IT Manuale utente
SV Bruksanvisning
CS Návod na použití
PL Instrukcja obsługi
SK Návod na použitie
RU Руководство по эксплуатации

1
3 2 1
3 2
4
7
5
6
PARTS DESCRIPTION / ONDERDELENBESCHRIJVING / DESCRIPTION DES PIÈCES /
TEILEBESCHREIBUNG / DESCRIPCIÓN DE LAS PIEZAS / DESCRIÇÃO DOS
COMPONENTES / DESCRIZIONE DELLE PARTI / BESKRIVNING AV DELAR /
OPIS CZĘŚCI / POPIS SOUČÁSTÍ / POPIS SÚČASTÍ / ОПИСАНИЕ ЗАПЧАСТИ
13
12
5
4
6
1110987

Instruction manual
3
SAFETY
• By ignoring the safety instructions the
manufacturer cannot be held responsible for
the damage.
• If the supply cord is damaged, it must be
replaced by the manufacturer, its service
agent or similarly qualified persons in order
to avoid a hazard.
• Never move the appliance by pulling the
cord and make sure the cord cannot
become entangled.
• The appliance must be placed on a stable,
level surface.
• This appliance is only to be used for
household purposes and only for the
purpose it is made for. In worst case the
food can catch fire. (i.e. do not use more
than one tea spoon of oil, no meat that will
release to much grease or water intended
for boiling foods.
• This appliance shall not be used by children
aged less than 8 years. This appliance can
be used by children aged from 8 years and
above and persons with reduced physical,
sensory or mental capabilities or lack of
experience and knowledge if they have been
given supervision or instruction concerning
use of the appliance in a safe way and
understand the hazards involved. Children
shall not play with the appliance. Keep the
appliance and its cord out of reach of
children aged less than 8 years. Cleaning
and user maintenance shall not be made by
children unless older than 8 and supervised.
• To protect yourself against an electric shock,
do not immerse the cord, plug or appliance
in the water or any other liquid.
• The appliance is to be connected to a
socket-outlet having an earthed contact (for
class I appliances).
• WARNING: If the surface is cracked, switch
off the appliance to avoid the possibility of
an electric shock.
• Keep the appliance and its cord out of reach
of children less than 8 years.
• The temperature of accessible surfaces may
be high when the appliance is operating.
• The appliance is not intended to be operated
by means of an external timer or a separate
remote-control system.
EN

Instruction manual
4
• Surfaces indicated with this logo are
liable to get hot during use.
• In order to prevent disruptions of the airflow do
not put anything on top of the appliance and
make sure there is always 10 centimeter of free
space around the appliance.
• After the baking process the appliance needs to
cooldown, this cooling process will activate
automatically when the timer is done. Avoid to
unplug the appliance from the net socket before
the cooling process is finished because the
remaining hot air can damage the appliance.
• This appliance is intended to be used in
household and similar applications such as:
• Staff kitchen areas in shops, offices and other
working environments.
• By clients in hotels, motels and other residential
type environments.
• Bed and breakfast type environments.
• Farm houses.
SAVE THESE INSTRUCTIONS
HOUSEHOLD USE ONLY
PARTS DESCRIPTION
1. Main unit
2. Display
3. Rotisserie handle
4. Rotating basket
5. Removal tool handle
6. Baking rack (3 x)
7. Fat collecting tray
Control Panel
1. Lcd display 8. Light button
2. Temperature
indicator
9. Power button
3. Working indicator 10. Rotating button
4. Time indicator 11. Preheat button
5. Temperature + 12. Time -
6. Temperature – 13. Time +
7. Mode indicators
BEFORE THE FIRST USE
• When the device is turned on for the first time, a slight odour will
occur. This is normal, ensure adequate ventilation. This fragrance is
only temporary and will disappear soon.
• Remove all packaging material.
• Remove any stickers or labels from the appliance.
• Wipe the inside and outside of the appliance with a moist cloth.

Instruction manual
5
Fat collecting/baking tray
• Always place the fat collecting tray in the lower rails of the
cooking space to collect dripping fat, food residues or crumbs. It
can also be used as a baking tray by placing food on it, place the
baking tray in the middle rails.
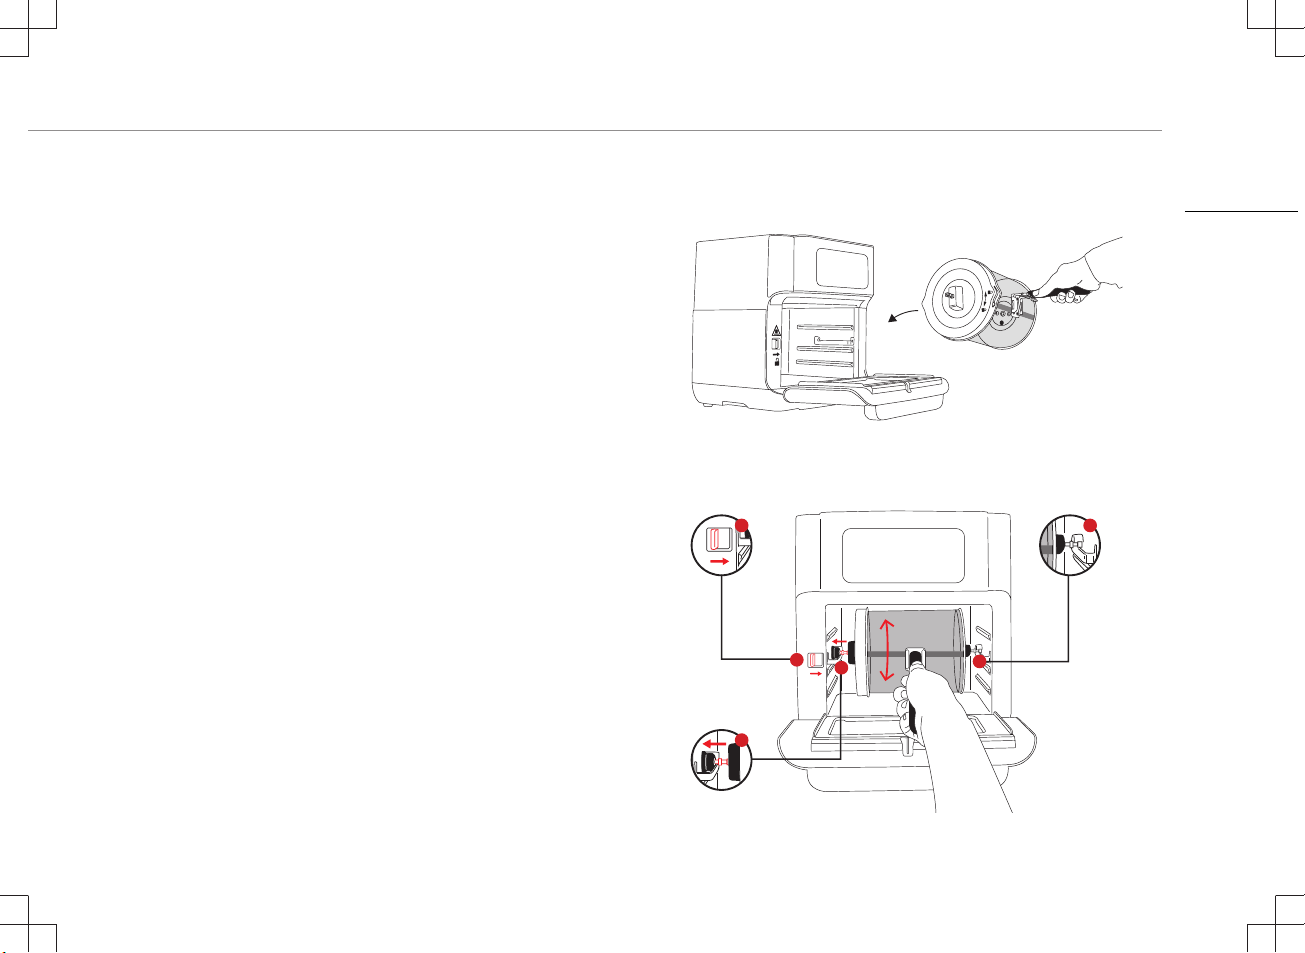
Removal tool
• Use the removal handle to take out the rotating basket from the
cooking space by pressing the handle and secure it in the handle
holder.
• Lift the rotating basket gently out of the cooking space and put it
on a heat-resistance surface.
Rotating basket
• The rotating basket can be used to prepare chips or other potato
products, pieces of vegetables, meat and frozen products like
chicken nuggets or squid rings.
• Don’t overfill the basket with ingredients, if it’s to full, the food will
not cook evenly.
• Close the basket and ensure that it is shut correctly so that it
can’t open during use.
• Toggle the red switch to the right. Insert the left side of the
rotating basket into the cooking space. To do this, plug the left
end of the shaft as far as it will go into the round holder on the left
side of the cooking space into the lock position.
• Then hang the right end of the shaft into the support on the right
side of the cooking space.
• Release the switch to lock the basket into place.
3
1
2
1
2
3
EN

Instruction manual
6
• Check if it is placed correctly.
Baking racks
• The baking racks are slid onto the rails in the cooking space.
• The heating element is located at the top of the cooking space.
• The higher a rack is placed, the more intense the heat is from above.
• In the upper part, the food is cooked faster and crispy.
• The middle position can be selected to achieve uniform heating from
all sides.
• The bottom rails are suitable for gentle cooking.
USE
• Put the mains plug in an earthed wall socket.
• Open the door.
• If the fat collecting tray is not to be used as a baking tray, slide it into
the lowest rails of the cooking space
• Select a suitable accessory for the food to be prepared.
• Process the food and place it on or in the accessory and attach this
accessory in the device.
• To attach and remove the rotating basket press the release button.
• Close the door.
• Press the on/off switch. The display will become active.
• Set the temperature and cooking time manually or choose between
one of the 10 programs.
•Manual setting:
• Touch the up or down symbol at the temperature setting to set the
desired temperature (lowest 80°C, highest 200°C).
• Touch the up and down symbol at the time setting to set the desired
time(1 minute to 90 minutes).
•Program setting:
• Activate the desired program by touching the program symbol, it’s
activated when the symbol starts flashing.
• Touching the same symbol again will cancel the selection.
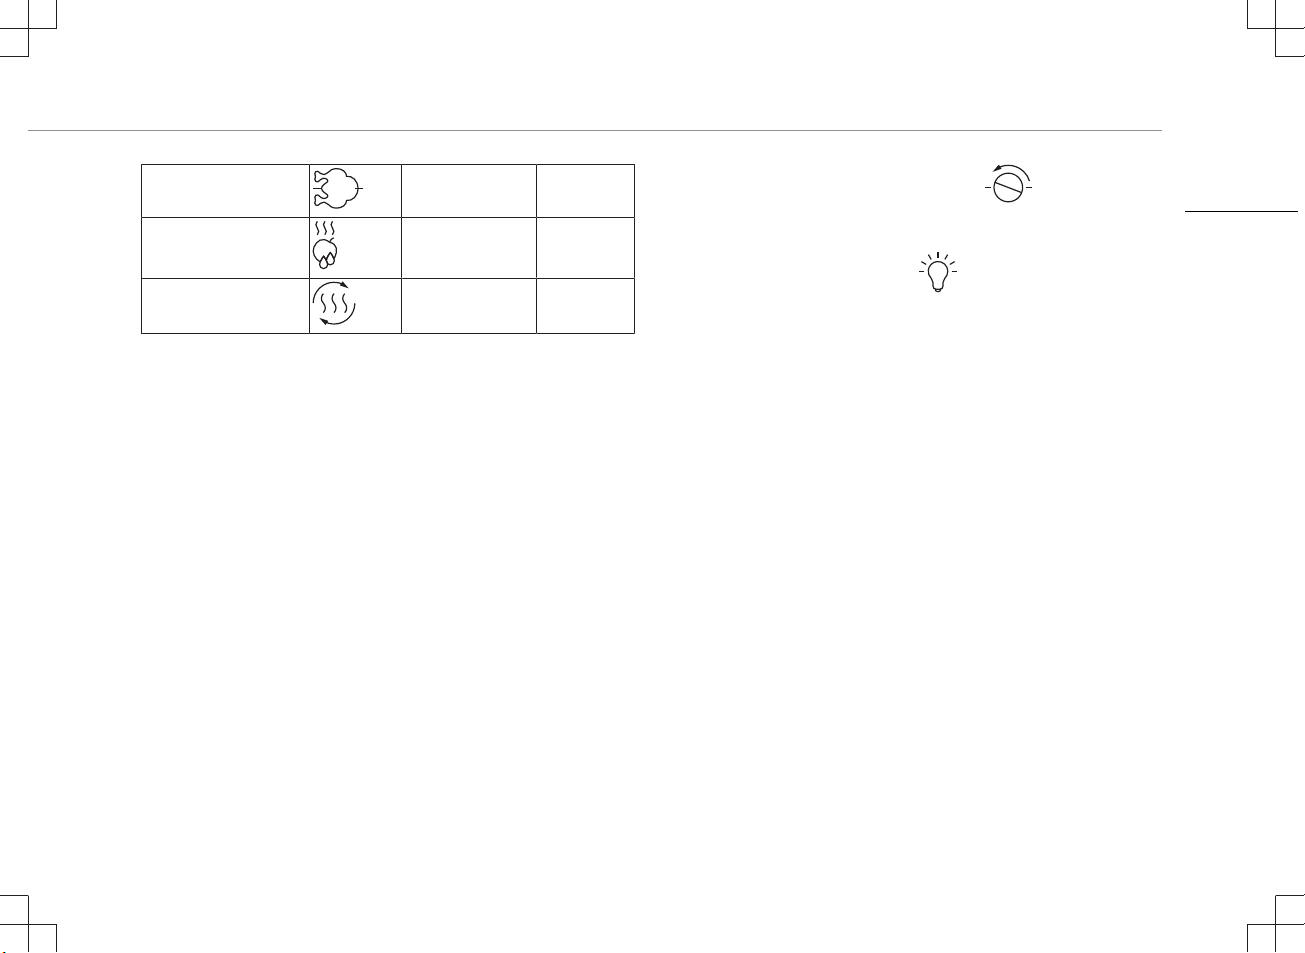
• See for presetting information the table below:
Program Program Default
temperature/time
Quantity
Aerofryer Fries *1 200°C/15 500g
Homemade Fries *2 Proposed time
120°C/10min
200°C/20min
500g
Roast 180°C/20min 200g
Fish 180°C/20min 200g
Shellfish/Crustaceans 180°C/15min 250g
Pizza 180°C/10min 1 pcs
Frozen pizza Proposed time
180°C/15min
1 pcs
Chicken 180°C/25min 500g
Bake 160°C/40min 1 pcs

Instruction manual
7
Rotisserie 190°C/30min 200g
Dehydrating 30°C/4hours 250g
Reheat 115°C/12min
Extra information:
• *1: When using the rotating frying basket, suitable up to 500g
fries. When using the 3 grill racks, suitable up to 750g. (Shake
every 5 minutes)
• *2: Add 1/2 a tablespoon of oil. When using the rotating frying
basket, suitable up to 400g fries. When using the 3 grill racks,
suitable up to 600g. (Shake every 5 minutes)
• The cooking time depends on the thickness of the food. Times
can also vary due to the quantity and consistency of the food.
The time settings are only guidelines and can be adapted to your
taste. Double the time for tough meat and extend the time by at
least 20% for deep-frozen food.
• Make sure that meat and poultry are thoroughly cooked before
serving.
• To change the temperature or cooking time of a selected
program, touch the temperature and time setting buttons, the
same as for manual setting and set a new value.
• Successively illuminating operating lamps indicate that the device
is operating. If operation is interrupted, they flash.
• If the rotating basket is in use, touch the button to start the
rotating function. Touching the button again will stop the rotating
function.
• Switch on the light pushing the button to check the
condition of the food during use or open the door, the light will
switch on and the operation is interrupted automatically.
Operation is resumed once the door is closed again.
• After the cooking time has elapsed, the device switches off
automatically and it will give a beep sound. If the device must be
stopped prematurely, press the on / off switch. To switch the
device off completely, press and hold the on / off switch until the
display goes out.
• Open the door and take the cooked items out of the device.
Always use oven gloves and use the removal handle/tool to take
out the accessories.
• After use, remove the mains plug from the wall socket.
• Allow the used accessories and device to cool down and then
clean them.
CLEANING AND MAINTENANCE
• Before cleaning, unplug the appliance and wait for the appliance
to cool down.
• Never immerse the device in water or any other liquid. The
device is not dishwasher proof.
• Clean the appliance with a damp cloth. Never use harsh and
abrasive cleaners, scouring pad or steel wool, which damages
the appliance.
EN

Instruction manual
8
• Rinse all other used parts with dish soap and warm water or in the
dishwasher. In the case of stubborn dirt, we recommend soaking the
accessories in warm water and washing-up liquid beforehand.
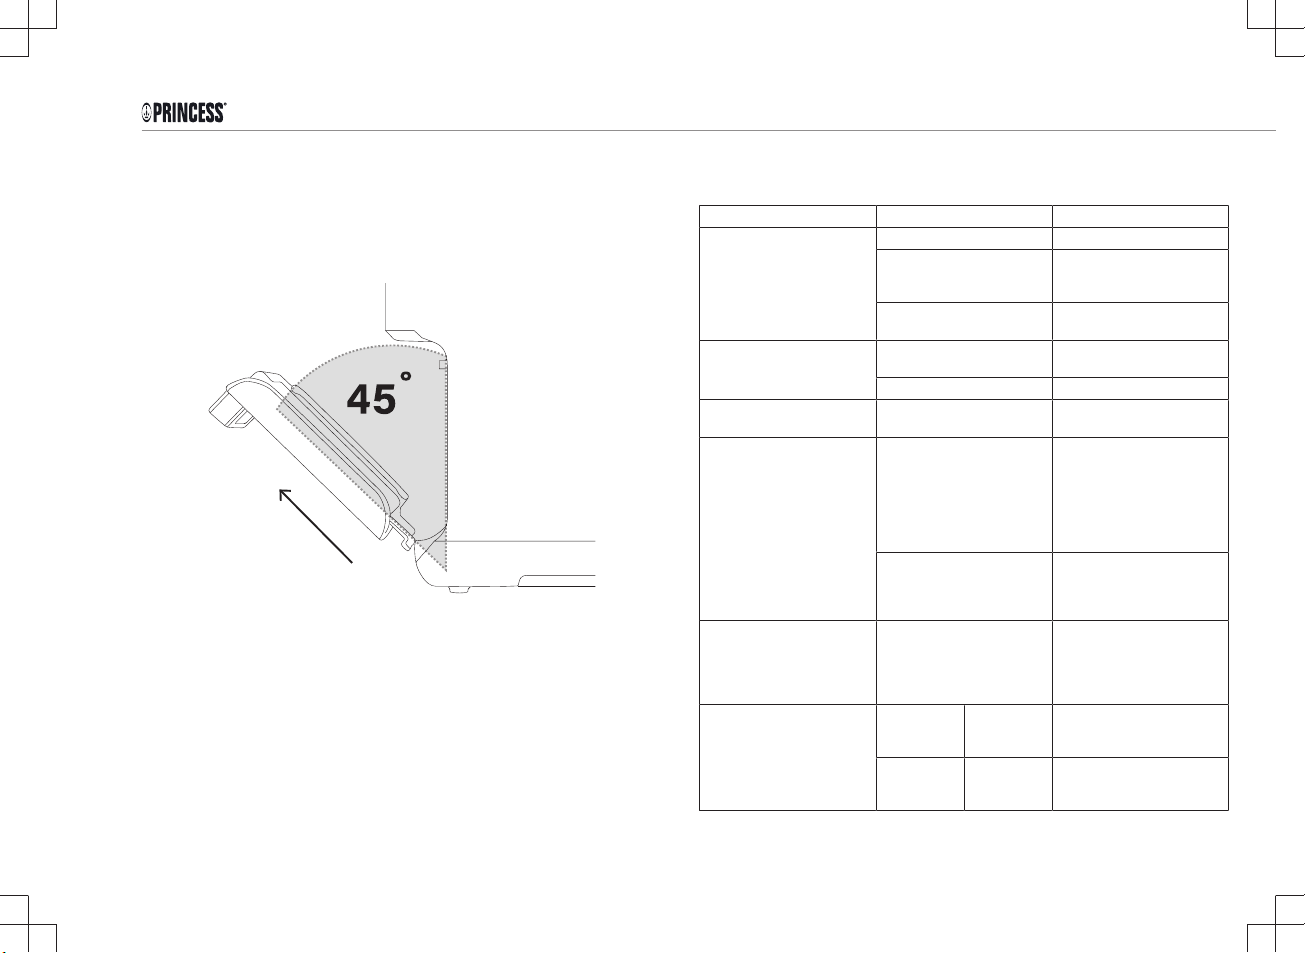
• The door is detachable for easy cleaning, open the door to a 45° angle
and pull out the door. The door is not dishwasher safe.
• Allow all parts to dry completely or dry them with a towel.
TROUBLESHOOTING
Problem Possible cause Solution
The oven does not work. The appliance is not plugged in. Plug power cord into wall socket.
You have not turned on the
appliance by setting the cooking
time and temperature.
Set the temperature and time as
instructed.
The product window is not
closed properly.
Check that window is closed.
The ingredients fried with the aero
fryer oven are not done.
Too much amount of food. Reduce the amount of food for
single cooking.
Setting temperature too low. Set the temperature higher.
The ingredients are fried
unevenly.
When tray is used to make food,
the tray position is not adjusted.
During cooking, adjust the tray
position appropriately.
White smoke comes out of the
appliance.
You are preparing greasy
ingredients.
When you fry greasy ingredients
in the aero fryer, a large amount
of oil will leak into the pan. The oil
produces white smoke and the
pan may heat up more than usual.
This does not affect the appliance
or the end result.
The pan still contains grease
residues from previous use.
White smoke is caused by grease
heating up in the pan. Make sure
you clean the pan properly after
each use.
Fresh fries are not crispy. The crispiness of the fries
depends on the amount of oil and
water in the fries.
Make sure you dry the potato
sticks properly before you add the
oil. Cut the potato sticks smaller
for a crispier result. Add slightly
more oil for a crispier result.
All lights flash and error code
appears on the display.
E1 Broken circuit of
the thermal
sensor.
Contact Customer Care Team.
E2 Short circuit of
the thermal
sensor.
Contact Customer Care Team.

Instruction manual
9
ENVIRONMENT
This appliance should not be put into the domestic garbage at
the end of its durability, but must be offered at a central point for the
recycling of electric and electronic domestic appliances. This symbol
on the appliance, instruction manual and packaging puts your
attention to this important issue. The materials used in this appliance
can be recycled. By recycling of used domestic appliances you
contribute an important push to the protection of our environment.
Ask your local authorities for information regarding the point of
recollection.
Support
You can find all available information and spare parts at
www.princesshome.eu!
EN

Gebruiksaanwijzing
10
VEILIGHEID
• Als u de veiligheidsinstructies negeert, kan de
fabrikant niet verantwoordelijk worden
gehouden voor de mogelijke schade.
• Als het netsnoer beschadigd is, moet het
worden vervangen door de fabrikant, de
onderhoudsmonteur van de fabrikant of door
personen met een soortgelijke kwalificatie om
gevaar te voorkomen.
• Verplaats het apparaat nooit door aan het snoer
te trekken en zorg dat het snoer niet in de war
kan raken.
• Het apparaat moet op een stabiele, vlakke
ondergrond worden geplaatst.
• Dit apparaat is uitsluitend voor huishoudelijk
gebruik en voor het doel waar het voor bestemd
is. In het ergste geval kan het voedsel vlam
vatten. (Gebruik niet meer dan één theelepel
olie, geen vlees dat te veel vet vrijgeeft of water
dat bedoeld is om voedsel te koken.)
• Dit apparaat mag niet worden gebruikt door
kinderen jonger dan 8 jaar. Dit apparaat kan
worden gebruikt door kinderen vanaf 8 jaar en
door personen met verminderde lichamelijke,
zintuiglijke of geestelijke vermogens of gebrek
aan de benodigde ervaring en kennis indien ze
onder toezicht staan of instructies krijgen over
hoe het apparaat op een veilige manier kan
worden gebruikt alsook de gevaren begrijpen
die met het gebruik samenhangen. Kinderen
mogen niet met het apparaat spelen. Houd het
apparaat en het netsnoer buiten bereik van
kinderen jonger dan 8 jaar. Laat reiniging en
onderhoud niet door kinderen uitvoeren, tenzij
ze ouder zijn dan 8 jaar en onder toezicht staan.
• Dompel het snoer, de stekker of het apparaat
niet onder in water of andere vloeistoffen om
elektrische schokken te voorkomen.
• Het apparaat moet worden aangesloten op een
geaard stopcontact (voor klasse I-apparaten).
• WAARSCHUWING: Indien het oppervlak is
gebarsten, schakel dan het apparaat uit om
elektrische schokken te voorkomen.
• Houd het apparaat en het netsnoer buiten
bereik van kinderen jonger dan 8 jaar.
• De temperatuur van de toegankelijke
oppervlakken kan hoog zijn wanneer het
apparaat in gebruik is.
• Het apparaat is niet bedoeld om bediend te
worden met behulp van een externe timer of
een afzonderlijk afstandbedieningssysteem.

Gebruiksaanwijzing
11
• Oppervlakken gemarkeerd met dit
logo kunnen heet worden tijdens gebruik.
• Plaats niets boven op het apparaat en zorg
ervoor dat er altijd 10cm vrije ruimte rondom
het apparaat is om verstoring van de
luchtstroom te voorkomen.
• Na het bakken moet het apparaat afkoelen.
Dit koelproces wordt automatisch
geactiveerd na afloop van de timer.
Verwijder de stekker pas na voltooiing van
het koelproces uit het stopcontact, omdat de
resterende hete lucht het apparaat kan
beschadigen.
• Dit apparaat is bedoeld voor huishoudelijk
en soortgelijk gebruik, zoals:
• Personeelskeukens in winkels, kantoren en
andere werkomgevingen.
• Door gasten in hotels, motels en andere
residentiële omgevingen.
• Bed&Breakfast-type omgevingen.
• Boerderijen.
BEWAAR DEZE INSTRUCTIES
ALLEEN VOOR HUISHOUDELIJK GEBRUIK
ONDERDELENBESCHRIJVING
1. Hoofdgedeelte
2. Display
3. Handgreep van rotisserie
4. Draaimand
5. Handgreep van verwijderinstrument
6. Bakrooster (3x)
7. Vetopvangplaat
Bedieningspaneel
1. Lcd-display 8. Verlichtingstoets
2. Temperatuurindicat
or
9. Aan/uit-toets
3. Activiteitsindicator 10. Rotatietoets
4. Tijdindicator 11. Voorverwarmingstoets
5. Temperatuur + 12. Tijd -
6. Temperatuur - 13. Tijd +
7. Modusindicators
VÓÓR HET EERSTE GEBRUIK
• Wanneer het apparaat voor de eerste keer wordt ingeschakeld,
zal het een lichte geur afgeven. Dit is normaal. Zorg voor
voldoende ventilatie. Deze geur is slechts tijdelijk en zal spoedig
verdwijnen.
• Verwijder alle verpakkingsmateriaal.
• Verwijder eventuele stickers of etiketten van het apparaat.
NL

Gebruiksaanwijzing
12
• Reinig de binnenkant en de buitenkant van het apparaat met een
vochtige doek.
Vetopvang-/bakplaat
• Plaats de vetopvangplaat altijd in de onderste rails van de ovenruimte.
Zo kunt u vet, etensresten of kruimels goed opvangen. U kunt deze
plaat ook gebruiken als bakplaat door er voedsel op te leggen. Plaats
de bakplaat dan in de middelste rails.
Verwijderinstrument
• Gebruik de verwijdergreep om de draaimand uit de ovenruimte te
halen. Hiervoor drukt u de greep in en zet u deze vast in de
greephouder.
• Til de draaimand voorzichtig uit de ovenruimte en plaats deze op een
warmtebestendige ondergrond.
Draaimand
• U kunt de draaimand gebruiken voor de bereiding van friet of andere
aardappelproducten, stukken groente, vlees en diepvriesproducten
zoals kipnuggets of inktvisringen.
• Doe de mand niet te vol, anders wordt het eten niet gelijkmatig bereid.
• Sluit de mand en controleer of deze goed is gesloten, zodat de mand
tijdens het gebruik niet open kan gaan.
• Activeer de rode schakelaar aan de rechterkant. Steek de linkerkant
van de draaimand in de ovenruimte. Hiervoor steekt u het
linkeruiteinde van de as zo ver mogelijk in de ronde houder aan de
linkerkant van de ovenruimte, zodat de as in de vergrendelde positie
komt te zitten.
• Hang daarna het rechteruiteinde van de as in de steun aan de
rechterkant van de ovenruimte.
• Zet de schakelaar terug om de mand op zijn plek vast te zetten.
3
1
2
1
2
3

Gebruiksaanwijzing
13
• Controleer of de as correct is aangebracht.
Bakroosters
• U schuift de bakroosters in de rails in de ovenruimte.
• Het verwarmingselement bevindt zich boven in de ovenruimte.
• Hoe hoger u een rooster plaatst, hoe intenser de hitte van
bovenaf is.
• In het bovenste deel wordt voedsel daarom sneller en krokant
bereid.
• Kies de middelste stand voor een gelijkmatige verwarming aan
alle kanten.
• De onderste rails zijn geschikt voor een milde bereiding.
GEBRUIK
• Plaats de netstekker in een geaard stopcontact.
• Open de deur.
• Als u de vetopvangplaat niet gebruikt als bakplaat, schuift u deze
in de onderste rails van de ovenruimte.
• Kies een geschikt accessoire voor het voedsel dat u wilt
bereiden.
• Bereid het voedsel voor en plaats het aan of in het accessoire.
Plaats het accessoire daarna in het apparaat.
• Als u de draaimand wilt plaatsen of verwijderen, drukt u op de
vrijgaveknop.
• Sluit de deur.
• Druk op de aan/uit-schakelaar. Het display wordt ingeschakeld.
• Stel de temperatuur en bereidingstijd handmatig in of kies een
van de tien programma's.
•Handmatige instelling:
• Druk op de pijl omhoog/omlaag voor de temperatuurinstelling om
de gewenste temperatuur in te stellen (minimaal 80°C, maximaal
200°C).
• Druk op de pijl omhoog/omlaag voor de tijdinstelling om de
gewenste duur in te stellen (1 tot 90minuten).
•Programma-instelling:
• Activeer het gewenste programma door op het
programmasymbool te drukken. Het programma is geactiveerd
als het symbool begint te knipperen.
• Als u nogmaals op hetzelfde symbool drukt, wordt de selectie
ongedaan gemaakt.
• Meer informatie over de voorinstellingen vindt u in de
onderstaande tabel:
Programma Programm
a
Standaardtempe
ratuur/-tijd
Hoeveelhei
d
Aerofryer-friet *1 200°C/15 500g
Zelfgemaakte friet *2 Voorgestelde tijd
120°C/10min
200°C/20min
500g
Braadstuk 180°C/20min 200g
Vis 180°C/20min 200g
Schelp- en
schaaldieren
180°C/15min 250g
NL

Gebruiksaanwijzing
14
Pizza 180°C/10min 1stuk
Bevroren pizza Voorgestelde tijd
180°C/15min
1stuk
Kip 180°C/25min 500g
Gebak 160°C/40min 1stuk
Rotisserie 190°C/30min 200g
Drogen 30°C/4uur 250g
Opnieuw opwarmen 115°C/12min
Extra informatie:
• *1: Bij gebruik van het draaiende frituurmandje, geschikt voor 500g
aan friet. Bij gebruik van de 3grillroosters, geschikt voor 750g. (Elke
5minuten schudden)
• *2: Voeg 1/2 eetlepel olie toe. Bij gebruik van het draaiende
frituurmandje, geschikt voor 400g aan friet. Bij gebruik van de
3grillroosters, geschikt voor 600g. (Elke 5minuten schudden)
• De bereidingstijd is afhankelijk van de dikte van het voedsel. De tijden
kunnen ook verschillen afhankelijk van de hoeveelheid en consistentie
van het voedsel. De vermelde tijdsinstellingen zijn slechts een
indicatie en kunnen naar wens worden aangepast. Verdubbel de tijd
voor taaier vlees en verleng de tijd met minstens 20% voor
diepgevroren voedsel.
• Zorg dat vlees of gevogelte goed gaar is voordat u het serveert.
• Als u de temperatuur of bereidingstijd van een geselecteerd
programma wilt wijzigen, drukt u op de knoppen voor de temperatuur-
en tijdsinstelling, op dezelfde manier als u dit doet voor een
handmatige instelling. Vervolgens stelt u een nieuwe waarde in.
• Wanneer de bedieningslampjes achtereenvolgend gaan branden,
betekent dit dat het apparaat in bedrijf is. Als de werking wordt
onderbroken, knipperen de lampjes.
• Als u de draaimand gebruikt, drukt u op de toets om de
draaifunctie te starten. Als u nogmaals op de toets drukt, stopt u de
draaifunctie.
• Schakel het licht in met de toets of open de deur als u tijdens de
bereiding het voedsel wilt controleren. Het licht gaat branden en de
werking wordt automatisch onderbroken. De werking wordt hervat
nadat u de deur weer hebt gesloten.
• Wanneer de bereidingstijd is verstreken, wordt het apparaat
automatisch uitgeschakeld en klinkt er een piepgeluid. Als u het
apparaat voortijdig wilt stoppen, drukt u op de aan/uit-schakelaar. Als
u het apparaat volledig wilt uitschakelen, houdt u de aan/uit-
schakelaar ingedrukt totdat het display wordt gedoofd.
• Open de deur en haal de bereide producten uit het apparaat. Draag
altijd ovenwanten en gebruik de verwijdergreep/het
verwijderinstrument om de accessoires eruit te halen.
• Verwijder na gebruik de netstekker uit het stopcontact.

Gebruiksaanwijzing
15
• Laat de gebruikte accessoires en het apparaat eerst afkoelen en
reinig ze dan pas.
REINIGING EN ONDERHOUD
• Verwijder voor reiniging de stekker uit het stopcontact en wacht
tot het apparaat is afgekoeld.
• Dompel het apparaat nooit onder in water of andere vloeistoffen.
Het apparaat is niet vaatwasserbestendig.
• Maak het apparaat schoon met een vochtige doek. Gebruik nooit
krassende en schurende schoonmaakmiddelen, schuursponzen
of staalwol, aangezien deze het apparaat kunnen beschadigen.
• Spoel alle andere gebruikte onderdelen af met afwasmiddel en
warm water of reinig ze in de vaatwasser. Bij hardnekkig vuil is
het raadzaam om de accessoires van tevoren te laten weken in
warm water met afwasmiddel.
• U kunt de deur verwijderen om deze makkelijker te reinigen.
Open de deur tot een hoek van 45° en verwijder de deur
voorzichtig. De deur is niet vaatwasserbestendig.
• Laat alle onderdelen volledig drogen of droog ze af met een
theedoek.
NL

Gebruiksaanwijzing
16
PROBLEMEN OPLOSSEN
Probleem Mogelijke oorzaak Oplossing
De oven werkt niet. De stekker van het apparaat zit niet in
een stopcontact.
Doe het netsnoer in een stopcontact.
U hebt het apparaat niet ingeschakeld
door de bereidingstijd en temperatuur
in te stellen.
Stel de temperatuur en tijd in zoals is
uitgelegd.
De deur van het product is niet
goed gesloten.
Controleer of de deur is gesloten.
De ingrediënten die met de aerofryer-
oven zijn gebakken, zijn nog niet
gaar.
Te veel voedsel. Beperk de hoeveelheid voedsel die u
in één keer bereidt.
De temperatuur is te laag ingesteld. Stel een hogere temperatuur in.
De ingrediënten zijn niet gelijkmatig
gebakken.
De plaat is gebruikt om het voedsel te
bereiden, maar de positie ervan is
niet aangepast.
Pas de positie van de plaat aan voor
de bereiding.
Er komt witte rook uit het apparaat. U bereidt vette ingrediënten. Als u vette ingrediënten bakt in de
aerofryer, lekt er een grote
hoeveelheid olie in de pan. De olie
veroorzaakt witte rook en de pan
wordt mogelijk heter dan normaal. Dit
heeft geen invloed op het apparaat of
het eindresultaat.
De pan bevat nog vetresten van een
vorige keer.
De witte rook wordt veroorzaakt door
vetresten in de pan die heet worden.
Zorg dat u de pan goed reinigt na elk
gebruik.
Verse friet is niet krokant. Hoe krokant de friet wordt, is
afhankelijk van de hoeveelheid olie en
water in de friet.
Droog de aardappelstukken goed
voordat u de olie toevoegt. Snijd de
aardappel in kleinere stukken voor
een krokanter resultaat. Voeg een
beetje meer olie toe voor een
krokanter resultaat.
Alle lampjes knipperen en er
wordt een foutcode
weergegeven op het display.
E1 Defect circuit in
de thermische
sensor.
Neem contact op met de
klantenservice.
E2 Kortsluiting in
de thermische
sensor.
Neem contact op met de
klantenservice.
MILIEU
Dit apparaat mag aan het einde van de levensduur niet bij het
normale huisafval worden gedeponeerd, maar moet bij een speciaal
inzamelpunt voor hergebruik van elektrische en elektronische apparaten
worden aangeboden. Het symbool op het apparaat, in de
gebruiksaanwijzing en op de verpakking attendeert u hierop. De in het
apparaat gebruikte materialen kunnen worden gerecycled. Met het
recyclen van gebruikte huishoudelijke apparaten levert u een belangrijke
bijdrage aan de bescherming van ons milieu. Informeer bij uw lokale
overheid naar het inzamelpunt.
Support
U kunt alle beschikbare informatie en reserveonderdelen vinden op
www.princesshome.eu!

Manuel d'instructions
17
SÉCURITÉ
• Si vous ignorez les consignes de sécurité, le
fabricant ne peut être tenu pour responsable
des dommages.
• Si le cordon d'alimentation est endommagé,
il doit être remplacé par le fabricant, son
réparateur ou des personnes qualifiées afin
d'éviter tout risque.
• Ne déplacez jamais l'appareil en tirant sur le
cordon et veillez à ce que celui-ci ne
s'enroule pas.
• L'appareil doit être posé sur une surface
stable et nivelée.
• Cet appareil est uniquement destiné à des
utilisations domestiques et seulement dans
le but pour lequel il est fabriqué. Dans le pire
des cas, les aliments peuvent prendre feu.
(N'utilisez pas plus d'une cuillère à café
d'huile, aucune viande pouvant diffuser trop
de graisse ou d'eau pour l'ébullition des
aliments.)
• Cet appareil ne doit pas être utilisé par des
enfants de moins de 8 ans. Cet appareil
peut être utilisé par des enfants de 8 ans ou
plus et des personnes présentant un
handicap physique, sensoriel ou mental
voire ne disposant pas des connaissances
et de l'expérience nécessaires en cas de
surveillance ou d'instructions sur l'usage de
cet appareil en toute sécurité et de
compréhension des risques impliqués. Les
enfants ne doivent pas jouer avec l'appareil.
Maintenez l'appareil et son cordon
d'alimentation hors de portée des enfants de
moins de 8 ans. Le nettoyage et la
maintenance utilisateur ne doivent pas être
confiés à des enfants sauf s'ils ont 8 ans ou
plus et sont sous surveillance.
• Afin de vous éviter un choc électrique,
n'immergez pas le cordon, la prise ou
l'appareil dans de l'eau ou autre liquide.
• Branchez l'appareil sur une prise électrique
munie d'une connexion à la terre (pour les
appareils de catégorie I).
• AVERTISSEMENT: Si la surface est
fissurée, arrêtez l'appareil pour éviter tout
risque de choc électrique.
• Maintenez l'appareil et son cordon
d'alimentation hors de portée des enfants de
moins de 8 ans.
• La température des surfaces accessibles
peut devenir élevée quand l'appareil est en
fonction.
FR

Manuel d'instructions
18
• L'appareil n'est pas destiné à fonctionner avec
un dispositif de programmation externe ou un
système de télécommande indépendant.
• Les surfaces indiquées par ce logo
risquent de devenir chaudes à l'usage.
• Pour éviter les perturbations du flux d'air, ne
placez rien sur l'appareil et assurez-vous de
préserver systématiquement un dégagement de
10 cm autour de l'appareil.
• Après le processus de cuisson, l'appareil doit
refroidir. Ce processus de refroidissement
s'active automatiquement une fois la minuterie
terminée. Évitez de débrancher l'appareil du
secteur avant la fin du processus de
refroidissement. L'air chaud résiduel risquerait
d'endommager l'appareil.
• Cet appareil est destiné à une utilisation
domestique et aux applications similaires,
notamment:
• Coin cuisine des commerces, bureaux et autres
environnements de travail.
• Hôtels, motels et autres environnements de
type résidentiel.
• Environnements de type chambre d’hôtes.
• Fermes.
CONSERVEZ CES INSTRUCTIONS
USAGE DOMESTIQUE UNIQUEMENT
DESCRIPTION DES PIÈCES
1. Unité principale
2. Écran
3. Poignée de rôtissoire
4. Panier rotatif
5. Poignée de l'outil de retrait
6. Grille de cuisson (3 x)
7. Plateau collecteur de graisse
Panneau de commande
1. Écran LCD 8. Bouton d'éclairage
2. Indicateur de
température
9. Bouton d'alimentation
3. Témoin de
fonctionnement
10. Bouton de rotation
4. Indicateur de
minuterie
11. Bouton de préchauffage
5. Température+ 12. Durée -
6. Température - 13. Durée +
7. Indicateurs de mode

Manuel d'instructions
19
AVANT LA PREMIÈRE UTILISATION
• À la première mise en marche de l'appareil, une légère odeur est
perceptible. C'est normal : assurez une ventilation adéquate.
Cette odeur est seulement temporaire et disparaît rapidement.
• Retirez tout l'emballage.
• Retirez tout autocollant ou étiquette de l'appareil.
• Nettoyez l'intérieur et l'extérieur de l'appareil avec un chiffon
humide.
Plateau de cuisson/collecteur de graisse
• Placez toujours le plateau collecteur de graisse dans les rails
inférieurs ou dans l’espace de cuisson pour recueillir les gouttes
de graisse, les résidus d’aliments ou les miettes. Il peut
également être utilisé comme plateau de cuisson en y plaçant
des aliments, placez-le dans les rails du milieu.
Outil de retrait
• Utilisez la poignée de retrait pour sortir le panier rotatif de
l'espace de cuisson en appuyant sur la poignée et fixez-la dans
son support.
• Soulevez doucement le panier rotatif pour le sortir de l'espace de
cuisson et posez-le sur une surface résistant à la chaleur.
Panier rotatif
• Le panier rotatif peut être utilisé pour préparer des chips ou
d’autres produits à base de pommes de terre, des morceaux de
légumes, de la viande et des produits surgelés tels que des
nuggets de poulet ou des rondelles de calmars.
• Ne remplissez pas trop le panier d'ingrédients. S'il est trop plein,
les aliments ne cuisent pas uniformément.
• Fermez le panier et assurez-vous qu'il est correctement fermé
afin qu'il ne puisse pas s'ouvrir pendant l'utilisation.
• Poussez le bouton de verrouillage/déverrouillage rouge vers la
droite. Insérez le côté gauche du panier rotatif dans l'espace de
cuisson. À cette fin, fixez l'extrémité gauche de l'axe aussi loin
que possible dans le support rond situé à gauche de l'espace de
cuisson en position verrouillée.
• Accrochez ensuite l'extrémité droite de l'axe dans le support situé
à droite de l'espace de cuisson.
• Relâchez le bouton de verrouillage/déverrouillage pour verrouiller
le panier.
FR

Manuel d'instructions
20
3
1
2
1
2
3
• Assurez-vous qu'il est correctement positionné.
Grilles de cuisson
• Les grilles de cuisson sont glissées sur les rails dans l'espace de
cuisson.
• L'élément chauffant est situé en haut de l'espace de cuisson.
• Plus une grille est placée haut, plus la chaleur venant d’en haut est
intense.
• Dans la partie supérieure, les aliments sont cuits plus rapidement et
sont plus croustillants.
• La position intermédiaire peut être sélectionnée pour obtenir une
cuisson uniforme de tous les côtés.
• Les rails inférieurs conviennent à la cuisson douce.
UTILISATION
• Branchez la fiche secteur dans une prise murale mise à la terre.
• Ouvrez la porte.
• Si le plateau collecteur de graisse n’est pas utilisé comme plateau de
cuisson, faites-le glisser dans les rails les plus bas de l’espace de
cuisson.
• Sélectionnez un accessoire approprié pour la nourriture à préparer.
• Préparez les aliments et placez-les sur ou dans l'accessoire, puis fixez
celui-ci à l'appareil.
• Pour fixer et retirer le panier rotatif, appuyez sur le bouton de
déblocage.
• Fermez la porte.
• Appuyez sur le bouton Marche/Arrêt. L'affichage s'allume.
• Réglez la température et le temps de cuisson manuellement ou
choisissez l’un des 10programmes.
•Réglage manuel:
• Appuyez sur le symbole haut ou bas pour le paramètre de
température afin de régler la température souhaitée (minimum 80 °C,
maximum 200 °C).
• Appuyez sur le symbole haut et bas pour le paramètre de l'heure afin
de régler la durée souhaitée (1 minute à 90 minutes).
•Réglage du programme:
• Activez le programme souhaité en touchant le symbole correspondant.
Il est activé lorsque le symbole commence à clignoter.
• Si vous appuyez à nouveau sur le même symbole, la sélection est
annulée.
• Consultez le tableau ci-dessous pour plus d'informations sur les
programmes disponibles:
Other manuals for 182065
2
This manual suits for next models
1
Table of contents
Languages:
Other Princess Oven manuals

Princess
Princess 01.183314.01.7 User manual

Princess
Princess 112370 User manual

Princess
Princess 112371 User manual

Princess
Princess 01.183026.01.001 User manual

Princess
Princess 112359 User manual

Princess
Princess 112361 User manual

Princess
Princess 112459 User manual

Princess
Princess 0118208501001 User manual

Princess
Princess DeLuxe 01.182075.01.001 User manual