Princess 112371 User manual

112371 Princess Oven 28L
112372 Princess Oven 35L
112373 Princess Oven 42L
Nederlands 4
English 9
Français 14
Deutsch 19
Español 24
Italiano 29
Svenska 34
Norsk 38
Português 42
Polski 46

2
10911
1
2
4
3
5
6
7
8
1
A
F
E
B
C
D
2
B C
A

3
3
D

4
NL
Veiligheidsinstructies
Algemene veiligheid
Lees voor gebruik de•
gebruiksaanwijzing
zorgvuldig door. Bewaar de
gebruiksaanwijzing voor
toekomstig gebruik.
Gebruik het apparaat en de•
accessoires uitsluitend voor
de beoogde doeleinden.
Gebruik het apparaat en de
accessoires niet voor andere
doeleinden dan beschreven
in de gebruiksaanwijzing.
Gebruik het apparaat niet als•
een onderdeel of een
accessoire beschadigd of
defect is. Laat een beschadigd
of defect onderdeel of een
accessoire door de fabrikant
of een erkend servicecentrum
vervangen.
Hetapparaatkanworden•
gebruikt door kinderen vanaf
8 jaar en door personen met
een lichamelijke, zintuiglijke,
geestelijke of motorische
handicap of zonder de
benodigde ervaring en kennis
indien ze onder toezicht staan
of instructies krijgen over hoe
het apparaat op een veilige
manier kan worden gebruikt
alsook de gevaren begrijpen die
met het gebruik samenhangen.
Kinderen mogen niet met het
apparaat spelen. Reiniging en
onderhoud mogen niet worden
uitgevoerd door kinderen tenzij
ze ouder zijn dan 8 jaar en
onder toezicht worden
gehouden. Houd het apparaat
en het netsnoer buiten bereik
van kinderen jonger dan 8 jaar.
Gebruik het apparaat niet in•
de buurt van badkuipen,
douches, wastafels of andere
voorzieningen die water
bevatten.
Dompel het apparaat niet•
onder in water of andere
vloeistoffen. Verwijder het
apparaat niet met uw
handen als het apparaat is
ondergedompeld in water of
andere vloeistoffen. Haal
onmiddellijk de stekker uit
het stopcontact. Gebruik het
apparaat niet langer als het in
water of andere vloeistoffen
ondergedompeld is geweest.
Reinig het apparaat en de•
accessoires. Zie het gedeelte
"Reiniging en onderhoud".

5
NL
Elektrische veiligheid
Controleer voor gebruik altijd•
of de netspanning
overeenkomt met de spanning
op het typeplaatje van het
apparaat.
Sluit het apparaat op een•
geaard stopcontact aan.
Gebruik indien nodig een
geaarde verlengkabel met
een geschikte diameter
(minimaal 3 x 1,5 mm2).
Installeer voor extra•
bescherming een
aardlekschakelaar (RCD) met
een nominale reststroom van
maximaal 30 mA.
Bedien het apparaat niet•
door middel van een externe
timer of een apart
afstandsbedieningssysteem.
Zorg ervoor dat er geen water•
in de aansluitpunten van het
netsnoer en het verlengsnoer
kan komen.
Wikkel netsnoer en het•
verlengsnoer altijd volledig af.
Zorg ervoor dat het netsnoer•
niet over de rand van een
werkblad hangt, dat het niet
per ongeluk verstrengeld kan
raken en dat niemand erover
kan struikelen.
Houd het netsnoer uit de•
buurt van warmtebronnen,
olie en scherpe randen.
Controleer het netsnoer en de•
netstekker op tekenen van
beschadiging. Gebruik het
apparaat niet als het netsnoer
of de stekker beschadigd of
defect is. Laat een beschadigd
of defect netsnoer of een
stekker door de fabrikant of
een erkend servicecentrum
vervangen.
Trek de stekker niet aan het•
netsnoer uit het stopcontact.
Haal de stekker uit het•
stopcontact als het apparaat
niet in gebruik is, voordat u het
gaat monteren of demonteren
en voordat u reinigings- en
onderhoudswerkzaamheden
gaat uitvoeren.
Veiligheidsinstructies voor
ovens
Het apparaat is alleen geschikt•
voor huishoudelijk gebruik.
Gebruik het apparaat niet•
buitenshuis.
Plaats het apparaat op een•
stabiel en vlak oppervlak.
Plaats het apparaat op een•
hittebestendig en spatvrij
oppervlak.

6
NL
Plaats het apparaat niet op•
een kookplaat.
Bedek het apparaat niet.•
Plaats geen objecten boven•
op het apparaat. Plaats geen
objecten op de open deur.
Zorg ervoor dat er voldoende•
ruimte rondom het apparaat
is voor het ontsnappen van de
warmte en voor voldoende
ventilatie.
Zorg ervoor dat het apparaat•
niet in contact komt met
brandbaar materiaal.
Houd het apparaat uit de•
buurt van warmtebronnen.
Plaats het apparaat niet op
hete oppervlakken of in de
buurt van open vlammen.
Plaats uitsluitend schalen,•
kommen, etc. van metaal,
steen of glas in het apparaat.
Plaats geen schalen, kommen,
etc. van andere materialen in
het apparaat.
Gebruik het apparaat niet•
voor opslagdoeleinden.
Pas op voor hete delen.•
De oppervlakken die zijn
gemarkeerd met een
waarschuwingssymbool voor
hete oppervlakken worden
heet tijdens gebruik.
De toegankelijke oppervlakken
kunnen heet worden wanneer
het apparaat in gebruik is.
Het buitenoppervlak kan
heet worden wanneer het
apparaat in gebruik is.
Wees voorzichtig wanneer u•
het apparaat aanraakt.
Gebruik altijd ovenhand-
schoenen indien u het
apparaat tijdens of kort na
gebruik moet aanraken.
Zorg ervoor dat uw handen•
droog zijn voordat u het
apparaat aanraakt.
Laat het apparaat niet•
onbeheerd achter tijdens
gebruik.
Verplaats het apparaat niet•
wanneer het is ingeschakeld
of nog heet is. Verwijder de
netstekker uit het stopcontact
en wacht totdat het
apparaat is afgekoeld.
Reiniging en onderhoud
Waarschuwing!
- Haal voor reiniging en onderhoud de
stekker uit het stopcontact en wacht tot
het apparaat is afgekoeld.
- Dompel het apparaat niet onder in water
of andere vloeistoffen.
Voorzichtig!
- Reinig het apparaat niet met bijtende of
schurende reinigingsmiddelen.
- Gebruik geen scherpe voorwerpen om het
apparaat te reinigen.

7
NL
- Gebruik geen ovenreinigers om de
binnenkant van het apparaat te reinigen.
- Reinig het apparaat niet in de vaatwasser.
Reinig de accessoires niet in de vaatwasser.
Controleer het apparaat regelmatig op•
mogelijke schade.
Reinig de binnenkant van het apparaat met•
een vochtige doek. Droog de binnenkant
van het apparaat grondig met een schone,
droge doek. Veeg niet over de
verwarmingselementen.
Reinig het bakrooster, de bakplaat en de•
voedselvork in sop. Spoel de accessoires af
onder stromend water. Droog de accessoires
grondig met een schone, droge doek.
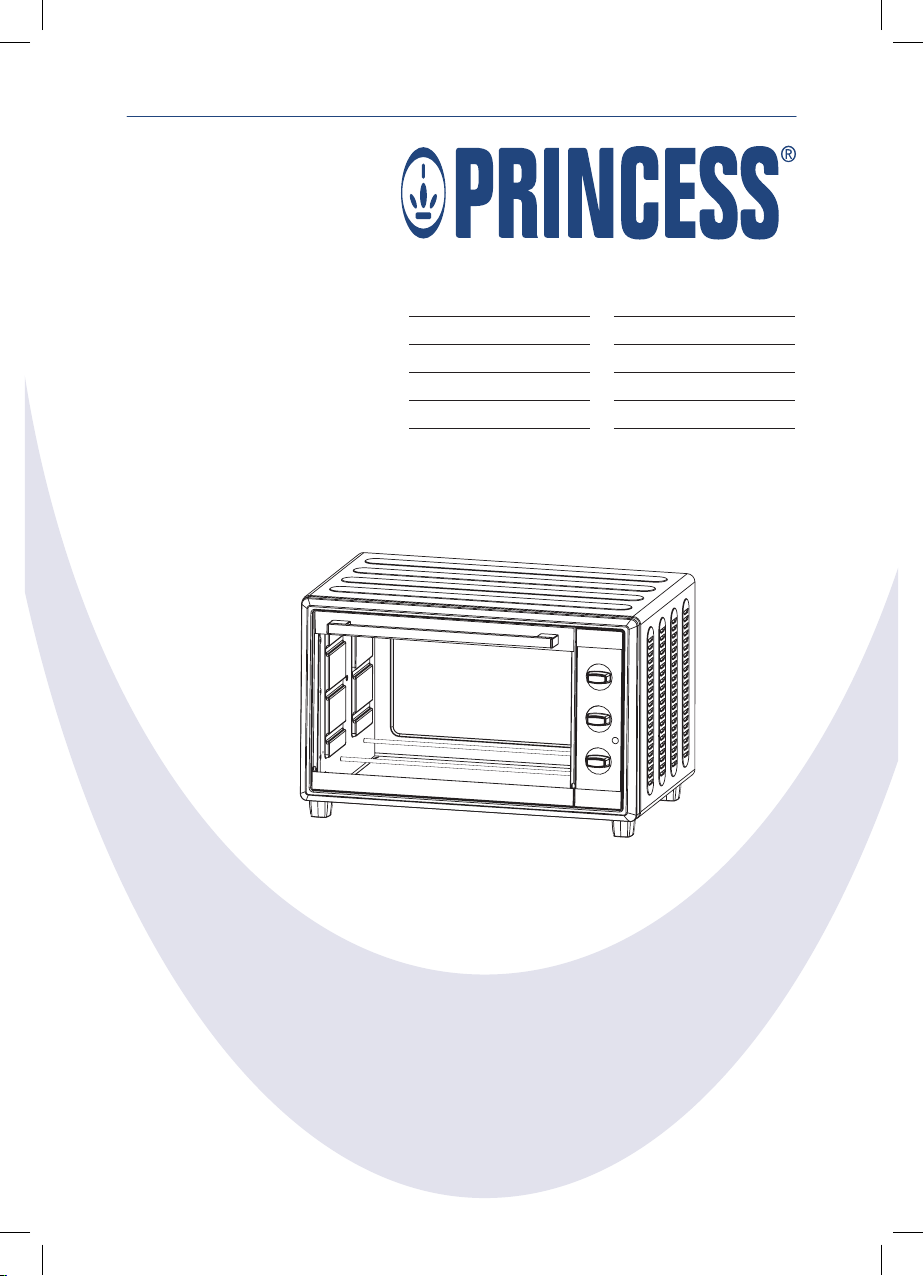
Beschrijving (fig. A)
Uw 112371/112372/112373 Princess oven is
ontworpen voor het roosteren van brood, het
bakken van voedsel en het ontdooien van
voedsel. Het apparaat is uitsluitend geschikt
voor gebruik binnenshuis. Het apparaat is
alleen geschikt voor huishoudelijk gebruik.
1. Temperatuurknop
2. Functieknop
3. Timerknop
4. Aan/uit-indicator
5. Kookcompartiment
6. Verwarmingselement
7. Deur
8. Deurhandgreep
9. Bakrooster
10. Bakplaat
11. Voedselvork
Eerste gebruik (fig. A)
Plaats het apparaat op een stabiel en vlak•
oppervlak.
Plaats de netstekker in het stopcontact.•
Plaats het bakrooster (9) en de bakplaat•
(10) in het kookcompartiment (5). Schuif
het accessoire in de steunrails in de
zijkanten van het kookcompartiment.
Draai de functieknop (2) naar positie "C"•
(fig. C).
Draai de temperatuurknop (1) rechtsom•
om de temperatuur in te stellen op 230 °C.
Draai de timerknop (3) rechtsom om de•
tijd in te stellen op 10 minuten. De aan/
uit-indicator (4) gaat branden. Het
apparaat begint met verwarmen.
Na het einde van het proces schakelt het•
apparaat automatisch uit. De aan/uit-
indicator (4) gaat uit.
Let op: Bij de eerste keer inschakelen van het
apparaat kan gedurende korte tijd een lichte
rookontwikkeling ontstaan en een
karakteristieke geur vrijkomen. Dit is normaal.
Gebruik
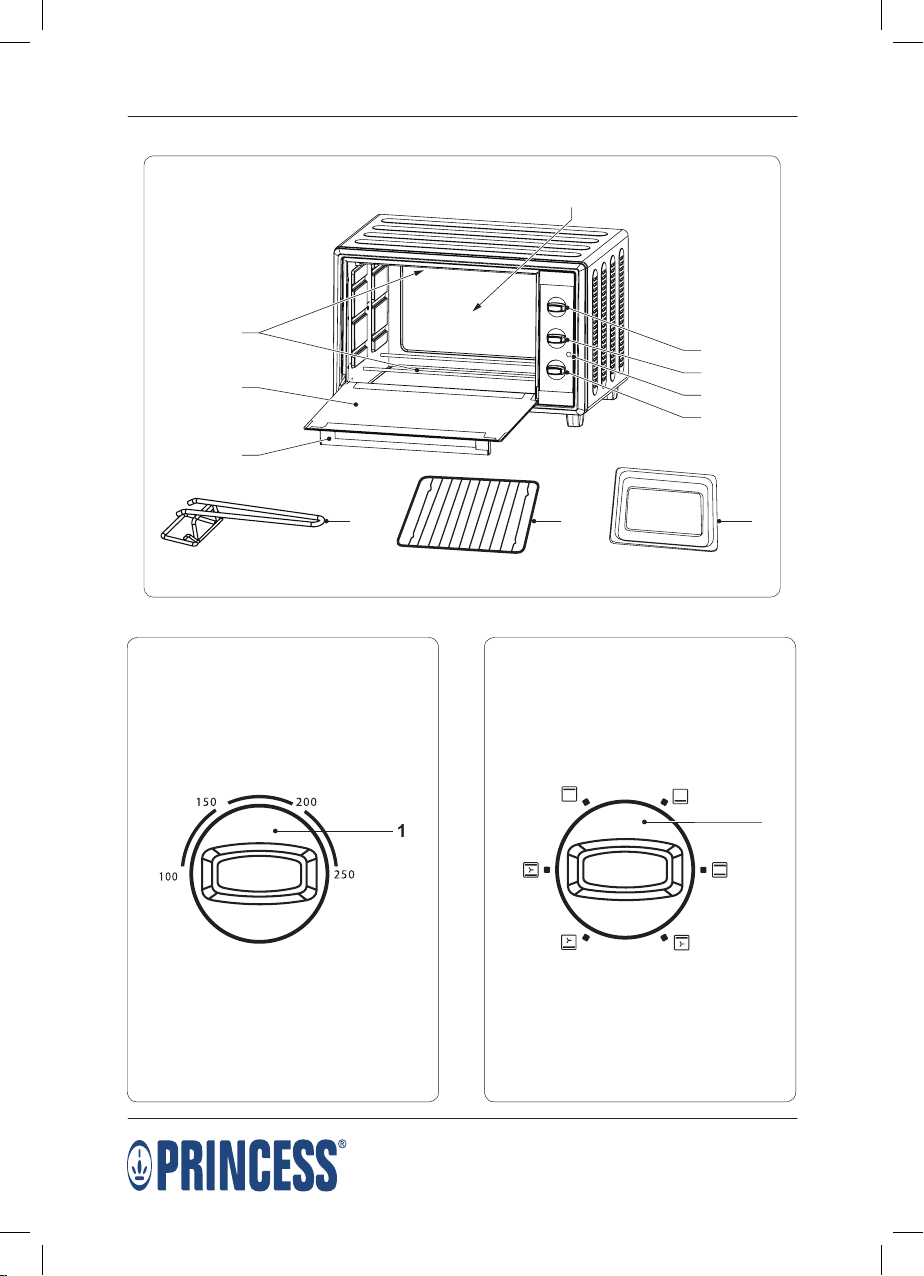
Instellen van de temperatuur (fig. B)
tot 230 °C.
Draai de temperatuurknop (1) rechtsom•
om de temperatuur te verhogen.
Draai de temperatuurknop (1) linksom om•
de temperatuur te verlagen.
Instellen van de ovenfunctie (fig. C)
Draai de functieknop (2) om de gewenste•
ovenfunctie in te stellen. Zie onderstaande
tabel voor het instellen van de juiste
ovenfunctie.
Instelling Ovenfunctie
A Verwarming boven
B Verwarming onder
C Verwarming boven & onder
D Verwarming/convectie boven
E Verwarming/convectie onder
F Verwarming/convectie boven & onder
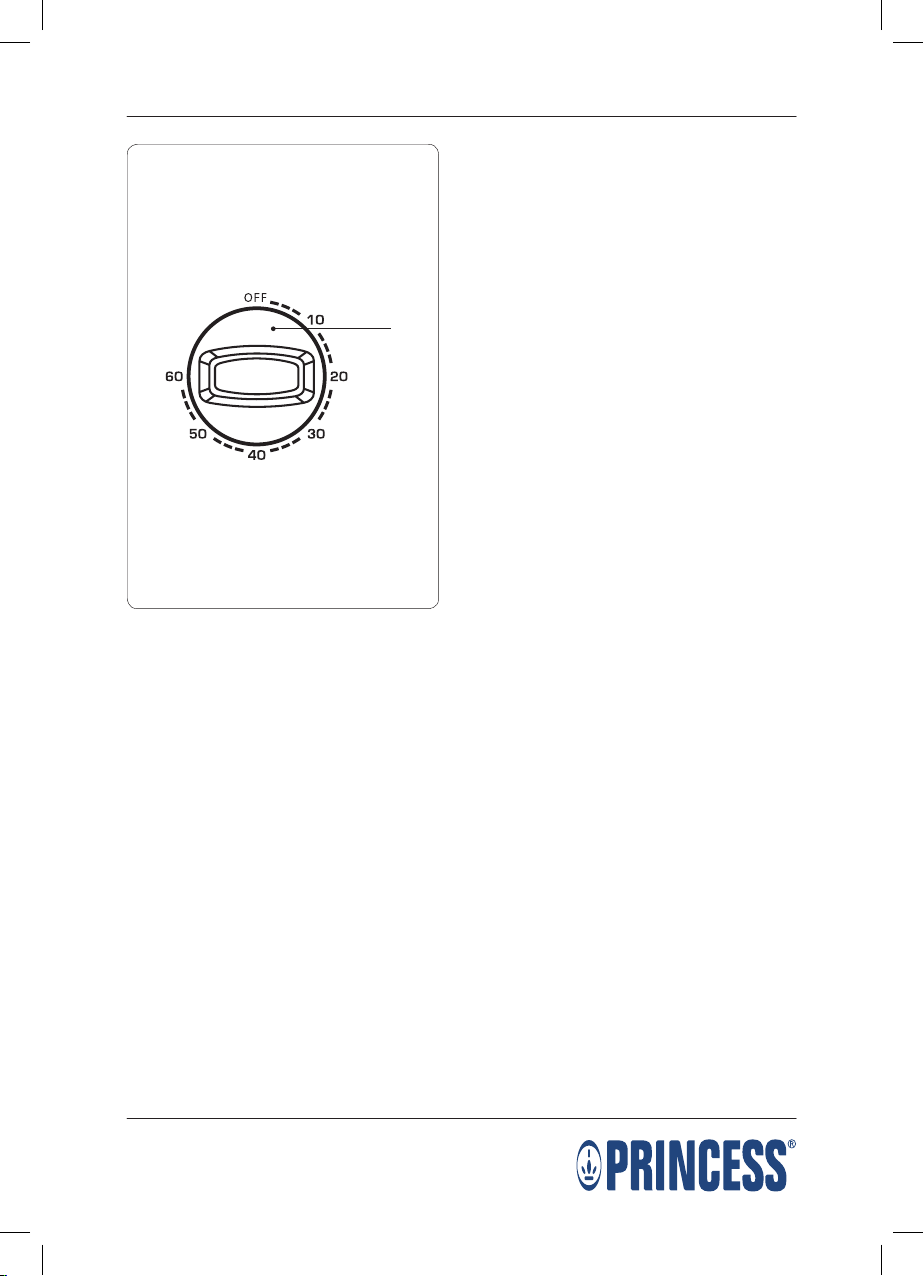
Instellen van de tijd /
In- en uitschakelen (fig. D)
De tijd kan worden ingesteld van 0 minuten
tot 60 minuten.
Voor het inschakelen van het apparaat•
draait u de timerknop (3) om de gewenste
tijd in te stellen. De aan/uit-indicator (4)
gaat branden.
Om het apparaat voor 5 minuten of minder•
in te schakelen, draait u de timerknop (3)
rechtsom naar meer dan 6 minuten en
vervolgens terug naar de gewenste tijd.
De aan/uit-indicator (4) gaat branden.
De temperatuur kan worden ingesteld van90°C

8
NL
Terwijl het apparaat in gebruik is: Draai de•
timerknop (3) rechtsom om de tijd te
verhogen. Draai de timerknop (3) linksom
om de tijd te verlagen.
Voor het uitschakelen van het apparaat•
draait u de timerknop (3) naar de "OFF"-
positie. De aan/uit-indicator (4) gaat uit.
Aanwijzingen voor gebruik (fig. A - D)
Waarschuwing!
- Houd de deur tijdens gebruik altijd gesloten.
- Plaats de bakplaat niet rechtstreeks op het
onderste verwarmingselement.
Voorzichtig!
- Verwam de oven indien nodig voor alvorens
het voedsel in het kookcompartiment te
zetten.
- De ruimte tussen het bovenste
verwarmingselement en het voedsel moet
minstens 30 mm bedragen om de beste
resultaten te verkrijgen.
Plaats het apparaat op een stabiel en vlak•
oppervlak.
Plaats de netstekker in het stopcontact.•
Open de deur (7) met behulp van de•
deurhandgreep (8).
Plaats het bakrooster (9) en/of de bakplaat•
(10) in het kookcompartiment (5). Schuif
het accessoire in de steunrails in de
zijkanten van het kookcompartiment.
Plaats het voedsel op het bakrooster (9) of•
op de bakplaat (10).
Sluit de deur (7) met behulp van de•
deurhandgreep (8).
Stel de temperatuur in met behulp van de•
temperatuurknop (1).
Stel de ovenfunctie in met behulp van de•
functieknop (2).
Schakel het apparaat in door de timerknop•
(3) rechtsom te draaien om de tijd in te
stellen. De aan/uit-indicator (4) gaat branden.
Het apparaat begint met verwarmen.
Kijk regelmatig door de deur (7) om te•
controleren of het voedsel op de juiste
wijze wordt bereid en ervoor te zorgen dat
het niet aanbrandt.
Draai de timerknop (3) naar de "OFF"-•
positie om het proces te onderbreken. De
aan/uit-indicator (4) gaat uit.
Na het einde van het proces schakelt het•
apparaat automatisch uit. Een bel zal
rinkelen. De aan/uit-indicator (4) gaat uit.
Verricht een van de volgende stappen:•
Gebruik de voedselvork (11) om het•
voedsel uit het apparaat te verwijderen.
Gebruik ovenhandschoenen om het•
voedsel uit het apparaat te verwijderen.
Haal na gebruik de stekker uit het•
stopcontact en wacht tot het apparaat is
afgekoeld.

9
EN
Safety instructions
General safety
Read the manual carefully•
before use. Keep the manual
for future reference.
Only use the appliance and the•
accessories for their intended
purposes. Do not use the
appliance and the accessories
for other purposes than
described in the manual.
Do not use the appliance if•
any part or any accessory is
damaged or defective. If a part
or an accessory is damaged or
defective, it must be replaced
by the manufacturer or an
authorised repair agent.
The appliance can be used by•
children from 8 years and
above and by persons with a
physical, sensory, mental or
motorial disability, or lack of
experience and knowledge if
they are supervised or
instructed on how to use the
appliance in a safe way and
understand the hazards
involved. Children shall not play
with the appliance. Cleaning
and maintenance shall not be
made by children unless they
are older than 8 years and
supervised. Keep the appliance
and the mains cable out of
the reach of children younger
than 8 years.
Do not use the appliance near•
bathtubs, showers, basins or
other vessels containing water.
Do not immerse the•
appliance in water or other
liquids. If the appliance is
immersed in water or other
liquids, do not remove the
appliance with your hands.
Immediately remove the mains
plug from the wall socket.
If the appliance is immersed
in water or other liquids, do
not use the appliance again.
Clean the appliance and the•
accessories. Refer to the section
"Cleaning and maintenance".
Electrical safety
Before use, always check that•
the mains voltage is the same
as the voltage on the rating
plate of the appliance.
Connect the appliance to an•
earthed wall socket. If necessary,
use an earthed extension
cable of a suitable diameter
(at least 3 x 1.5 mm2).
For additional protection,•
install a residual current device

10
EN
(RCD) with a rated residual
operating current that does
not exceed 30 mA.
The appliance is not intended•
to be operated by means of
an external timer or separate
remote-control system.
Make sure that water cannot•
enter the contact plugs of the
mains cable and the extension
cable.
Always fully unwind the mains•
cable and the extension cable.
Make sure that the mains•
cable does not hang over the
edge of a worktop and cannot
be caught accidentally or
tripped over.
Keep the mains cable away•
from heat, oil and sharp edges.
Regularly check the mains•
cable and the mains plug for
signs of damage. Do not use
the appliance if the mains
cable or the mains plug is
damaged or defective. If the
mains cable or the mains
plug is damaged or defective,
it must be replaced by the
manufacturer or an authorised
repair agent.
Do not pull the mains cable•
to disconnect the mains plug
from the mains.
Disconnect the mains plug from•
the mains when the appliance
is not in use, before assembly
or disassembly and before
cleaning and maintenance.
Safety instructions for ovens
The appliance is suitable for•
domestic use only.
Do not use the appliance•
outdoors.
Place the appliance on a stable•
and flat surface.
Place the appliance on a heat-•
resistant and splash-proof
surface.
Do not place the appliance•
on a hob.
Do not cover the appliance.•
Do not place objects on top•
of the appliance. Do not place
objects on the open door.
Make sure that there is•
sufficient space around the
appliance to allow heat to
escape and provide sufficient
ventilation.
Make sure that the appliance•
does not come into contact
with flammable material.
Keep the appliance away•
from heat sources. Do not
place the appliance on hot
surfaces or near open flames.

11
EN
Only put containers made of•
metal, stone or glass in the
appliance. Do not put
containers made of other
materials in the appliance.
Do not use the appliance for•
storage purposes.
Beware of hot parts. The•
surfaces marked with a caution
symbol for hot surfaces are
liable to become hot during
use. The accessible surfaces
can become hot when the
appliance is operating. The
outer surface can become
hot when the appliance is
operating.
Be careful when touching the•
appliance. If you need to touch
the appliance during or
shortly after use, always wear
oven gloves.
Make sure that your hands•
are dry before touching the
appliance.
Do not leave the appliance•
unattended during use.
Do not move the appliance•
while it is switched on or is
still hot. Remove the mains
plug from the wall socket
and wait until the appliance
has cooled down.
Cleaning and maintenance
Warning!
- Before cleaning or maintenance, remove
the mains plug from the wall socket and
wait until the appliance has cooled down.
- Do not immerse the appliance in water or
any other liquids.
Caution!
- Do not use aggressive or abrasive cleaning
agents to clean the appliance.
- Do not use sharp objects to clean the
appliance.
- Do not use oven cleaners to clean the
inside of the appliance.
- Do not clean the appliance in the dishwasher.
Do not clean the accessories in the dishwasher.
Regularly check the appliance for possible•
damage.
Clean the inside of the appliance with a•
damp cloth. Thoroughly dry the inside of
the appliance with a clean, dry cloth.
Do not wipe the heating elements.
Clean the baking rack, the baking tray and•
the food fork in soapy water. Rinse the
accessories under running water. Thoroughly
dry the accessories with a clean, dry cloth.
Description (fig. A)
Your 112371/112372/112373 Princess oven
has been designed for toasting bread, baking
food and defrosting food. The appliance is
suitable for indoor use only. The appliance is
suitable for domestic use only.
1. Temperature control dial
2. Function dial
3. Timer dial
4. On/off indicator
5. Cooking compartment
6. Heating element
7. Door
8. Door grip
9. Baking rack
10. Baking tray
11. Food fork

12
EN
Initial use (fig. A)
Place the appliance on a stable and flat•
surface.
Insert the mains plug into the wall socket.•
Insert the baking rack (9) and the baking•
tray (10) into the cooking compartment (5).
Slide the accessory into the support rails in
the sides of the cooking compartment.
Turn the function dial (2) to position "C"•
(fig. C).
Turn the temperature control dial (1)•
clockwise to set the temperature to 230 °C.
Turn the timer dial (3) clockwise to set the•
time to 10 minutes. The on/off indicator
(4) comes on. The appliance starts heating.
If the process is completed, the appliance•
will switch off automatically. The on/off
indicator (4) goes off.
Note: If you switch on the appliance for the
first time, the appliance may emit a little smoke
and a characteristic smell for a short period.
This is normal operation.
Use
Setting the temperature (fig. B)
°C.
Turn the temperature control dial (1)•
clockwise to increase the temperature.
Turn the temperature control dial (1)•
counterclockwise to decrease the temperature.
Setting the oven function (fig. C)
Turn the function dial (2) to set the required•
oven function. Refer to the table below to
set the correct oven function.
Setting Oven function
A Upper heating
B Lower heating
C Upper & lower heating
D Upper heating/convection
E Lower heating/convection
F Upper & lower heating/convection
Setting the time /
Switching on and off (fig. D)
The time can be set from 0 minutes to 60 minutes.
To switch on the appliance, turn the timer•
dial (3) to the required time. The on/off
indicator (4) comes on.
To switch on the appliance for 5 minutes or•
less, first turn the timer dial (3) clockwise to
more than 6 minutes and then back to the
required time. The on/off indicator (4)
comes on.
While the appliance is operating: Turn the•
timer dial (3) clockwise to increase the time.
Turn the timer dial (3) counterclockwise to
decrease the time.
To switch off the appliance, turn the timer•
dial (3) to the "OFF" position. The on/off
indicator (4) goes off.
Hints for use (fig. A - D)
Warning!
- Always keep the door closed during use.
- Do not place the baking tray directly onto
the lower heating element.
Caution!
- If necessary, preheat the oven before putting
the food into the cooking compartment.
- The space between the upper heating
element and the food must be at least
30 mm in order to achieve the best results.
Place the appliance on a stable and flat•
surface.
Insert the mains plug into the wall socket.•
Open the door (7) using the door grip (8).•
Insert the baking rack (9) and/or the baking•
tray (10) into the cooking compartment (5).
Slide the accessory into the support rails in
the sides of the cooking compartment.
Put the food onto the baking rack (9) or•
the baking tray (10).
Close the door (7) using the door grip (8).•
Set the temperature using the temperature•
control dial (1).
Set the oven function using the function•
dial (2).
Switch on the appliance by turning the•
timer dial (3) clockwise to set the time.
The on/off indicator (4) comes on.
The appliance starts heating.
The temperature can be set from 0 °C and 230

13
EN
Regularly look through the door (7) to check•
whether the food is prepared correctly and
to make sure that it does not burn.
To interrupt the process, turn the timer dial•
(3) to the "OFF" position. The on/off indicator
(4) goes off.
If the process is completed, the appliance•
will switch off automatically. A bell will ring.
The on/off indicator (4) goes off.
Take one of the following actions:•
Use the food fork (11) to remove the•
food from the appliance.
Use oven gloves to remove the food•
from the appliance.
After use, remove the mains plug from the•
wall socket and wait until the appliance
has cooled down.

14
FR
Instructions de sécurité
Sécurité générale
Lisez avec soin le manuel•
avant utilisation. Conservez le
manuel pour référence future.
Utilisez l'appareil et ses•
accessoires uniquement pour
leurs fins prévues. N'utilisez
pas l'appareil et ses
accessoires pour tout autre
objet que celui exposé dans
le manuel.
N'utilisez pas l'appareil si une•
pièce ou un accessoire
quelconque est endommagé
ou défectueux. Si une pièce
ou un accessoire quelconque
est endommagé ou
défectueux, il doit être
remplacé par le fabricant ou
par un réparateur agréé.
Cet appareil peut être utilisé•
par des enfants 8 ans ou plus
et des personnes présentant un
handicap physique, sensoriel,
mental ou moteur voire ne
disposant pas des connaissances
et de l'expérience nécessaires
en cas de surveillance ou
d'instructions sur l'usage de
cet appareil en toute sécurité
et de compréhension des
risques impliqués. Les enfants
ne doivent pas jouer avec
l'appareil. Le nettoyage et la
maintenance ne doivent pas
être confiés à des enfants sauf
s'ils ont 8 ans ou plus et sont
sous surveillance. Maintenez
l'appareil et le cordon
d'alimentation hors de portée
des enfants de moins de 8 ans.
N'utilisez pas l'appareil à•
proximité d'une baignoire,
d'une douche, d'un lavabo ou
d'autres récipients contenant
de l'eau.
Ne plongez pas l'appareil•
dans l'eau ou autres liquides.
Si l'appareil est plongé dans
l'eau ou d'autres liquides, ne
retirez pas l'appareil avec vos
mains. Débranchez
immédiatement la fiche
secteur de la prise murale.
Si l'appareil est plongé dans
l'eau ou autre liquide,
ne l'utilisez pas à nouveau.
Nettoyez l'appareil et les•
accessoires. Consultez la section
"Nettoyage et entretien".
Sécurité électrique
Avant toute utilisation, vérifiez•
que la tension du secteur
correspond à celle indiquée
sur la plaque signalétique de
l'appareil.

15
FR
Connectez l'appareil à une•
prise murale mise à la terre.
Si nécessaire, vous pouvez
utiliser une rallonge d'un
diamètre adapté (au moins
3 x 1,5 mm2).
Pour maximiser la protection,•
installez un dispositif de
courant résiduel (RCD)
présentant une intensité de
service résiduelle nominale
inférieure ou égale à 30 mA.
L'appareil n'est pas conçu pour•
être utilisé avec une minuterie
externe ou un système de
télécommande séparé.
Assurez-vous que l'eau ne•
peut pas s'infiltrer dans les
contacts de prise du cordon
d'alimentation et de la rallonge.
Déroulez toujours•
complètement le cordon
d'alimentation et la rallonge.
Assurez-vous que le cordon•
d'alimentation ne pend pas
sur le bord d'un plan de
travail et ne peut pas être
happé ou faire trébucher
quelqu'un accidentellement.
Maintenez le cordon•
d'alimentation à l'écart de la
chaleur, de l'huile et des bords
tranchants.
Contrôlez régulièrement l'état•
du cordon d'alimentation et
de la fiche secteur. N'utilisez
pas l'appareil si le cordon
d'alimentation ou la fiche
secteur est endommagé ou
défectueux. Si le cordon
d'alimentation ou la fiche
secteur est endommagé ou
défectueux, il doit être
remplacé par le fabricant ou
par un réparateur agréé.
Ne tirez pas sur le cordon•
d'alimentation pour débrancher
la fiche secteur du secteur.
Débranchez la fiche secteur du•
secteur lorsque l'appareil n'est
pas utilisé, avant le montage
ou le démontage de même
qu'avant le nettoyage ou
l'entretien.
Instructions de sécurité pour
les fours
L'appareil est réservé à un•
usage domestique.
N'utilisez pas l'appareil à•
l'extérieur.
Placez l'appareil sur une surface•
stable et plane.
Placez l'appareil sur une•
surface résistante à la chaleur
et aux projections.

16
FR
Ne placez pas l'appareil sur•
une plaque de cuisson.
Ne couvrez pas l'appareil.•
Ne placez pas d'objets au•
sommet de l'appareil. Ne
placez pas d'objets sur la
porte ouverte.
Assurez-vous que l'appareil•
dispose d'un dégagement
suffisant pour que la chaleur
se dissipe tout en assurant
une ventilation satisfaisante.
Assurez-vous que l'appareil•
n'entre en contact avec
aucune matière inflammable.
Maintenez l'appareil à l'écart•
des sources de chaleur. Ne
placez pas l'appareil sur une
surface chaude ou à proximité
de flammes nues.
Placez uniquement des•
conteneurs en métal, en pierre
ou en verre dans l'appareil.
Ne placez pas de conteneurs
composés d'autres matériaux
dans l'appareil.
N'utilisez pas l'appareil pour•
le rangement.
Attention aux pièces chaudes.•
Les surfaces marquées d'un
symbole d'attention aux surfaces
chaudes peuvent devenir
chaudes durant l'utilisation.
Les surfaces accessibles peuvent
devenir chaudes lorsque
l'appareil fonctionne. La surface
extérieure peut devenir chaude
lorsque l'appareil fonctionne.
Faites attention en touchant•
l’appareil. Utilisez toujours des
gants de cuisine si vous devez
toucher l'appareil pendant ou
juste après l'utilisation.
Assurez-vous d'avoir les mains•
sèches avant de toucher
l'appareil.
Ne laissez jamais l'appareil sans•
surveillance pendant l'utilisation.
Ne déplacez pas l'appareil s'il•
est sous tension ou encore
chaud. Retirez la fiche secteur
de la prise murale et attendez
que l'appareil refroidisse.
Nettoyage et entretien
Avertissement !
- Avant le nettoyage ou l'entretien, retirez la
fiche secteur de la prise murale et attendez
que l'appareil refroidisse.
- Ne plongez pas l'appareil dans l'eau ou
autres liquides.
Attention !
- N'utilisez pas de produits de nettoyage
agressifs ou abrasifs pour nettoyer l'appareil.
- Ne nettoyez pas l'appareil avec des objets
coupants.
- N'utilisez pas de produits nettoyants pour
four pour nettoyer l'intérieur de l'appareil.
- Ne nettoyez pas l'appareil dans le lave-
vaisselle. Ne nettoyez pas les accessoires au
lave-vaisselle.

17
FR
Contrôlez régulièrement les éventuels•
dommages sur l'appareil.
Nettoyez l'intérieur de l'appareil avec un•
chiffon humide. Séchez soigneusement
l'intérieur de l'appareil avec un chiffon
propre et sec. N'essuyez pas les éléments
chauffants.
Nettoyez l'étagère de cuisson, la plaque de•
cuisson et la fourchette à aliment à l'eau
savonneuse. Rincez les accessoires sous
l’eau courante. Séchez soigneusement les
accessoires avec un chiffon propre et sec.
Description (fig. A)
Votre four 112371/112372/112373 Princess a
été conçu pour griller le pain, cuire les aliments
et les décongeler. L'appareil est réservé à un
usage à l'intérieur. L'appareil est réservé à un
usage domestique.
1. Molette de température
2. Molette de fonction
3. Molette de minuterie
4. Témoin marche/arrêt
5. Compartiment de cuisson
6. Élément chauffant
7. Porte
8. Poignée de porte
9. Étagère de cuisson
10. Plaque de cuisson
11. Fourchette à aliment
Utilisation initiale (fig. A)
Placez l'appareil sur une surface stable et•
plane.
Insérez la fiche secteur dans la prise murale.•
Insérez l'étagère de cuisson (9) et la plaque•
de cuisson (10) dans le compartiment de
cuisson (5). Glissez l'accessoire dans les
glissières de support latérales du compartiment
de cuisson.
Tournez la molette de fonction (2) sur la•
position "C" (fig. C).
Tournez la molette de température (1) dans•
le sens horaire sur la température de 230 °C.
Tournez la molette de minuterie (3) dans le•
sens horaire pour régler le temps sur
10 minutes. Le témoin marche/arrêt (4)
s'allume. L'appareil commence à chauffer.
Si le processus est terminé, l'appareil s'arrête•
automatiquement. Le témoin marche/arrêt
(4) s'éteint.
Remarque : pour sa première mise en marche,
l'appareil peut émettre une légère fumée et une
odeur caractéristique pendant une période brève.
C'est normal.
Utilisation
Réglage de la température (fig. B)
Tournez la molette de température (1) dans•
le sens horaire pour augmenter la température.
Tournez la molette de température (1) dans•
le sens antihoraire pour réduire la température.
Réglage de la fonction du four (fig. C)
Tournez la molette de fonction (2) sur la•
fonction de four requise. Consultez la table
suivante pour régler la fonction de four
correcte.
Réglage Fonction de four
A Chauffage supérieur
B Chauffage inférieur
C Chauffages supérieur et inférieur
D Convection/chauffage supérieurs
E Convection/chauffage inférieurs
F Convections/chauffages supérieurs
et inférieurs
Réglage de durée /
Mise en marche et arrêt (fig. D)
La durée est réglable de 0 minutes à 60 minutes.
Pour mettre l'appareil en marche, tournez la•
molette de minuterie (3) sur la durée requise.
Le témoin marche/arrêt (4) s'allume.
Pour mettre l'appareil en marche 5 minutes•
ou moins, tournez d'abord la molette de
minuterie (3) dans le sens horaire sur plus de
6 minutes puis revenez à la durée requise.
Le témoin marche/arrêt (4) s'allume.
Pendant le fonctionnement de l'appareil :•
Tournez la molette de minuterie (3) dans le
sens horaire pour augmenter la durée.
Tournez la molette de minuterie (3) dans le
sens antihoraire pour réduire la durée.
La température est réglable entre 90 °C et 230 °C.

18
FR
Pour arrêter l'appareil, tournez la molette•
de minuterie (3) sur la position "OFF".
Le témoin marche/arrêt (4) s'éteint.
Conseils d'usage (fig. A - D)
Avertissement !
- La porte doit toujours être fermée pendant
l'utilisation.
- Ne placez pas la plaque de cuisson sur
l'élément chauffant inférieur.
Attention !
- Si nécessaire, préchauffez le four avant de
placer les aliments dans le compartiment
de cuisson.
- L'espace entre l'élément chauffant supérieur
et les aliments doit être d'au moins 30 mm
pour optimiser les résultats.
Placez l'appareil sur une surface stable et•
plane.
Insérez la fiche secteur dans la prise murale.•
Ouvrez la porte (7) avec sa poignée (8).•
Insérez l'étagère de cuisson (9) ou la plaque•
de cuisson (10) dans le compartiment de
cuisson (5). Glissez l'accessoire dans les
glissières de support latérales du compartiment
de cuisson.
Placez les aliments sur l'étagère de cuisson•
(9) ou la plaque de cuisson (10).
Fermez la porte (7) avec sa poignée (8).•
Réglez la température avec la molette de•
température (1).
Réglez la fonction du four avec la molette•
de fonction (2).
Mettez l'appareil en marche en tournant la•
molette de minuterie (3) dans le sens
horaire afin de régler l'heure. Le témoin
marche/arrêt (4) s'allume. L'appareil
commence à chauffer.
Regardez régulièrement à travers la porte•
(7) pour vérifier si les aliments sont préparés
correctement et vous assurer qu'ils ne
brûlent pas.
Pour interrompre le processus, tournez la•
molette de minuterie (3) sur la position "OFF".
Le témoin marche/arrêt (4) s'éteint.
Si le processus est terminé, l'appareil s'arrête•
automatiquement. Une cloche retentit.
Le témoin marche/arrêt (4) s'éteint.
Effectuez l'une des actions suivantes :•
Utilisez la fourchette à aliment (11) pour•
retirer les aliments de l'appareil.
Utilisez des gants de cuisine pour retirer•
les aliments de l'appareil.
Après usage, retirez la fiche secteur de la•
prise murale et attendez que l'appareil
refroidisse.

19
DE
Sicherheitsanweisungen
Allgemeine Sicherheit
Lesen Sie das Handbuch vor•
dem Gebrauch genau durch.
Bewahren Sie das Handbuch
zur künftigen Bezugnahme auf.
Verwenden Sie das Gerät•
und sein Zubehör nur für den
Zweck, für den es konstruiert
wurde. Verwenden Sie das
Gerät und sein Zubehör nicht
für Zwecke, die nicht in diesem
Handbuch beschrieben sind.
Verwenden Sie das Gerät nicht,•
wenn ein Teil oder Zubehör
beschädigt oder defekt ist.
Ist ein Teil oder Zubehör
beschädigt oder defekt, muss
es vom Hersteller oder einem
autorisierten Reparaturbetrieb
ausgetauscht werden.
Das Gerät kann von Kindern•
ab 8 Jahren und von Personen
mit einer körperlichen,
sensorischen, geistigen oder
motorischen Behinderung oder
einem Mangel an Erfahrung
und Kenntnissen verwendet
werden, sofern diese Personen
beaufsichtigt oder über den
sicheren Gebrauch des Geräts
unterrichtet wurden und die
damit verbundenen Gefahren
verstanden haben.
Kinder dürfen mit dem Gerät
nicht spielen. Die Reinigung
und Wartung darf nur dann
von Kindern durchgeführt
werden, wenn sie älter als
8 Jahre sind und beaufsichtigt
werden. Halten Sie das Gerät
und das Netzkabel aus der
Reichweite von Kindern, die
jünger als 8 Jahre sind.
Verwenden Sie das Gerät nicht•
in der Nähe von Badewannen,
Duschen, Bassins oder anderen
Wasserbehältern.
Tauchen Sie das Gerät niemals•
in Wasser oder andere
Flüssigkeiten ein. Falls das
Gerät in Wasser oder andere
Flüssigkeiten eingetaucht
wurde, nehmen Sie es nicht mit
Ihren Händen heraus. Ziehen
Sie sofort den Netzstecker
aus der Wandsteckdose. Falls
das Gerät in Wasser oder
andere Flüssigkeiten
eingetaucht wird, darf es nicht
mehr verwendet werden.
Reinigen Sie das Gerät und•
das Zubehör. Siehe Abschnitt
"Reinigung und Wartung".
Elektrische Sicherheit
Vergewissern Sie sich vor•
dem Gebrauch stets, dass die

20
DE
Netzspannung mit der
Spannung auf dem Typenschild
des Geräts übereinstimmt.
Schließen Sie das Gerät an eine•
geerdete Wandsteckdose an.
Verwenden Sie nötigenfalls
ein geerdetes Verlängerungs-
kabel mit einem geeigneten
Durchmesser (mindestens
3 x 1,5 mm2).
Lassen Sie als zusätzliche•
Schutzmaßnahme einen
Fehlerstromschutzschalter
(FI-Schutzschalter) installieren,
der einen Nenn-Fehlerstrom
von 30 mA nicht überschreitet.
Das Gerät ist nicht dafür•
ausgelegt, von einer externen
Zeitschaltuhr oder einem
Fernsteuersystem betrieben
zu werden.
Stellen Sie sicher, dass kein•
Wasser in die Steckkontakte
des Netzkabels und in das
Verlängerungskabel eindringen
kann.
Wickeln Sie das Netzkabel•
und das Verlängerungskabel
stets vollständig ab.
Vergewissern Sie sich, dass•
das Netzkabel nicht an der
Kante einer Arbeitsplatte
hängen bleibt und nicht
versehentlich daran gezogen
oder darüber gestolpert wird.
Halten Sie das Netzkabel von•
Hitzequellen, Öl und scharfen
Kanten fern.
Kontrollieren Sie das Netzkabel•
und den Netzstecker
regelmäßig auf Anzeichen von
Beschädigung. Verwenden
Sie das Gerät nicht, wenn das
Netzkabel oder der Netzstecker
beschädigt oder defekt ist.
Ist das Netzkabel oder der
Netzstecker beschädigt oder
defekt, muss das Teil vom
Hersteller oder einem
autorisierten Reparaturbetrieb
ausgetauscht werden.
Ziehen Sie niemals am•
Netzkabel, um den Netzstecker
aus der Wandsteckdose zu
ziehen.
Ziehen Sie den Netzstecker aus•
der Wandsteckdose, wenn das
Gerät nicht gebraucht wird,
sowie vor der Zerlegung bzw.
dem Zusammenbau und vor
der Reinigung und Wartung.
Sicherheitsanweisungen für Öfen
Das Gerät ist nur für den•
Hausgebrauch geeignet.
Verwenden Sie das Gerät•
nicht im Freien.
This manual suits for next models
2
Table of contents
Languages:
Other Princess Oven manuals

Princess
Princess 182065 User manual

Princess
Princess 112359 User manual

Princess
Princess 112370 User manual

Princess
Princess 112361 User manual

Princess
Princess 112459 User manual

Princess
Princess 0118208501001 User manual

Princess
Princess DeLuxe 01.182075.01.001 User manual

Princess
Princess 01.183026.01.001 User manual

Princess
Princess 01.183314.01.7 User manual