PRISM+ XQ340 PRO User manual

XQ340 PRO
User Manual


3
Table of Contents
Section 1: Safety Precautions..................................................... 4
Section 2: Box Contents .............................................................. 5
Section 3: Product Overview....................................................... 6
3.1 – Monitor Buttons ............................................................... 6
3.2 – Monitor Ports................................................................... 6
Section 4: Stand Installation ....................................................... 7
Section 5: Mount Installation ...................................................... 9
Section 6: Connectivity Options................................................. 10
6.1 – Connecting Your Earphones............................................ 10
6.2 – DP Connectivity .............................................................. 10
6.3 – Connecting the Power Cable .......................................... 11
6.4 – HDMI Connectivity .......................................................... 11
Section 7: Basic Operation.......................................................... 12
Section 8: Indicator Light ............................................................ 12
Section 9: On-Screen Display (OSD) .......................................... 13
9.1 – OSD Menu Functions ...................................................... 14
Section 10: 16
Section 11: Specifications ........................................................... 17
ECO Modes and Gameplus Switching....................

4
Section 1: Safety Precautions
Read and observe the following warnings and information below.
1. Please disconnect the power plug before cleaning the product. It is recommended to
wipe the monitor with a clean, soft and dry cloth. If using a damp cloth, kindly ensure
that your monitor is dry before connecting the power plug.
2. Do not use alcohol or ammonia-based cleaning agent toclean your monitor.
3. The ventilation openings are at the back of the monitor. Avoid blocking these
openings to prevent the monitor from overheating.
4. Avoid placing the monitor near any heat sources such as portable heaters, heating vents,
or any device that produce heat as it may cause a fire.
5. Do not spray cleaner or any kind of liquid directly onto the monitor’s screen or
any part of the monitor.
6. Do not insert any objects into the monitor, especially via the ventilation openings.
7. Always make sure your monitor is placed on a stable, secure and, leveled surface
to prevent it from falling and sustaining damage.
8. Unplug your monitor during any extended periods of non-use.
9. Do not place heavy items on the monitor or monitor cables.
10.
Do not attempt to disassemble or remove parts from the monitor. Any disassembly
or modification not performed by an authorized technician can damage the monitor
and possible exposure to high voltage electricity, which may lead to severe injury
or death.

5
Section 2: Box Contents
DP Cable x 1
Stand Stem x 1
Screws*11mm x 3
(for stand installation)
Spacer Screws*35mm x 4
(for wall mounting)
XQ340 PRO
User Manual

6
Section 3: Product Overview
3.1 – Monitor Buttons
8 Audio Output: Insert one end of the audio cable into an external audio
source, e.g., speakers or headphones, to pass audio signals through the
monitor.
9 DP Connector: Insert one end of the DP cable into the computer’s DP output
and connect the other end to the monitor’s DP port.
10 HDMI Connectors: Insert one end of the HDMI cable into the computer’s
HDMI output and connect the other end to the monitor’s HDMI port.
7Power Connector: Insert the power cable to supply power to the monitor.
7 8
1 M Menu Button: Press to display the OSD menu or enter sub-menus.
2 Down Button: Press to navigate down in the menus.
3 Up Button: Press to navigate up in the menus.
4 E Exit Button:Press to exit.
5 Power Button: Press to turn on/off the monitor.
6 LED Indicator: Changes colors to indicate status. Refer to Section 8.
3.2 – Monitor Ports
9 10

7
Section 4: Stand Installation
Open the package and take out the product. With the foam still attached, gently
place it on a desktop or table.
Remove the upper foam and place the monitor on top of the foam.
As per picture shown below, push the click button and take out the shaft assembly.
upper foam
lower foam
lower foam
lower foam
shaft assembly

8
Take out shaft assembly part and stand stem. Use 2 pcs of 11mm screws to
fasten them. As shown in the picture below, use 1pc of 11mm screw
to fasten the stand stem and stand base.
Based on the picture below, place the well assembled stand to the corresponding
slot at the back cover and ensure the shaft assembly is well attached to the monitor.
Gently lift the monitor up and ensure that the monitor is well attached.
To dismantle, operate by reversing the installation steps.
Gently lift your monitor to an upright position.
Note: Do removed the foam attached to the monitor panel when lifting the
monitor. Do not lift the monitor by holding on the screen to prevent breaking
the panel.

9
Section 5: Mount Installation
Take out the monitor from the box and gently place it on the foam on a stable,
flat table. Remove the shaft assembly.
Take out the four hexagonal spacer screws with a height of 35mm from the
accessory bag, and fasten them into the M4 threaded hole of the rear tank sinking
slot with a screwdriver (not included). It is advised to place the monitor on top of the
foam to prevent breaking the screen.
Install the monitor on the wall mount or bracket as desired.
VESA and mounting accessories are not included.

10
Section 6: Connectivity Options
6.1 – Connecting Your Earphones
Plug in your earphones to receive audio signals from your monitor. If you have an audio
device connected to your computer when you connect your earphones to the monitor,
the audio devices will not produce sound. Earphones and other audio devices are not
included.
Earphones (not included)
DP
DP OUTPUT
DP Cable (Included)
Exposure to loud audio for prolonged periods of time may permanently
damage your hearing.
6.2 – DP Connectivity
For the monitor to receive DP signals from the computer, use the DP cable to
connect the monitor tothe computer

11
6.3 – Connecting the Power Cable
Connect the included power cable to the power connector and then plug the other
end into a wall outlet.
6.4 – HDMI Connectivity
For the monitor to receive HDMI signals from the computer, use an HDMI
cable to connect the monitor to the computer.
HDMI OUTPUT
PC
HDMI Cable (Not included)

12
Section 7: Basic Operation
1. Insert one end of the DP cable into your PC’s graphics card. A HDMI cable may
also be used. HDMI cable is not included.
2. Connect the other end of the cable to the corresponding connector on your
monitor.
HDMI Connectors
3. Connect the power cable to your monitor then connect the other end to your
power source. It is recommended that you use a surge protector with adequate
voltage if a wall outlet cannot be reached directly.
4. Locate the power button on the monitor and press it to turn on the monitor.
FreeSync
This feature is off by default. To use this feature, please note that you must have
hardware with FreeSync capability, a DP or HDMI cable, and the latest graphic drivers.
To use this feature, connect your computer and monitor with a DP or HDMI cable. After
connecting, a pop-out message will prompt and request you to enable this feature on
your computer. If you do not receive the prompt, you may need to enable your graphics
card menu's function. See your graphics card manufacturer’s documentation for
instructions on how to enable FreeSync.
Section 8: Indicator Light
Indicator Light
Solid blue light indicates power is on and the monitor is operating normally. Flashing
blue light indicates no video source, no horizontal/vertical signal has been
detected or voltage is low. Please ensure your computer is on and all video cables
are fully connected.
DP Connector

13
Section 9: On-Screen Display (OSD)
The On-Screen Display (OSD) Menu may be used to adjust your monitor’s settings and
appears on screen after turning on the monitor and pressing the Mbutton.
When using the monitor for the rst time, settings will automatically adjust to optimal
settings according to your computer’s con guration and parts etc.
1. Press any one of the buttons (M, , , E, ) to activate the navigator screen.
2. Press Mto enter the OSD screen.
3. Press or to browse functions.
- Highlight the desired function and then press Mto enter the sub-menu.
- Press or to browse sub-menus then press Mto highlight the desired function.
- Press or to highlight an option and then press M
current screen.
4. Press Eto exit the current screen.
14
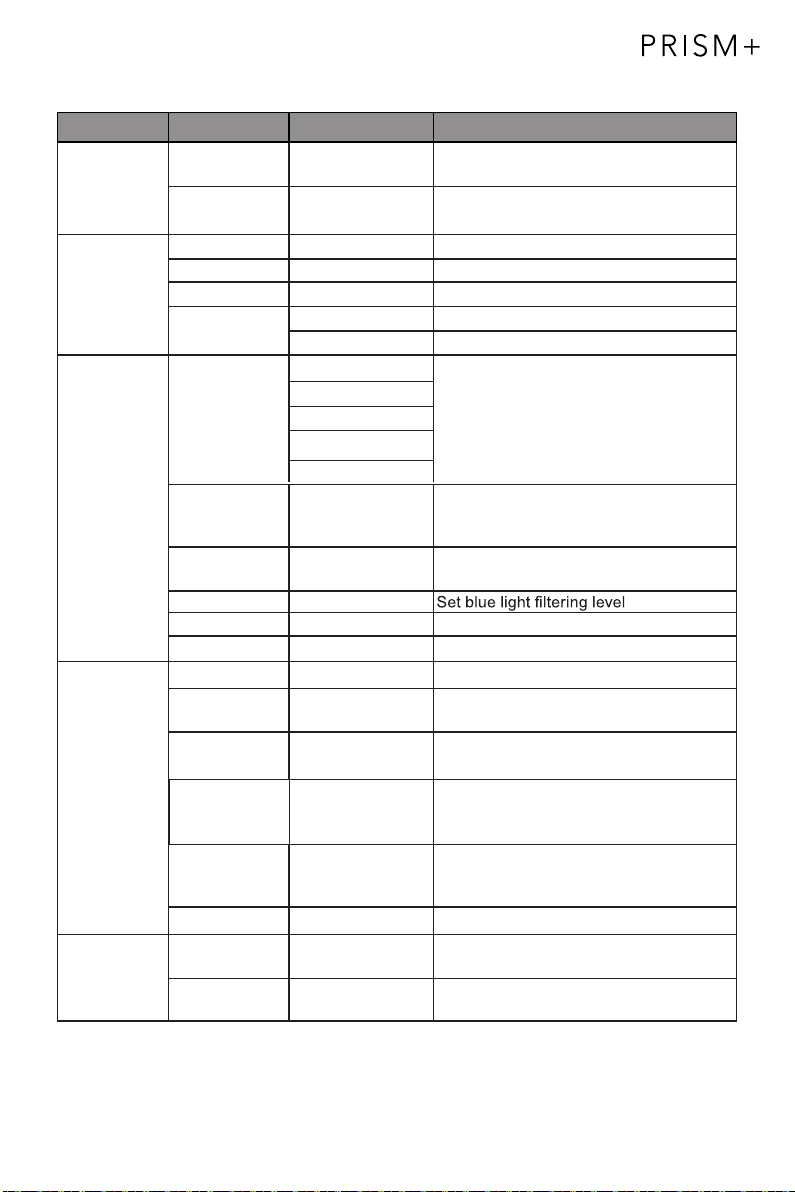
9.1 – OSD Menu Functions
Main Menu Sub-Menu Options Description
Input Source
HDMI 1
HDMI 2
NONE Switch to HDMI signal input
D
DP 2
P 1 NONE Switch to DP signal input
Brightness/
Contrast
Brightness 0~100 Adjust display brightness
Blacklevel 0~100 Adjust display black level
Contrast 0~100 Adjust display contrast
DCR On Turn on DCR function
Off Turn off DCR function
Color Setting Gamma Set Gamma add-inGamma 1.8
Gamma 2.0
Gamma 2.6
Picture Mode Standard, Photo,
Movie, Game,
FPS, RTS
Set visual mode according to activity
Color
Temperature
Warm, Cool, User Select color temperature
Low Blue Light 0~100
Hue 0~100 Adjust hue levels
Saturation 0~100 Adjust saturation levels
Picture
Quality
Setting
Sharpness 0~100 Set display sharpness
Response Time Off, High, Middle,
Low
Adjust response time
Noise
Reduction
Off, High, Middle,
Low
Reduce the interference of image noise
caused by signal source interference
Dynamic
Luminous
Control
On, Off Compensate for gray scale display
screen and strengthen the expression of
gray scale
Super-
Resolution
Off, High, Middle,
Low
When the resolution of the display
screen is low, this function can be turned
on to enhance the image resolution
MPRT On, Off
Moving Picture Response Time
Display Aspect Ratio Wide Screen, 4:3,
1:1, Auto
Select on-screen aspect ratio
LedMode Flicker, Normal,
Off
Switch LED modes / turn LED on/off
Gamma 2.4
Gamma 2.2

15
Main Menu Sub-Menu Options Description
Multi-Window Multi-Window Off, PIP Mode,
PBP 2Win
Select PIP/PBP modes according to the
number of input signals etc.
Sub Win2 Input DP 1, DP 2,
HDMI 1,
HDMI 2
Select according to input signal for PIP/
PBP mode
PIP Size Small, Medium,
Large
Adjust the PIP/PBP display window size
PIP Position Top Right, Top
Left, Bottom Right,
Bottom Left
Adjust the PIP/PBP window position
Swap NONE Swap the two channel signal source of
only the PIP/PBP 2 screens function
OSD Language English, 简体中文,
한국어,Русский,
Español, 日本語,
Français
Set OSD language
OSD
H-Position
0-100 Adjust the OSD’s horizontal position
OSD V-Position 0-100 Adjust the OSD’s vertical position
OSD
Transparency
0-100 Set the OSD’s overall transparency
OSD Time Out 5-100 Set how long the OSD remains open
after non-use
Other DP Version DP 1.1; DP 1.2;
FreeSync
(Adaptive Sync)
On, Off Turn the FreeSync function on/off
HDR On, Off; Auto
Detect
Turn the HDR mode on/off
Reset None
Audio Mute On, Off Turn mute mode on/off
Volume 0-100 Adjust audio volume
Audio Source DP 1, DP 2,
HDMI 1,
HDMI 2
Select audio signal input via HDMI or DP
OSD Rotation Normal,90,180,
270
When the user flips the display,this
function can also flip the OSD to achieve
the best display angle

Section 10: ECO Modes and Gameplus Switching
16
1. Press any one of the buttons (M, , , E, ) to activate the navigation window.
eco
2. Press button to switch Gameplus modes. Choose the crosshair icon best suited for
your game. These game icons are primarily designed to optimize your aim during shooting
games, though they can be used for other scenarios.
3. Press button to switch ECO modes. These modes include Standard, Photo, Movie,
Game, FPS, and RTS and can be used to optimize settings according to your activity.
Standard mode is suitable for most activities.
Standard

17
Section 11: Specifications
Item Detail
Model Number XQ340 PRO
Screen Size 34”
Curvature 1500R
Viewing Angle ≥178°(H); ≥178°(V)
Aspect Ratio 21:9
Resolution DP1.4: 3440x1440@144Hz
HDMI2.0: 3440x1440@100Hz
Backlight E-LED
Typical Brightness 400 cd/m2
Default Color Temp. 6500
Contrast Ratio 3,000:1 (Static)
Response Time MPRT 1ms
Refresh Rate 144Hz
Ports DP1.4 x 2, HDMI2.0 x 2
Power AC 100-240V~ 50/60Hz 2.0A
VESA Compatibility 75X75 mm
Dimension (With Stand) 809 x 511 x 218mm
Weight 7.62kg (Net) / 11.0kg (Gross)


108.007.12931
XQ340 PRO
2020.11.12
V01
324HR-Q
feihong
PRISM+
120g双铜版纸 单色印刷 骑马钉
140x210mm
*封二不要印刷内容
Table of contents
Other PRISM+ Monitor manuals


