PRIXTON THOR User manual

ASPIRADOR VACUUM CLEANER
THOR

ES
Introducción del producto
Este producto utiliza una batería de iones de litio como fuente de energía.
Advertencias y precauciones de seguridad
El aspirador Thor es un aparato eléctrico, por lo que debe ser usada en
condiciones normales y bajo supervisión.
1. La aspiradora puede provocar fuego y dañar a las personas si aspira los siguientes
elementos:
a) Fuente de calor: fuego de carbón, colillas de cigarrillos.
c) Líquido: sustancia peligrosa (disolvente, corrosivo), ácido, producto de limpieza y agua.
e) Escombros y cemento.
2. Corte la corriente si va a limpiar o hacer el mantenimiento del aparato o si no va a usarlo
en un período de tiempo.
3. Se recomienda utilizar el cargador suministrado y comprobar el voltaje de la máquina y
del cargador, asegurándose de que es consistente.
4. No sumerja el cuerpo del aparato en agua.
5. Los niños no deben jugar ni usar la aspiradora para evitar accidentes.
6. No use la aspiradora en las siguientes circunstancias:
a) Caída con daño aparente o avería.
b)Cargador dañado.
7. No utilice la aspiradora durante un largo período de tiempo si la entrada de succión ha
estado bloqueada, ya que el motor podría estar dañado o la máquina deformada.
Instrucciones especiales:
La aspiradora no debe ser utilizada por niños, personas con capacidades físicas, mentales
es un juguete, los niños deben ser supervisados para evitar que jueguen con la aspiradora.
2
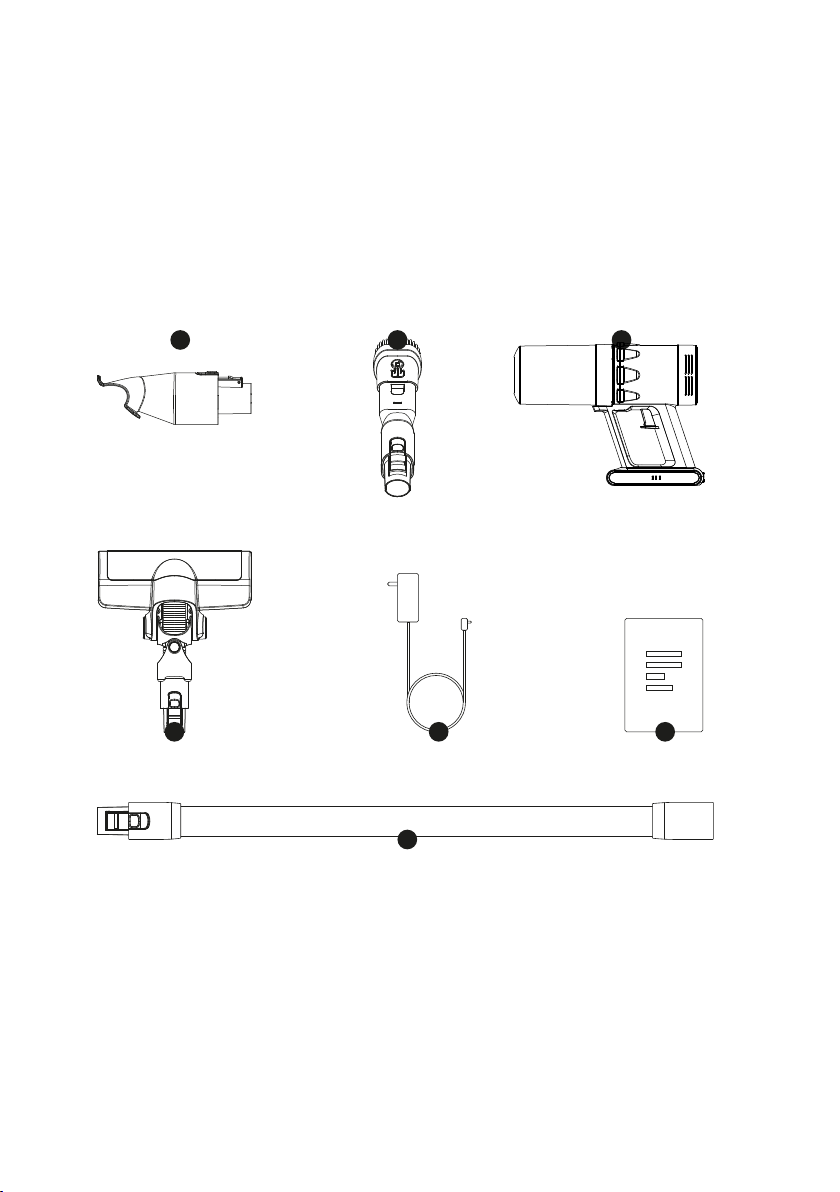
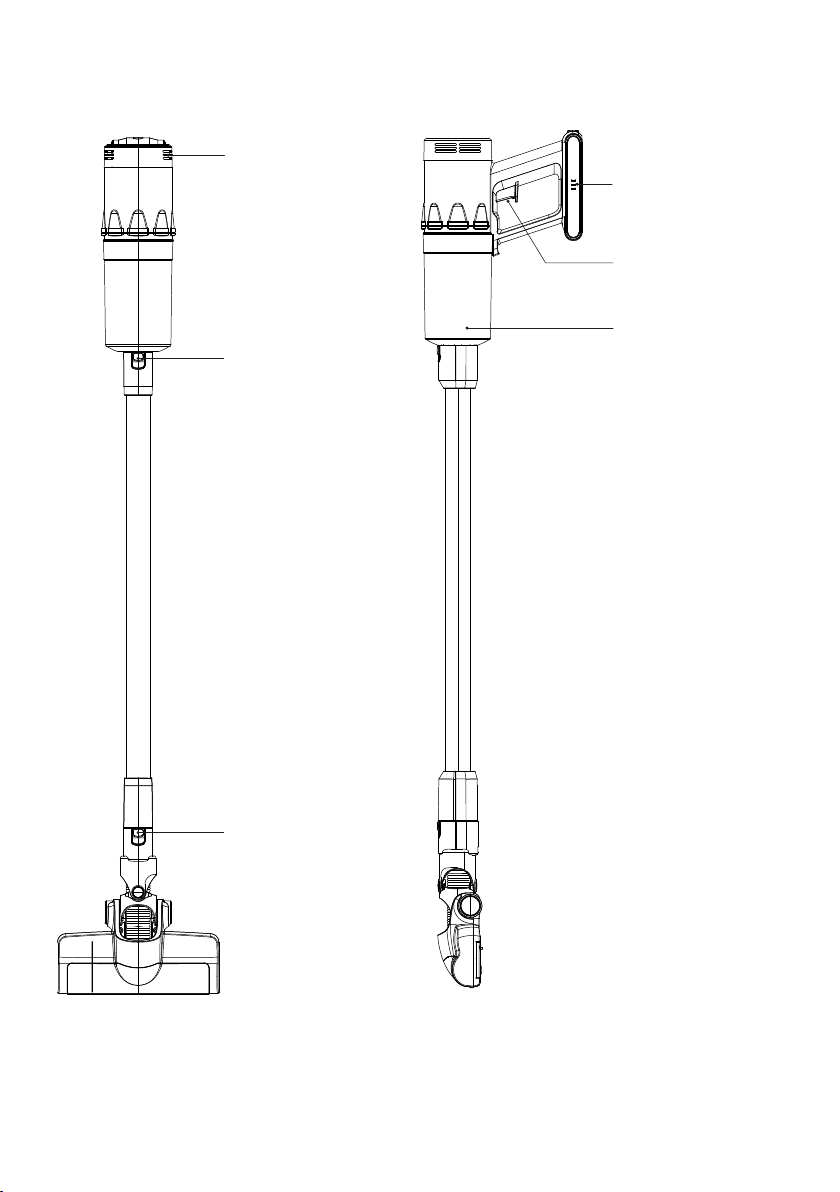
Nombre y diagrama de las partes del producto
Aspiradora
Ensamblaje del cepillo
Ensamblaje del tubo
1.
4.
7.
Cepillo telescópico
Cargador
2.
5.
Cepillo multifunción
Manual de instrucciones
3.
6.
21
3
7
64 5
3

Descripción de los componentes del producto
Tapa de salida de aire
Botón de encendido
Luz indicadora
de la batería
Bloqueo del tubo
Depósito de polvo
Bloqueo del cepillo
4
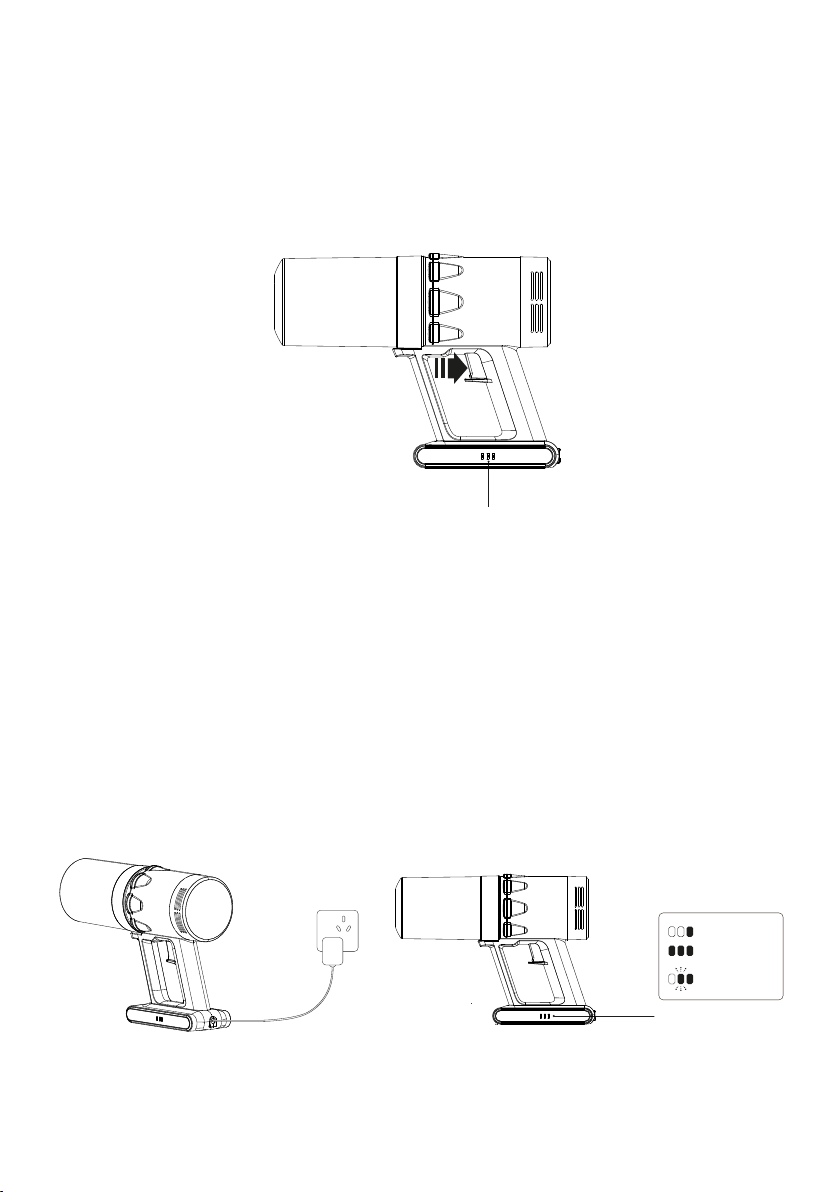
Instrucciones de uso
que la bloqueen, de lo contrario causaría el sobrecalentamiento del motor y podría
provocar un accidente.
Funcionamiento: presione el botón de encendido; la aspiradora se encenderá en el modo
de potencia bajo. Pulse de nuevo el botón para aumentar la potencia. Cuando quiera
apagarla, mantenga pulsado el botón de encendido; la aspiradora se apagará.
Modo de funcionamiento: potencia bajapotencia altaapagar
Aviso
Tenga en cuenta que no es necesario pulsar el botón de regulación de la velocidad
durante mucho tiempo. Después del uso de la máquina, la pantalla de la batería mostrará
la carga restante, y la luz indicadora se irá apagando poco a poco con la disminución de la
carga, hasta agotarse. En ese caso, la máquina dejará de funcionar y necesitará volver a
cargarse.
Carga
aspiradora directamente al cargador o en el enchufe de la pared. Los LED azules
parpadearán durante la carga. Cuando la batería esté cargada, los LED azules
permanecerán encendidos.
Aviso: Desenchufe la aspiradora antes de usarla.
Indicador de batería
Batería baja
Carga
completa
Cargando
Luz indicadora
de la batería
5
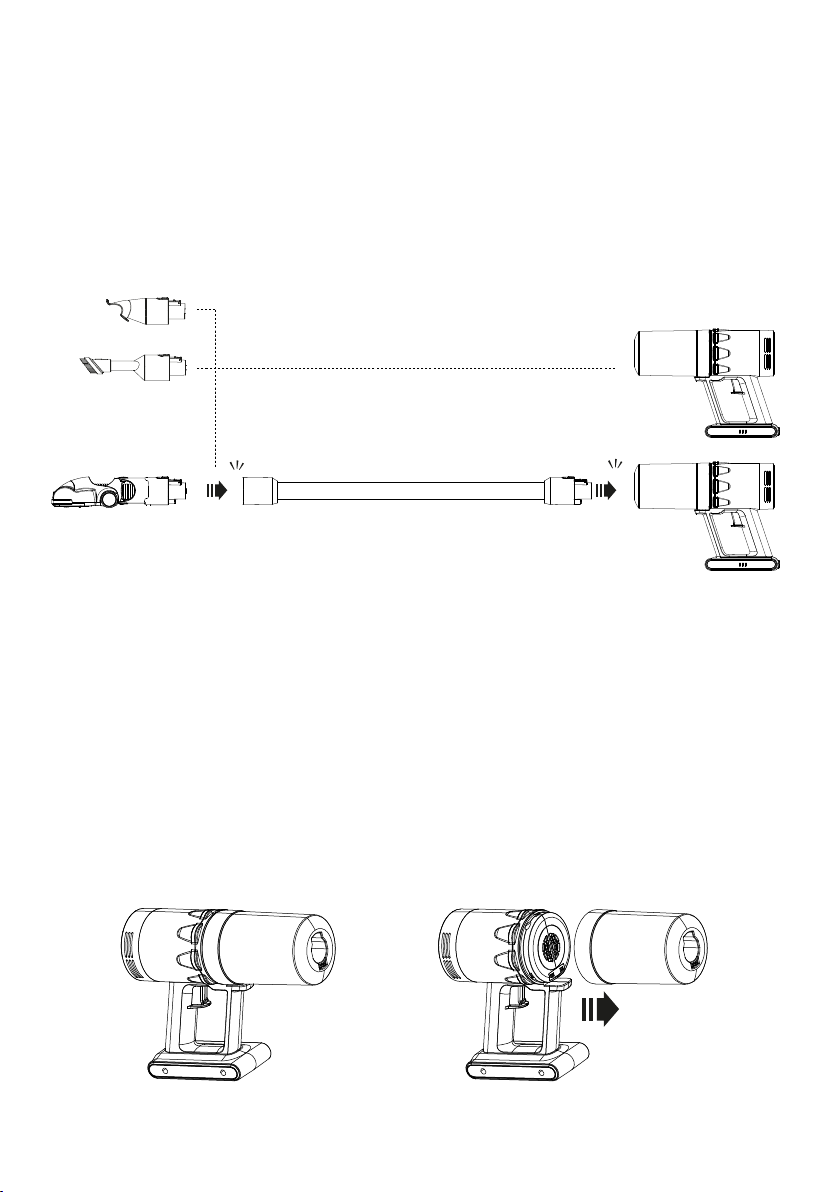
Instalación de accesorios
Cómo instalar los accesorios
frontal de la pieza móvil con depósito de polvo hasta que oiga un clic.
pieza móvil con depósito de polvo.
accesorios y cepillos, en función de sus necesidades: limpiar el suelo/cortinas, etc.
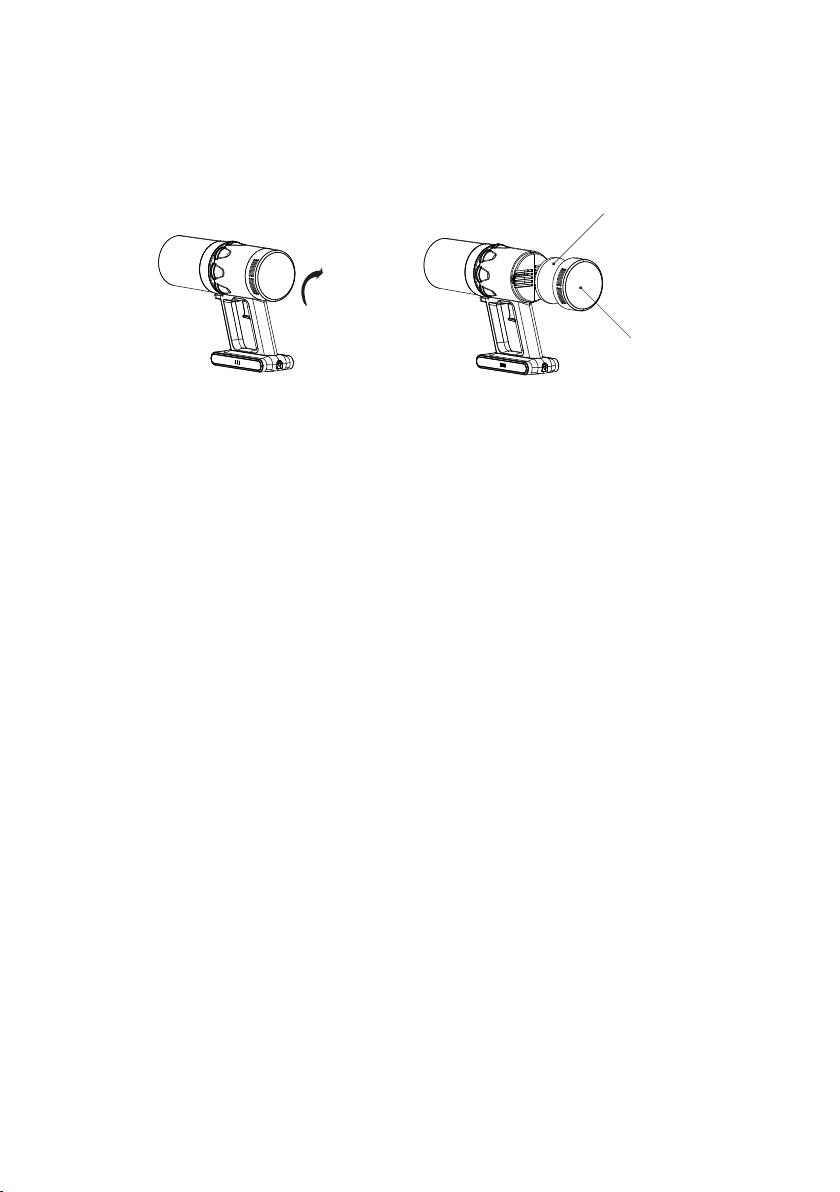
Limpieza del aspirador
Limpieza del depósito de polvo
Aviso
absorbido podrían seguir reproduciéndose. Para evitar una contaminación secundaria, los
otros nuevos.
1.Apagar
2. Tal y como se muestra en la imagen, sujete el mango del aparato con la mano izquierda
y gire el depósito de polvo en sentido contrario a las agujas del reloj con la otra mano.
clic clic
6
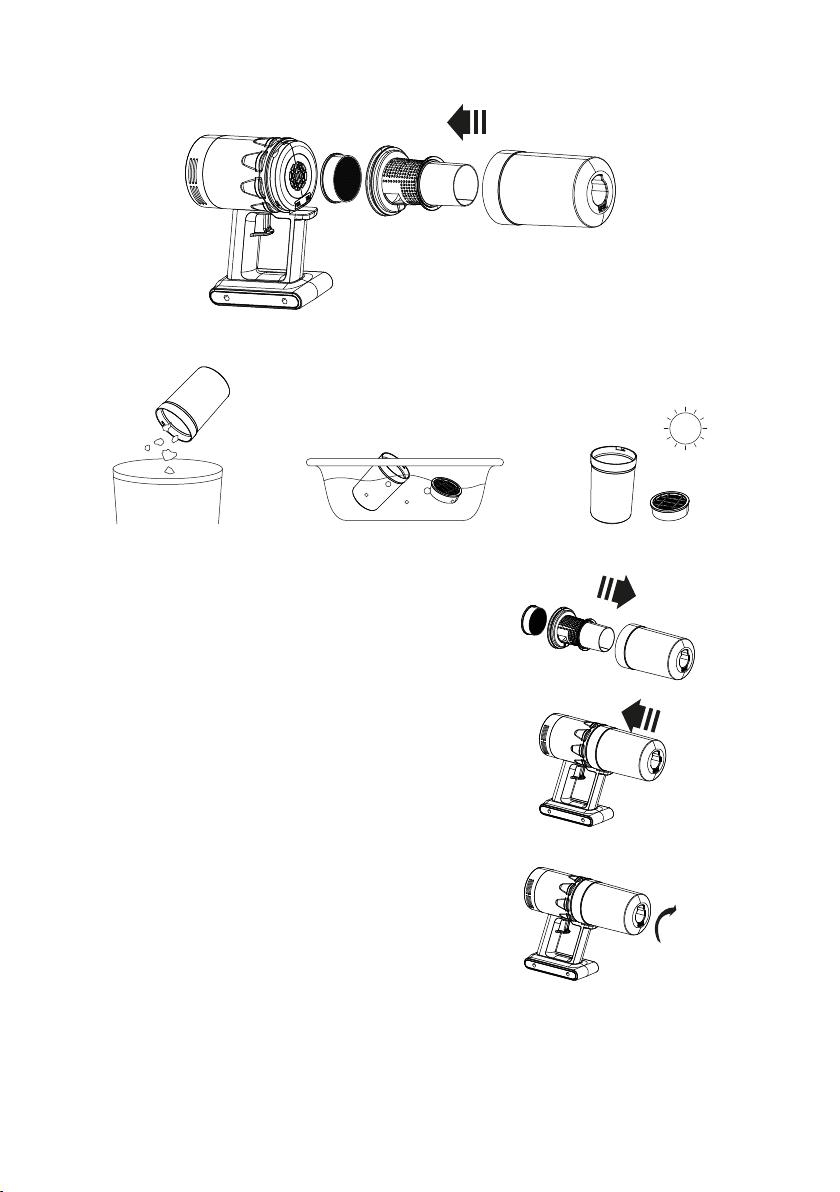
Instalación del depósito de polvo
alinee la posición de entrada del ensamblaje
con la posición de entrada del depósito de
quede totalmente introducido y no pueda
desplazarse hacia abajo, la unidad estará bien
colocada.
B. Sujete la máquina y presione la unidad del
depósito de polvo desmontable en la dirección
opuesta. Alinee el punto de referencia de
bloqueo del depósito de polvo con el punto de
referencia de la máquina.
Depósito
de polvo
Ensamblaje
Filtro
7
Esponja de aire
Limpieza de la esponja de aire
y, con la otra mano, gire la tapa de salida de aire en el sentido de las agujas del reloj.
Tire de la tapa hacia afuera. Enjuague la tapa y la esponja con agua.
Séquelas antes de volver a usarlas.
Mantenimiento y almacenamiento
1. Todos los trabajos diarios de mantenimiento y conservación deben realizarse después de
que la aspiradora haya sido apagada.
2. Limpie frecuentemente la basura del depósito de polvo para evitar fallos en la
aspiradora.
Utilice un paño suave o un producto neutro para lavar platos. No utilice un paño muy
aspiradora.
4. Mantenga el área de almacenamiento seca.
5. No apile objetos pesados encima de la máquina.
Solución de problemas
Al encontrarse con los siguientes problemas generales, los usuarios pueden realizar su
propia investigación. Aviso: cuando detecte alguno de los siguientes problemas, por favor,
apague inmediatamente la aspiradora para evitar daños y otros peligros.
Cómo colocar nuevamente la tapa
Después de introducir la esponja de aire en la tapa de salida de aire, sujete la máquina con
la mano izquierda y la tapa de aire con la otra mano. Luego, introduzca la tapa de salida de
Esponja de aire
Tapa de aire
8

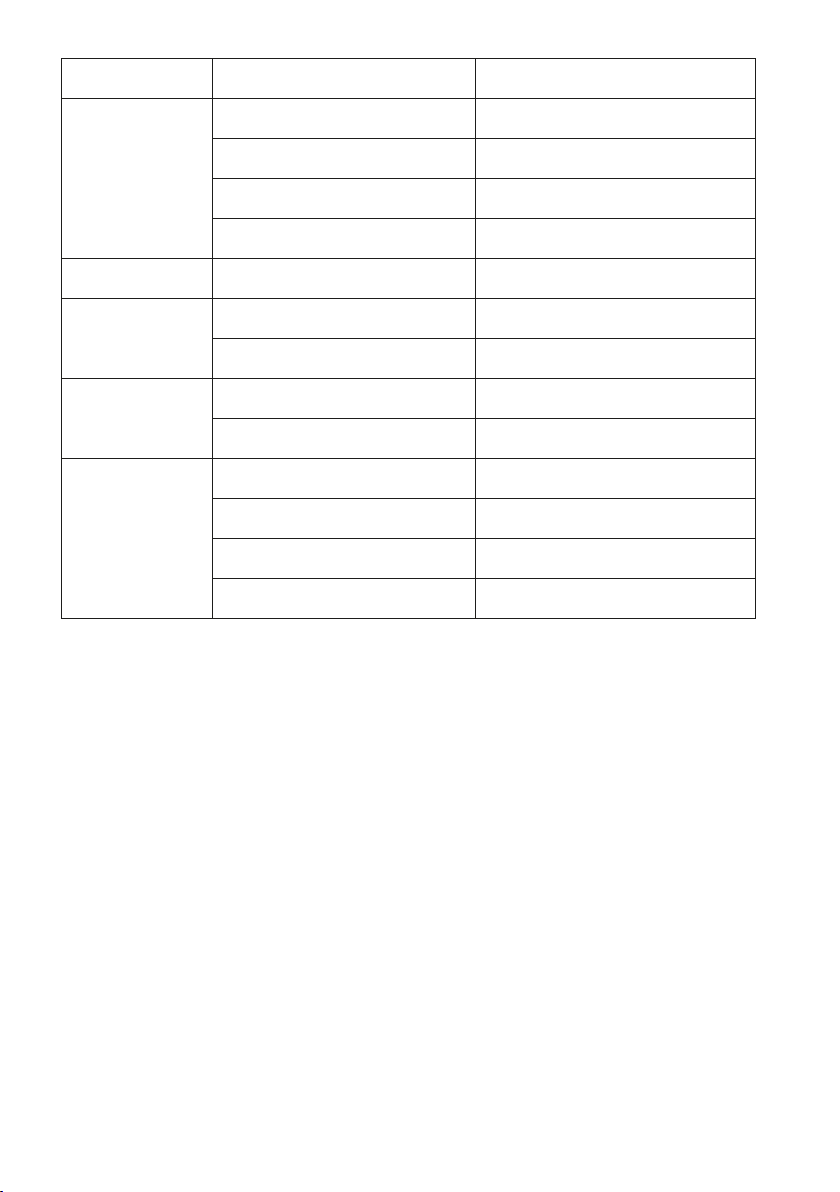
Problema Causa Solución
La aspiradora no se
enciende
Sin batería Cargar
El usuario no encendió el botón Encender el botón
La batería no está en su lugar Colocar la batería
Piezas de repuesto dañadas Cambiar la aspiradora
Ruido El depósito de polvo está lleno o el
conducto está bloqueado Retirar y limpiar el depósito de polvo
La succión ha
disminuido El depósito de polvo está lleno Retirar y limpiar el filtro
Batería baja Cargar
El polvo sale hacia
fuera durante el uso El filtro HEPA está roto Apagar la máquina y cambiar el filtro HEPA
El usuario olvidó colocar el filtro HEPA Volver a colocar el filtro HEPA
La aspiradora no
carga
El adaptador no está enchufado Enchufar el adaptador
El adaptador no está conectado a la
aspiradora Conectar el adaptador
Adaptador dañado Cambiar el adaptador
Piezas de repuesto dañadas Cambiar la aspiradora
9

Política de garantía
En cumplimiento de lo establecido en el art. 16.7 del Real Decreto-ley 7/2021, de 27 de
abril. Ref. BOE-A-2021-6872, se pone a disposición de los interesados, accediendo a
desistimiento atendiendo a los supuestos que recoge dicha ley, dando por cumplidas las
Las características técnicas y eléctricas que aquí se brindan corresponden a unidades
Declaración ue de conformidad simplificada
ubicada en Avenida Cervantes 49, módulo 25, Basauri 48970, Bizkaia, declara que el tipo de
Es conforme con la Directiva 2014/53/UE del Parlamento Europeo y del consejo de 16 de
abril de 2014.
Internet siguiente:
LA TRASTIENDA DIGITAL
MARCA MODELO DESCRIPCIÓN CATEGORÍA
PRIXTON THOR ASPIRADOR HOGAR
10

EN
Product introduction
This products uses lithium-ion battery for power. Its very convenience for using.
Operation safety and notice
The Thor vacuum cleaer is electrical appliance, so it must be used under normal
conditions,it should not be operated without supervision
b) Large sharp fragment: broken glass piece
c) Liquid: hazardous artical (solvent, corrodent) acid agent, cleanser and water
e) Construction waste and cement
2. Cut off the power when cleaning, maintainance and not using in a while.
3. Recommanded using the supplied charger,checking the voltage the machine and the
charger,making sure its consistent
4. Do not immerse the body of the unit into water
5. The children should not play or operate the vacuum cleaner in case any accidents
happens.
6. Do not operate cleaner under such circumstance:
a) Falling down with apparent damage or out of order
b) Damage charger
7. Do not operate for a long period of time when the suction inlet was blocked, in case the
motor was damaged or machine was deformed.
11

Product parts name and diagram
Vacuum cleaner
Brush Assembly
Tube Assembly
1.
4.
7.
Telescopic brush
Charger
2.
5.
Multi-function brush
Instruction manual
3.
6.
21
3
7
64 5
12
Product Component Description
Air-outlet cover
Switch
Battery indicator
light
Tube Locker
Dust cup
Brush locker
13

Operation
Note: Air-inlet must be kept unobstructed, and there are no foreign bodies blocked,
otherwise will cause the motor overheating causes the accident .
Operation: press the handle on the power switch, the machine open, belongs to low mode,
work to push the button once again, when need to turn it off, continue to press the switch
button, the vacuum cleaner stops working.
Working state: low model high mode shutdown.
Note
Note that the speed regulation button does not need to be pressed for a long lime in the
work. After the work of the machine, the display window of the battery pack will display
the power, and the indicator light will gradually go out with the decrease of the power.
Until it is all out. The machine has stopped working and needs recharging.
Charging
The charging port of the machine is at the tail of the machine. Remains closed to vacuum
region round plug end insert the charging jack on the vaccum cleaner battery pack, when
when light into three blue lights all, don’t blink after said vacuum cleaner battery has been
charged, can pull out the power adapter plug, the vacuum cleaner can be used again.
power adapter is charged, it should be connected to the power supply line in time.
Battery indicator
Low power
Full power
Charging
Battery indicator
light
14

Accessories installing
How to Install Accessories
brush head, the department after the lock up, brush a head in place, you can use
The current lock up after, to take over the installed, you can use the link to brush
accessories like.
the front of the lock up local, to brush installed can use, according to the need to match
Machine cleaning
Cleaning the dust cup
Note
may not be killed, and will continue to breed. In order to avoid secondary pollution, the
components.
1. Turn of
2.
the dust cup countercloclwise with the other hand. After drawing the reference point,
pull out the dust cup outwards.
click click
15

Dust cup Reset
assembly, align the positioning shape of the
shape of the dust cup inlet, and then push the
the unit is placed in place.
B. Hold the host and press the disassembly dust
cup component in the opposite direction. Align
the reference point of unlocking dust cup on
the dust cup with the reference point of the
host
Dust cup
Filter Assemble
Filter
16

Air sponge
Air sponge cleaning
outlet cover plate clockwise with the other hand.
Pull out the cover plate outwards. Rinse out the cover plate and the sponge with water.
Dry before use.
Maintenance and storage
1. All daily maintenance and maintenance work mut be carried out after the vacuum
cleaner has turned off the power.
2. Frequently clean up the garbage in the dust bucket to avoid the failure of the vacuum
cleaner.
3. Vacuum cleaner surface cannot be swabbed with gasoline-like or oily appearance, apply
soft cloth or neuter dishwashing essence is swabbed, scrub cloth when swabbing must
4. Keep the storage area dry.
5. Heavy objects should not be piled above the machine.
Trouble shooting
When encountering the following general problems, users can conduct their own
investigation: Note: when the following problems are found, please turn off the switch
immediately to prevent damage to the machine and other hazards.
Return the outlet cover plate
After loading the air sponge into the air cover plate, grasp the machine with the left hand
and hold the air cover plate with the other hand. Parallel load the air cover plate inward to
the bottom and rotate the air cover plate in the opposite direction.
Air Sponge
Air cover
17
Reason
power o
did not switch the button
without battery pack
spare parts damage
dustbin is full or the vent is blocked
dustbin is full
battery is low
HEPA is broken
forgetting put back the HEPA
the adaptor unplugged
the adaptor did not connect the vacuum
the adaptor damaged
spare parts in vacuum cleaner damaged
Problem
could not turn on
Noise
the suction has reduced
dust come out
dur ing usi ng
could not recharge
Solutions
recharge
turn on the switch
put back the battery pack
change the vacuum cleaner
remove and clean the dustbin
remove and clean the fliter
recharge
turn o the machine and change the HEPA
stop using ,put back the HEPA
plug the adaptor
connect the adaptor
change the adaptor
change the vacuum cleaner
18

Warranty policy
This product is guaranteed for 2 years from the date of purchase. When you have a
the contact option to send us your assistance form.
without prior notice in order to provide improved equipment.
Simplified eu declaration of conformity
We, La Trastienda Digital located in Avenida Cervantes 49, módulo 25, Basauri 48970,
Bizkaia hereby declare that the following goods, imported and selling at European
market:
Are in compliance with the EC Council Directive of 2014/53/EU (EM DIRECTIVE) and
harmonized standards and with the board of the 16th of April 2014.
website address:
LA TRASTIENDA DIGITAL
BRAND MODEL NAME DESCRIPTION CATEGORY
PRIXTON THOR VACUUM CLEANER
HOME
19

FR
Présentation du produit
Ce produit utilise une batterie au lithium-ion pour l'alimentation.
Avertissement et précautions de sécurité
L'aspirateur Thor est un appareil électrique, il doit donc être utilisé dans des conditions
normales, il ne doit pas être utilisé sans surveillance.
1. L'aspirateur peut provoquer un incendie et blesser des personnes s'il aspire les objets
suivants :
a)Source de chaleur : Feu de charbon de bois, mégots de cigarettes
b)Gros fragment tranchant : morceau de verre brisé
e) Déchets de construction et ciment
2. Couper le courant lors du nettoyage, de l'entretien et lorsqu’il n’est pas utilisé.
chargeur, de s'assurer de sa cohérence.
4. Ne pas immerger le corps de l'appareil dans l'eau
5. Les enfants ne doivent pas jouer ou utiliser l'aspirateur au cas où un accident se
produirait.
6. Ne faites pas fonctionner l'aspirateur dans de telles circonstances :
a) Chute avec des dommages apparents ou hors service
b)Chargeur endommagé
7. Ne pas faire fonctionner pendant une longue période lorsque l'entrée d'aspiration a été
bloquée, au cas où le moteur serait endommagé ou l'appareil déformé.
Instructions spéciales:
ce produit n'est pas un jouet, les enfants doivent être surveillés pour s'assurer qu'ils ne
jouent pas avec cet aspirateur.
20
Table of contents
Languages:
Other PRIXTON Vacuum Cleaner manuals


