Pro Breeze PB-12 User manual

Instruction manual
Mode d'emploi
Bedienungsanleitung
Manuale di istruzioni
Manual de instrucciones
Cool / Warm Ultrasonic Humidifier 5.6L
MODEL PB-12

01 | English
Use the appliance only as described in this instruction manual.
Check that the voltage of the main circuit corresponds with the rating of the
appliance before operating.
This appliance is suitable for indoor use only.
This appliance is not a toy. Never leave unattended around children or pets.
This appliance can be used by children aged from eight years above and persons
with reduced physical, sensory or mental capabilities or lack of experience and
knowledge if they have been given supervision or instruction concerning use of
the appliance in a safe way and understand the hazards involved.
Children shall not play with the appliance.
Cleaning and user maintenance shall not be made by children without
supervision.
Keep the appliance and all parts out of the reach of children.
This appliance is intended for domestic use only. It should not be used for
commercial purposes.
Place the appliance on a flat and dry surface.
Always keep the appliance in an upright position to avoid leaks.
Always empty the water tank before storing the appliance. Ensure the appliance is
off and unplugged before emptying the water tank.
Always dispose of the water held in the appliances water tank. The water is not
drinkable.
When moving the appliance ensure it is kept in an upright position.
Ensure the power cord plug is properly inserted into the power socket before
operating.
Do not cover the power cord.
Do not place the appliance too close to other objects. A distance of 40cm from
other objects is recommended.
Do not operate the appliance with wet hands.
Do not touch or damage the ultrasonic oscillator.
Thank you for choosing to purchase a product from Pro Breeze. Please read the
entire manual carefully prior to first use and keep in a safe place for future reference.
-
-
-
-
-
-
-
-
-
-
-
-
-
-
-
-
-
-
-
Safety Warning
Cool / Warm
Ultrasonic Humidifier 5.6L

English | 02
Do not operate the appliance with an empty water tank.
Do not add water over 45℃ to the appliances water tank.
Do not place metals, chemicals, and/or detergents in the appliances water tank.
Do not leave the appliance unattended whilst connected to the power supply.
Do not pull the power cord to stop the appliance.
Do not unplug the appliance until it has been switched off.
Do not modify the appliance or use any accessories other than those supplied.
Do not place or use the appliance, power cord, or any accessories in a bathroom,
wet, or damp place.
Do not cover the appliance whilst in use.
Do not put essential oils directly into the appliances water tank.
Do not use pressurised containers (e.g. aerosol cans) or other flammable
substances near the appliance.
Do not use the appliance near petrol, flammable gases, ovens, or other heating
sources.
Do not attempt to repair or adjust any electrical or mechanical elements in the
appliance. Doing so may be unsafe and will void your warranty.
Do not operate the appliance if there are signs of damage to the appliance, power
cord, or any of the accessories.
Do not wipe or wash the appliance with chemical solvents. Prior to cleaning
ensure the appliance is turned off and unplugged from the power supply.
Avoid placing the power cord in areas where it can become a tripping hazard.
Avoid using extension cables as they may overheat and cause a fire risk.
If the power cord is damaged, it must be replaced by the manufacturer, its service
agent or a similarly qualified person in order to avoid a hazard.
Prior to cleaning or other maintenance, the appliance must be disconnected from
the power supply.
Unplug the appliance and store in a cool and dry place when not in use.
Never place anything on top of the appliance.
-
-
-
-
-
-
-
-
-
-
-
-
-
-
-
-
-
-
-
-
-

03 | English
Product Dimensions - 25.5 x 18.6 x 33cm
Net Weight - 2.55kg
Power Supply - 220V-240V~ 50/60Hz
Power - Cool Mist 25W / Warm Mist 115W
Noise Level - 42dB
Water Tank Size - 5.6L
Max Cool Mist Humidifying Capacity - 380ml/hr
Max Warm Mist Humidifying Capacity - 480ml/hr
Room Coverage - 70m²
-
-
-
-
-
-
-
-
-
Specifications
1.
2.
3.
4.
5.
6.
7.
8.
9.
10.
11.
12.
13.
14.
15.
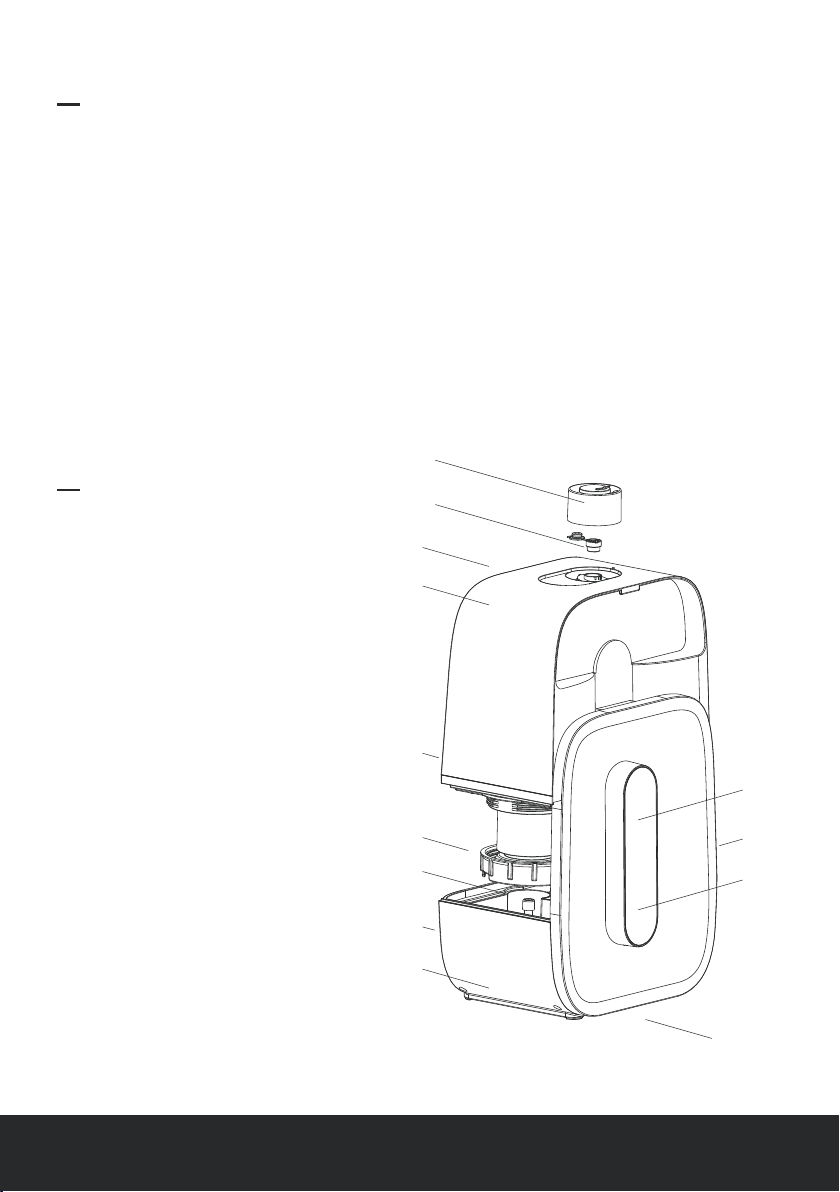
360° mist outlet
Aroma diffuser pod
Aroma diffuser pad
Water tank
Handle
Water tank cap with filter
Cleaning brush
Control panel
LED display
Humidifier base
Pre-filter
Power cord
Ultrasonic oscillator
Heating element
LED mood light
Parts 1.
2 & 3.
12.
10.
13 & 14. 8.
15.
9.
11.
4.
6.
7.
5.
English | 04
1.
2.
3.
4.
5.
6.
7.
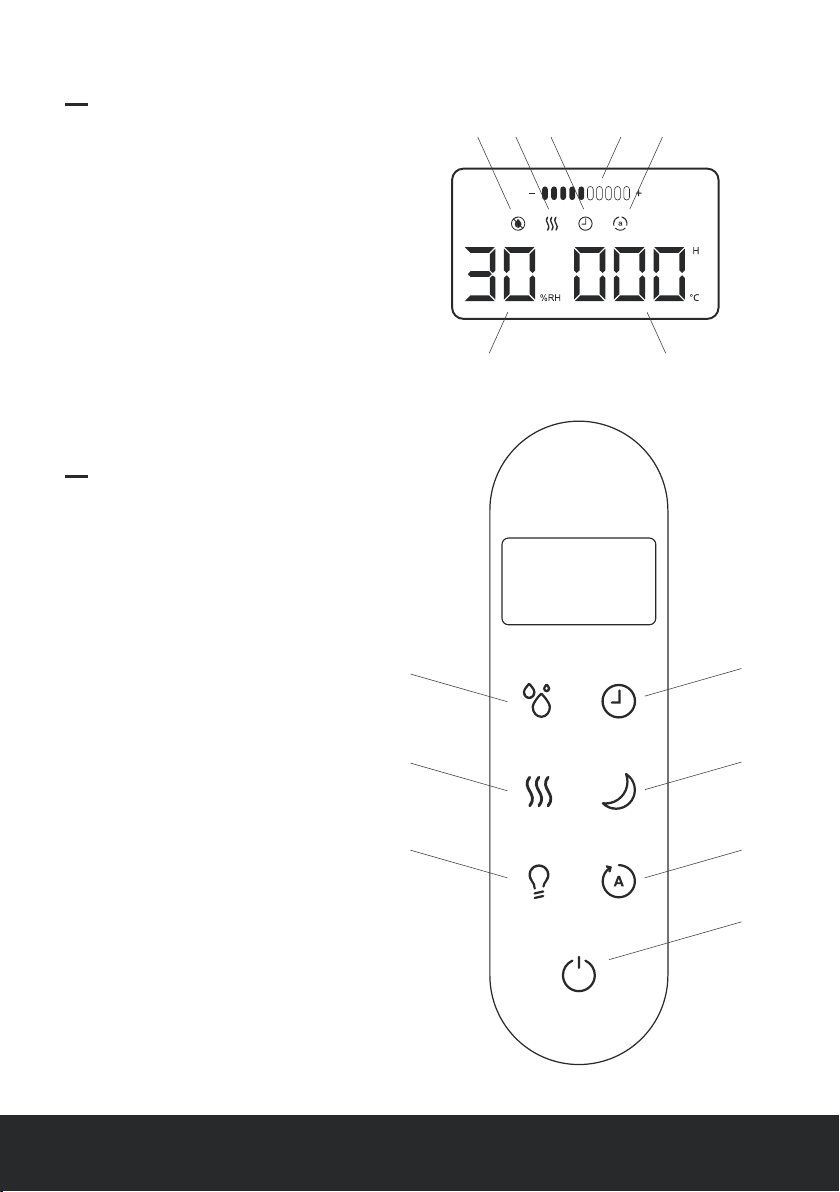
Mist output level indicator
Low water level indicator
Warm mist indicator
Timer indicator
Auto mode indicator
Room humidity indicator
Room temperature /
Timer hours indicator
Display Panel
1.
2.
3.
4.
5.
6.
7.
Mist level button
Timer button
Warm mist button
Night mode button
Mood light button
Auto mode button
Power button
Control Panel
2.1.
2.
6. 7.
3. 4. 1. 5.
3.
5.
4.
6.
7.

05 | English
Turn the appliance on and off.
Controls
Power Button
Select between low, medium, and high mist levels.
Mist Level Button
Turn the warm mist function on and off.
The appliance will take 15 minutes to warm up before producing warm mist.
Caution: The warm mist produced is (44℃). Do not place exposed skin over the 360°
mist outlet while using the warm mist function.
Warm Mist Button
Set a turn-off timer for 1 to 12 hours. Setting a turn-off timer:
The appliance will automatically turn off once the turn-off timer ends.
Timer Button
1.
2.
3.
4.
5.
6.
7.
Ensure the appliance is plugged in and the power socket turned on.
Press the power button to turn the appliance on.
Press the timer button repeatedly or press and hold to set the desired time (1 to 12
hours) until turn-off.
The time digits will stop blinking and the timer indicator will illuminate showing that a
turn-off timer has been set.
The LED display will switch between showing the room temperature and the number
of hours until turn-off.
Select the desired settings prior to turn-off.
To cancel the turn-off timer press the timer button repeatedly or press and hold until
the timer indicator shows “00” or turn the appliance off.

English | 06
Turn the night mode function on and off.
When in night mode the LED display and control panel backing lights are turned off and
only the night mode button is illuminated in low-level brightness.
Night Mode Button
Turn the appliances blue LED mood light on and off.
When the mood light is on the LED display and control panel backing lights are
illuminated in low-level brightness.
Mood Light Button
Set the desired humidity level at 45% RH, 55% RH, 60% RH, or 75% RH. Setting the
desired humidity level:
Auto Mode Button
Prior to operating the appliance, the water tank will need to be filled.
1.
2.
3.
4.
5.
6.
7.
Ensure the appliance is plugged in and the power socket turned on.
Press the power button to turn the appliance on.
Press the auto mode button repeatedly to set the desired humidity level between
45% RH and 75% RH.
The relative humidity digits will stop blinking and the room humidity indicator will
illuminate showing that the appliance is operating in auto mode.
The LED display will show the current room humidity.
Once the room humidity level reaches the set humidity level the mist output will
automatically stop. The mist output will start again once the room humidity level falls
below the set humidity level.
To turn auto mode off press the auto mode button repeatedly until the room humidity
indicator shows “- -” or turn the appliance off.
Getting Started

07 | English
To do so:
1.
2.
3.
4.
5.
Using the handle remove the water tank from the base of the appliance.
Turn the water tank upside down and unscrew the water tank cap. The water tank
cap forms part of the water filter which helps to eliminate contaminants in the water.
Fill the water tank with cold or room temperature water (for best results and to
prohibit and/or reduce build up of white dust (limescale) use distilled water). The
maximum capacity of the water tank is 5.6L.
Screw the water tank cap tightly back into position to prohibit leaking.
Using two hands replace the water tank on the base of the appliance. Be sure to
align the water tank with the base correctly so that it fits securely in place thereby
preventing leaking.
Once the water tank has been filled, to operate the appliance:
Note: When the humidifier is low on water a beep will sound and low water level indicator
light will illuminate on the LED display.
1.
2.
3.
4.
5.
Plug the power cord into a suitable power socket.
Press the power button to turn the appliance on.
After a few seconds mist will start to flow out of the mist outlet.
Choose the desired settings.
Adjust the 360° mist outlet by hand to direct the mist flow.
1.
2.
3.
4.
Remove the 360° mist outlet by lining up the two small arrows and lifting up.
Open the lid of the aroma diffuser pod and place two to three drops of your chosen
essential oil on the aroma diffuser pad.
Close the aroma diffuser pod and replace the 360° mist outlet locking it into position
by ensuring that the two arrows are not aligned.
Operate the appliance as normal but now with a scented mist.
The aroma diffuser pod allows you to use essential oils to generate a scented mist. To
use:
Essential Oils

English | 08
Note: The aroma diffuser pad should only be used for one essential oil. Prior to using a
different essential oil clean the aroma pad by lightly hand washing it in warm water and
then leaving to air dry. Spare aroma diffuser pads are included for your convenience.
Note: Do not throw the water filter cap away when replacing the filter.
Replacement filter model number: PB-12F
The ion-exchange resin filter is designed to remove impurities from the water and ensure
it stays clean for as long as possible. We recommend replacing your filter at least once
every three months or 700 hours of use.
To replace the filter:
This appliance requires regular cleaning to reduce the risk of bacteria growth and to
remove any limescale residue. We recommend cleaning the appliance once a week if
being used daily.
To clean the appliance:
Replacing The Filter
Cleaning
1.
2.
3.
4.
5.
Turn off the appliance and unplug it from the power socket.
Using the handle remove the water tank from the base of the appliance.
Turn the water tank upside down and unscrew the water tank cap.
Unscrew the filter from the water filter cap and replace with a new filter.
Screw the water tank cap tightly back into position to prohibit leaking.
1.
2.
3.
Turn off the appliance and unplug it from the power socket.
To clean the pre-filter, remove the pre-filter from the bottom of the appliance and tap
to remove any debris. Replace once clean.
To clean the water tank, using the handle remove the water tank from the base of the
appliance.

09 | English
4.
5.
6.
7.
8.
9.
10.
11.
Turn the water tank upside down and unscrew the water tank cap.
Unscrew the filter from the water filter cap and place to one side.
Fill the water tank with two tablespoons of distilled vinegar or bleach in 3L of water
and let it stand for 20 minutes.
Screw the water tank cap (without the filter attached) back tightly into position and
shake well for a few minutes.
Unscrew the water tank cap and screw the filter back into position. Drain and rinse
the water tank with clean water until the distilled vinegar or bleach smell has gone.
Then dry with a clean, soft cloth.
To clean the base, fill the base with water and two teaspoons of distilled vinegar or
bleach and soak for 20 minutes. Drain the base and rinse with clean water. Then dry
with a clean, soft cloth. Do not immerse the base in water.
Use the cleaning brush housed in the bottom of the water tank to gently clean the
ultrasonic oscillator of any white dust (limescale) or debris build up. Note: Use
distilled water to prohibit and/or reduce the build up of white dust (limescale).
Use a soft, dry cloth to clean away any dust, or debris from the exterior surface of the
appliance.
1.
2.
3.
Turn off the appliance and unplug the power cord.
Clean the appliance following the Cleaning instructions.
Cover the appliance and all parts with a waterproof covering and store in a safe, dry
place, out of the reach of children.
This appliance requires little maintenance. Do not try to fix it by yourself. Refer it to a
qualified service personnel if assistance is required.
Maintenance
For long-term storage:
Storage

English | 10
Troubleshooting
Problem Cause Solution
The appliance is not
plugged in.
Plug the appliance into a
suitable power socket.
The appliance is not
turned on.
Press the power button
to turn the appliance on.
The appliance is
making an unusual
and/or loud noise.
The water level is
too low.
Fill the water tank with
cold or room temperature
water (for best results use
distilled water).
The water tank is not
positioned correctly on
the base.
Realign the water tank
with the base so that it
fits securely.
No mist coming out of
mist outlet.
No water in the water tank. Fill the water tank with
cold or room temperature
water (for best results use
distilled water).
The water level is low.
White dust (limescale)
has appeared around the
appliance and inside.
The water being used
has high mineral
content.
Use distilled, purified, or
filtered water. Clean the
appliance on a regular
basis.
The appliance is leaking
water.
The silicone ring within
the water tank cap is
incorrectly positioned
and/or the water tank
cap is loose and needs
tightening.
Ensure the silicone ring
within the water tank
cap is correctly
positioned and/or
tighten the water tank
cap.
There is a pool of water
around the appliance.
Excess water has been
spilt when filling the water
tank or when placing the
water tank onto the base.
Use a dry, soft cloth to
absorb any excess water
when filling the water
tank and placing it onto
the base.
11 | English
Disposal
This marking indicates that this product should not be disposed of with
other household waste throughout the EU. This is to prevent possible harm
to the environment and human wellbeing. Contact your local authority for
information regarding the collection systems available. If possible, recycle it
responsibly to promote the sustainable reuse of resources.
The appliance is
making an unusual
and/or loud noise.
The appliance is
producing an
unusual smell.
Clean the appliance
following the Cleaning
instructions.
The appliance is not level. Place the appliance on a
level surface.
The appliance
is new.
The water tank has not
been cleaned.
The water in the
water tank is old.
Problem Cause Solution

English | 12

13 | Deutsch
Verwenden Sie das Gerät nur gemäß der Beschreibung in dieser Bedienungsanleitung.
Prüfen Sie vor der Inbetriebnahme, ob die Netzspannung mit der Spannung des
Gerätes übereinstimmt.
Dieses Gerät ist ausschließlich für die Verwendung im Haushalt bestimmt.
Das Gerät ist kein Spielzeug. Lassen Sie das Gerät niemals unbeaufsichtigt in der
Nähe von Kindern oder Haustieren stehen.
Das Gerät darf von Kindern ab acht Jahren und von Personen mit eingeschränkten
körperlichen, sensorischen bzw. geistigen Fähigkeiten oder mangelnder Erfahrung
bzw. Kenntnis nur dann verwendet werden, wenn diese beaufsichtigt werden bzw.
eine Einweisung in die sichere Nutzung des Gerätes erhalten haben und die damit
verbundenen Risiken kennen.
Kinder dürfen nicht mit diesem Gerät spielen.
Reinigung und Wartung darf nur durch Kinder erfolgen, wenn diese durch Erwachsene
entsprechend überwacht werden.
Bewahren Sie das Gerät und sämtliche Teile außerhalb der Reichweite von Kindern
auf.
Dieses Gerät ist ausschließlich für den privaten Gebrauch bestimmt. Es ist nicht für die
kommerzielle Nutzung gedacht.
Stellen Sie das Gerät auf einen ebenen, trockenen Untergrund.
Das Gerät stets in einer aufrechten Position aufbewahren, um ein Auslaufen zu
vermeiden.
Wassertank vor dem Verstauen des Geräts immer entleeren. Das Gerät vor dem
Entleeren des Wassertanks ausschalten und Stecker ziehen.
Entleeren Sie immer das im Wassertank des Gerätes befindliche Wasser. Das Wasser
ist nicht trinkbar.
Halten Sie das Gerät beim Transport aufrecht.
Vergewissern Sie sich vor der Inbetriebnahme, dass der Netzstecker ordnungsgemäß
in die Steckdose eingesteckt ist.
Netzkabel nicht abdecken.
Vielen Dank, dass Sie sich für ein Produkt von Pro Breeze entschieden haben. Bitte
lesen Sie die gesamte Anleitung vor dem ersten Gebrauch sorgfältig durch und
bewahren Sie sie zum späteren Nachschlagen an einem sicheren Ort auf.
-
-
-
-
-
-
-
-
-
-
-
-
-
-
-
-
Sicherheitshinweise
Kalt- & Warmdampf-
Ultraschall-Luftbefeuchter (5,6 l)

Deutsch | 14
Gerät nicht in unmittelbarer Nähe zu anderen Objekten aufstellen. Empfohlener
Abstand zu anderen Objekten: 40 cm.
Gerät nicht mit nassen Händen bedienen.
Ultraschall-Oszillator nicht berühren oder beschädigen.
Gerät nicht mit leerem Wassertank in Betrieb nehmen.
Die Temperatur des in den Geräte-Wassertank eingefüllten Wassers darf maximal 45°C
betragen.
Keine Metallgegenstände, Chemikalien und/oder Reinigungsmittel in den
Geräte-Wassertank geben.
Lassen Sie das Gerät nicht unbeaufsichtigt, während der Stecker in der Steckdose
steckt.
Nicht am Stromkabel ziehen, um das Gerät auszuschalten.
Schalten Sie das Gerät aus, bevor Sie den Stecker aus der Steckdose ziehen.
Gerät darf nicht modifiziert werden. Die Verwendung von Zubehör mit Ausnahme des
mitgelieferten ist untersagt.
Platzieren oder verwenden Sie das Gerät, das Netzkabel oder jegliches Zubehör nicht
in einem Badezimmer oder in einer anderen feuchten oder nassen Umgebung.
Gerät während des Betriebs nicht abdecken.
Füllen Sie keine ätherischen Öle direkt in den Wassertank des Geräts.
Verwenden Sie keine unter Druck stehenden Behälter (z.B. Sprühdosen) oder andere
brennbare Stoffe in der Nähe des Gerätes.
Verwenden Sie das Gerät nicht in der Nähe von Kraftstoffen, brennbaren Gasen, Öfen
oder anderen Wärmequellen.
Versuchen Sie nicht, elektrische oder mechanische Komponenten im Gerät zu
reparieren oder einzustellen. Dies ist gefährlich und führt zum Erlöschen der Garantie.
Nehmen Sie das Gerät nicht in Betrieb, wenn Anzeichen einer Beschädigung am
Gerät, am Netzkabel oder eines der Zubehörteile ersichtlich sind.
Gerät nicht mit chemischen Lösungsmitteln abwischen oder waschen. Das Gerät muss
vor der Reinigung ausgeschaltet und vom Stromnetz getrennt werden.
Verlegen Sie das Netzkabel nicht in Bereichen, in denen es eine Stolpergefahr
darstellen kann.
Verwenden Sie keine Verlängerungskabel, da diese überhitzen und einen Brand
auslösen können.
Falls das Stromkabel beschädigt ist, muss es vom Hersteller, seinem
Kundendienstmitarbeiter oder einer vergleichbar ausgebildeten Person ersetzt werden,
um Gefahren zu vermeiden.
Vor der Reinigung oder Wartung muss das Gerät vom Stromnetz getrennt werden.
Ziehen Sie den Netzstecker und lagern Sie das Gerät bei Nichtgebrauch an einem
kühlen und trockenen Ort.
Stellen Sie niemals etwas auf dem Gerät ab.
-
-
-
-
-
-
-
-
-
-
-
-
-
-
-
-
-
-
-
-
-
-
-
-
15 | Deutsch
Abmessungen: 25,5 cm x 18,6 cm x 33cm
Nettogewicht: 2,55kg
Netzstrom: 220 V–240 V~ 50/60Hz
Leistung: kühler Dampf – 25 W / warmer Dampf – 115 W
Geräuschpegel: 42dB
Fassungsvermögen des Wassertanks: 5,6 l
Max. Befeuchterleistung bei Kaltdampf: 380 ml/hr
Max. Befeuchterleistung bei Warmdampf: 480 ml/hr
Wirkbereich: 70 m²
-
-
-
-
-
-
-
-
-
Technische Daten
1.
2.
3.
4.
5.
6.
7.
8.
9.
10.
11.
12.
13.
14.
15.
360°-Dampfauslass
Aromadiffusor-Kapsel
Aromadiffusor-Kissen
Wassertank
Griff
Wassertankdeckel mit Filter
Reinigungspinsel
Bedienfeld
LED-Display
Luftbefeuchtersockel
Vorfilter
Netzkabel
Ultraschall-Oszillator
Heizelement
LED-Stimmungslicht
Teile 1.
2 & 3.
12.
10.
13 & 14. 8.
15.
9.
11.
4.
6.
7.
5.

Deutsch | 16
1.
2.
3.
4.
5.
6.
7.
Dampfmengen-Anzeige
Füllstandswarn-Anzeige
Warmdampf-Anzeige
Timer-Anzeige
Automatikmodus-Anzeige
Raumfeuchtigkeits-Anzeige
Raumtemperatur- /
Timer-Stunden-Anzeige
Display
1.
2.
3.
4.
5.
6.
7.
Dampfmengen-Taste
Timer-Taste
Warmdampf-Taste
Nachtmodus-Taste
Stimmungslicht-Taste
Automatikmodus-Taste
Ein-/Aus-Schalter
Bedienfeld
2.1.
2.
6. 7.
3. 4. 1. 5.
3.
5.
4.
6.
7.

17 | Deutsch
Zum Ein- und Ausschalten des Geräts.
Bedienelemente
Ein-/Aus-Schalter
Zur Auswahl einer geringen, mittleren oder großen Dampfmenge.
Dampfmengen-Taste
Zum Ein- & Ausschalten der Warmdampffunktion.
Das Gerät benötigt 15 Minuten zum Aufwärmen, bevor es warmen Dampf erzeugt.
Vorsicht: Der warme Dampf hat eine Temperatur von 44°C. Halten Sie keine nackte Haut
über den 360°-Dampfauslass, während die Warmdampffunktion aktiviert ist.
Warmdampf-Taste
Zum Einstellen einer Zeit zwischen 1 und 12 Stunden, nach der sich das Gerät
ausschaltet. Ausschaltzeit einstellen:
Das Gerät schaltet sich automatisch aus, sobald der Timer abgelaufen ist.
Timer-Taste
1.
2.
3.
4.
5.
6.
7.
Vergewissern Sie sich, dass das Gerät ans Stromnetz angeschlossen ist.
Drücken Sie den Ein-/Aus-Schalter, um das Gerät einzuschalten.
Drücken Sie die Timer-Taste mehrmals oder halten Sie die Taste gedrückt, um die
gewünschte Zeit (1 bis 12 Stunden) bis zum Ausschalten einzustellen.
Die Ziffern der Zeitangabe hören auf zu blinken und die Timer-Anzeige leuchtet auf
und signalisiert, dass eine Ausschaltzeit festgelegt wurde.
Das LED-Display wechselt kontinuierlich zwischen der Anzeige der Raumtemperatur
und den verbleibenden Stunden bis zum Ausschalten.
Wählen Sie vor dem Ausschalten die gewünschten Einstellungen.
Um den Timer zu deaktivieren, drücken Sie mehrmals die Timer-Taste oder halten Sie
diese gedrückt, bis auf der Timer-Anzeige “00” angezeigt wird, oder schalten Sie das
Gerät aus.

Deutsch | 18
Zum Ein- & Ausschalten des Nachtmodus.
Im Nachtmodus sind die LED-Anzeige und die Bedienfeld-Beleuchtung ausgeschaltet.
Nur die Nachtmodus-Taste leuchtet schwach.
Nachtmodus-Taste
Zum Ein- und Ausschalten des blauen LED-Stimmungslichts.
Bei eingeschaltetem Stimmungslicht leuchten das LED-Display und die
Bedienfeld-Beleuchtung schwach.
Stimmungslicht-Taste
Zum Festlegen der gewünschten Feuchtigkeit: 45% RH, 55% RH, 60% RH oder 75%
RH. Gewünschte Feuchtigkeit einstellen:
Automatikmodus-Taste
Vor Inbetriebnahme des Geräts muss der Wassertank gefüllt werden.
1.
2.
3.
4.
5.
6.
7.
Vergewissern Sie sich, dass das Gerät ans Stromnetz angeschlossen ist.
Drücken Sie den Ein-/Aus-Schalter, um das Gerät einzuschalten.
Drücken Sie mehrmals auf die Automatikmodus-Taste, um die gewünschte
Feuchtigkeit zwischen 45% RH und 75% RH in 5-%-Schritten einzustellen.
Die Ziffern für die relative Feuchtigkeit hören auf zu blinken und die
Raumfeuchtigkeits-Anzeige leuchtet auf und signalisiert, dass sich das Gerät im
Automatik-Modus befindet.
Das LED-Display zeigt die aktuelle Luftfeuchtigkeit im Raum an.
Wird im Raum die eingestellte Luftfeuchtigkeit erreicht, wird kein weiterer Dampf
erzeugt. Dampf wird erneut abgegeben, sobald die Luftfeuchtigkeit im Zimmer unter
den eingestellten Feuchtigkeitswert fällt.
Drücken Sie zum Ausschalten des Automatikmodus die Automatikmodus-Taste
mehrmals, bis die Raumfeuchtigkeits-Anzeige “- -” anzeigt, oder schalten Sie das
Gerät aus.
Erste Schritte

19 | Deutsch
Vorgehensweise:
1.
2.
3.
4.
5.
Heben Sie den Wassertank mithilfe des Griffs aus dem Gerätesockel.
Stellen Sie den Wassertank auf den Kopf und schrauben Sie den Wassertankdeckel
ab. Der Wassertankdeckel ist mit dem Wasserfilter verbunden. Dieser hilft,
Verunreinigungen aus dem Wasser zu beseitigen.
Füllen Sie kaltes oder lauwarmes Wasser in den Wassertank (Verwenden Sie
destilliertes Wasser, um Kalkablagerung zu vermeiden und/oder zu reduzieren). Das
maximale Fassungsvermögen des Wassertanks beträgt 5,6 l.
Schrauben Sie den Wassertankdeckel wieder fest, um ein Auslaufen zu vermeiden.
Stellen Sie den Wassertank mit zwei Händen zurück auf den Gerätesockel. Richten
Sie den Wassertank korrekt auf den Sockel aus, damit er ordnungsgemäß sitzt und
nicht ausläuft.
Inbetriebnahme des Geräts nach dem Befüllen des Wassertanks:
Hinweis: Bei geringem Wasserfüllstand des Befeuchters ertönt ein Piepton und die
Füllstandswarnlampe leuchtet auf dem LED-Display.
1.
2.
3.
4.
5.
Stecken Sie den Netzstecker in die Steckdose.
Drücken Sie den Ein-/Aus-Schalter, um das Gerät einzuschalten.
Nach einigen Sekunden strömt Dampf aus dem Dampfauslass.
Wählen Sie die gewünschten Einstellungen.
Stellen Sie den 360°-Dampfauslass von Hand ein, um den Dampf in eine bestimmte
Richtung zu lenken.
1.
2.
3.
4.
Ziehen Sie den 360°-Dampfauslass ab, indem Sie die beiden kleinen Pfeile
aufeinander ausrichten.
Öffnen Sie den Deckel der Aromadiffusor-Kapsel und geben Sie zwei bis drei Tropfen
des gewünschten ätherischen Öls auf das Aromadiffusor-Kissen.
Schließen Sie die Aromadiffusor-Kapsel und verriegeln Sie den 360°-Dampfauslass,
indem Sie darauf achten, dass die beiden Pfeile nicht aufeinander ausgerichtet sind.
Anschließend können Sie das Gerät wie gewohnt nutzen – jedoch ab sofort mit
Duftnebel.
Mithilfe der Aromadiffusor-Kapsel und ätherischen Öle können Sie einen Duftnebel
erzeugen. Vorgehensweise:
Ätherischer Öle
Other manuals for PB-12
1
Table of contents
Languages:
Other Pro Breeze Humidifier manuals


