Pro-dig Intelli-Tork User manual

Instruction Manual
Owners Manual
Safety Precautions
Manual number: PROITK
Release Date: September 3, 2019
Operating Instructions
Maintenance
Parts Lists
WIRELESS SCREW
PIER TORQUE
MONITORING SYSTEM
785.856.2661
WWW.PRO-DIG-USA.COM

WWW.PRO-DIG-USA.COM
MODEL NO: ___________________________
SERIAL NO: ___________________________
DATE OF PURCHASE:
__________________
785.856.2661
2
TABLE OF CONTENTS
Table of Contents/Introduction ................................................................................................2-3
Operation of PRO-DIG®Intelli-Tork Analyzer Rotor................................................................ 3- 7
Locating and Viewing Logged Files ..........................................................................................8-9
Torque Alarms and Changing WIFI Channels............................................................................ 10
Exporting Data Files.................................................................................................................. 11
Torque Rotor Calibration .......................................................................................................... 12
Installing the Torque Transducer.......................................................................................... 12-13
Battery Module.......................................................................................................................... 14
PRO-DIG® LLC
is document and any information contained therein are condential and the copyright of
PRO-DIG® LLC. Neither the whole, nor any part, may be disclosed, loaned, copied, or otherwise
disseminated for any purpose whatsoever without express written consent from PRO-DIG® LLC.
No liability is accepted for any loss, damage or injury from any cause whatsoever from the use of
this document.

WWW.PRO-DIG-USA.COM 785.856.2661 3
INTRODUCTION
e PRO-DIG®, Intelli-Tork is a revolutionary, fully wireless, non-contact torque transducer with fully
potted state-of-the-art electronics. e unit is extremely rugged and ideal for eld based applications.
e Intelli-Tork measures the torque and axial load applied between two anges and transmits the
readings to the smart device for visual display and data logging. is method of measuring the torque
applied is highly accurate (+/- 0.3%). e torque sensor is built into the housing of the Intelli-Tork.
e data is transmitted directly to a smart device that has the “Intelli-tork®” App downloaded. e
data is captured by the program and recorded as a text le (TXT). e text le can be viewed in the
app and emailed to anyone where peripheral soware such as Microso Excel for further custom
analysis can be done.
OPERATION OF THE INTELLI-TORK MONITORING SYSTEM
Powering On the PRO-DIG® Intelli-Tork Hub
LED Status:
1. Press the on/o button for at LEAST 2 SECONDS: a GREEN slow ashing light will appear
when powered on.
2. If the battery state is good, the GREEN light will stays slow ashing.
3. e battery has an approximate life of 1 week, depending on use.
Connecting the PRO-DIG® Intelli-Tork to the Intelli-tork App
1.0 COMPATIBILITY
An iPhone, iPad or Android with the operating system iOS 6.0 or later is required. The App is optimized for
iPhone.
2.0 DOWNLOADING THE INTELLI-TORK©APP FROM THE APPLE©APP STORE OR GOOGLE PLAY STORE
IPad users will need to navigate to the upper left corner of the screen and change the device to iPhone.
Then search for “Intelli-Tork”

WWW.PRO-DIG-USA.COM
4
3.0 SETTINGS PAGE
All settings for your PRO-DIG®Intelli-Tork©are accessable from within the App. Simply select the settings icon
from the bottom right.
On this page you can select preferences and make changes, as appropriate to your desired usage.
1) Torque units can be selected, options are ft.lbs or Nm.
2) Thrust units can be selected, options are lbf, N, t or kgf.
3) When using the logging feature, you can choose your desired logging interval. Options are,
a) Auto (approximately 100 samples per second)
b) On Depth Change (this option only creates a log entry when the depth is manually changed on the
App’s Monitor page
c) A sample taken every 1 second, 5 seconds, 10 seconds & 30 seconds
4) The Show Voltage option allows you to choose whether or not to show the Battery Voltage on the
Monitor page
5) Similarly, you can choose to show or hide the Angle here also
6) The default email address, which is the destination email address for all log files, can be entered on
this page by simply clicking in the space and typing an email address. A default email address is not
required, if one is not entered here then you’ll be prompted to enter an email address each time a log
file is emailed.
7) The Log All Raw Sensor Data option is a factory option used in fault finding. Under normal working
this should be left unselected
8) The Network Settings are shown for reference. Multicast enabled should normally be left selected as
non-multicast mode is for debug only.

WWW.PRO-DIG-USA.COM 785.856.2661 5
4.0 CONNECTION GUIDE
Once you have switched on your PRO-DIG®Intelli-Tork by pressing the on/off switch on the front of the
transmitter please wait 10 seconds for the transmitter configuration to take place.
You’ll notice a green flashing LED, which signifies that the transmitter is on, and also a flashing orange LED to sig-
nify that the transmitter configuration has taken place successfully.
It is then essential that the PRO-DIG®Intelli-Tork©is held vertically (within 5° or so) and that 3 full and slow
rotations are completed. This allows for self-calibration of the rotational count and RPM functions. This must
be done each time that the PRO-DIG®Intelli-Tork©is switched on.
To connect to the WiFi enabled PRO-DIG®Intelli-Tork© torque sensor please choose the wireless network, from your
device, which corresponds to the serial number of your Intelli-Tork©by accessing the list of wireless networks avail-
able in Settings. Please ensure that you are in close proximity to the PRO-DIG®Intelli-Tork©when you do this.
Your PRO-DIG®Intelli-Tork©wireless network name (SSID) will appear in the list of available wireless networks and
will be as per follows,
Pro-dig-Intell-XXXXXX

WWW.PRO-DIG-USA.COM
6
Connected Successfully Not Connected
If the App is connected successfully to the PRO-DIG®Intell-Tork©then Data will be displayed in the con-
nection information. Otherwise No Data will be shown, examples follow,
You can now close the settings page and open the PRO-DIG®Intelli-Tork©App which you will have
previously downloaded from the Apple App Store or Google Play Store.
WWW.PRO-DIG-USA.COM 785.856.2661 7
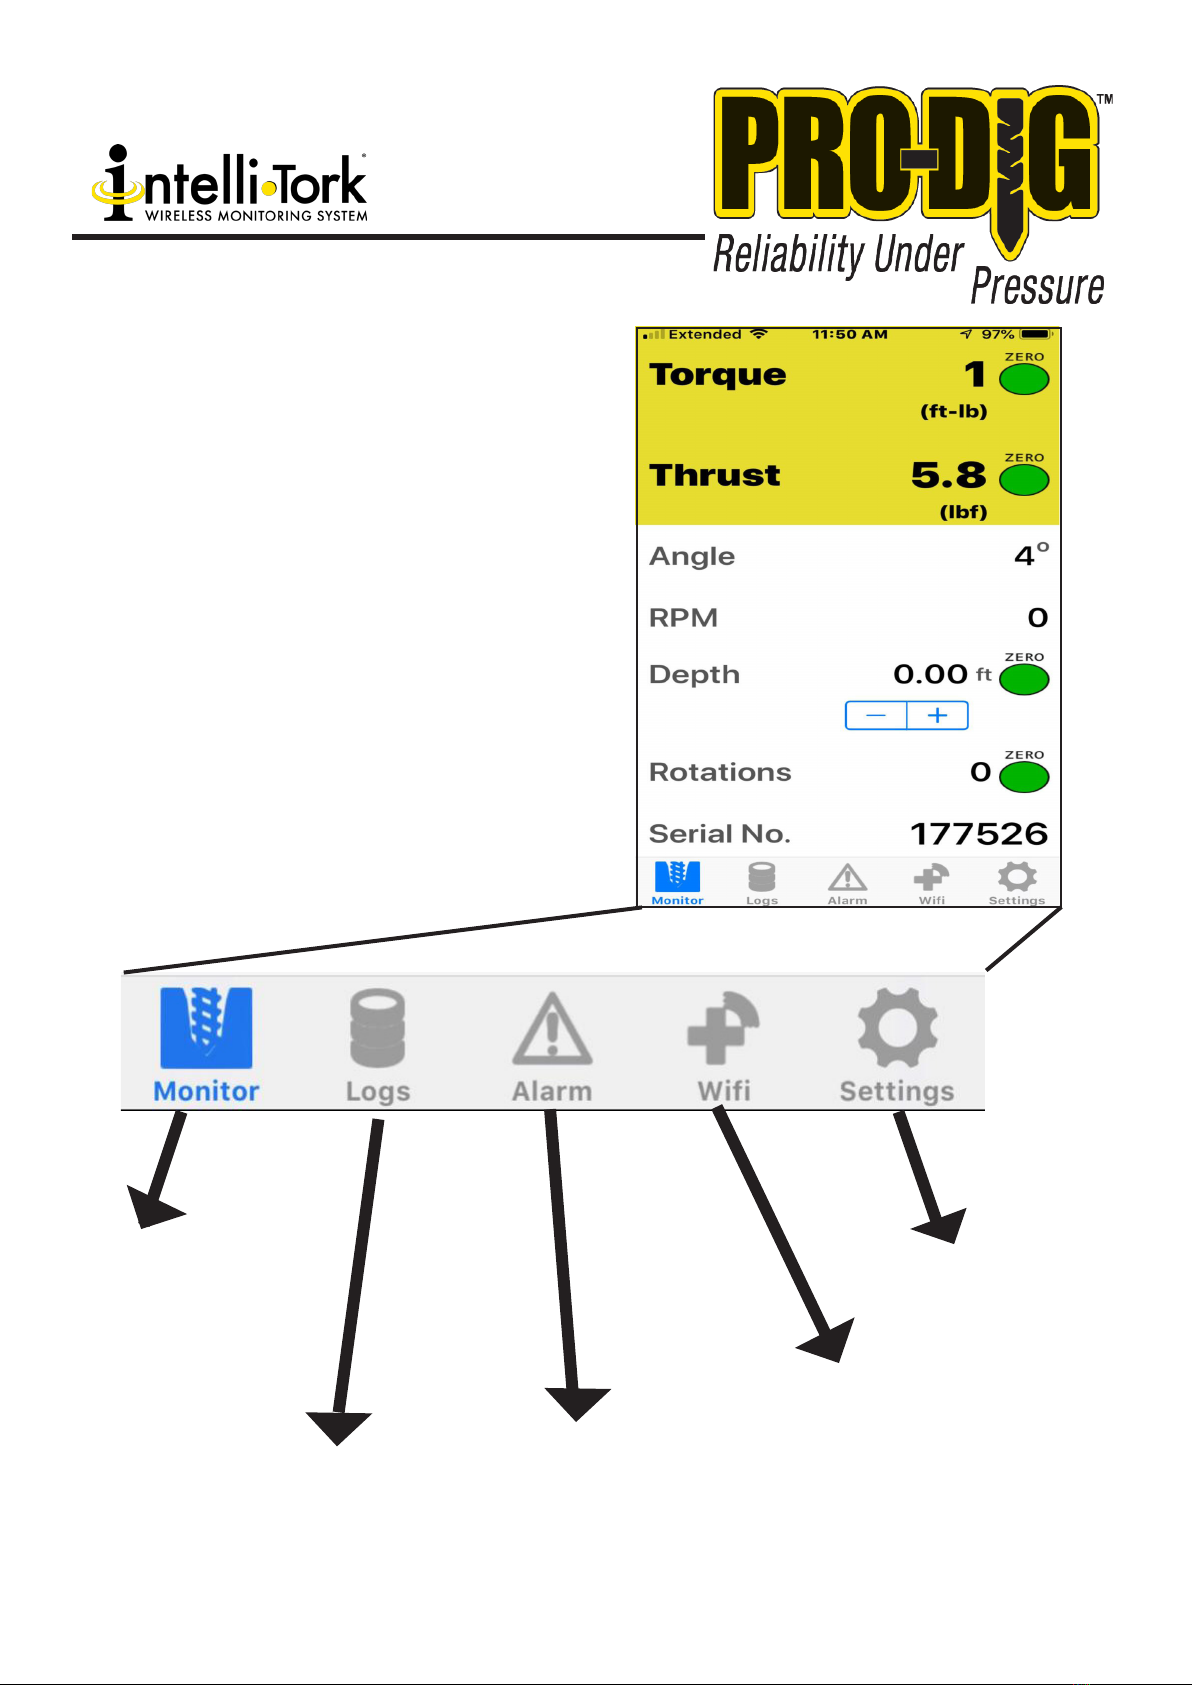
5.0 GENERAL OPERATION
The App has five pages and navigation
between pages is achieved by clicking on
one of the four icons shown at the bottom
of the screen, as below,
Settings: Here you can
change the Intellitork
settings,
WiFi: Here you can change
the WiFi channel, should
you experience loss of data
associated with a busy
WiFi channel.
ALARM: On this page you
can set an audible and visual
alarm to alert you to when
a specific torque value has
been reached.
LOGS: This is where you
can create log files and
then start, stop, view and
email log files.
MONITOR: this is the page
on which we imagine you will
spend the most time. It is
where all the parameters are
displayed. Connection status
is also displayed here.
785.856.2661
8
5.1 MONITOR PAGE IN THE APP
This is the page that you will use to monitor parameters during operation
of your equipment.
This page is essentially self-explanatory but there are a few things which
should be pointed out.
The Torque and thrust values can be zeroed by pressing the green
zero button but should only be done so when no load is on the
Intelli-Tork©drilling head. Incorrect torque and thrust vales can be
indicated if they are zeroed when the drilling head is under load. If
in doubt, take all load of the drill head and re-zero. You can do this
as many times as you wish.
The depth can be increased manually here, in increments of 0.5ft or 0.5m
dependent on whether you have ft.lbs or Nm selected for the units.
The number of rotations are displayed and can be zeroed from the Moni-
tor page.
The serial number of your Intelli-Tork©is displayed, as is the battery volt-
age, assuming that you have selected this option in the Settings page,
see above.
The Raw figure is referenced here and it is generally a factory parameter
used for reference.
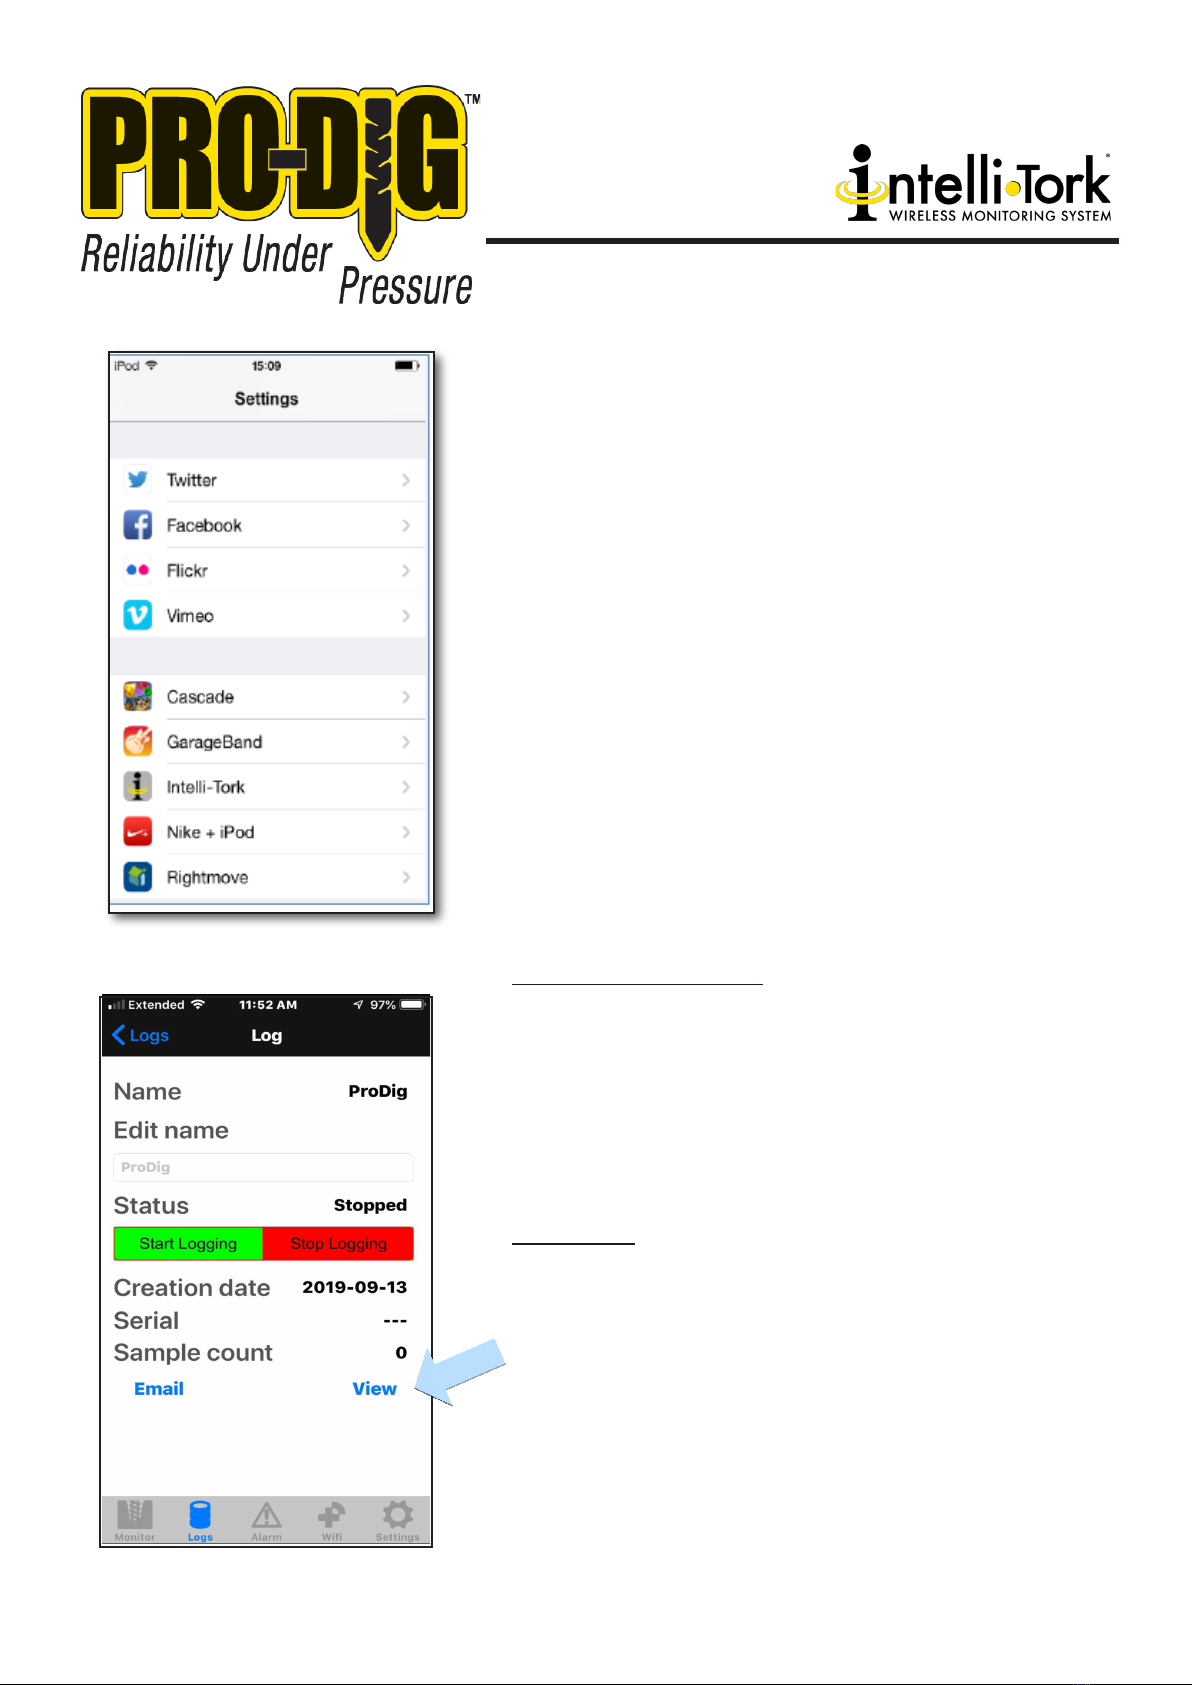
5.2 LOGS & LOGGING
5.2.1 Creating a new log file
Your Intelli-Tork©App deals with logging simply and easily. Once
you’ve selected the Logs page follow the instructions below to create
a new log,
1) Click in the dialogue box and enter the
desired name for your new log file, in the
example below we’ve used Pro-Dig and
click Add Log and the new log file will appear
in the list of available log files
5.2.2 Logging
To start and stop logging simply click on the desired log file and you’ll
be taken to the options associated with that log. Starting and stop-
ping the logging is done simply by using the Start Logging and Stop
Logging buttons.
The status of logging is shown as either Logging or Stopped.
A log can be stopped and re-started, as required, and the log file will
simply continue logging from where it was stopped.
Once you start logging you are then free to move around the other
screens in the app whilst logging takes place. The Monitor screen
should be displayed while drilling operations are taking place to
ensure safe operation. While logging data do not navigate
outside the app

WWW.PRO-DIG-USA.COM 9
5.2.3 Viewing and Emailing Log Files
Once you have finished logging you have the option to view the
log file before emailing it, should you require. To do this, simply
click on the View option, which is located at the bottom right
hand corner of the Log screen.
If you wish to email the log file then simply click on Email,
as above, and you’ll be prompted to review the email before
sending. If you have not entered a default email address in the
Settings page then you’ll need to enter one here in the To: box.
If you are not connected to the internet, through WiFi or 3G,
then a message may be shown advising you that the email will
be sent next time you connect to the internet, this is normal.
Once an address appears in the To: box your email is ready to
send by pressing the send button, at the top right hand of the
screen, and the email will be sent automatically next time you
have internet connection.
The email will contain a .csv
which will contain the log
data and can be opened in
Microsoft Excel©or most
other spreadsheet software
packages.

785.856.2661
10
5.3 ALARMS
Your PRO-DIG®Intelli-Tork©App allows a torque alarm to be set
to aid safe operation of your equipment. This alarm remains ac-
tive until the maximum torque alarm level is set to zero.
An audible and visual alarm is triggered when the measured
torque value exceeds the maximum torque alarm level.
To set the alarm simply go the alarm page and enter your de-
sired maximum torque alarm level and select Save Changes.
Your alarm is now set and will remain set allowing for multiple
operations.
To cancel the alarm simply enter ‘0’ as the maximum torque
alarm level.
During normal operation the actual measured torque value
should be monitored from the Monitor page. The alarm function
should not be relied on as the only source of information relating
to the measured torque.
5.4 CHANGING THE WIFI CHANNEL
Under certain circumstances you may experience a loss of data
when using a WiFi channel which is also used by other devices.
Should this occur, and if you wish to change the WiFi channel,
this can be done from the WiFi page. Simply click on the ‘+’ or
‘-‘ buttons to select the desired new channel. Click on Change
Channel to make the change.
If the WiFi channel has been changed successfully you will
receive a confirmation message informing you of such.
If the channel was unable to be changed then an error message
will be displayed.
Should you try and change the WiFi channel while not connected
to your PRO-DIG®Intelli-Tork©torque sensor then you will
receive an error, as below. Just press OK. You should not receive
this error message when connected to your PRO-DIG®Intelli-
Tork©.
WWW.PRO-DIG-USA.COM 11
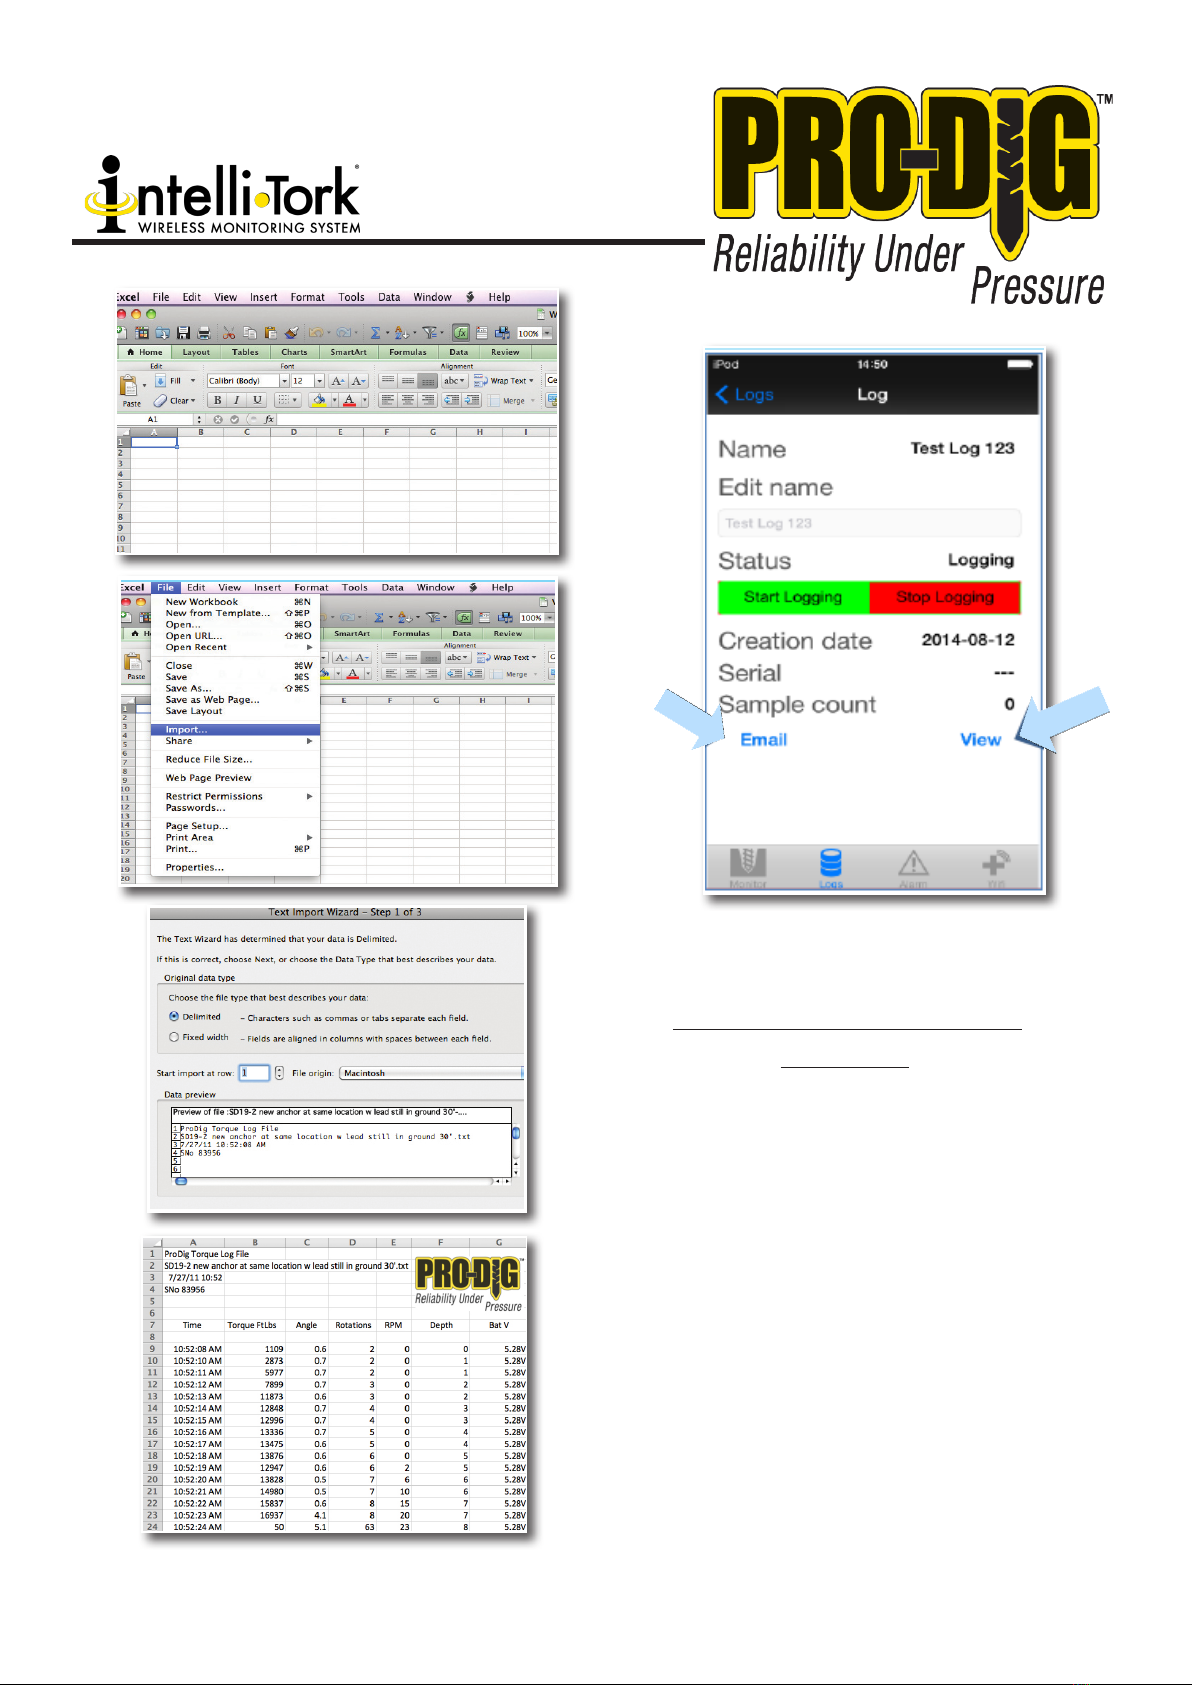
EXPORTING TO THIRD PARTY
SOFTWARE
1. Select the file you wish to download, and then
store it in a location on your computer.
2. Open the Microsoft Excel software on your PC,
and click on the “FILE” tab.
3. Click on the “Import” tab (highlighted in blue).
4.
Then select the file from your directory that you
saved. (4).
5. The “Text Import Wizard” will appear. Follow the
wizard instructions on how you wish the data to
appear.
6. After completing the text import wizard, your
data will display in your Microsoft Excel spread-
sheet. The displayed data can be manipulated
and graphed to suit your individual preferences.

785.856.2661
12
INSTALLING THE TORQUE HUB
1. The Intelli-Tork should be installed between the flange faces of the shaft adaptor and the pile drive tool. Please ensure
that the fastening bolts are rated to at least grade 8, and torque the bolts to the appropriate manufacturer’s guide-
lines. The total assembly is now ready to be attached to the drive motor.
a. Pile Drive Tool
b. Shaft Adaptor
c. Drive tool and Kelly Bar secured to the Torque Hub. Use the correct bolts and not screws
2. Attach the shaft adaptor to the shaft of the drive motor. Screw Piles can then be attached to the pile drive tool.
3. The unit is now ready to operate.
To power off the Intelli-Tork, hold down the power button for
2 seconds.
*There is an option to use our Handhled Nautiz device vs. using an apple or android device please call for information.
CALIBRATION
e Intelli-Tork has been precision-factory calibrated and tested. In order to maintain an accurate and
reliable reading, periodic calibration and certication is essential. THE INTELLI-TORK NEEDS TO BE
RETURNED TO OUR CALIBRATION DEPARTMENT AT LEAST ONCE A YEAR. (For further informa-
tion, please contact a member of our engineering dept.)

13
WWW.PRO-DIG-USA.COM

14

NOTES:
15

1604 ROSEPORT RD
ELWOOD, KS 66024
785.856.2661
WWW.PRO-DIG-USA.COM
PROUD MEMBER OF:
Table of contents
Other Pro-dig Measuring Instrument manuals


