Pro-dig Intelli-Tork H200 User manual
Instruction Manual
Owners Manual
Safety Precautions
Manual number: PROITK
Release Date: June 2021
Operating Instructions
Maintenance
Parts Lists
785.856.2661
WWW.PRO-DIG-USA.COM
WIRELES SCREW
PIER TORQUE
MONITORING SYSTEM
CLOUD BASED

WWW.PRO-DIG-USA.COM 785.856.2661
2.
TABLE OF CONTENTS
Table of Contents/Introduction ................................................................................................2-3
Operation of PRO-DIG®Intelli-Tork Analyzer Rotor................................................................ 3- 6
Locating and Viewing Logged Files ......................................................................................... 7- 8
Torque Alarms and Changing WIFI Channels............................................................................ 9
Exporting Data Files............................................................................................................. 10-11
PRO-DIG® LLC
is document and any information contained therein are condential and the copyright of
PRO-DIG® LLC. Neither the whole, nor any part, may be disclosed, loaned, copied, or otherwise
disseminated for any purpose whatsoever without express written consent from PRO-DIG® LLC.
No liability is accepted for any loss, damage or injury from any cause whatsoever from the use of
this document.
MODEL NO: ___________________________
SERIAL NO: ___________________________
DATE OF PURCHASE:
__________________

WWW.PRO-DIG-USA.COM 785.856.2661 3.
WARRANTY WILL BE VOID IF ANY COMPONENTS OR ACCESS COVERS ARE
REMOVED FROM THE INTELLITORK DEVICE.
INTRODUCTION INTELLI-TORK CLOUD USER MANUAL
(Note: e information provided within this document is applicable to all Intelli-Tork Cloud Systems.)
ere is no power button on the Intelli-Tork hub. Once the user disconnects from the hub,
it will enter sleep mode awaiting connection. Operators must ensure proper disconnection
from the hub to maintain maximum battery life.
e battery life of this system has been designed to exceed 10.5 month of usage running 10
hours a day, 5 days a week in -20° F. Battery replacement will occur automatically during your
yearly calibration.
Communication range for the Intelli-Tork System is 300’ line of sight. Note that obstructions
may diminish the communication range.
Intelli-Tork Hub Operating Temperature Range: -30° F to 130°F
e Intelli-Tork hub has been tested to 12’ submersion depth for 24 hours. At no time should
the hub be subjected to pressurized wash down. e hub should be cleaned with water and
mild detergent as required.

WWW.PRO-DIG-USA.COM
4.
DOS AND DON’TS
1. Ensure the USB cable is attached between the tablet and the black box mounted to
the back of the tablet prior to connecting the tablet to the Intelli-Tork device.
2. Verify that the Hub Serial No. matches the Serial No. stamped on the Intelli-Tork
in use.
3. Do not power o the tablet prior to disconnecting from the Intelli-Tork.
4. Always disconnect from the Intelli-Tork when nished. is is to be treated as a
power o procedure.
5. Do not carry or hang by the USB cable.
6. Do not remove the black box mounted to the back of the tablet.
7. Do not attempt to disassemble the Intelli-Tork unit in any way without communi
cation with supplier.
8. Ensure that the torque and thrust parameters are zeroed prior to connecting a
helical pile.
9. Backup data/sync to cloud dialy to prevent loss.
10. Ensure calibration is up to date prior to starting your job.
WWW.PRO-DIG-USA.COM 785.856.2661 5.
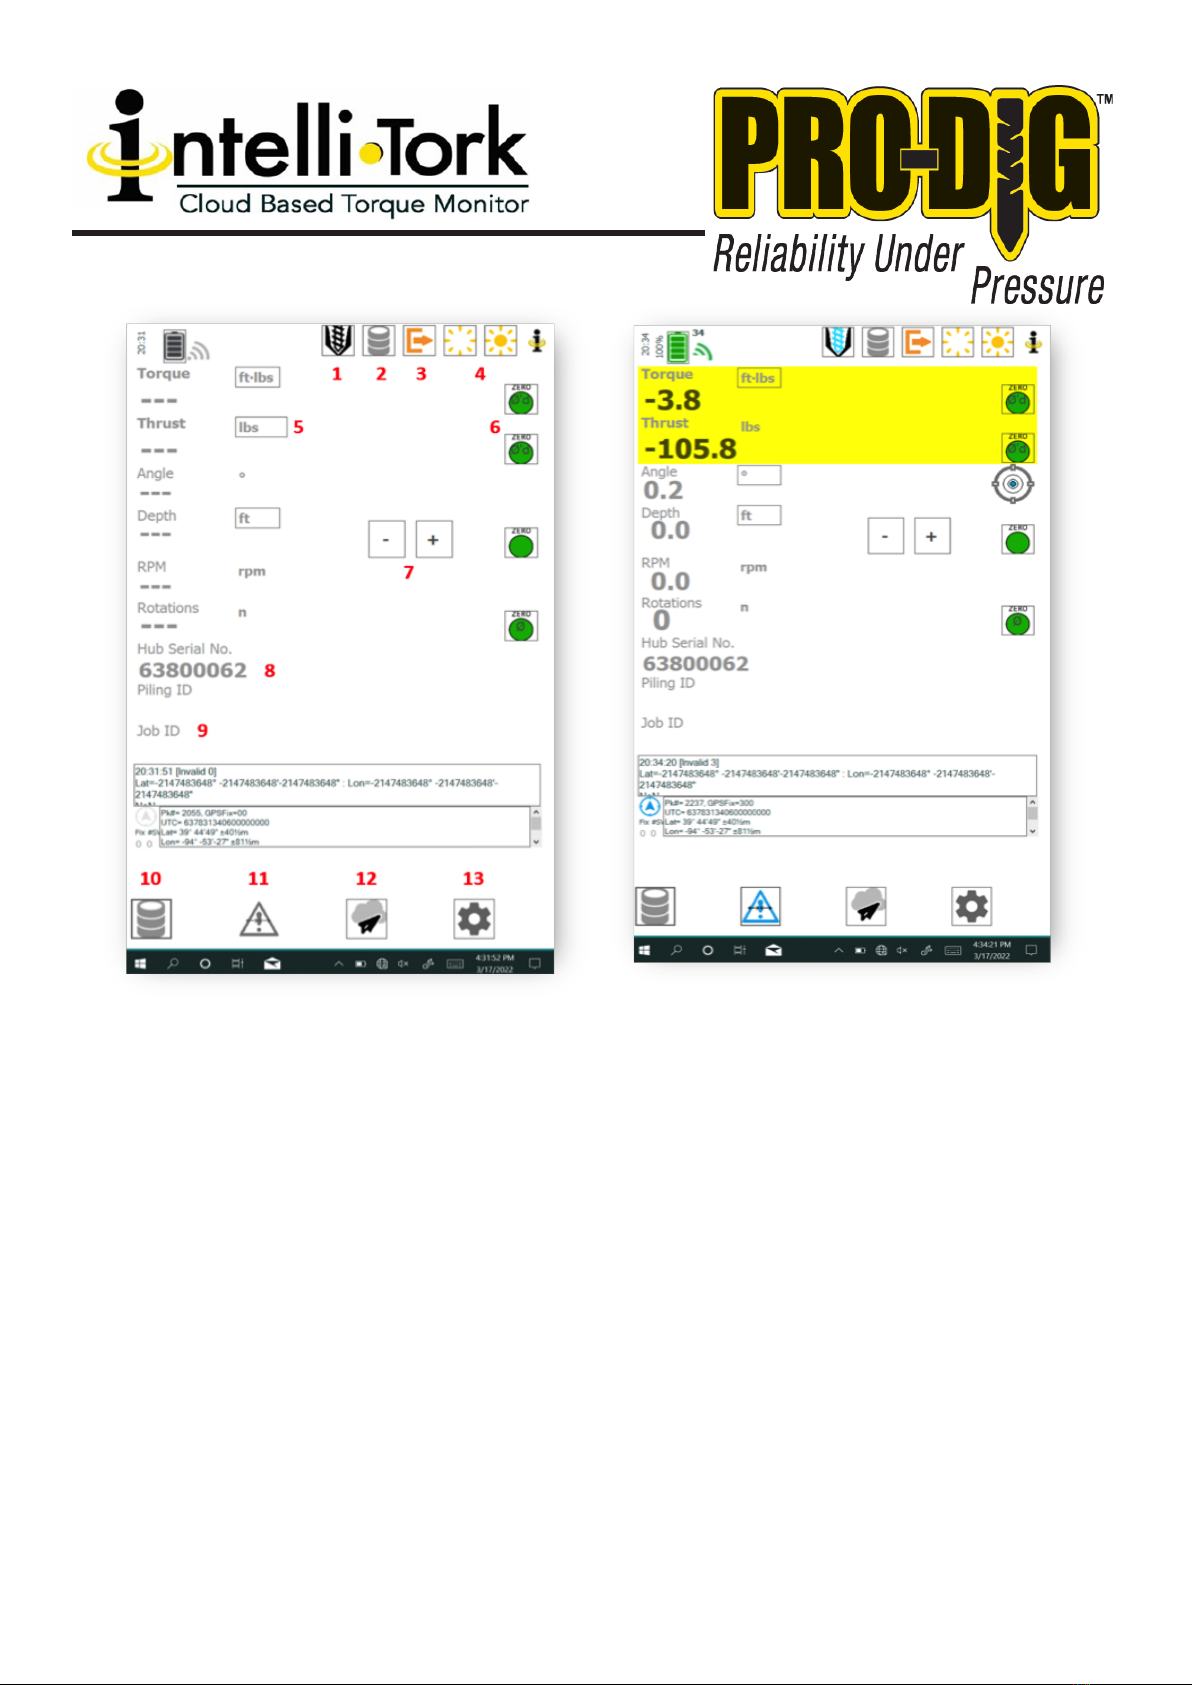
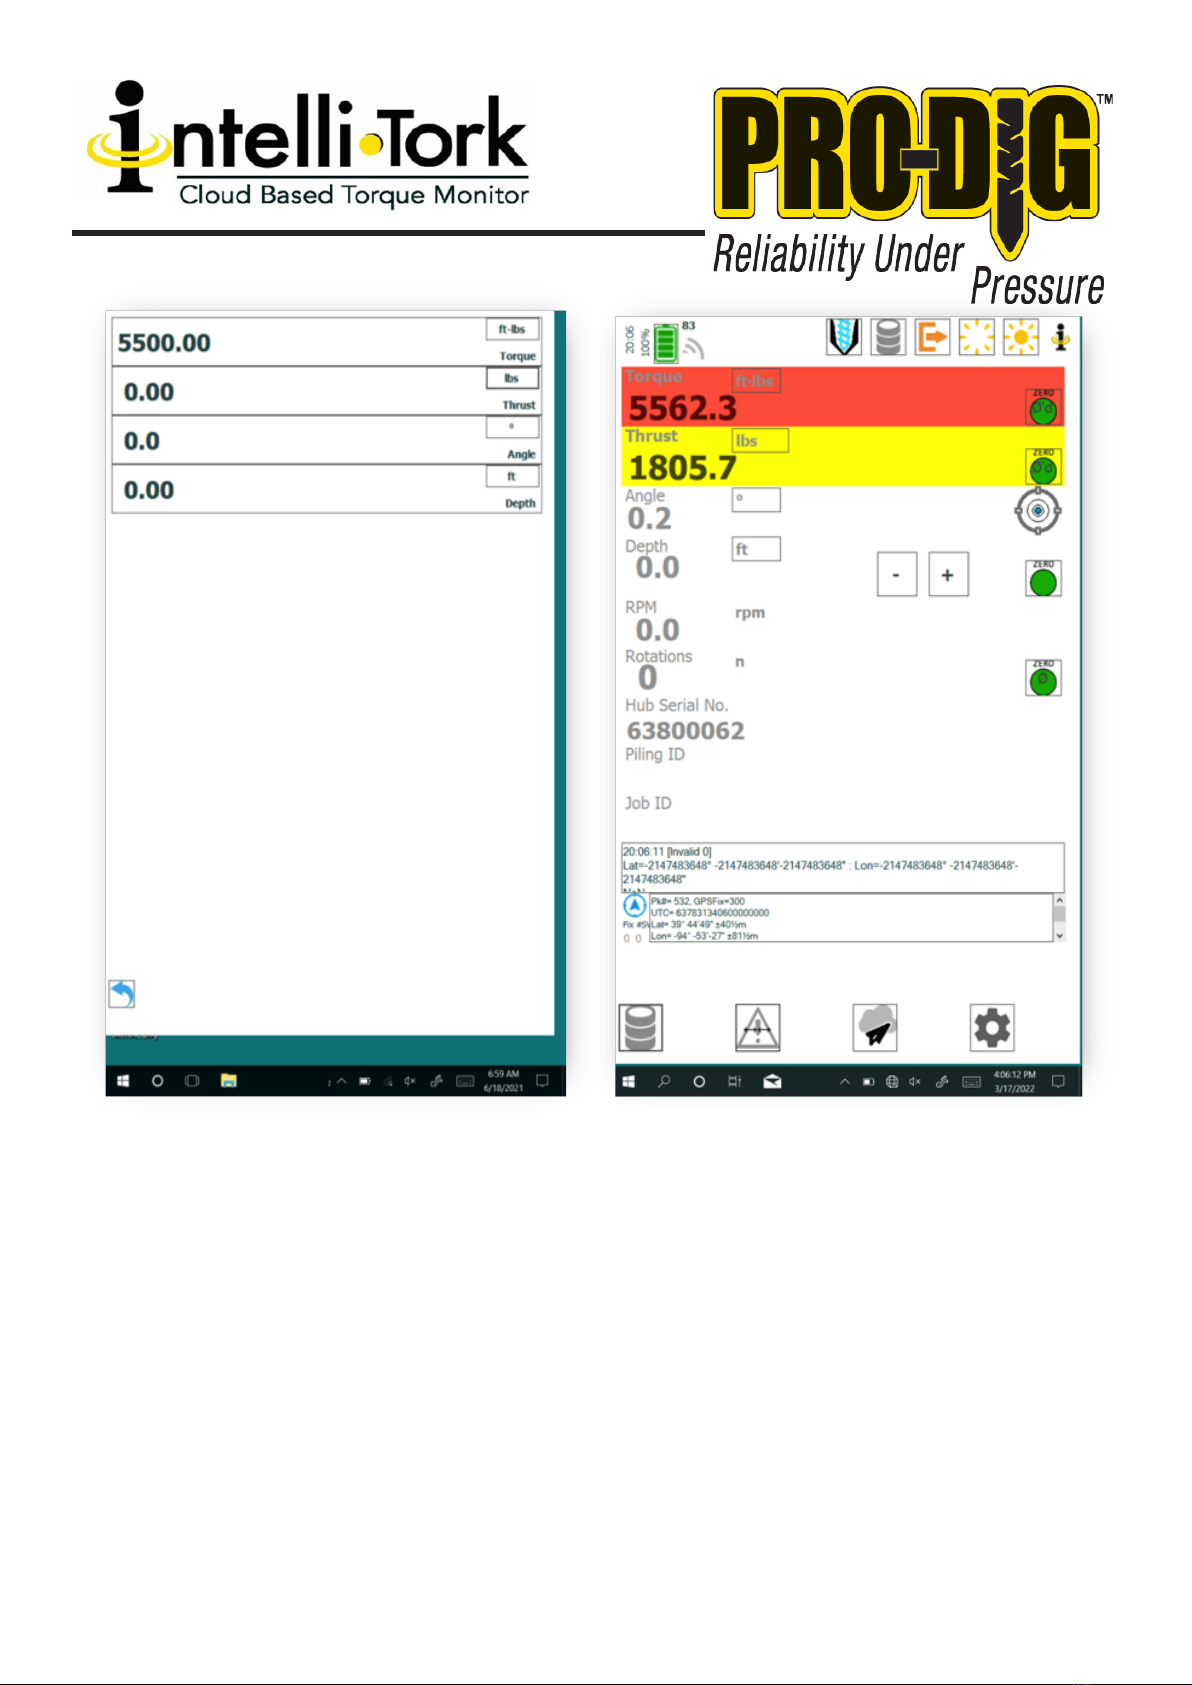
1. Press to connect and disconnect from the Intelli-Tork (ITK). e icon will turn blue once
connected and data will be displayed. Disconnect when the ITK is no longer in use. is is to be
treated as a power o procedure.
2. Pause and restart data logging. User must initiate the log from the log conguration screen to
enable this feature.
3. Exit application and turn o ITK remote.
4. Change screen brightness levels.
5. Change units (rust and Angle can be turned o)
6. Zero associated readings. (Torque and rust should be zeroed at the beginning of each pile
under no load).
7. Depth, manually increase/decrease depth as pile is driven.
8. Shows the hub serial number you are currently connected to or the last hub you were
communicating with.
9. Pile and Job number.
10. Press to setup Project and Pile Number. Icon will turn blue while logging, select logging icon at
the top of the display to start and stop logging. (Data will append to the le called out in item 9)
11. Set alarms.
12. Send all data to the Cloud for automatic processing. (Must be connected to WiFi)
13. Enter Settings.
WWW.PRO-DIG-USA.COM
6.
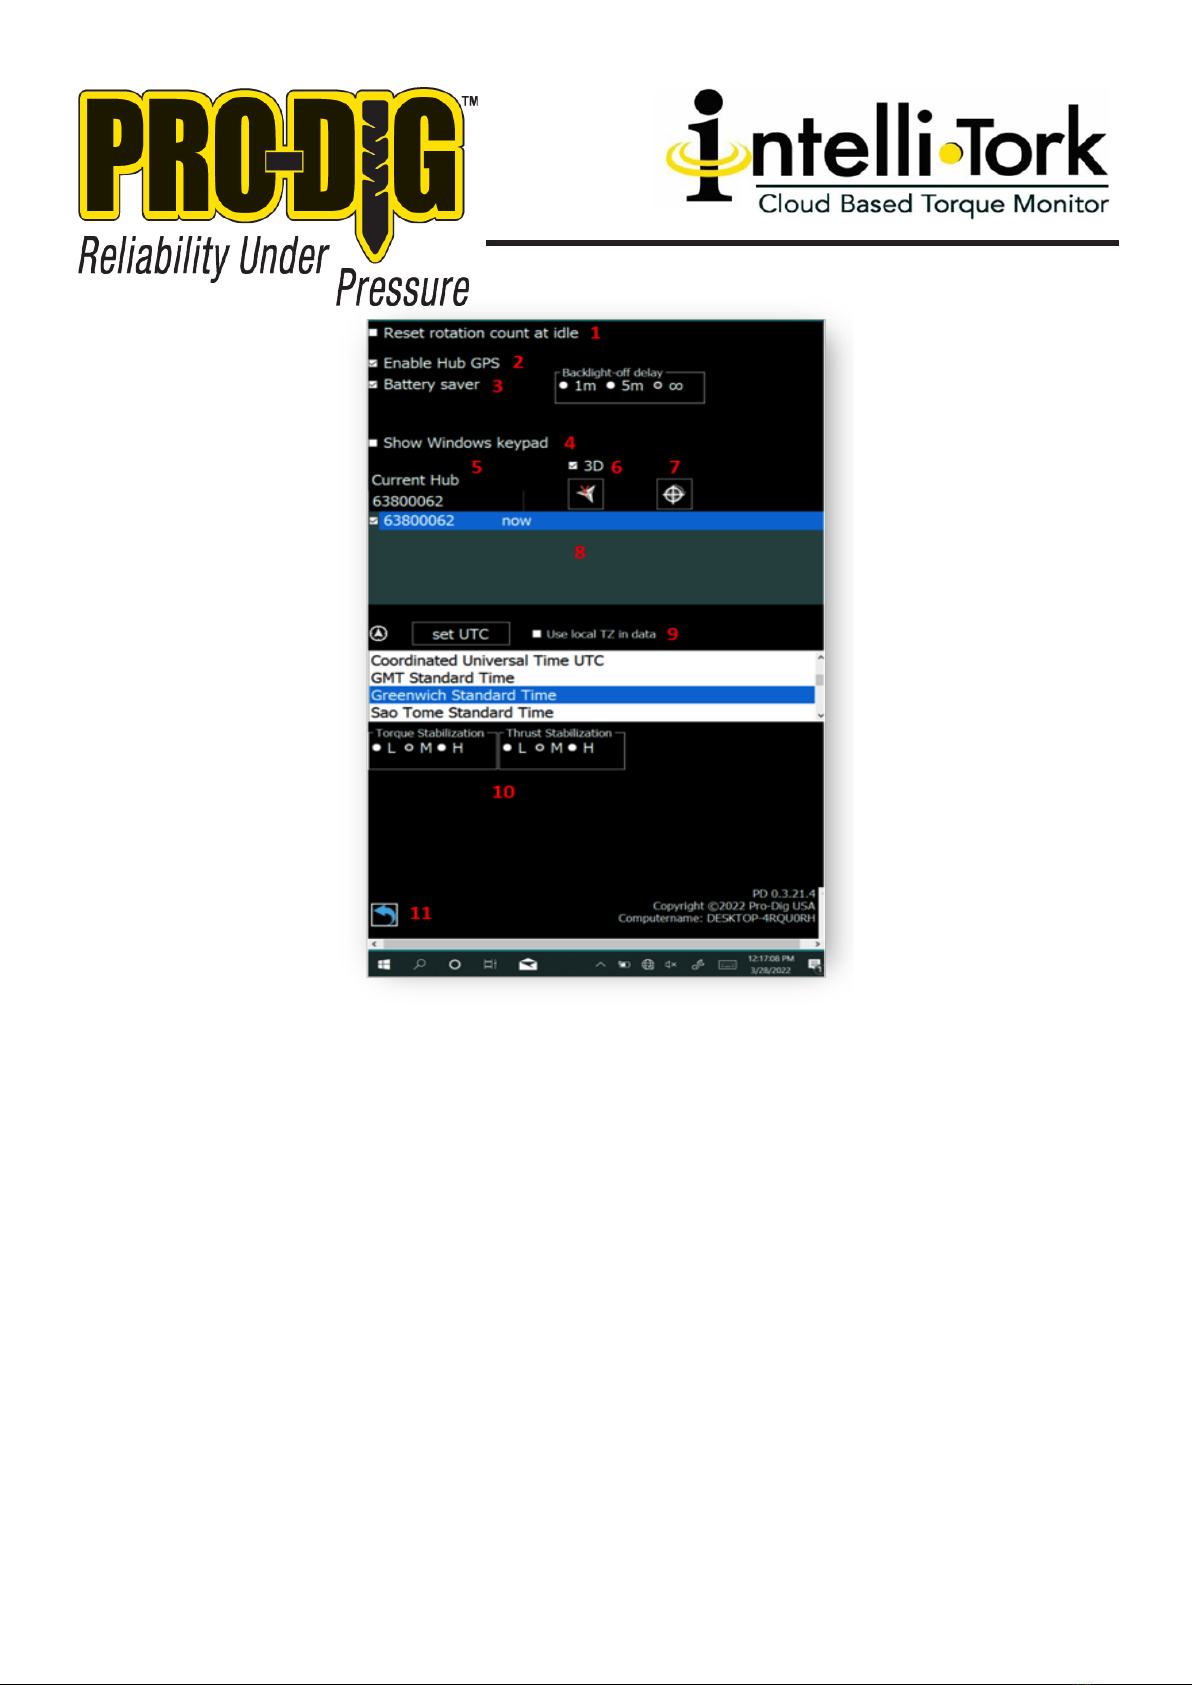
1. Check Box to reset rotation count when idle.
2. Check Box to enable the GPS functionality of the Intelli-Tork.
3. Check Box to help save the tablet battery. Select user prefered Backlight O Delay.
4. Check Box to display Windows key pad.
5. Current hub or last hub that the user has connected to is displayed in the eld. Select current
hub eld and enter serial number of the Intelli-Tork that is stamped into the rounded edge of
the ange. Return to the main menu and press the connect icon.
6. Check Box to set the vertical zero to 90 degrees. Press axis icon selecting X, Y, or Z to monitor
the installation angle relative to the choosen axis.
7. Gyro calibration button. Tap once to begin a calibration for the RPM, rotations and angle
parameters. Ensure the unit is level and stationary prior to calibration. Wait 10 seconds for
the calibration to complete.
8. Displays the serial number of Intelli-Torks that the tablet has recently been paired with.
9. When the user selects the Set UTC icon the GPS obtains global positioning information rela-
tive to your location. Once the connection is established select Look up TZ to capture the
correct time stamp for the log les. A clear view of the sky is required for GPS lock. Check
the “Use local TZ in data” box to display the selected time zone in data logs.
10. Torque and rust Stabilization can be independantly set to Low, Medium, or High. is will
eectively smooth out the displayed values as seen from the main menu.
11. Return to Main Menu.

WWW.PRO-DIG-USA.COM 785.856.2661 7.
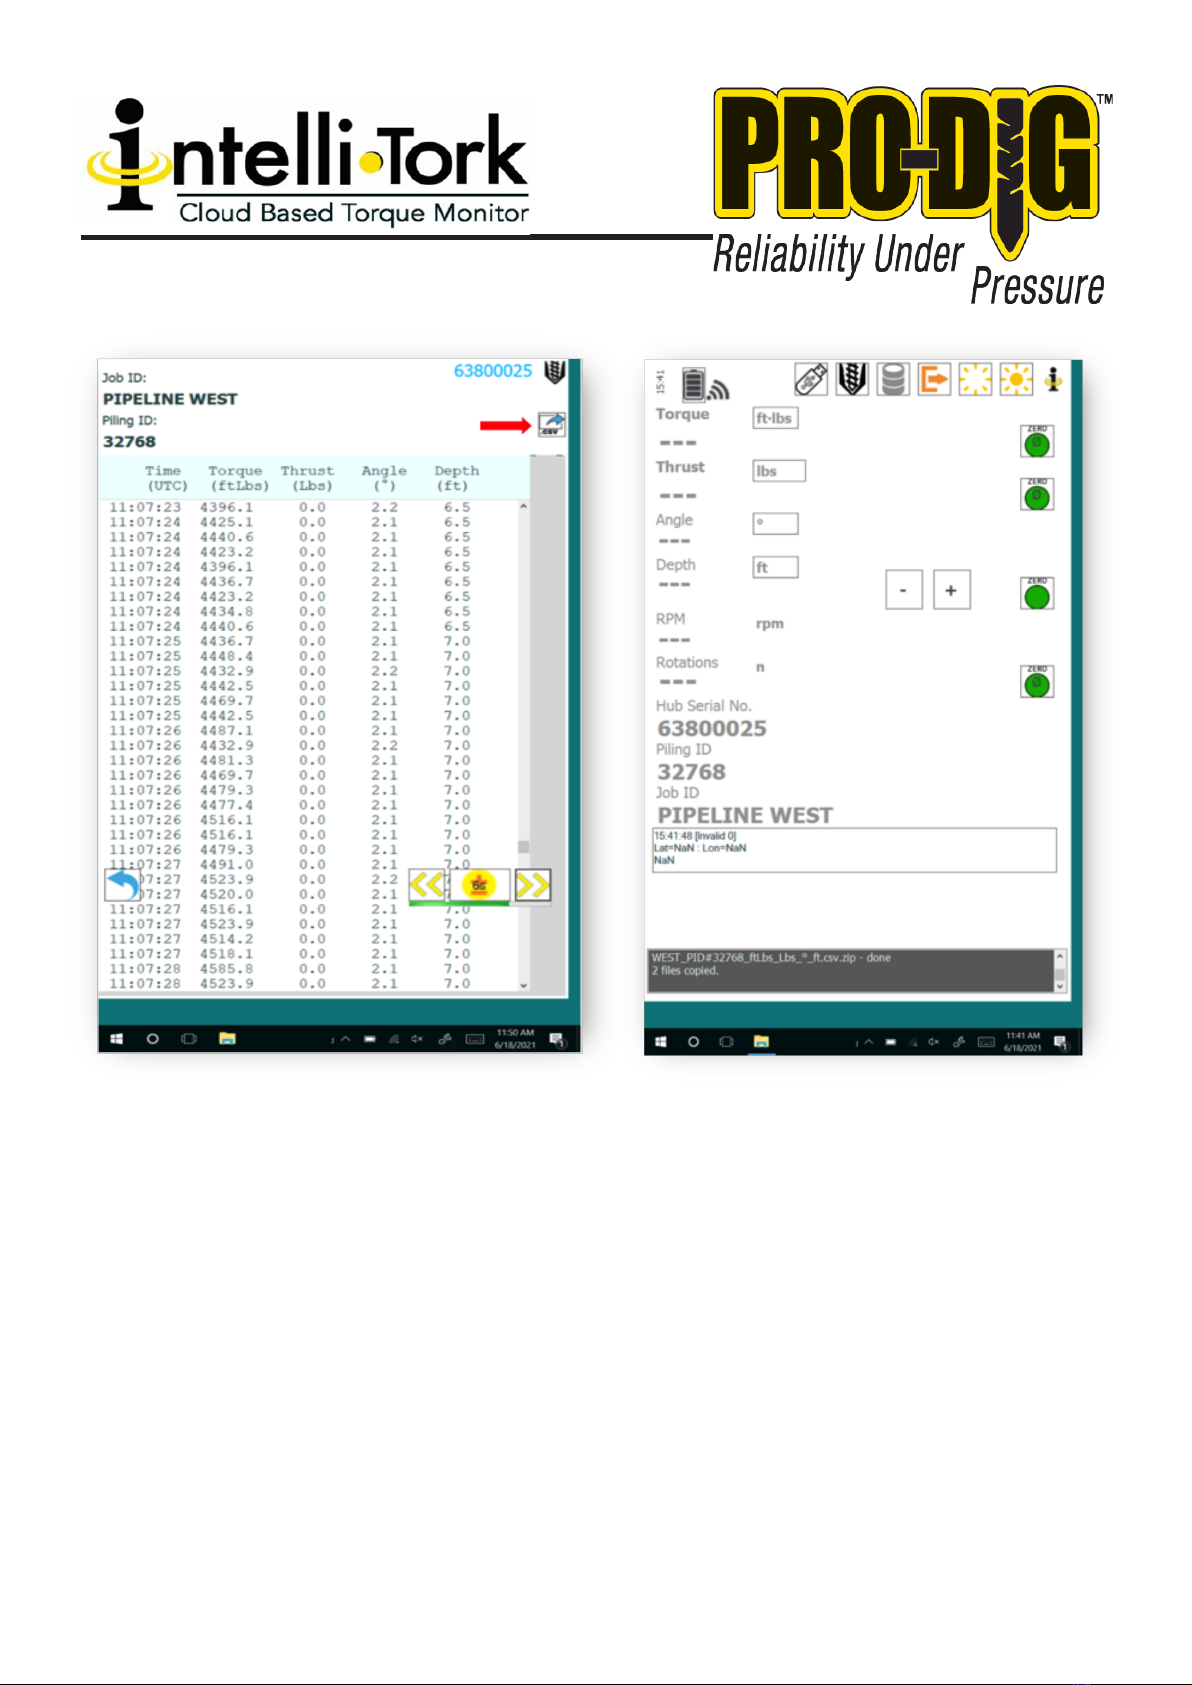
1. Start new log le.
2. Each row displayed is a log le.
3. View Data for that specic log le. Press the View icon to view the associate log le.
Secting the arrows in the lower right of the individual pile log screen allows the
user to advance through the log le. Pressing the center button allow the user to
advance through the log le in 1 & 6 second, 1 minute, and 10-minute intervals.
4. Refresh List. is displays all logs that are currently stored on the tablet.
5. Clean up log le list. Removes existing logs from the log list. e log les remain
saved on the tablet.
6. Return to the Main Menu.
WWW.PRO-DIG-USA.COM
8.
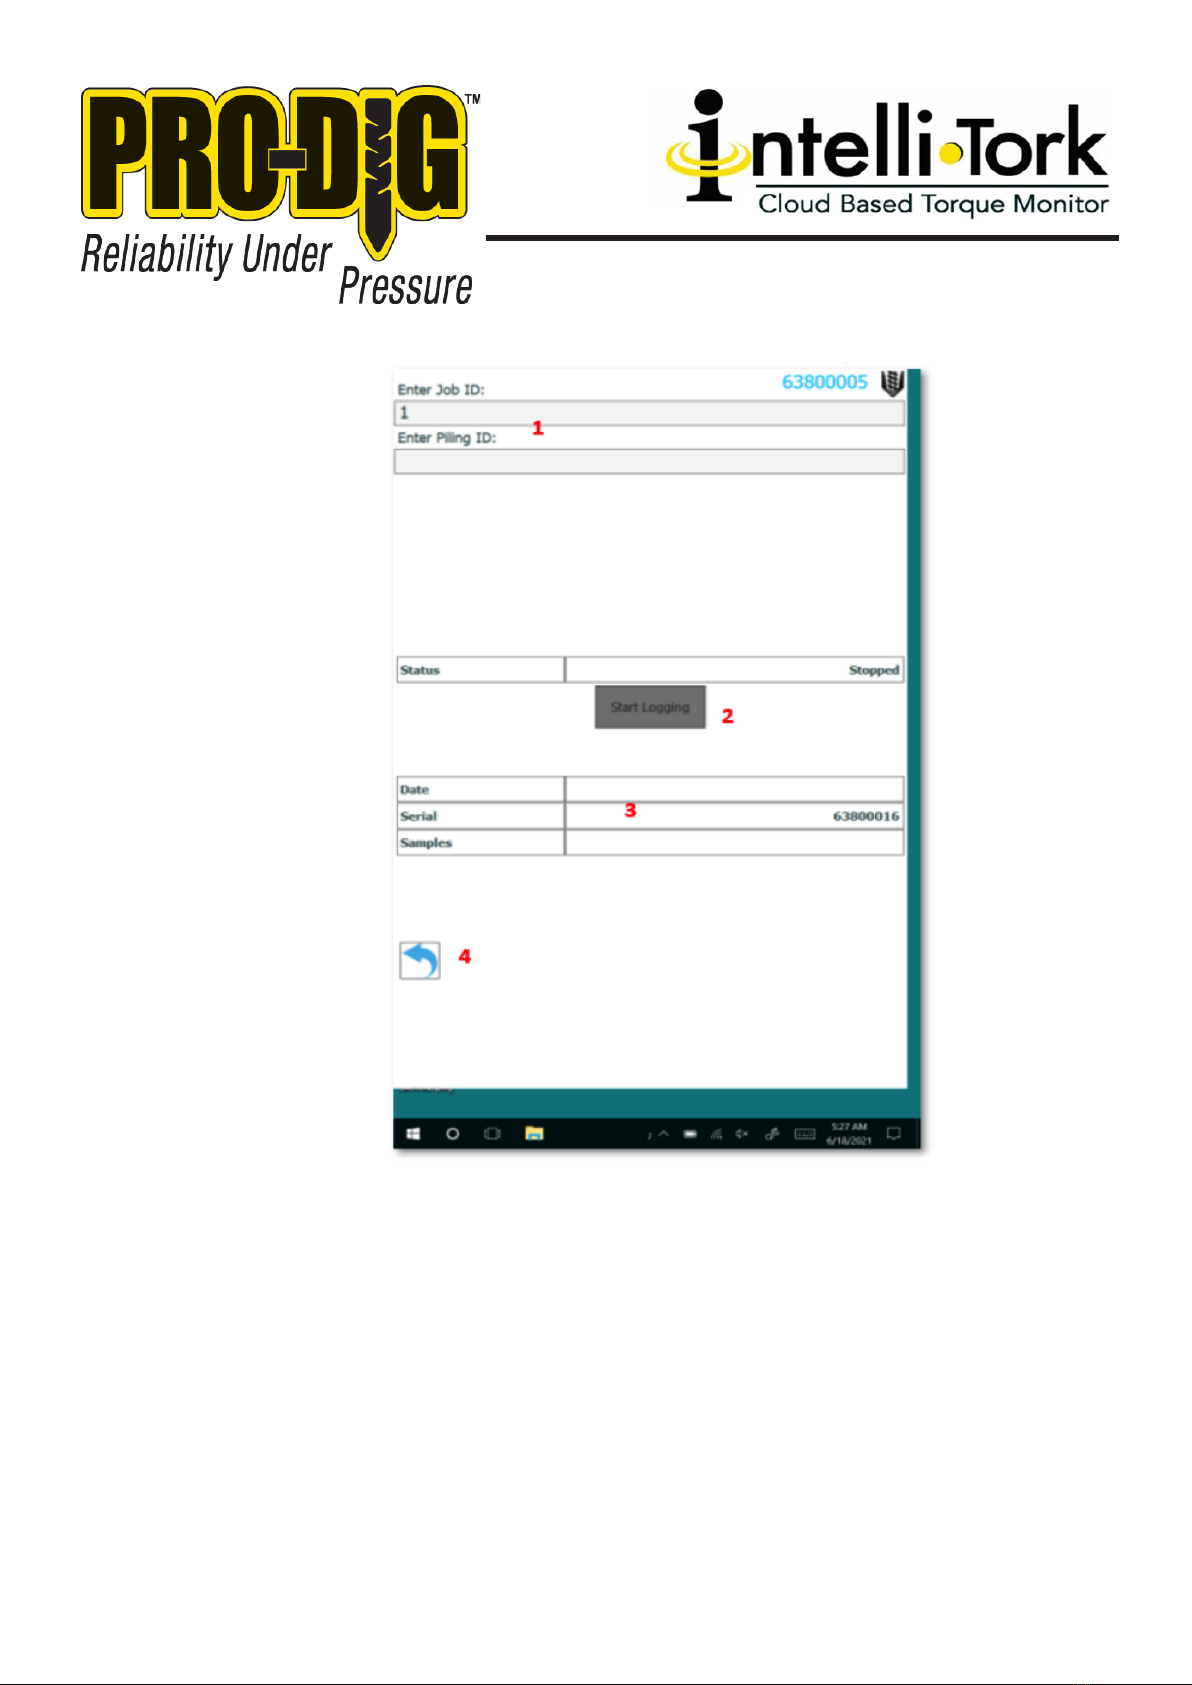
1. Enter new Job ID and Pile ID. e current Job ID will remain in the Job ID eld
until modied.
2. Start Logging Data. (Aer selecting, return to main menu)
3. Log File Information.
4. Return to Main Menu.
WWW.PRO-DIG-USA.COM 785.856.2661 9.
is page allows the user to set alarms and target values in the units displayed on the right.
For Cloud based reporting, targets must be set to report Torque and Depth. Once the Alarm
value is reached the associated value’s background will turn Red while the alarm value is
exceeded, as shown in the gure on the right

10. WWW.PRO-DIG-USA.COM
Press “Sync to Cloud” to upload all pile logs to the Cloud for data processing and storage. is
function requires the use of a Hotspot of other wireless connection to the Internet.
Intelli-Tork Cloud Subscription is required to utilize this feature. Alternatively, the user may
download the log les to a USB or Micro SD in a .cvs le format for data processing using MS
Excel. If the user is downloading log les to a memory device WinZip is required for
extraction of zipped les once download to a PC.
785.856.2661
WWW.PRO-DIG-USA.COM 11.
Prior to downloading the log les to a memory device, each individual le log must be
exported to .csv. To export a log le to .csv, start by navigating to the list of logs. On the log
le that you want exported, select the eyeball icon on the far-right side. From this menu,
select view. You will now see a data preview of that individual log. In the upper right corner
of this menu, select the button labeled “.csv”. is will generate the .csv le to later be down-
loaded.
To download the exported log les, the user must insert a USB drive or Micro SD card into
the tablet. Once the memory device is installed, a USB icon will be displayed in the top
center of the Main Menu screen. Press the USB icon to download all log les to the memo-
ry device for later viewing and processing.

12. WWW.PRO-DIG-USA.COM

785.856.2661
WWW.PRO-DIG-USA.COM 13.
NOTES:

14. WWW.PRO-DIG-USA.COM
NOTES:

785.856.2661 15.
WWW.PRO-DIG-USA.COM
NOTES:

1604 ROSEPORT RD
ELWOOD, KS 66024
785.856.2661
WWW.PRO-DIG-USA.COM
PROUD MEMBER OF:
This manual suits for next models
5
Table of contents
Other Pro-dig Measuring Instrument manuals

Popular Measuring Instrument manuals by other brands

IN-COMMAND
IN-COMMAND NCSP3 Installation and operation manual

MYIRO
MYIRO MYIRO-1 instruction manual

Lovibond
Lovibond SensoDirect pH200 operating instructions

VoiceCollect
VoiceCollect IR44CF-II user manual

Microplan
Microplan ARCHIMEDE HR user manual

AEA Technology, Inc.
AEA Technology, Inc. Bravo MRI II operating manual


