Pro-Line Boats PRO 86 MIX EURO User manual

PRO 86 MIX EURO
www.pro-intell.com English
User manual
Banknote counter with verification and recognition
of EURO banknotes’ denomination
Gebrauchsanweisung
Banknotenzählmaschine mit der Überprüfung und
Erkennung des Nominalwertes einer EURO Banknote
Deutsch

2
English
Contents
1 Functions ...................................................................................................................4
2 Appearance ................................................................................................................4
3 Specifications..............................................................................................................5
4 Safety precautions and maintenance rules ................................................................5
5 Control panel operation ..............................................................................................6
6 Preparation ................................................................................................................7
7 Selection of counting modes ....................................................................................7
8 «COUNT» mode – counts banknotes of different currencies in a normal mode .......8
9 «SORT» mode – counts and controls banknotes denomination................................9
10 «VALUE» mode – counts and summates the banknotes’ denominations ............11
11 Adjustment of sensors ...........................................................................................11
12 Adjustment of the slot size and its correct setting..................................................12
13 Error codes .............................................................................................................14
14 Warranty .................................................................................................................16

3
Deutsch
Inhalt
1 Standardfunktionen...................................................................................................18
2 Außenansicht ..........................................................................................................18
3 Technische Daten .....................................................................................................19
4 Sicherheits- und Bedienungshinweise......................................................................19
5 Bedienungsfunktionen der Steuerungstafel..............................................................20
6 Bedienung der Banknotenzählmaschine.................................................................21
7 Auswahl der Zählparameter .....................................................................................19
8 «COUNT» Zählung der Banknoten verschiedener Länder..............................................22
9 «SORT» - Zählung und Sortierung mit der Erkennung eines Nominalwertes .........24
10 «VALUE» - Zählung der Banknoten mit einer ......................................................25
11 Summierung der Nominalwerte .............................................................................25
12 Einstellung und Justierung .....................................................................................26
13 Error codes (Störungsbehebung) ...........................................................................28
14 Garantieerklärung .................................................................................................30
PRO INTELLECT TECHNOLOGY Co. Ltd. offers the PRO 86 MIX EURO series of banknote
counters, with the ability to recognize denomination, which are specially designed to verify
EURO banknotes via MT, MG, UV, DEN detection.
In the «VALUE» mode, the total value of a stack of mixed denomination EURO banknotes
can be calculated in just a few seconds.
In the «SORT» mode, the device will count, verify, and sort based on the denomination of the
first banknote. In the "Count" mode PRO 86 MIX EURO can be used for counting different
currencies.
This is a complex technical device. This manual will help you easily and quickly get
acquainted with the device, its functions, and capabilities. Please read this manual to ensure
proper operation of the device.
1 Functions
1. Recognition of EURO banknotes’ denomination
2. «VALUE» mode – recognition and summation mode for a stack of EURO banknotes with
mixed denominations via MT, MG, UV, DEN detection.
3. «SORT» mode – recognition and summation by one denomination (automatically
determines the first banknote’s denomination) and rejects banknotes with other
denominations (for EURO banknotes).
4. «СOUNT» - normal mode for banknotes’ counting and summation with UV detection for dif-
ferent currencies.
5. For all counting modes: «VALUE», «SORT», «СOUNT», you can put the banknotes into
the hopper with any orientation.
6. The counting speed in «VALUE» and «SORT» modes is 1200 banknotes per minute.
7. Automatic and manual start modes.
8. Banknotes’ ultra-violet detection.
9. Banknotes’ optical density detection.
10. ROM memory renewal via a PC port.
11. Connection to an external display.
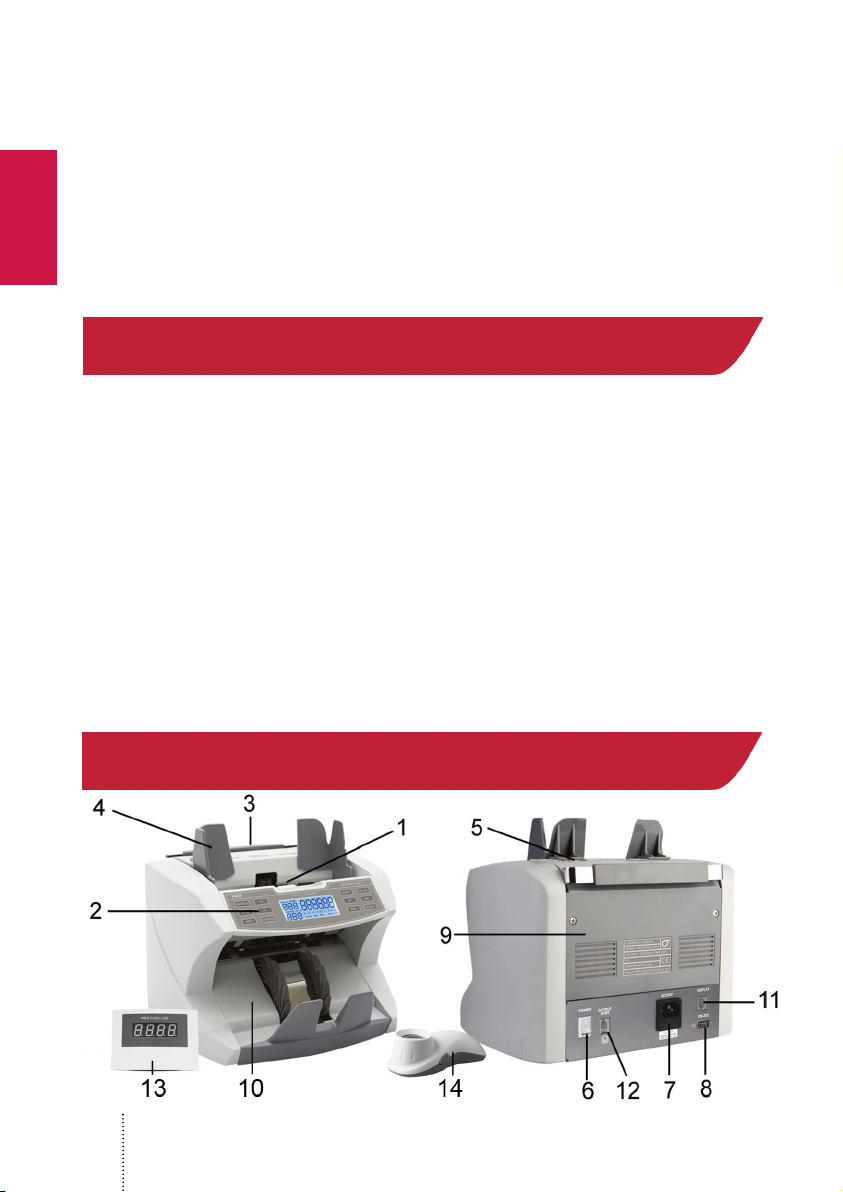
2 Appearance
Fig. 1
4
English

1. Hopper
2. Control panel
3. Carrying handle
4. Auxiliary hopper plates
5. Paper thickness adjustment screw
6. Power switch
7. Power cord
8. RS-232 port for connecting with PC
9. Rear cover
10. Stacker
11. Port for external display
12. Port for remote magnifying glass PRO L-10XP
13. External display
14. Remote magnifying glass PRO L-10XP
3 Specifications
Counting speed, banknotes/min .......................................................................900/1200/1500
Hopper capacity, banknotes: ..............................................................................................500
Stacker capacity, banknotes ..............................................................................................200
Suitable banknote size (LxW), mm: ..............................................................120x60 – 172x87
Thickness of countable banknote, mm ....................................................................0.08 - 0.12
Power supply, V/Hz ......................................................................................................220/50
Power consumption, W.........................................................................................................50
Net weight, Kg / Pounds ...............................................................................................5.5 / 12
Dimensions, mm / inch.............................................................270x250x240 / 10.6 х 9.9 х 9.5
4 Safety precautions and maintenance rules
Warning: this device is intended to operate from the power source 220V/50Hz. The
user shall use electric power cord with a ground contact.
Do not use power cable or power cord without ground contact.
• Read this manual before operation
• The manual should be available to operator
• Do not use this device under the following conditions:
- The device is not resting on a level surface
- The device is in an excessively dusty or polluted room
- The device will be exposed to vibration while in use
- The device is exposed to direct sunlight or strong directional interior lighting
• Do not operate the device with wet hands
• During operation, do not touch the moving parts of the counter
• Do not expose to water (or other liquid).
• Avoid foreign objects, paper clips, and staples
• Avoid dropping the device
• When finished be sure there are no banknotes in the hopper or transport system
• Clean the device regularly and service the device as needed at a licensed service center to
ensure the device will function within its specified parameters
• Do not disassemble, repair or attempt to update the counter on your own. This can result
in damage to the device or injury to the operator.
5
English

• Technical maintenance and cleaning shall be carried out only in certified service centers.
• If the device was exposed to cold for an extensive period of time, it is necessary to keep it
at the room temperature for no less than 6 hours, when the device has not been stored in a
box. If the device has been stored in a box while exposed to cold temperature, allow the
device to rest at room temperature for 12 hours prior to use. Remember the manufacturer is
in no way responsible for damage to the device or injury to the operator in the event of
incorrect operation /care of the device.
5 Control panel operation
«VALUE» button – Selects counting modes: VALUE / COUNT.
«SORT» button – Selects counting modes: SORT / COUNT.
«START» button – Starts and continues counting, nulls, resets error messages, returns to the
main menu.
«BATCH» button – enters number value BATCH 100, 50, 25, 20, 10, 0. To enter the value,
press the button several times. To adjust the BATCH value use buttons «+10», «+1» , «-1».
«SPEED» button – Adjusts the counting speed. In “COUNT” mode the counting speed is set
in the range of 900/1200/1500 banknotes per minute, which corresponds to SPEED I, SPEED
II, and SPEED III levels. In «VALUE» and «SORT» modes the counting speed is 1200
banknotes per minute.
«MNL» button – turns on / off manual start mode. In automatic mode, the indicator MNL is
switched off in the display, the device starts counting automatically after you put banknotes
into the hopper. In the manual mode, the MNL indicator is lit on the display, the device starts
counting another stack of banknotes after you press button «START».
«ADD» button – turns on/off the banknote summation mode by sum and number. In ADD
mode, the indicator «ADD» is lit on the display.
«CF» button – enters/exits UV, DEN detection menu. When pressing “CF” button the
changing UV value starts to blink. When pressing “CF” button for the second time the
changing DEN value starts to blink.
«LIST» button – monitors banknotes’ distribution by denomination in “VALUE” mode. In order
to view the number of counted EURO banknotes of all denominations, press “LIST” button
several times:
Fig.3
PCS
NOMINAL EUR
6
English
6 Preparation
Connect the power cord to the device and connect to a 220V/50Hz power supply. The user
shall use electric power cord with a ground contact.
- Turn the power switch ON;
- The counter runs a diagnostic and is then ready for operation.
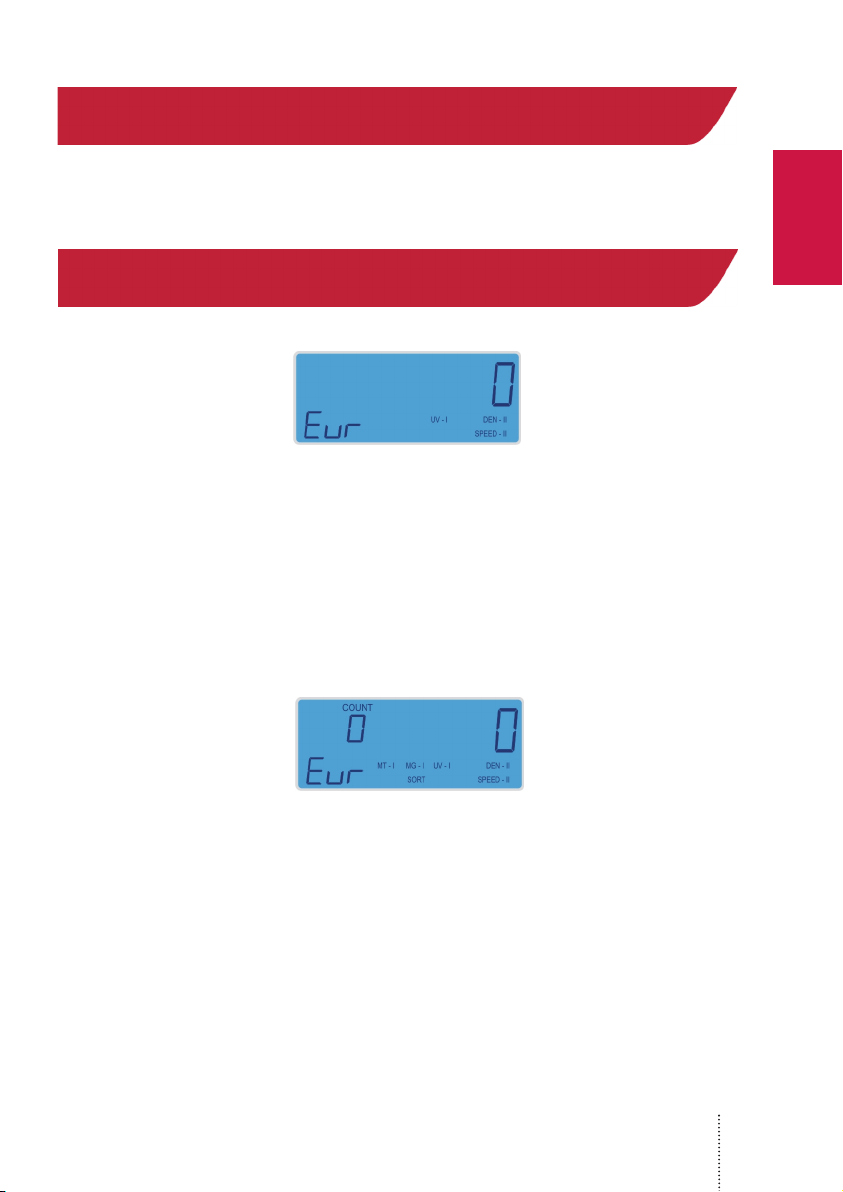
7 Selection of counting modes
«COUNT» MODE
«COUNT» mode – banknotes’ normal counting mode. Is used for counting various
currencies. Is recommended for medium and large counting volumes. The recommended
maximum load of banknotes on the hopper is 400 banknotes.
The counting speed in this mode is 900/1200/1500 banknotes per minute. In this mode you
can quickly count banknotes with UV detection.
When counting in this mode, the device is not sensitive to the placement of the banknotes,
irrelevant marks, dirt, a banknote’s loss of color, crumpled banknotes, banknotes with curved
edges or corners, and taped or glued banknotes.
«SORT» MODE
‹‹SORT» mode – A mode for banknotes counting and summation by one denomination
(automatically determined by the first banknote’s denomination). Uses MT, MG, UV, DEN
detection, and rejects banknotes with other denominations. This mode is designed only to
count EURO banknotes from the 2002 series. The counting speed in this mode is 1200
banknotes per minute. We recommend using this mode to count and verify banknotes of one
denomination by MT Detection for small and medium volumes. The recommended maximum
load of banknotes on the hopper is 200 banknotes. In this mode, the counter is sensitive to
the placement of the banknotes, irrelevant marks, dirt, a banknote’s loss of color, crumpled
banknotes, banknotes with curved edges or corners, and taped or glued banknotes. When
there is a suspicious banknote or a banknote of another denomination, the counter will give
an error.
Fig.4
Fig.5
7
English
«VALUE» MODE
«VALUE» mode – recognition and summation mode for a stack of EURO banknotes with
mixed denominations. This mode is designed only to count EURO banknotes from the 2002
series. The counting speed in this mode is 1200 banknotes per minute. This mode is
recommended for counting and verification of a stack of banknotes with mixed denominations
by MT, MG, UV, DEN detection with a small volume. The recommended maximum load of
banknotes on the hopper is 100 banknotes. In this mode, the counter is sensitive to the
placement of the banknotes, irrelevant marks, dirt, a banknote’s loss of color, crumpled
banknotes, banknotes with curved edges or corners, and taped or glued banknotes.
Select «VALUE» or «SORT» mode by pressing the «VALUE», «SORT» buttons. The second
pressing of these buttons allow to enter the «COUNT» mode.
8 «COUNT» mode – counts banknotes of different
currencies in a normal mode
If you choose the «COUNT» mode, the counter only does normal counting:
- Counts banknotes’ quantity «COUNT»
- Summation «ADD»
- Batch mode «BATCH»
- Optical density detection «DEN»
- Ultraviolet detection «UV»
NOT AVAILABLE: Recognition and summation by denomination, MT and MG detection.
8.1 Counting Operation
WARNING! In order to avoid errors during counting, examine banknotes and put aside the
following:
- Any banknote that has been repaired with white paper, has been exposed to water or
“washed”, and any banknote that is dirty or torn
WARNING! Adjust the auxiliary hopper plates (Figure 1-4) in accordance with the banknotes’
size.
Banknotes shall be placed in a neat stack before being placed into the hopper!
- Banknotes are to be placed in the hopper
- The counter will start counting banknotes automatically after one second
Fig.6
Fig.7
8
English

- Display will show the quantity of counted banknotes
- Repeat again up to Table 8.1, when necessary
- Press and the «START» button to reset display when finished.
If an error occurs during counting, see Table “Error codes”
8.2. Batch mode
- Enter a number corresponding to the amount of banknotes for the desired batch size on the
display. To enter the value, press the button «BATCH» several times. To adjust the BATCH
value use buttons «+10», «+1» , «-1». The set batch value is indicated in the upper left
corner (Figure 8).
- Repeat the operation once again under cl. 8.1
- Remove banknotes from the stacker
-Add banknotes if necessary
In order to exit the batch mode, press the «BATCH» button several times till the display is
reset.
-If an error occurs during counting, repeat all these operations once again under cl. 8.2.
This mode works for all counting modes.
8.3. Summation mode
Press the “ADD” button to enter the summation mode. If the summation mode is on, the
“ADD” indicator is be lit (Figure 8).
- Repeat the operation once again under cl. 8.1
- Remove banknotes from the stacker
-Add banknotes if necessary
- Press the “ADD” button to exit the summation button, the indicator “ADD” is not lit.
- If an error occurs during counting, repeat summation once again.
This mode works for all counting modes.
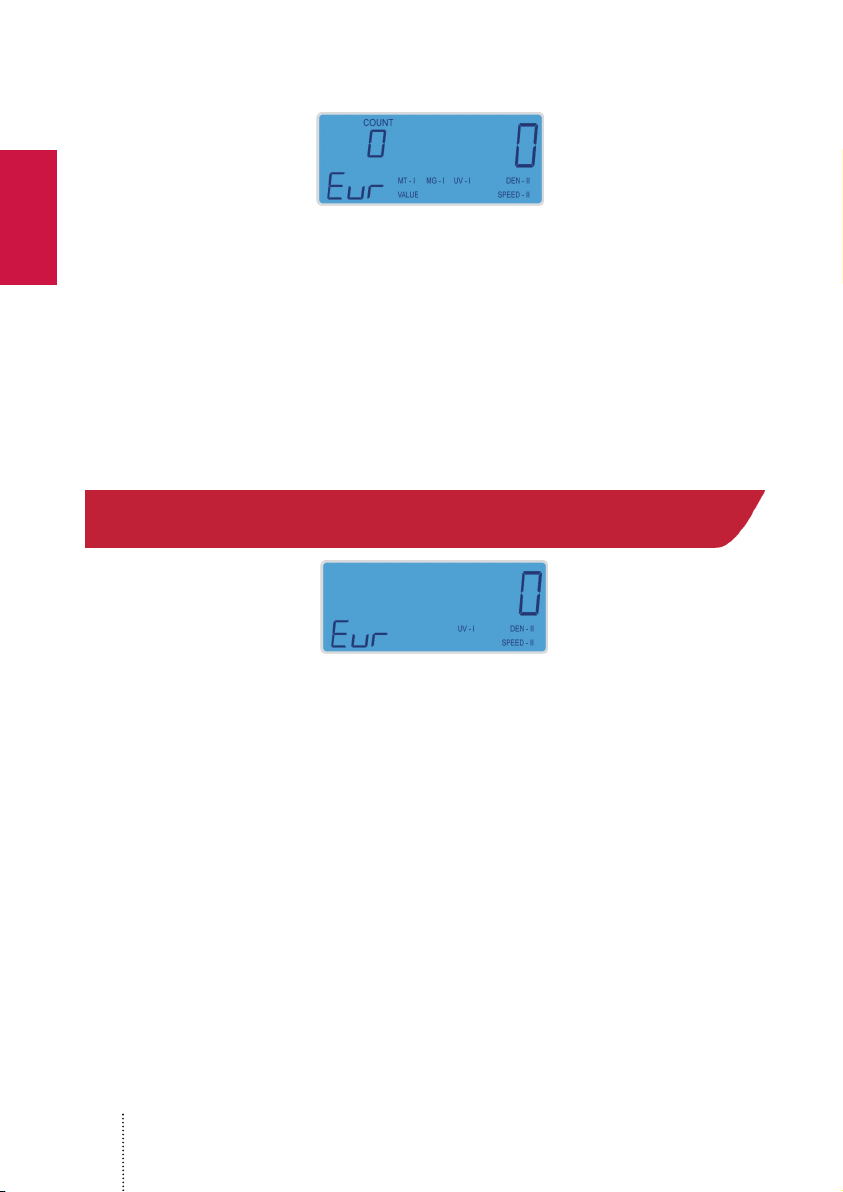
9 «SORT» mode – counts and controls banknotes
denomination
This counting mode counts and recognizes EURO banknotes' denominations (determined by
the first banknote’s denomination in a stack) and rejects banknotes with other denominations.
The display shows detections included into MT, MG, UV, DEN.
In this mode, the counter is sensitive to proper placement of the banknotes, irrelevant marks,
Fig.8
Fig.9
9
English

dirt, a banknote’s loss of color, crumpled banknotes, banknotes with curved edges or corners,
and taped or glued banknotes.
9.1 Counting Operation
WARNING! Adjust the auxiliary hopper plates (Figure 1-4) in accordance with the banknotes’
size.
WARNING! The recommended maximum load of banknotes on the hopper is 400 banknotes.
ATTENTION! In this mode, the counter is very sensitive to the position of banknotes.
Banknotes shall be placed in a neat stack prior to being placed into the hopper! (see
Fig. 10)
- Place the banknotes into the hopper as shown in Figure 10;
- The counter will start counting banknotes automatically after one second;
- The display will show the quantity (PCS), the controlled denomination (NOMINAL) and the
TOTAL value of the banknotes. Figure 11 represents an example: 2 banknotes of 100 EURO
each have been counted:
9.2 Errors during banknote counting:
In terms of authentic banknotes, the counter may give error codes due to the following
reasons:
1 A banknote in a stack is of a different denomination.
2 Banknotes being incorrectly placed or unevenly laid in the hopper (see Table 9.1)
3 Banknotes are crumpled, torn, damaged, or bear irrelevant marks.
When an error occurs, the result will not be recorded in the counter’s memory, so you can
remove the suspicious banknote (lying on the top) from the stacker, and place it back in the
hopper again.
CORRECT INCORRECT
Fig.11
Fig.10
PCS TOTAL
NOMINAL
10
English
If an error occurs again on the same banknote, put it upside down in the hopper again. If the
above steps do not help, the banknote cannot be recognized as an authentic one and other
methods of verification should be used, such as UV or IR. If an error occurs during counting,
you can also reference the Error Code Table.
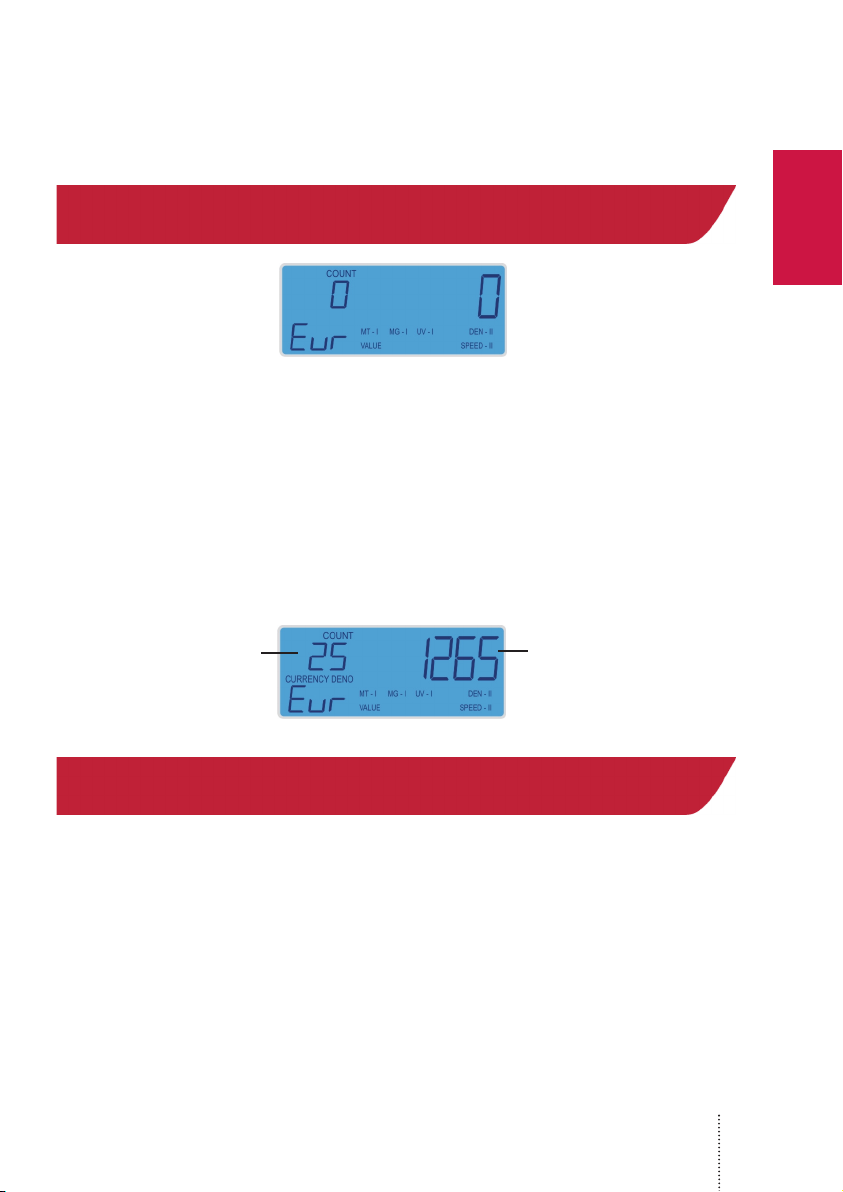
10 «VALUE» mode – counts and summates the
banknotes’ denominations
This counting mode recognizes the denominations of EURO banknotes and completes
counting and summation operations for a stack of banknotes of mixed denominations. The
display shows detections included into MT, MG, UV, DEN.
- To start, repeat counting operations under cl. 9.1; (9.2).
- To avoid additional errors during counting, it is recommended to pre-sort banknotes by their
size (for example, a 5 EURO banknote is significantly different in size from other
denominations),starting with larger denominations and progressing to smaller ones.
- The display will show the quantity (PCS) and the total value of (TOTAL) counted banknotes:
11 Adjustment of sensors
«CF» button – enters UV and DEN detection menu. When pressing “CF” button the changing
UV value starts to blink. In different modifications standard detection levels MT-I MG-I
UV-I DEN-II are set by default for «VALUE», «SORT» and «COUNT» modes.
UV detection level is set within 0 – IIII range (depending on the counter modification). The
higher the level, the higher sensitivity and the more precise a banknote’s checking. Press
«+1» и«-1» buttons to make changes. Press the “START” button to exit.
When pressing the button for the second time the changing DEN value starts to blink. DEN
detection level is set within 0 – IIII range. The higher the level, the higher sensitivity and the
more precise a banknote’s checking. Press «+1» и «-1» buttons to make changes. Press the
“START” button to exit.
In case of high UV and DEN detection levels, CF1, Ed errors are possible, that is why it is
recommended to use standard detection levels MT-I, MG-I, UV-I, DEN-II by default.
Fig. 12
Fig. 13
PCS TOTAL
11
English

12 Adjustment of the slot size and its correct setting
12.1 It is important to remember, that different currencies, depending on the thickness
of the banknotes, require correct adjustment of the slot (Figure C, position 4) between
the upper and lower feed rollers. Adjusting the feeder slot size is possible by using the
paper thickness adjustment screw (Fig. 1-5). Turn the screw counterclockwise to
decrease the feeder slot size and clockwise to increase the size. Adjusting the feeder
slot size shall be done smoothly, with adjustments of no more than 2-5 degrees (1/10
division). The feeder slot shall be larger for excessively worn banknotes, dirty ban-
knotes and USD. The feeder slot shall be smaller for “new” banknotes and EURO ban-
knotes.
- If due to adjustment of the feeder slot size the sensor starts to operate abnormally
slowly, and/or indicates «CF2», «CF3», or «EH» errors, then the slot size shall be
smoothly increased.
- If due to adjustment of the feeder slot size the sensor starts to indicate «EC» or «Ed»
errors, then the slot size shall be smoothly decreased.
12.2 To check whether the setting of the feeder slot is correct, take the following actions:
1. Turn off the power.
2. Prepare two banknotes (in medium usage condition or nearly new).
3. To properly set up the kicker rollers (Figure B, position 2) and feed rollers as shown
in Figure B (a smooth side facing you, with ribbed lining out of sight), turn the kicker
rollers(Figure B, position 2) so that they take the position as shown in figure B.
Figure A Figure B
12
English

4. Take one banknote and check the lower boundary of the slot.
For this, one banknote should freely pass between the upper feed rollers (Figure C, posi-
tion 1) and the lower feed rollers (Figure C) position 3). If one banknote cannot pass
through between the upper and lower feed rollers, increase the slot by 2-5 degrees (1/10
division) and check again.
5. Take one banknote and check the upper boundary of the slot. For this, two banknotes
SHALL NOT PASS THROUGH between the upper and the lower feeder rollers
(Figure C). If two banknotes pass through between the upper and lower feed rollers,
reduce the slot by 2-5 degrees (1/10 division) and then check again.
6. If the slot’s lower and upper boundaries are set correctly in accordance with para-
graphs 5, the slot is set correctly.
Symbols:
1 Upper feed roller
2 Kicker roller
3 Lower feed roller
4 Slot (between the upper and lower feed rollers)
Figure C
13
English

Maintenance
In order to provide the best functioning of the device, it is necessary to comply with the
following simple requirements:
- Switch off the device, when not in use
- Clean the hopper and stacker with a clean dry cloth. Sensors can cause errors when
dirty.
It is recommended to carry out preventive measures, including partial disassembling of
the counter each 30 days by an engineer in the service center.
13 Error codes
System errors (appears on the display immediately after you turn on the counter)
If other errors are indicated when switching on the counter, apply to a service center.
Error codes during counting process:
Code Message Reason
E5 The hopper sensor is blocked by
banknotes or dirt Remove banknotes from the hopper and clean it
E6 The stacker sensor is blocked by
banknotes or dirt Remove banknotes from the stacker and clean it
E2 The left counting sensor is
blocked by dirt or out of operation Clean the sensor or replace ut
E1 The right counting sensor is
blocked by dirt or out of operation Clean the sensor or replace ut
Code Message Reason
EC Banknotes have passed through
without being properly separated
1. Remove banknotes from the stacker and repeat the
counting procedure
2. Adjust the slot, see Table 12
Ed
1. The device has detected a
banknote with a different density
than expected,
2. DEN level is very high.
1. Remove banknotes from the stacker and repeat the
counting procedure
2. Adjust the slot, see Table 12
3. Set a lower DEN sensitivity level, see Table 11
CF1
1. The banknote has exhibited
suspicious UV properties
2 UV level is very high
1. Remove the suspicious banknote (lying on the top).
Remove banknotes from the stacker and repeat the
counting procedure.
2. Use additional verification methods for the
suspicious banknote, for example, viewing UV or IR
detectors.
3. Set a lower DEN sensitivity level under cl. 11.
14
English
Code Message Reason
EH
1 A half banknote has been
detected
2 A banknote passes through
incorrectly
1. Remove the banknote (lying on the top). Press
the «START» button and repeat the counting
procedure.
2. Count banknotes once again. Banknotes shall be
placed in a neat stack on the hopper. You must
align banknotes in a neat stack without distortion
(Figure 1, position 4)
CF-2
1. The currency being counted is
other than EURO
2. . Error of magnetic thread
detection MT, MG
1. «VALUE» and «SORT» modes are only for
EURO banknotes counting
2. Remove the banknote (lying on the top) and
verify it with IR detector
CF-3
3. Counted banknotes of mixed
denominations in «SORT» mode
4. The magnetic thread detection
level does not correspond to the
banknote
3. «SORT» mode is used only for counting
banknotes of the same denomination
4. Remove the banknote (lying on the top) and
verify it with IR detector
5. Incorrect placement banknotes in
the counter
5. Put banknotes into the hopper. Banknotes shall
be placed in a neat stack on the hopper. You must
align banknotes in a neat stack without distortion
(see cl. 9.1)
6. Improperly adjusted slot.
7. Two EURO banknotes stuck
together
6. Adjust the slot under cl. 12
7. Decrease the slot under cl. 12
15
English

16
English
14 Warranty
Manufacturer guarantees proper functioning of the device within the warranty period
since the date of sale provided the user meets operation, maintenance and storage con-
ditions set on his manual. After unpacking the device please keep the package and
technical description. Warranties are canceled in the event the device is transported in
no- original packaging or operation/maintenance conditions are not met. Manufacturer
is not responsible for device malfunction due to improper maintenance, storage and
transportation including mechanical damage. In case of the device failure within the
warranty period, the customer is not entitled to its repair in our service center free of
charge.
The service center accepts equipment for cleaning due to dust and mud, however clean-
ing equipment from dust and mud is not included in the warranty and is charged sepa-
rately. Warranty service does not include any training for equipment maintenance or
other use of the device (connection, testing, customizing, preventive works etc.) which
the customer can complete on their own by referencing the attached manual. The device
frequently showing error codes on authentic banknotes is not necessarily a malfunction.
If this occurs, adjust the slot size, detection or sensitivity of detection. Manufacturer is
entitled to introduce updated software, not described in the current manual.
Warranty service is not available in the following cases:
• Absence of a warranty card, an incorrectly filed warranty card, or other invalid card;
• If operation or maintenance rules requirements set in the manual are not met;
• If there is mechanical damage to the equipment;
• If there are foreign objects or liquid inside of the device;
If the seal portions of the device have been opened or tampered with;
• If the device has been connected to a power supply without a ground contact or to an
unstable power source.
The present warranty does not apply to batteries, cable adaptors, power units, safety
fuses, belts, lamps, brushes, external displays, power cords, and external structural ele-
ments, parts of the body of the product or any other parts which have a naturally limited
period of service including failures caused by power supply failures.
Replaced defective parts are to be considered the property of the manufacturer.
The owner delivers faulty equipment to the service center at their own expense.

17
English

18
Deutsch
Sehr geehrter Kunde! Die professionelle Banknotenzählmaschine PRO 86 MIX EURO ist ein
präzises, zuverlässiges und extrem schnelles Gerät. Vor der Inbetriebnahme, lesen Sie bitte
genau die Bedienungsanleitung durch, um sich mit allen Funktionen des Gerätes bekannt zu
machen. PRO INTELLECT TECHNOLOGY stellt Ihnen die Banknotenzählmaschine PRO 86
MIX EURO mit der Funktion einer Erkennung des Nominalwertes vor, welche speziell dafür
konzipiert wurde, EURO Banknoten mit Hilfe der MT, MG, UV und DEN Erkennung zu
überprüfen.
Innerhalb weniger Sekunden steht Ihnen die Gesamtsumme der EURO Banknoten in einem
Bündel mit gemischten Nominalwert im «VALUE» Modus zur Verfügung. Sortierung nach der
ersten Banknote im Bündel im «SORT» Modus erlaubt Ihnen, Banknoten eines
Nominalwertes in einem Bündel durchzählen und überprüfen zu können. Im Modus einer
einfachen Zählung der Banknoten, «COUNT», sind die Banknotenzähler der Serie PRO 86
MIX EURO zu einer Durchzählung verschiedener Währungsarten der Welt ausgerichtet.
1 Standardfunktionen
1 Nominalwert-Erkennung der EURO Banknoten
2 «VALUE» - Erkennung und Summierung der Nominalwerte der EURO Banknoten im
Bündel mit einem gemischten Nominalwert dank einer MT, MG, UV und DEN Erkennung.
3 «SORT» - Durchzählung und Summierung der Banknoten eines Nominalwertes (wird
automatisch nach der ersten Banknote erkannt) mit einer Aussortierfunktion der Banknoten
anderen Nominalwertes (für EURO Banknoten).
4 «СOUNT» - Einfache Durchzählung und Summierung der Banknoten mit einer UV-
Erkennung (verschiedene Währungsarten).
5 Bei den Zählvorgängen im VALUE, SORT und СOUNT Modus können die Banknoten von
beliebiger Seite im Aufnahmefach platziert werden.
6 Zählgeschwindigkeit im «VALUE» und «SORT» Modus beträgt 1200 Banknoten pro
Minute.
7 Automatischer und manueller Startvorgang.
8 UV-Ultraviolette Erkennung der Banknoten
9 DEN-Erkennung der optischen Stärke einer Banknote
10 Update einer Firmware durch einen PC.
11 Anschluss eines Displays an den Banknotenzähler
2 Außenansicht
1. Aufnahmefach
2. Bedienungsplatte
3. Tragevorrichtung
4. Banknotenführungen
5. Justierungsschraube
6. Ein/Aus-Schalter
7. Stromversorgung
8. RS-232 Schnittstelle (zum Anschluss an einen PC)
9. Rückklappe
10. Ausgabefach
11. Anschluss zu einem externen Display
12. Anschluss zu einer externen Lupe PRO L-10XP
13. Externen Display
14. Externen Lupe PRO L-10XP

19
Deutsch
3 Technische Daten
Zählgeschwindigkeit, Banknoten/Min: ..............................................................900/1200/1500
Kapazität des Aufnahmefachs, Banknoten:........................................................................500
Kapazität Ausgabefach, Banknoten:...................................................................................200
Größe der Banknoten: .....................................................................120х60 mm – 172х87 mm
Stärke der Banknoten.........................................................................................0,08-0,12 mm
Netzspannung: ......................................................................................................220V / 50Hz
Leistung:............................................................................................................................50W
Nettogewicht: ..................................................................................................................5.5 kg
Abmessungen ...........................................................................................270 х 250 х 240 mm
4 Sicherheits- und Bedienungshinweise
Achtung! Dieses Gerät soll von einer Stromquelle mit 220V / 50Hz bedient werden. Eine
Steckdose soll über einen Schutzkontakt verfügen. Es ist verboten, ein Netzkabel an
eine Steckdose ohne den Schutzkontakt anzuschließen.
• Lesen Sie bitte vor dem ersten Gebrauch Ihrer Banknotenzählmaschine diese
Bedingungsanleitung sorgfältig durch. Beachten Sie alle Anweisungen bei der Benutzung des
Gerätes.
• Bewahren Sie die Bedingungsanleitung zum Nachschlagen an einer gut erreichbaren Stelle
auf.
• Stellen Sie die Banknotenzählmaschine nicht in folgenden Plätzen auf:
- Auf rutschigem, geneigtem oder nicht ebenem Untergrund
- In Räumen mit hoher Luftfeuchtigkeit
- Wo das Gerät Vibrationen ausgesetzt wird
- Unter starkem Lichteinfall oder direkter Sonneneinstrahlung
• Vermeiden Sie die Arbeit am Gerät mit feuchten Händen
• Während der Arbeit mit dem Banknotenzähler vermeiden Sie den Kontakt mit beweglichen
Teilen des Gerätes
Abb 1

20
Deutsch
• Vermeiden Sie das Eindringen des Wassers oder anderer Flüssigkeiten ins Innere des
Gerätes
• Richten Sie Ihren Arbeitsplatz so ein, dass zufälliger Sturz des Banknotenzählers
ausgeschlossen wird
• Am Ende Ihrer Arbeit mit dem Banknotenzähler vergewissern Sie sich, dass keine
Banknoten im Ausgabefach oder im Transportsystem zurückbleiben
• Für eine einwandfreie Funktion des Gerätes ist eine regelmäßige Reinigung und Wartung
des Gerätes in einem Servicezentrum (zwecks technischer Überprüfung der
Werkseinstellungen) dringend geboten
• Versuchen Sie bitte nicht, den Banknotenzähler auseinanderzubauen oder umzubauen, um
Verletzungen des Benutzers und Beschädigungen des Gerätes zu vermeiden. Wenden Sie
sich hierfür an ein Servicezentrum und lassen Sie das Gerät nur mit Original-Ersatzteilen
reparieren
• Vor dem Einschalten des Banknotenzählers in den kalten Jahreszeiten ist es bei niedrigen
Temperaturen erforderlich, das Gerät ausgepackt bei Raumtemperatur mindestens 4
Stunden oder in der Verpackung mindestens 12 Stunden stehen zu lassen.
Der Hersteller übernimmt keine Haftung für Schäden oder Funktionsausfälle, die durch
falsche oder missbräuchliche Verwendung oder Nichteinhaltung der Gebrauchsanweisungen
des Herstellers beim Betrieb oder bei der Wartung des Gerätes herbeigeführt werden
5 Bedienungsfunktionen der Steuerungstafel
«VALUE» Auswahltaste der Zählmöglichkeiten: VALUE / COUNT
«SORT» Auswahltaste der Zählmöglichkeiten: SORT / COUNT
«START» Taste des Startvorganges, der Weiterzählung, der Nullstellung, des Löschens
eines Fehlercodes, der Rückkehr in das Hauptmenü.
«BATCH» Taste für die Bündelungseinstellung BATCH 100, 50, 25, 20, 10, 0. Für die
Einstellung der Bündelung drücken Sie bitte mehrmals die Taste «BATCH», bis die
erwünschte Anzahl der Banknoten angezeigt wird. Für die Korrektur der Bündelung benutzen
Sie die Tasten «+10», «+1», und «-1».
«SPEED» Zählgeschwindigkeitstaste SPEED. Im «СOUNT» Modus können Sie zwischen
900/1200/1500 Banknoten / Min auswählen, was den Stufen SPEED I; SPEED II; SPEED
III entspricht. Bei «VALUE», «SORT» ist die Zählgeschwindigkeit SPEED auf der Marke
1200 Banknoten pro Minute festgesetzt.
«MNL» Ein/Aus-Taste MNL für den manuellen Startvorgang. Bei einem automatischen
Startvorgang wird auf dem Display die Aufschrift MNL nicht dargestellt. Der Zählvorgang fängt
automatisch zu zählen, indem Sie die Banknoten im Aufnahmefach platzieren.
Bei einem manuellen Startvorgang leuchtet auf dem Display die Aufschrift MNL. Für den Start
Table of contents
Languages:


