Pro-Line Boats BL-1421Q User manual

BL-1421Q
User Manual
Commercial
Blender
With Ice Blade and Sound Cover

Congratulations on your purchase
of a Pro-line Commercial Blender.
Note: Please read through the instructions carefully before using or installing the product and ensure that the
manual is kept in a safe place for future reference.
The system must be properly installed and located in accordance with the installation instructions before it is used.
During the set up of this product if you have any questions / comments / issues DO NOT RETURN TO STORE.
FOR SERVICE AND TECHNICAL ADVICE VISIT WWW.PROLINEAUSTRALIA.COM.AU/CONTACT
Electrical Requirements:
Australia / New Zealand
Due to manufacturing alterations product
may vary slightly from that pictured.
Pro-line Australia
Norwood South LPO
Find us
/prolineaustralia
/proline_australia
Email: info@prolineaustralia.com.au
Web: www.prolineaustralia.com.au

INSTALLATION AND OPERATING INSTRUCTIONS 3
READ ALL INSTRUCTIONS CAREFULLY BEFORE OPERATION OF THE UNIT
• All components need to be installed in accordance with the user
manual instructions for correct performance of the appliance.
• This appliance is not intended for use by persons (including children)
with reduced physical, sensory or mental capabilities, or lack of
experience and knowledge, unless they have been given supervision
or instruction concerning use of the appliance by a person
responsible for their safety.
• Appliance can be used by persons with reduced physical, sensory
or mental capabilities or lack of experience and knowledge if they
have been given supervisions or instruction concerning use of the
• Children should be supervised to ensure that they do not play with
the appliance.
• Do not operate appliance with a damaged cord or plug or after the
appliance malfunctions, or has been damaged in any manner.
• If the cord is damaged, it must be replaced by the manufacturer, its’
not immerse cord, plugs, or Blender Base in water or other liquid.
parts and before cleaning.
OPERATION CONDITIONS & SAFETY PRECAUTIONS
WARNING: RISK OF INJURY:
has stopped completely before disassembling.

4 INSTALLATION AND OPERATING INSTRUCTIONS
IMPORTANT:
• Do not use appliance for other than intended use.
• Place the device on a level, nonslip surface suitable for the weight of the
appliance.
• Do not use outdoors or on wet surfaces.
• Do not run the appliance without ensuring the lid is securely in place.
• Do not put any parts into the dishwasher. NOT dishwasher safe.
OPERATION CONDITIONS & SAFETY PRECAUTIONS
WARNING: RISK OF INJURY:
be made in this blender as the lid does not vent steam.

INSTALLATION AND OPERATING INSTRUCTIONS 5
Your Blender has 2 safety functions. Occasionally during the use of
unit to temporarily cease working. This is completely normal and is
implemented to protect the user and unit from damage.
Overheating Protection
The motor of the Blender is equipped with a temperature control
device. If the motor or the blades turn too slowly due to solid food
socket and move into a well-ventilated area. Allow the Blender to cool
Auto Shut Down
To prevent overuse or overheating of the appliance the Blender
Sensor for the Blender Jug
Blender is equipped with a safety sensor which detects when the
the sensor.
Pro-line Commercial Blender
Model Code
Product Dimensions
Product Weight
Power
Max. Running Time
SAFETY FEATURES
6 INSTALLATION AND OPERATING INSTRUCTIONS
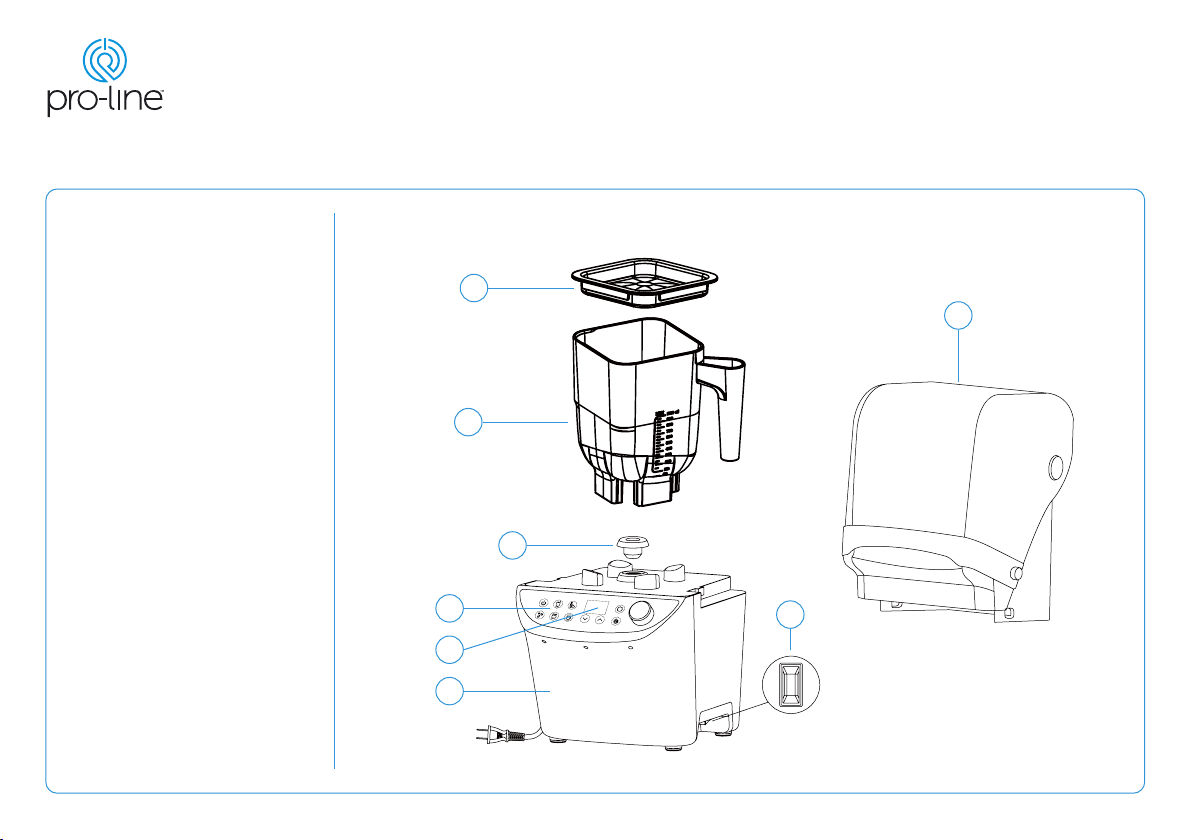
3. Coupler
2
3

INSTALLATION AND OPERATING INSTRUCTIONS 7
SOUND COVER ASSEMBLY INSTRUCTIONS
IMPORTANT: The Blender Base comes with a black plastic cover
2. To use the Sound Cover, the black plastic cover needs to be removed.
cover, pull the cover outwards and lift upwards.
3. Install the Sound Cover onto the Blender base by aligning the 3 black
NOTE:
the Blender will not start.
Fig 1
8 INSTALLATION AND OPERATING INSTRUCTIONS
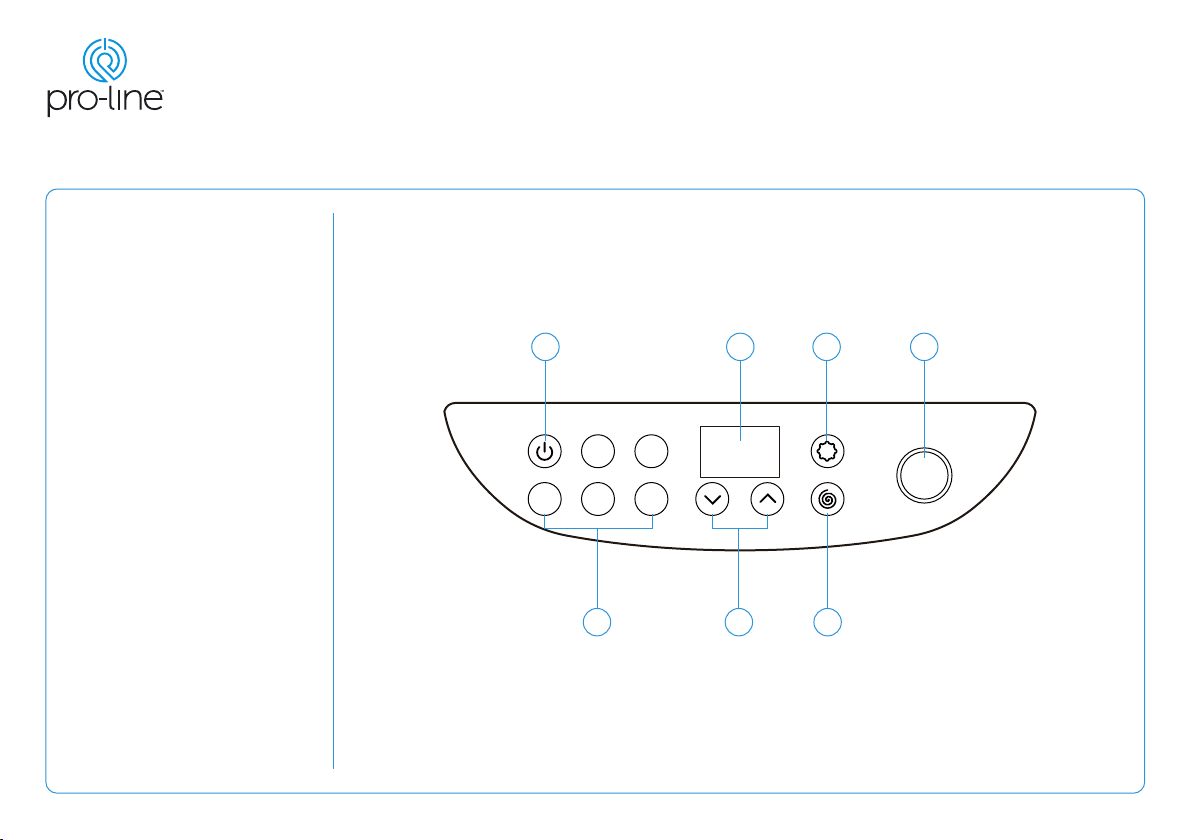
12
345
2. Display
3. Write Program
2 3

INSTALLATION AND OPERATING INSTRUCTIONS 9
On/O
the Blender to ready mode.
2. Display
recipe is shown on the display.
3. Write Program
Speed Dial
Turn Speed dial clockwise to gradually increase speed level. Turn
Program Keys 1-5
Pressing one of the Program keys will select that program. Press
Each Program key can be reprogrammed by using the Write
Program function.
Time +/-
You can pre-set the running time by pressing the up and down
During a program or manual running mode, timer display will count
down and automatically stop the blender when time is complete.
During manual use of Speed dial without a set time, the display
timer will count upwards to show total time.
Pulse
Press and hold Pulse to quickly increase speed to the highest
level. Motor will stop when the pulse key is released.
During a program or manual running mode, push Pulse to
temporarily run at the highest speed. Original program speed will
recommence after releasing the Pulse key.
Ref Description Ref Description

10 INSTALLATION AND OPERATING INSTRUCTIONS
• Do not operate appliance with wet hands as it may cause an
electric shock.
• Do not operate appliance prior to inserting ingredients.
• Do not operate appliance without the lid.
IMPORTANT: To protect the motor and provide you with a long
lasting machine, the Blender has an auto shut down feature. If the
components are not installed correctly the system will not operate.
If the motor overheats due to extended use of the product the
machine will automatically shut down. This is normal and prevents
2. Plug in the Blender and turn on at the wall socket.
3. Turn the Power Switch On, located under the blender base on the
right-hand side.
beep and the control panel will light up.
NOTE:
to Blend.
2. To reduce the speed, turn the speed dial anti-clockwise.
3. The display timer will start counting upwards to show total running
of running time the blender will stop automatically.
blend time will be shown on the display.
the blender at desired speed.
when the pre-set time is completed.
OPERATING INSTRUCTIONS USING IN MANUAL MODE

INSTALLATION AND OPERATING INSTRUCTIONS 11
USING A PROGRAM
to Blend.
press another Program key, you will hear a short beep and the
the program will be shown on the display and the remaining time for
each step will count down.
NOTE: Speed will gradually increase when each program starts.
Symbol Program Pre-set Program
Description Total Run Time
Ice Smoothies
2 Thick Ice Smoothies
3
Smoothies
Smoothies or Mixing
Cleaning

12 INSTALLATION AND OPERATING INSTRUCTIONS
press 2” press a program
procedures
end record
1-5 1-5
program for this Blender, therefore it is recommended that you use this
Program for your most used recipe.
To write a program follow the below steps:
00:00 time and SPEED 00.
2. Press the Program Number key for the Program number that you wish
show the time set.
will show the speed.
display will show ‘step 02’.
WRITING A PROGRAM
NOTE: A speed does not have to be set if you wish for the blender to
seconds for example.
A maximum of 30 Steps can be recorded with a total running time
save the entire program.
exit the Write Program mode.
9. Any Program keys that you write a program for will be displayed with
a red LED light.
Fig 2

INSTALLATION AND OPERATING INSTRUCTIONS 13
You can interchange between the original pre-set program and the self-
for 2 seconds. The LED colour of that key will change between RED and
indicates the original program is ready for use.
The Pro-line Blender is a great addition to any kitchen, allowing simple
and quick preparation of drinks. The more familiar you are with your Pro-
line Blender, the easier preparing dishes will be. Below are some tips
that will help you get started.
• For best results, pour liquids and soft ingredients into the blender
leafy greens.
disassembled.
BLENDER OPERATING TIPS

14 INSTALLATION AND OPERATING INSTRUCTIONS
This section provides important information for cleaning and
maintenance of your Pro-line Blender. Please note the following safety
guidelines before and during cleaning:
IMPORTANT:
socket before cleaning
• Do not immerse appliance in water or any other liquid.
NOT suitable for the dishwasher.
• Do not try and dismantle the blades from the container, they are
To clean Blender Jug
water and add a drop of mild detergent. Place onto the Blender Base.
a soft cloth and mild detergent.
Dry thoroughly before use.
To clean the Blender Base
• Do NOT immerse the Blender base in water or any other liquid.
Clean the Blender Base with a soft damp cloth only.
NOTE: If water or liquid is left on the Blender Blade, it may cause
of the blade.
CLEANING AND MAINTENANCE
WARNING: RISK OF INJURY:

INSTALLATION AND OPERATING INSTRUCTIONS 15
Problem Possible Cause Solution
No power to blender.
Appliance not plugged in/switched on.
underside of the blender base) is turned on.
Incorrect assembly.
Motor has stopped.
Ingredients stuck in blades.
WARNING:
Unplug the Blender from the wall socket and move into a well-ventilated area.
recommence use.
Overuse of product has caused motor to
shutdown as a safety precaution.
Unplug the Blender from the wall socket and move into a well-ventilated area.
recommence use.
Leaking.
Lid is not installed correctly. Ensure the lid is seated correctly.

16 INSTALLATION AND OPERATING INSTRUCTIONS
Your Pro-line Australian Commercial Repair
or Replacement Warranty
the stated conditions:
scale regardless of where the product is stored.
Warranty covers any defects in material or workmanship in the
date of purchase.
To make a warranty claim you must visit Pro-line online at
www.prolineaustralia.com.au/warrantyclaim
If a product is found to be faulty there is a 90 day return policy from the
date of purchase. Products returned to store MUST be accompanied
by a valid proof of purchase.
For warranty claims outside of 90 days from date of purchase, product
will be repaired or replaced at our discretion. Repair or replacement
costs of the product will be covered under warranty by Pro-line.
the same type rather than being repaired. Refurbished parts may be
used to repair the goods.
rights and remedies of the consumer law in relation to the goods or
services to which this warranty relates.
Our goods come with guarantees that cannot be excluded under
the Australian Consumer Law. You are entitled to a replacement or
foreseeable loss or damage. You are also entitled to have the goods
repaired or replaced if goods fail to be of acceptable quality and the

INSTALLATION AND OPERATING INSTRUCTIONS 17
Conditions Of This Warranty:
the user manual installation instructions.
2. The warranty extends only to repairing or replacing any
component that proves to be defective in material or
workmanship.
3. The warranty does not cover defects occasioned by
misuse, alterations, accidents, or used for other than
the intended purpose.
blackouts.
Please keep purchase receipt in a safe place.
Pro-line Australia
Norwood South LPO
info@prolineaustralia.com.au
www.prolineaustralia.com.au

18 INSTALLATION AND OPERATING INSTRUCTIONS

INSTALLATION AND OPERATING INSTRUCTIONS 19

Pro-line Australia
Norwood South LPO
Find us
/prolineaustralia
/proline_australia
Email: info@prolineaustralia.com.au
Web: www.prolineaustralia.com.au
Table of contents
Other Pro-Line Boats Blender manuals


