Pro-Peak 2500VPG2 User manual
PRO-PEAK 2500VPG2 AC/DC Delta Peak Charger Item No. O-IP2500VPG2
Dear Customer
Thank you for purchasing this Pro-Peak 2500 VPG2 AC/DC charger, we are sure you will be pleased with its performance. In order to ensure you obtain
the maximum from its operation, please read the following instruction manual carefully. Should there be any aspects of it you do not understand, please
contact your point of purchase or Ripmax customer services for advice
EXTREMELY IMPORTANT - READ BEFORE USING CHARGER - SAFETY PRECAUTIONS
• ThisPro-PeakchargerisNOT suitable for children under 14 years of age.
• ONLY charge rechargeable type Ni-Cad & Ni-MH battery packs. Never charge other
battery types. When quick charging, ONLY charge suitable ‘Quick Charge’ Ni-Cad or
Ni-MH battery packs. DO NOT charge other types of pack.
• DO NOT mix old and new cells or cells of different makes.
• ThechargingofbatteriescreatesHEAT. Both the Pro-Peak charger and the battery pack
will become WARM during charging, this is normal. DO NOT place the charger or battery
pack on any surface that can be affected by heat. Always charge on a heat resistant
surface.
• Alwaysensurethechargerandbatterypackhaveadequateventilationaroundthem.
DO NOT charge in an enclosed space.
• DO NOT cover charger ventilation openings.
• Ifthebatterypackbecomesextremelyhot-untouchable-discontinuechargingimmediately.
The battery pack may be defective. Consult your dealer or Ripmax Customer Service.
• The battery to be charged should be at room temperature before charging. DO NOT
charge a HOT battery pack.
• Allowchargertocooldownfor10minutesafter2consecutivequickcharges.
• ALWAYS follow charging instructions.
• ALWAYS remove battery pack from device (car, boat etc.) before charging.
• NEVER charge batteries inside their device or with the device switched on.
• NEVER charge 2 battery packs in parallel.
• NEVER allow the charger in close proximity to water. If charger becomes wet, leave
overnight in a warm environment to dry. Connection if wet, is life threatening.
• NEVER dismantle charger. Service or repair should only be carried out by authorised
personnel. Contact your dealer or Ripmax for service/repair information.
• Battery and charger should be monitored whilst charging takes place. DO NOT leave
unobserved (possible risk of fire).
CONNECTIONS OUTPUT CONNECTIONS
The Ripmax Pro-Peak 2500 VP G2 charger has two types of Power Input. Mains AC 220-
240V (50/60Hz) or 12V DC via an alternative power source, such as a battery or 12V output
power supply. These two power inputs allow charging at home or at the place of operation.
Under no circumstances should the two Power Inputs be connected at the same time.
The charger is designed for individual Power Input operation.
MAINS AC 220-240AV CONNECTIONS
• Connectthemainsleadtoawallsocket.
• Turn‘ON’themainswallsocketandthe‘RED’LEDwillflashevery2secondstoindicate
power to the charger, and the charger is ready for use. Turn ‘OFF’.
• Ifthe‘RED’LEDdoesnotflash,thisindicatesthatnopowerisreachingthecharger.Check
the fuse in the mains lead plug. Spare fuses can be purchased from most electrical shops.
Only use a fuse with the correct rating, 250V 3A, otherwise damage may occur to the
charger. This will not be covered under warranty.
DC 12V INPUT CONNECTION
• UsingthetwoCrocodileClipsontheendofthefixedleadexitingattherearofthecharger,
connect the ‘RED’ clip to the Positive (+) connection of the power source (i.e. battery etc.)
and the ‘Black’ clip to the Negative (-) connection.
• Onceconnectedthe‘RED’LEDwillflashevery2secondstoindicatethechargerisready
for use. Under no circumstances reverse the crocodile connections or attempt to connect
the DC crocodile clips to a 220~240v AC 60Hz power source. This will result in serious
damage to the charger, not covered under warranty, and possible electrocution.
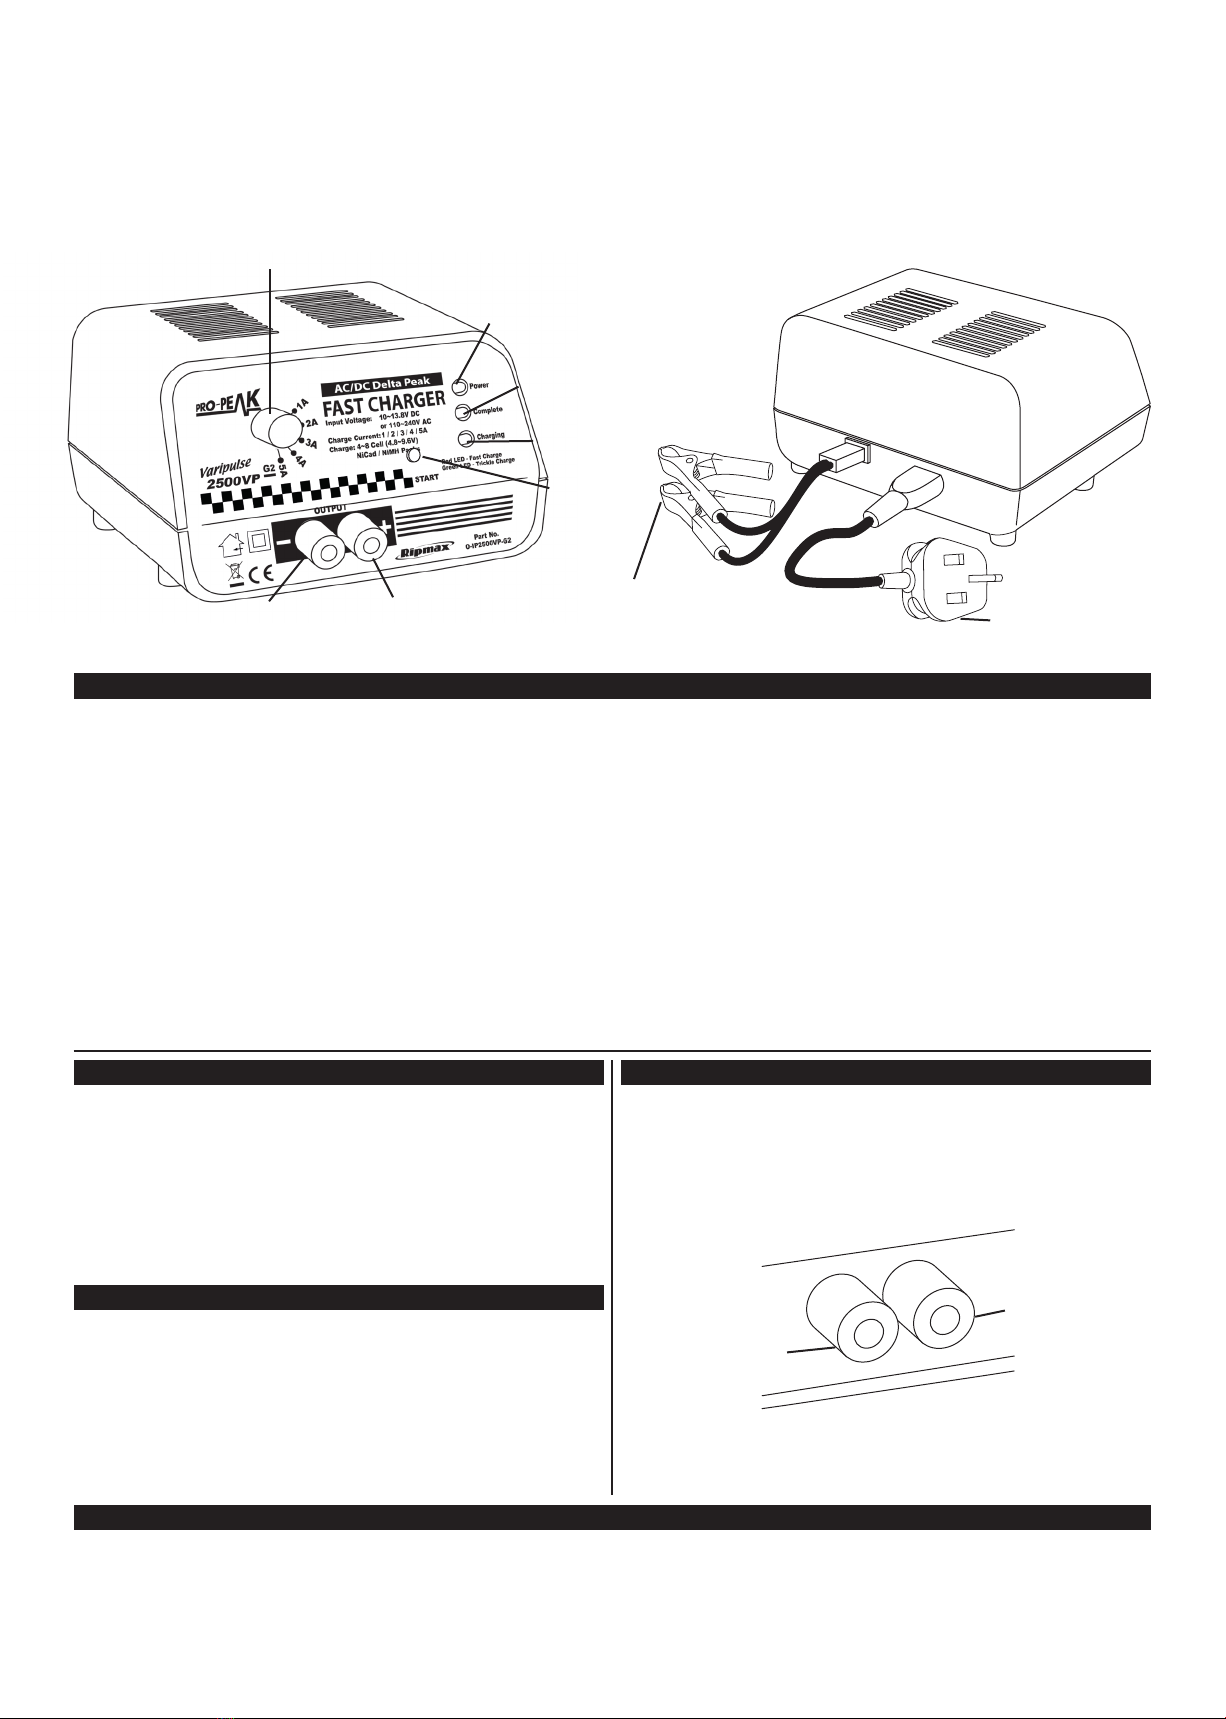
• TheProPeak2500VPG2usesstandard4mmgoldbananatypeconnectors.
• Pleaseensureyouconnecttheplugstothechargerusingthecorrectpolarityasshownin
the following diagram.
• Redconnector=Postive(+)
• Blackconnector=Negative(-)
Crocodile Connectors
DC 12V Input Mains Input
AC 240V 50/60-Hz
Negative (-) Black Positive (+) Red
Charging
Green LED
(Complete/Finish)
Red LED
(Power / Fast Charge)
Negative (-) Black
Positive (+) Red
Variable Control Knob (Current)
Start

OPERATION - FAST CHARGING
• Turn‘ON’themainspower.
• Connect the battery to be charged to the OUTPUT charge lead. When the battery is
connected the flashing ‘RED Ready to use’ LED will go out and the Continuous ‘GREEN’,
trickle charge LED will turn ‘ON’. The charger is now ‘Trickle charging’.
• TrickleChargingisthechargingofabatteryatalowchargerate(130mAh)sothatitis
charged slowly over a longer period of time. It is also used to charge lower capacity or
non-quick charge batteries where fast charging will damage them.
• TobeginFastCharging,pressthestartbuttona‘BLEEP’willbeheard.The‘RED’fast
charge LED will light, and both the RED and the GREEN LED’s will glow continuously, to
indicate that fast charging is taking place.
Fast charging will commence at the maximum charge rate, adjusting as the charge
continues. It will automatically shut ‘OFF’ at the end of the charge cycle, when the battery
is fully charged, using its delta peak, maximum charge, detection circuit.
• AttheendoftheFastChargecyclethechargerwillbeginBleeping-4‘Beeps’repeated16
times. The ‘RED’ LED will then go ‘OUT’, the ‘GREEN’ LED will continue to glow to indicate
the charger has returned to trickle charging.
• Tostopthe‘Bleeping’attheendofthechargepushthestartbuttonagain.
Operation cycle is as follows:
Power Connection: - ‘flashing RED’
Battery Connection: - ‘continuous GREEN’ - ‘Trickle Charging’
Press START: - ‘Bleep’ - ‘continuous RED/GREEN’ - ‘Fast Charging’
End of Fast Charge: - ‘Bleeps’- ‘continuous GREEN’-’Trickle Charge’
Push START: - ‘Bleeping Stops’
Disconnect Battery: - ‘flashing RED’ - ‘Power Connected’
OPERATION - STOP CHARGING
• ToSTOPchargingatanytimedisconnecttheBatterybeingcharged.
ALARM/ERROR MESSAGES
1.Output Disconnection
If the output connections become disconnected, not allowing the charge cycle to be
completed, charging will stop and the charger will start ‘Bleeping’ continuously. Press the
Start button to stop the bleeping, reconnect the output lead and start the charge cycle
again.
2.Low Input Voltage
If DC input voltage drops while quick charging, the Trickle LED will start to blink. If the input
voltage drops to the same level as the output voltage, the charger automatically perceives
an ‘Error’ and continuous ‘Bleeping’ commences.
3.Battery Short Circuit
To establish a battery short circuit, 10sec. after quick charging commences the
Pro-Peak 2500 VP G2 checks the battery voltage. If the voltage is detected as 0 volts, the
charger automatically discontinues quick charging and starts ‘Beeping’.
REVERSE POLARITY CONNECTION
1.Reversed Input Polarity
If the DC input polarity is connected the wrong way round the ‘RED’ power LED will not
light. Reconnect the correct way round.
2.Reversed Output Polarity
If the battery to be charged is connected with its Polarity reversed or the charge leads
are incorrectly connected, the 7.5A Fuse on the front of the charger will blow. Disconnect
the battery from the charger, replace the Fuse and reconnect the battery with the correct
polarity.
TRANSMITTER (TX) CHARGING (AC ONLY)
The Pro-Peak 2500 VP G2 charger can be used to charge Transmitter (Tx) batteries. This
can only be done using AC mains input power. It is recommended to only trickle charge Tx
batteries.
DO NOT UNDER ANY CIRCUMSTANCES QUICK CHARGE TX BATTERIES WHILE THEY
ARE STILL IN THE TRANSMITTER
• ConnectaTxchargecabletothechargeroutputsocket.
• ConnecttheTxchargecabletothechargesocketonthetransmitter,the‘Green’trickle
LED will light continuously to indicate trickle charging.
DO NOT PRESS START BUTTON.
• TricklechargingisacontinuousfunctionofthePro-Peak2500VPG2indicatedbythe
‘GREEN’ LED glowing continuously, so it is not necessary to start the trickle charge
operation.
Suggested Tx pack Trickle Charge Times: 500mAh - 5.5hrs, 600mAh - 6.5hrs,
700mAh - 7.5hrs.
TIMER
• Incasethebatteryisunsuitableforquickcharging,thebatteryisdamagedinsomewayor
the battery capacity is too great, all of which could result in an excessive charge time, the
charger will automatically shut down using an internal timer after 1 hour.
CE APPROVED
This product satisfies all the relevant and mandatory CE directives.
The design and manufacture of this product therefore meets all the all the EC requirements
for the safe operation of electrical equipment.
TECHNICAL DATA
Input: AC 220~240V (50/60Hz), DC 12V.
Output: Fast - DC 4.8~9.6V 3.5A (230V AC 50Hz Input)
Fast - DC 4.8~8.4V 3.5A (DC 12V Input)
Trickle - DC 4.8~9.6V 130mA (230V AC 50Hz Input)
Trickle - DC 4.8~8.4V 130mA (DC12V Input)
Battery Type: Rechargeable Fast Charge Nickel Cadmium (Ni-Cad) or
Nickel Metal Hydride (Ni-MH)
Protection: Reverse polarity DC Input, Reverse polarity
Output (Fused), Thermal Cut-out, Security Timer, Alarms.
REPAIR & WARRANTY
Pro-Peak chargers are warranted for 90 days from original date of purchase, verified by a
sales receipt. NO warranty can be accepted for chargers with broken casing seals, these will
be considered to have been opened without authorisation. In case of a problem, contact your
point of purchase or Ripmax Ltd. Points of purchase are not authorised to replace chargers
thought to be defective: Warranty can only be accepted when claimed by the customer
and accompanied by an original sales receipt. Chargers sent in for warranty repair that
operate correctly will be charged with a service fee. No estimates for service or repair can
be given without sight of unit. This warranty does not cover: Suitability for specific operation,
incorrect installation, component wear from use, reverse or incorrect voltage application,
misuse, damage due to opening of unit, replacing of cut or damaged wires and connectors,
connection to items not mentioned in instructions, mechanical damage, immersion in water
or any other type of damage caused by misuse.
Warranty liability is limited to repair or replacement of unit. As we, the supplier, have no
control over the use of this product, our liability is limited to the cost of the unit. No liability
can be accepted for damage resulting from the use of this product. By the act of use and
operation of this product the user accepts all resulting liability.
Ripmax Ltd, 241 Green Street Enfield, Middlesex, EN3 7SJ.
United Kingdom.
Web: http://www.ripmax.com
This manual suits for next models
1
Other Pro-Peak Batteries Charger manuals


