Pro Pond UV110 Advantage User manual

Pro Pond
Pro Pond
UV110
UV110

ENGLISH............................................................................................................1 - 3
FRANÇAIS......................................................................................................4 - 6
DEUTSCH....................................................................................................7 - 10
NEDERLANDS...............................................................................11 - 14
ITALIANO................................................................................................15 - 17
ESPAÑOL..................................................................................................18 - 21
Always isolate the unit from mains electricity before
carrying out any maintenance.
Isolez toujours l’appareil du courant de secteur avant de
procéder à tout entretien
Vor Ausführung irgendwelcher Wartungsarbeiten müssen
Sie immer zunächst die Stromversorgung der Einheit
unterbrechen.
Isoleer het toestel steeds van de hoofdleiding voordat u
een onderhoud uitvoert.
Scollegare sempre l'apparecchio dall'alimentazione di rete
prima di intraprendere qualsiasi operazione di manutenzione.
Aísle siempre la unidad de la red eléctrica principal antes
de llevar a cabo ningún tipo de reparación o mantenimiento.
Dispose of this unit responsibly. Check with your local
authority for disposal information. UVC bulbs must not be
disposed of in household refuse but must be taken to an
authorised collection point for environmentally responsible
disposal.
Eliminez cet appareil en respectant la législation en vigueur,
que vous pouvez obtenir auprès de vos autorités locales. Les
ampoules UVC ne doivent pas être jetées avec les déchets
domestiques mais emmenées dans un centre autorisé où
elles seront éliminées de manière écologique.
Entsorgen Sie diese Einheit auf eine verantwortungsvolle
Weise. Informationen über die Entsorgung erhalten Sie bei
Ihrer Kommunalbehörde. UVC-Röhren dürfen nicht
zusammen mit dem normalen Haushaltsmüll entsorgt
werden, sondern müssen zu einer genehmigten
Sammelstelle gebracht werden, wo sie umweltfreundlich
entsorgt werden können.
Gooi dit toestel op een verantwoorde manier weg.
Informeer bij uw plaatselijke autoriteit voor informatie over
afvalverwerking. UVC-lampen mogen niet bij het huisafval
worden gegooid en moeten naar een erkend verzamelpunt
gebracht worden voor een verantwoorde afvalverwerking.
Smaltire l’unità in modo responsabile. Per ulteriori
informazioni contattare gli enti locali. Le lampade UVC non
devono essere smaltite con i rifiuti domestici ma devono
essere portate a punti di raccolta autorizzati per lo
smaltimento in conformità con le leggi ambientali in vigore.
Deseche esta unidad de forma responsable. Pida información
a las autorices locales sobre cómo proceder correctamente.
Las bombillas UVC no pueden desecharse junto con la
basura doméstica, sino que deben ser llevadas a un centro
de recogida de residuos autorizado para desecharlas sin
dañar el medio ambiente.
IMPORTANT .WICHTIG . BELANGRIJK . IMPORTANTE
Instructions for
Installation and Use
Important Safety Information
- Please Read Carefully
- Consult a qualified electrician.
- Never look directly at an illuminated UV lamp.
- Do not run this unit dry. Do not cover this unit.
- Always isolate the unit from mains electricity and turn off the water supply
before carrying out any maintenance.
- Always disconnect all pond appliances from the mains supply before putting
your hands into the water.
- Use in the area of the garden pond only if the installation complies with the
relevant wiring regulations.
- Power must be supplied through a Residual Current Device (RCD) with
a rated residual operating current not exceeding 30mA.
- This unit must be earthed. Never use a higher rated fuse than specified below.
- Rating: 220-240V, 50Hz (USA models: 120V, 60Hz).
UV110, 128-134 watts. Class 1. IP64.
- The unit must not be submerged in water.
- If the quartz sleeve is cracked, replace it immediately.
- Young children should always be supervised near water.
Product Information
This unit is manufactured and conforms to:-
Safety: BS EN 60335-1: 2002. BS EN 60335-2-55: 2003
EMC: EN 55015: 2000. EN61000-3-2: 2000 EN61000-3-3: 1995.
EN61547:1995.
This unit is CE approved.
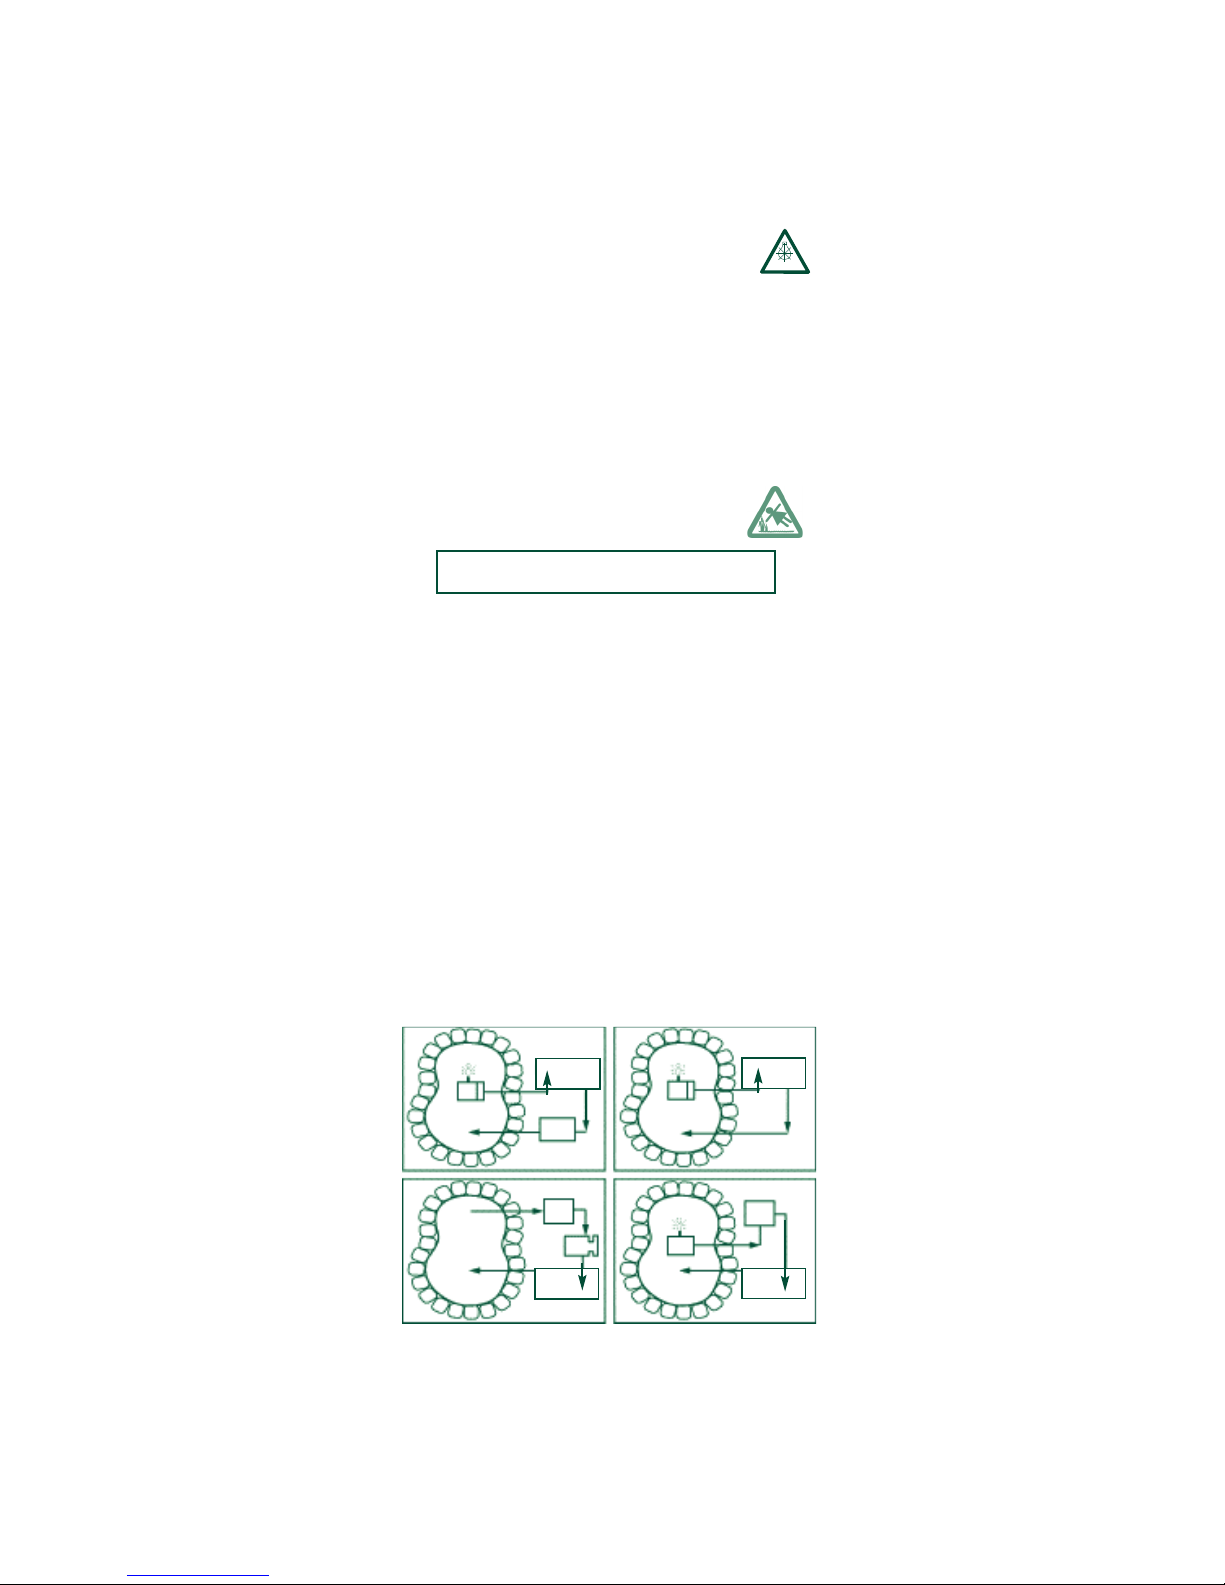
POSITIONINGTHE PRO POND UNIT
Caution: To prevent this unit falling into water, do not install it above or
alongside your pond.
Pro Pond units are weatherproof but not waterproof.The unit can be
positioned either on its base on a flat surface, or mounted on a vertical
surface. It must not be submerged in water or placed in a position where
water may collect around the unit. To prevent the unit inadvertently being
dropped into the pond, we strongly recommend that it is securely positioned
at least 2 metres from the edge of the pond. Any flexible cabling used
between the unit and the permanent wiring should also be kept to a
minimum length. We recommend a maximum length of 1.5 metres. If
installing the unit prior to, or without, a filter it is important that a pre-filter
is used on the water pump to prevent dirt being pumped into the unit.The
unit can be fitted into the water system in any of the ways shown below.
The unit must be either fully frost protected or
taken inside during the winter months.
DANGER
PUMP WITH
STRAINER
MAIN FILTER
PUMP WITH
STRAINER
PRO POND
UV UNIT
PUMP
FILTER
PRO POND
UV UNIT
PUMP
FILTER
GRAVITY FEED
PRO POND
UV UNIT
PRO POND
UV UNIT
UV-C
1

MOUNTING ON A HORIZONTAL
SURFACE
This unit may be mounted on any suitable flat surface including your filter lid.
Caution: To prevent this unit falling into water, do not install it above or
alongside your pond. Do not make the electrical connection to your unit
until it has been plumbed in and fixed securely.
MOUNTING ON A WALL OR OTHER
VERTICAL SURFACE
This unit may be mounted on a wall or other suitable vertical surface.
When full of water the unit is too heavy to mount onto a conventional
wooden fence panel. The unit should be mounted on a wall as shown in the
diagram below and using the mounting kit provided.
The mounting kit consists of six sets of screws, washers and rawlplugs. If
mounting onto brick use the rawlplugs. Identify the mounting plate at either end
of the unit. Assuming the unit is mounted as shown above, use the open slot in
the left hand mounting plate and the long centre slot in the right hand mounting
plate to register and fix the unit.Then mark the upper and lower slots on each
mounting plate. Use all six fixings to mount the unit, and ensure the washer is
fitted between the head of the screw and plastic mounting plate.
CONNECTION TO THE WATER SUPPLY
This unit has stepped inlet and outlet ports, allowing the use of either 2” or
63mm rigid BSP plastic pipe. If using 2” BSP plastic pipe the glued
connection will be made into the second stepped stage of the inlet and
outlet ports. If using 63mm rigid plastic pipe the connection will be made to
the first stepped stage of the inlet and outlet ports.
The unit may also be connected to flexible plumbing using the appropriate
plumbing fittings (not supplied). To ensure unrestricted flow, it is recommended
that the unit is not plumbed in with anything less than 11/2”/50mm pipework.
FLOW RATES
Please note that, for optimum performance, we recommend that you pass
the entire volume of your pond through the UV unit approximately once
every two hours. Please also note that we suggest a minimum flow rate of
passing the pond volume through the unit once every three hours.
Unit Maximum Flow Rate
UV110 8000 imp gal/36000 litres/9400 US gal per hour.
CONNECTIONTO ELECTRICAL SUPPLY
Consult a qualified electrician.
Caution: Use in the area of the garden pond only if the installation complies
with the relevant wiring regulations.
Caution: Always disconnect all pond appliances from the mains electricity
supply before putting your hands into the water.
Caution: Power must be supplied through a Residual Current Device (RCD)
with a rated residual operating current not exceeding 30mA.
Important: This unit is designed to be permanently wired to the mains supply
using the three core 0.75mm2rubber cable fitted to the unit. This unit must be
permanently connected to the mains supply inside a dry, weatherproof
enclosure and through a double pole switched fused spur with a minimum
contact gap of 3mm.The fused spur must only be fitted with a 3 amp fuse.
For safety never use a larger rated fuse.
This unit is fitted with 5 metres of power cable.To prevent the unit
inadvertently being dropped into the pond, we strongly recommend that it
is securely positioned at least 2 metres from the edge of the pond. Any
flexible cabling used between the unit and the permanent wiring should also be
kept to a minimum length. We recommend a maximum length of 1.5 metres.
Mains supply cable colour coding: Brown Live, Blue Neutral,Yellow/Green Earth.
INTERNAL FUSE REPLACEMENT
Always isolate unit from mains supply before undertaking any maintenance.
The control gear on this unit is fitted with a 5mm x 20mm 3.15 Amp quick
blow fuse.
Caution: To prevent this
unit falling into water, do
not install it above or
alongside your pond. Do
not make the electrical
connection to your unit
until it has been plumbed
in and fixed securely.
2

To replace the fuse remove the complete white plastic tubular control pod
by undoing the two bolts holding it in place on the main unit and removing
the lamp lead assemblies from each lamp.Work with the mains cable
positioned to your right hand side.With the control pod free of the main
unit loosen the four black plastic lamp lead watertight grommets situated at
the left hand end of the control pod. On this end only also remove the
screw situated in the centre of the end section. Do not remove the
screw or loosen the mains cable at the right hand end.With the left
hand end section now free, hold the right hand end assembly and gently pull
out the right hand end assembly (approximately 75mm) until you expose the
fuse holder assembly.The fuse holder assembly is easily identified as it
carries a spare fuse that is clearly visible.
Once the fuse has been replaced, gently slide the assembly back into the
plastic tube and reassemble the left hand end section ensuring that the
screw is tightened correctly and all four watertight grommets are sufficiently
tightened to prevent any moisture entering the control pod.
Bolt the complete control pod back into the main unit and reconnect the lamp
end assemblies ensuring that you match the correct numbered lamp holders.
ROUTINE MAINTENANCE
The UV lamps inside the Pro Pond unit have a useable life of 8000 hours.As
green water is only a problem during Spring and Summer, the lamps only need
to be replaced once a year in spring (see below).
As already mentioned, it is essential that the unit is protected from frost
during the Winter months, or disconnected from water and electricity
supplies and stored indoors during the Winter. During the Spring/Summer
season, the quartz sleeves, which separate the UV lamps from the water
passing through the unit, will need to be cleaned two or three times.This is
essential, as dirt or calcification building up on the quartz sleeves will inhibit
the penetration of the ultraviolet light into the water.
LAMP REPLACEMENT & QUARTZ CLEANING
Isolate from electrical and water supplies before carrying out any
maintenance.
Lampholder Restraint
A plastic lampholder restraint is fitted at either end of each lamp chamber to
prevent the lamp holders being accidentally removed while the unit is
connected to the mains. Each restraint is held in place with a self-tapping
screw. To carry out any routine maintenance these restraints must be
removed but it is essential to replace them once the maintenance work has
been done. In time it may be necessary to replace the fixing screw (no.8) with
a slightly larger screw.
To remove the lamp, carefully remove the blue lampholder shroud, then pull
the white plastic electrical end caps from the lamp end. Gently slide the
lamp out ensuring that no pressure is applied to the quartz sleeve. Next,
unscrew the two blue compression fittings located at either end of the
white plastic body and slide off the ‘O’ rings.Then slide out the quartz
sleeve. Clean the sleeve and polish with a soft cloth or paper towel. If you
live in a hard water area there may be some limescale on the quartz sleeve.
This can be easily removed by soaking the sleeve in a proprietary kettle
descaling solution (follow the manufacturer’s instructions). Failure to remove
the limescale will limit the effectiveness of the UV lamp.
ASSEMBLY PROCESS
Slide the clean, dry quartz sleeve into the unit. Ensure that you locate the ‘O’
rings carefully on the ends of the quartz. Failure to do so will result in leaks
when the water is turned on.
If you are carrying out the annual lamp change, use new ‘O’ rings.When you
re-assemble the unit, ensure that the female threads on the compression
fittings and the male threads on the main body are clean. Wipe a little silicon
grease or vaseline (NOT silicon sealant) onto these threads. As these threads
are only serviced periodically, this lubrication will help to prevent them binding
together. Then replace and firmly hand tighten the compression fittings.
Replace the lamp or fit a new one. Relocate the lampholders and blue
lampholder shrouds ensuring that you match the correct numbered lampholders.
NOTE: Pinch the blue lampholder shroud as you reassemble the unit to
release any trapped air. Failure to release the trapped air may cause the
lampholder to disconnect from the lamp end.
Reconnect and turn on the water supply to check for leaks before
reconnecting the electric supply.
IMPORTANT
The plastic body and blue compression fittings have been manufactured from
polymers that have been specifically stabilised to protect them from the effects
of the UVC emitted from the UV lamp. Despite this UV protection they will be
eroded by a combination of the UVC and water flow.As a matter of course
they should be inspected whenever a lamp change is carried out, to ensure they
are not showing excessive wear and tear. Replacement parts are available from
Tropical Marine Centre and its agents.
3
GUARANTEE
PLEASE NOTE that the 24 month guarantee
cover for the unit does not include serviceable
parts, ie. lamp and the quartz sleeve.
GARANTIE
VEUILLEZ NOTER que la Garantie de 24 mois de
l’unité ne couvre pas les pièces remplaçables,
c’est-à-dire la lampe et le manchon en quartz.
GARANTIE
ES IST ZU BEACHTEN, daß sich die
24-Monats-Garantie für das Gerät nicht auf
die wartbaren Teile, wie die Lampe und
die Quarzhülse, erstreckt.
GARANTIE
N.B.: In de garantie van 24 maanden voor het
apparaat zijn niet opgenomen de onderdelen
die onderhouden kunnen worden, zoals de
lamp en de kwartsmof.
GARANZIA
NOTARE che la garanzia di 24 mesi per
l’apparecchiatura non comprende i componenti
soggetti a normale usura, quali la lampara e il
manicotto di quarzo.
GARANTÍA
Recuerde por favor que la garantía de 24 meses
de la unidad no incluye piezas que entran en el
servicio rutinario de mantenimiento, por ej.
lámpara y mango de cuarzo.
Tropical Marine Centre, Solesbridge Lane, Chorleywood,
Hertfordshire,WD3 5SX.
Technical Information Lines
Tel: +44 (0) 1923 284151 Fax: +44 (0) 1923 285840
Open between
9am - 5pm Monday to Thursday/9am - 12pm Friday.
www.tmc-ltd.co.uk email:[email protected].uk
Table of contents
Popular Water Dispenser manuals by other brands

IBC Water
IBC Water AST0715MP-960 Installation & operating instructions

Lancaster Water Treatment
Lancaster Water Treatment X FACTOR LX15 Series Installation, operating and service manual

Elkay
Elkay EMABF8 Series Installation & use manual

Oasis
Oasis Osmosis Home installation manual

Monarch Water
Monarch Water ULTIMATE MINI AQUA HE install guide

Haier
Haier HLM-109B instruction manual


