Pro's Kit GE-631 Installation guide

Manual
Assembly Instruction
&
組裝說明手冊
GE-631
空氣動力引擎車
Air Engine Car Kit
0 1 2 3 4 5 6 7 8 9 10 11 12 13 14 15 16 17 18 19 20 21 22 23 24 25 26 27 28 29 30
CM
歡迎購買寶工GE-631空氣動力引擎車,在石油燃料能源逐漸消耗殆盡之際,替代能源成為重要議題,而
「空氣」就能解決這項難題!空氣一天24小時無所不在,取之不盡,用之不竭,而且最棒的是─免費! 也
許你會好奇,空氣要如何取代汽油?現在就跟孩子們一起動手做空氣飛車,親身體驗空氣帶來的原動力!
空氣飛車結合了環保意識﹑科學原理﹑和DIY的樂趣,讓孩子們做中學,學中做!這是一部真正引擎結構的
空氣車,組裝簡單,操作也很容易,內建打氣桿,只要將空氣瓶注滿空氣,車子通過空氣加壓可以在35秒
內推進到50公尺! 空氣動力飛車內紅色矽膠管可確保良好的氣密性,同時設計有測量空氣壓縮量的壓力計,
當持續將空氣注入已注滿的空氣瓶時,安全氣閥裝置會自動開啟來排放多餘的空氣,不用擔心氣瓶爆破問題。
空氣動力引擎車不需要電池,不受天氣狀況侷限提供您更多樂趣,對環境安全、無毒、乾淨,提供8歲以上
的孩子一個充滿啟發、有趣及滿足成就感的學習經驗。
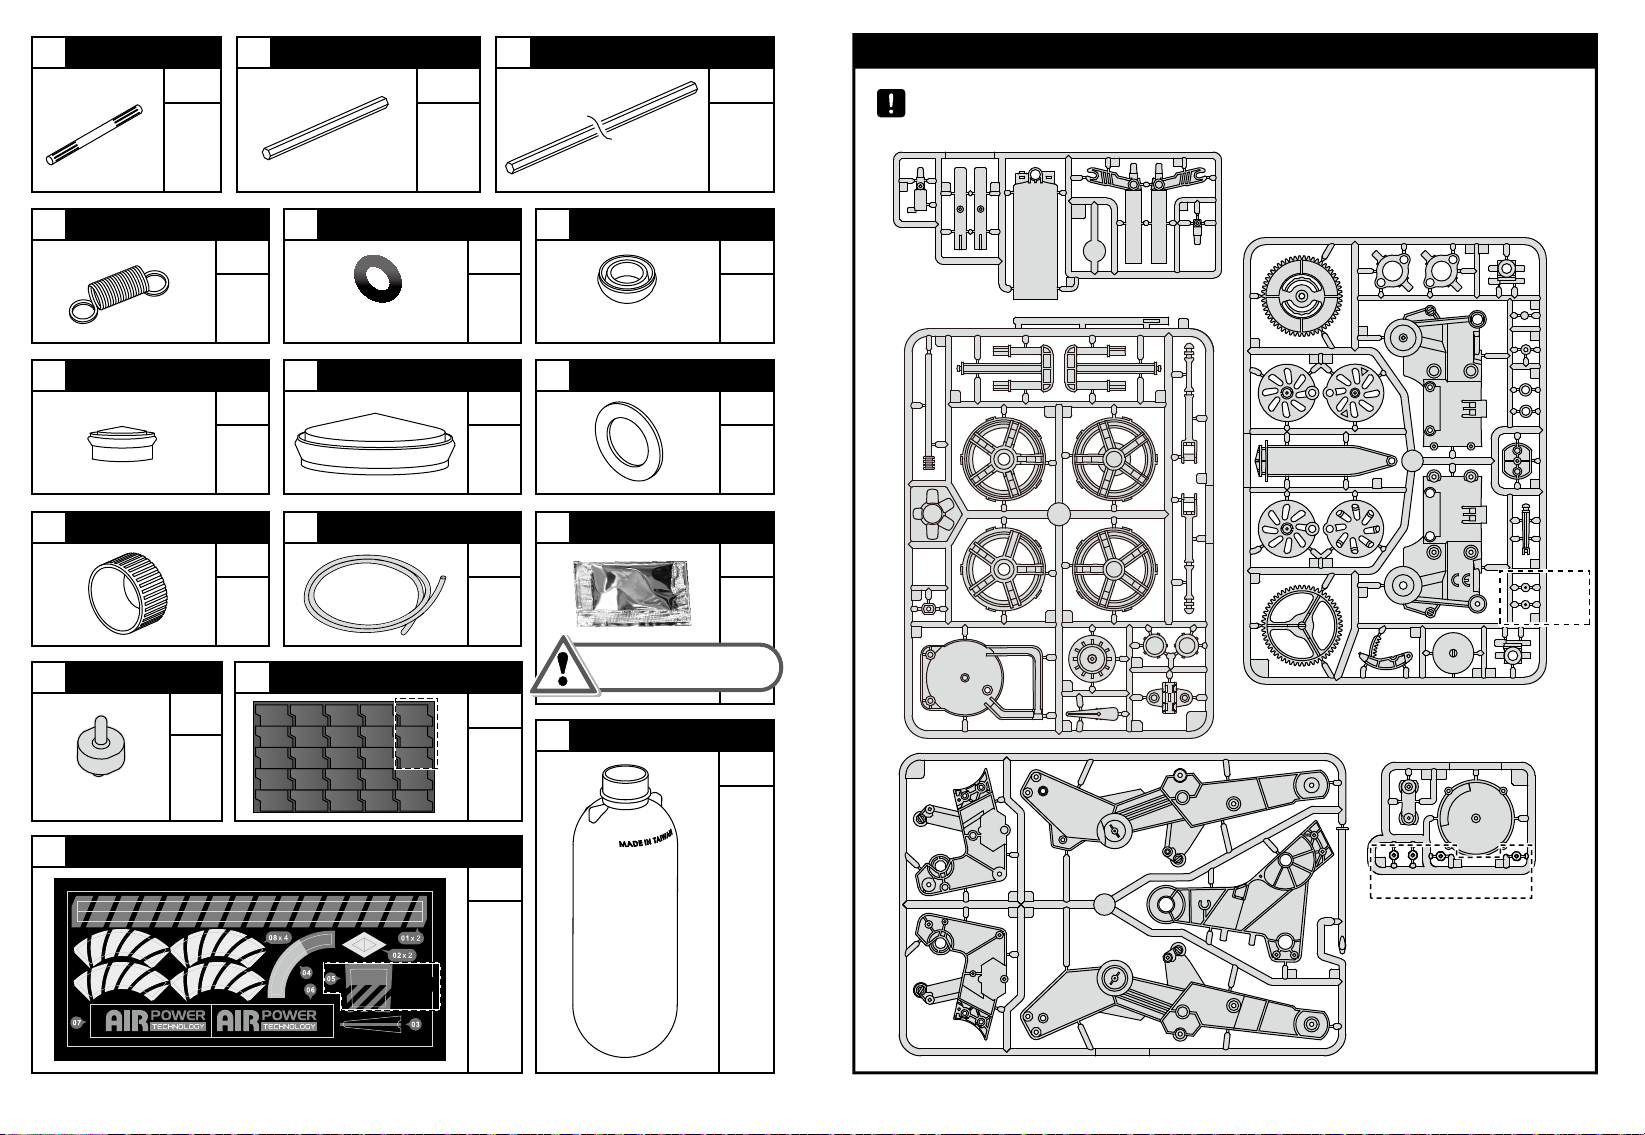
自攻螺絲 華司螺絲 圓軸 (短) 圓軸 (長)
120 6 1
P1 P2 P3 P4
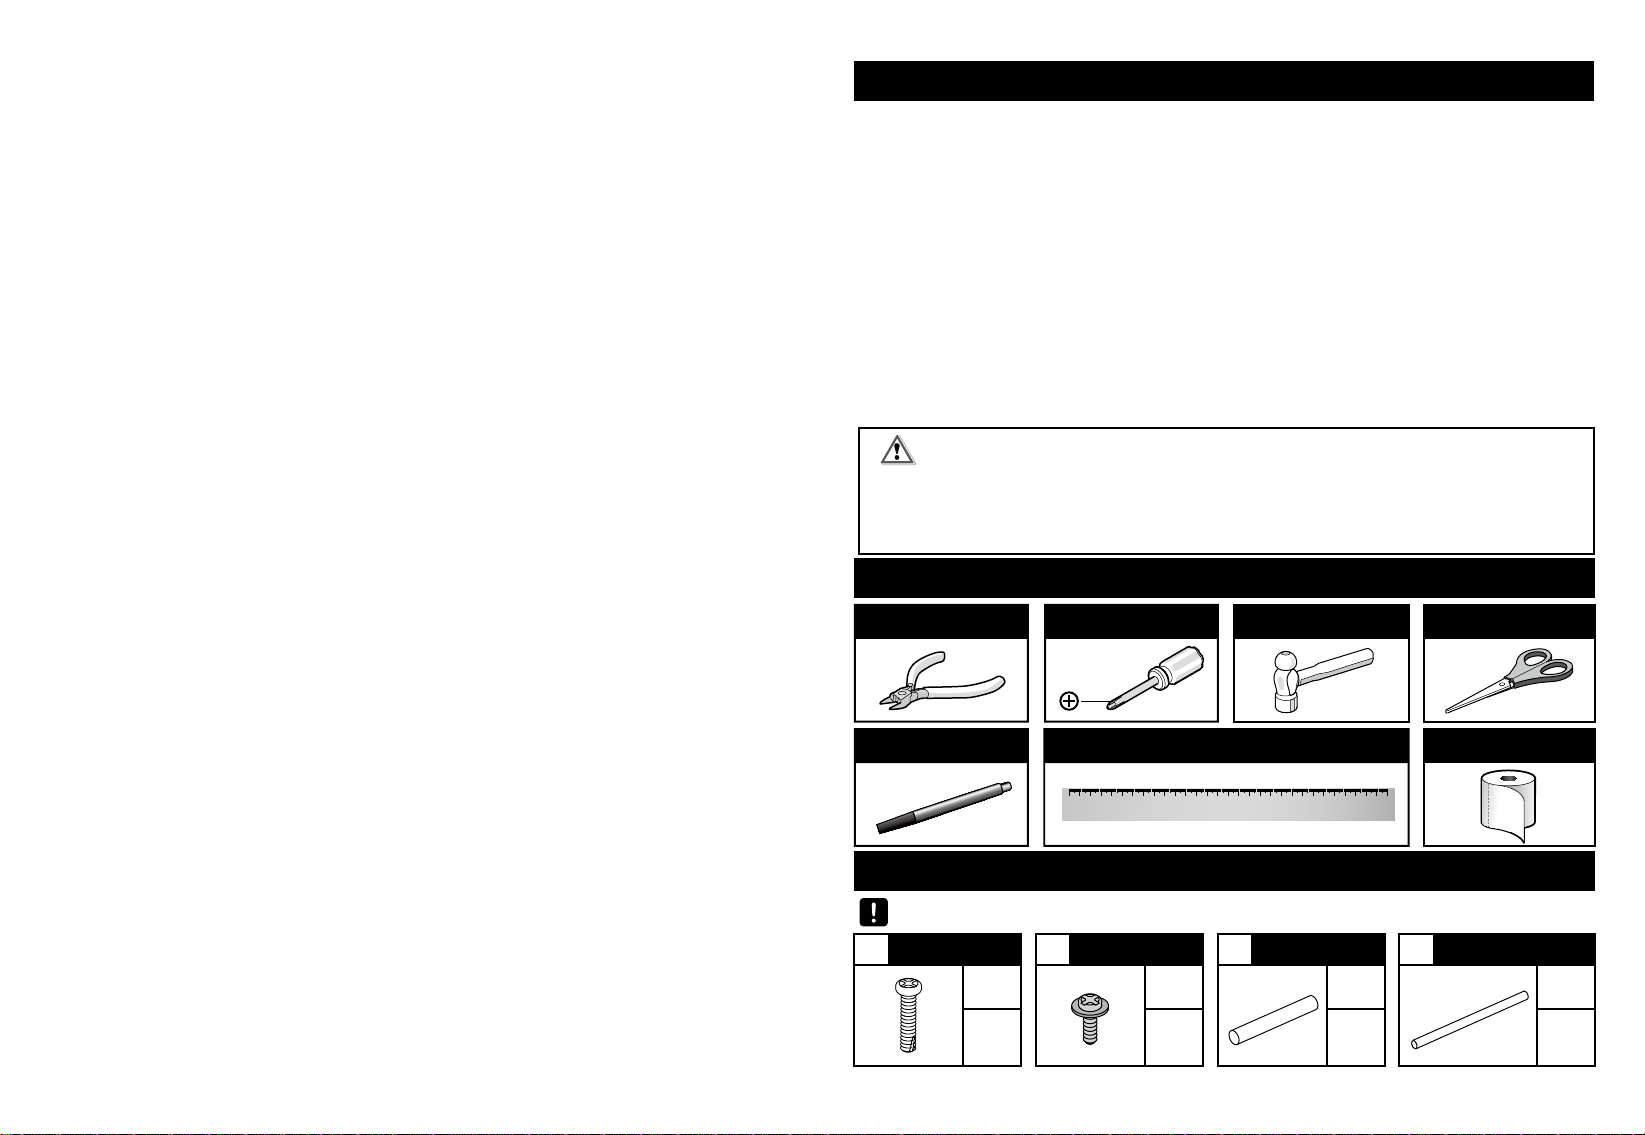
斜口鉗 十字起子 鐵鎚 剪刀
麥克筆 尺紙巾
部分零件含有銳利的邊緣及尖角,組裝時請注意
1
數量 數量 數量 數量
產品介紹 Product Introduction
自備工具如下 Tools You May Need
零件清單 Mechanical Parts List
Tapping Screw Tapping Screw Round Shaft(Short) Round Shaft(Long)
QTY QTY QTY QTY
Diagonal Cutter
Product contains functional edges and sharp points.
Permanent Marker Ruler
Scissors
Screwdriver Hammer
Tissue Paper
空氣動力引擎車
Air Engine Car Kit
Thank you for purchasing GE-631 Air Engine Car Kit. Gasoline is becoming difficult to find noways and is
contributing to environmental issues and worldwide problem, Air as fuel...could possibly be another alternative to
petroleum. Air is available 24/7, does not run out and it's free.You may wonder, how it will be possible. Now build the Air
Power Engine Car with your kids and bring the vision to life . This kit designed with the environment in mind, technology,
and also fun to build. Assembly and operation is breeze. A pump-up bar with a pressure meter is built into the car for
easy operation. When the air chamber is full, you can release the compressed air ; the air then expands and drives
the vehicle to 50 meters in 35 seconds. The silicone tube creates an air tight fit. Another safety device implemented into
the kit is a safety valve. if the user keeps pumping while the tank is full, the safety valve will open and bleed the air
automatically. The car is fun thatrequires no batteries or specific weather conditions to limit its usage. The kit is suitable
for child above 8 years old.
警
告
1.本玩具內含小物件,請勿讓三歲以下孩童取得,以免放入口中造成窒息。
2.兒童使用剪切工具時,請家長指導使用方式,並請在家長監督下使用,以免發生意外。
3.為避免嬰兒或兒童產生窒息的危險,請於拆卸後立即將塑膠袋銷毀或遠離嬰兒及兒童。
Choking hazard - Small parts. Not for children under 3 years.
Adult supervision is recommended when children use scissors.
To avoid danger of suffocation, keep the plastic bag away from babies and children.
Warning
1 1 1
127
11
2
1
P14 P15
P20
P11 P12 P13
1
1
P17 P18
P19
2
圓軸(兩端直紋)
彈簧 O型環(黑) 紅色活塞帽(小)
紅色活塞帽(中) 紅色活塞帽(大)
瓶蓋
氣閥(透明藍色)
裝飾貼紙
泡棉
空氣軟管
墊片
油包
PET空氣瓶
六角軸(短) 六角軸(長)
P8 P9
P10
P5 P6 P7
2 1 1
1
P16
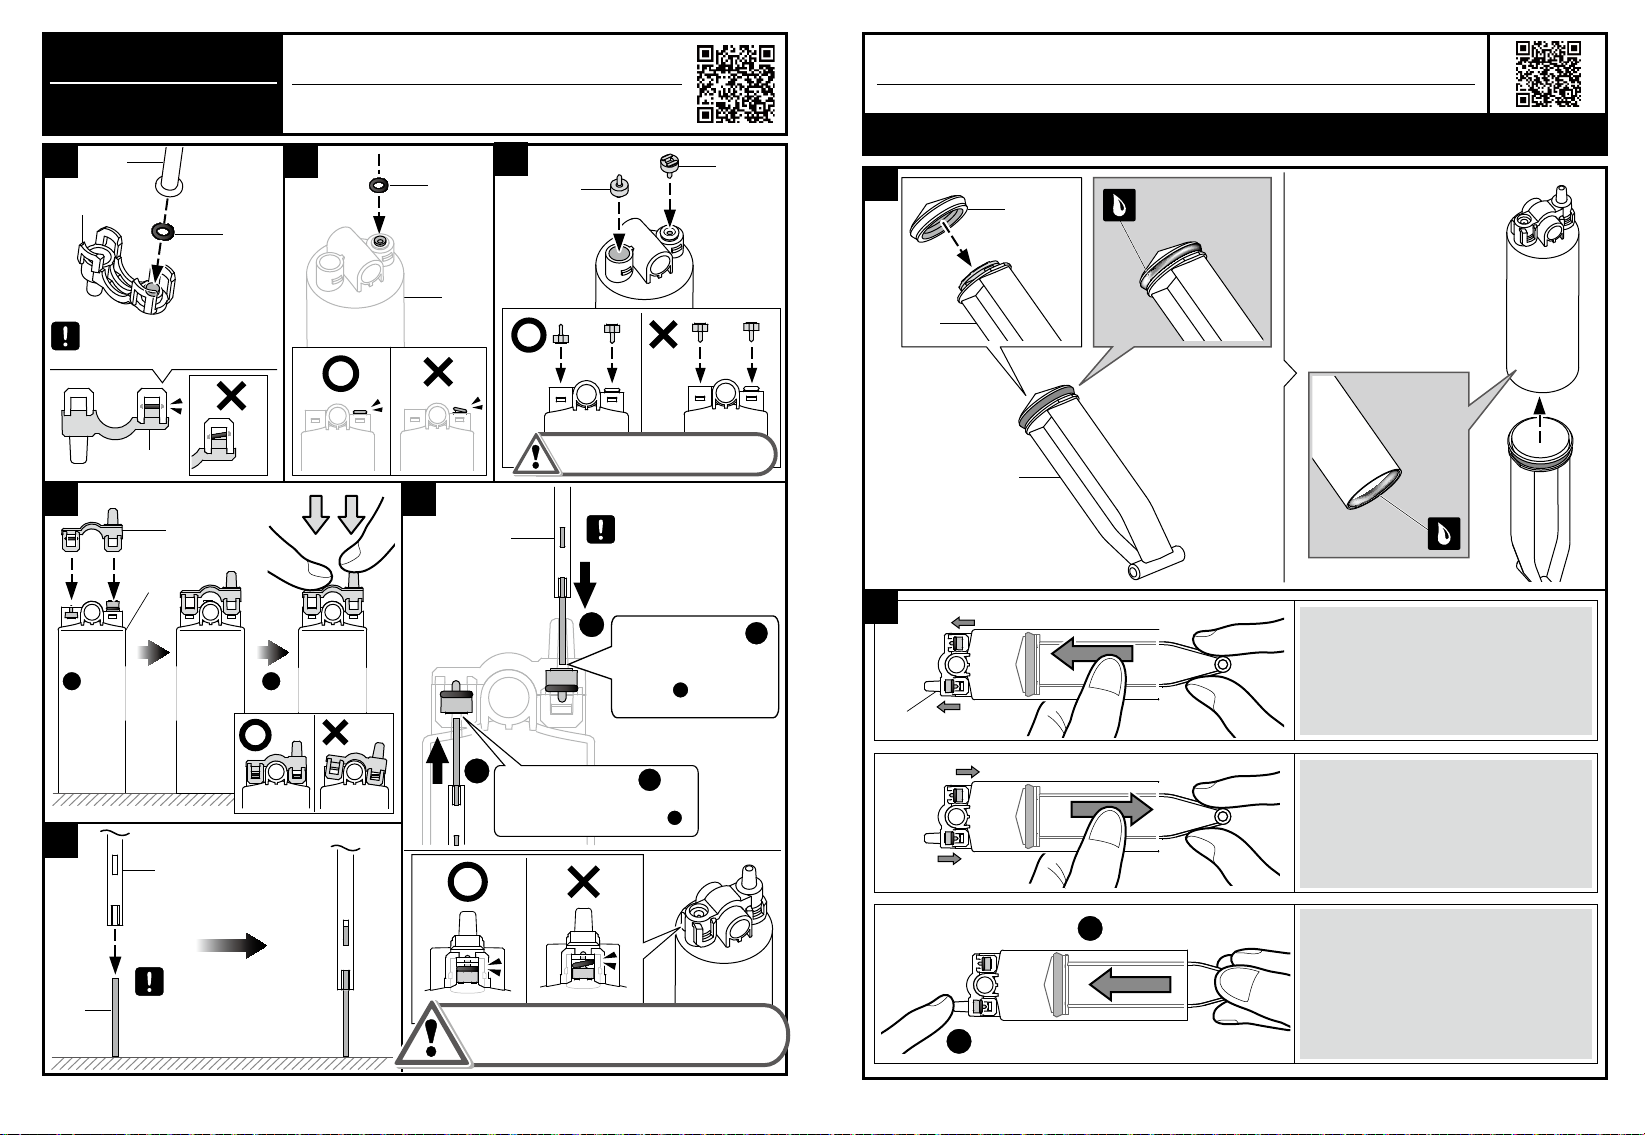
安裝空氣軟管時,請勿碰觸到油。
(備品x1)
備
品
(備品x1)
Ignore
請忽略請忽略
Hex Shaft (Short) Hex Shaft (Long)Round Shaft
Red Cap (Medium) Red Cap (Big) Spacer
Spring O-ring (Black) Red Cap (Small)
Sponge
Valve (Clear Blue)
Oil Bag
Bottle Cap Silicon Tube
PET Bottle
Sticker
Do not touch the oil while fitting
the silicon tube.
(Spare parts: 1 pcs)
(Spare part : 1 pc)
Spare parts
Ignore
數量
QTY
數量
QTY
數量
QTY
數量
QTY
數量
QTY
數量
QTY
數量
QTY
數量
QTY
數量
QTY
數量
QTY
數量
QTY
數量
QTY
數量
QTY
數量
QTY
數量
QTY
數量
QTY
(備品x1)
(Spare part : 1 pc)
3
請依照組裝步驟將所需的零件剪下,以免組裝時造成零件混淆。
C
1 2
3 4
5
MADE IN TAIWAN
6
1
2
3
4
5
7
6
8
9
10
2019
18
17
16
15
14
13
12
11
D
MADE IN TAIWAN
請忽略
122
4
3
4
5
A
MADE IN TAIWAN
16
OIL B7
B
8
10
9
9
3
2
4 5
13
10
12
11
MADE IN TAIWAN
14
MADE IN TAIWAN
1
2
333
E
塑膠模型零件 Plastic Parts
Cut the plastic parts when they are required. Do not cut them in advance.
Ignore
Ignore
請忽略

4
12
P15
請依照組裝步驟將所需的空氣軟管剪下,
以免組裝時造成混淆。
小技巧提醒 : 剪下零件時請將毛邊剪切乾淨,以免產生間隙影響組裝。
Tip : Cut Off The Burrs Before Assembly
量測並做記號 裁剪
空氣軟管
傾斜空氣軟管
便於套入接頭
將空氣軟管
套入至底部
毛邊
burr
毛邊
burr 毛邊
burr
空氣軟管安裝 How To Fit Air Tube
Tilt the tube
Tube
Measuring & Marking Cutting
空氣軟管裁切 How To Cut Air Tube
Follow the steps above, cut the air tubes when
they are required.Do not cut them in advance.
Insert the tube
to the bottom
5
1
請做2
組
1:1
2
A2
A2
A4
11cm
11 cm
請於組裝前先將空氣軟管裁剪至左側標示長度。
比例
空氣軟管模組A組裝 Tube Module A Assembly
2
Prepare air tube before assembly.
Scale
9 cm
6
2
A5
2
9cm
9cm 9cm
9cm
1:1
比例
請於組裝前先將空氣軟管裁剪至左側標示長度。
Prepare air tube before assembly.
Scale 1 2
11.5 cm
7
A1
11.5cm
11.5cm
2 1
14 cm
14cm
請於組裝前先將空
氣軟管裁剪至左側
標示長度。
請於組裝前先將空氣軟管
裁剪至左側標示長度。
1:1
比例
Scale
1:1
比例
Scale
空氣軟管模組B組裝 Tube Module B Assembly
Prepare air tube before
assembly.
Prepare air tube before
assembly.
3
5
B1
1
2
P13
B3
P14
8
P19
01x2
P20
A1
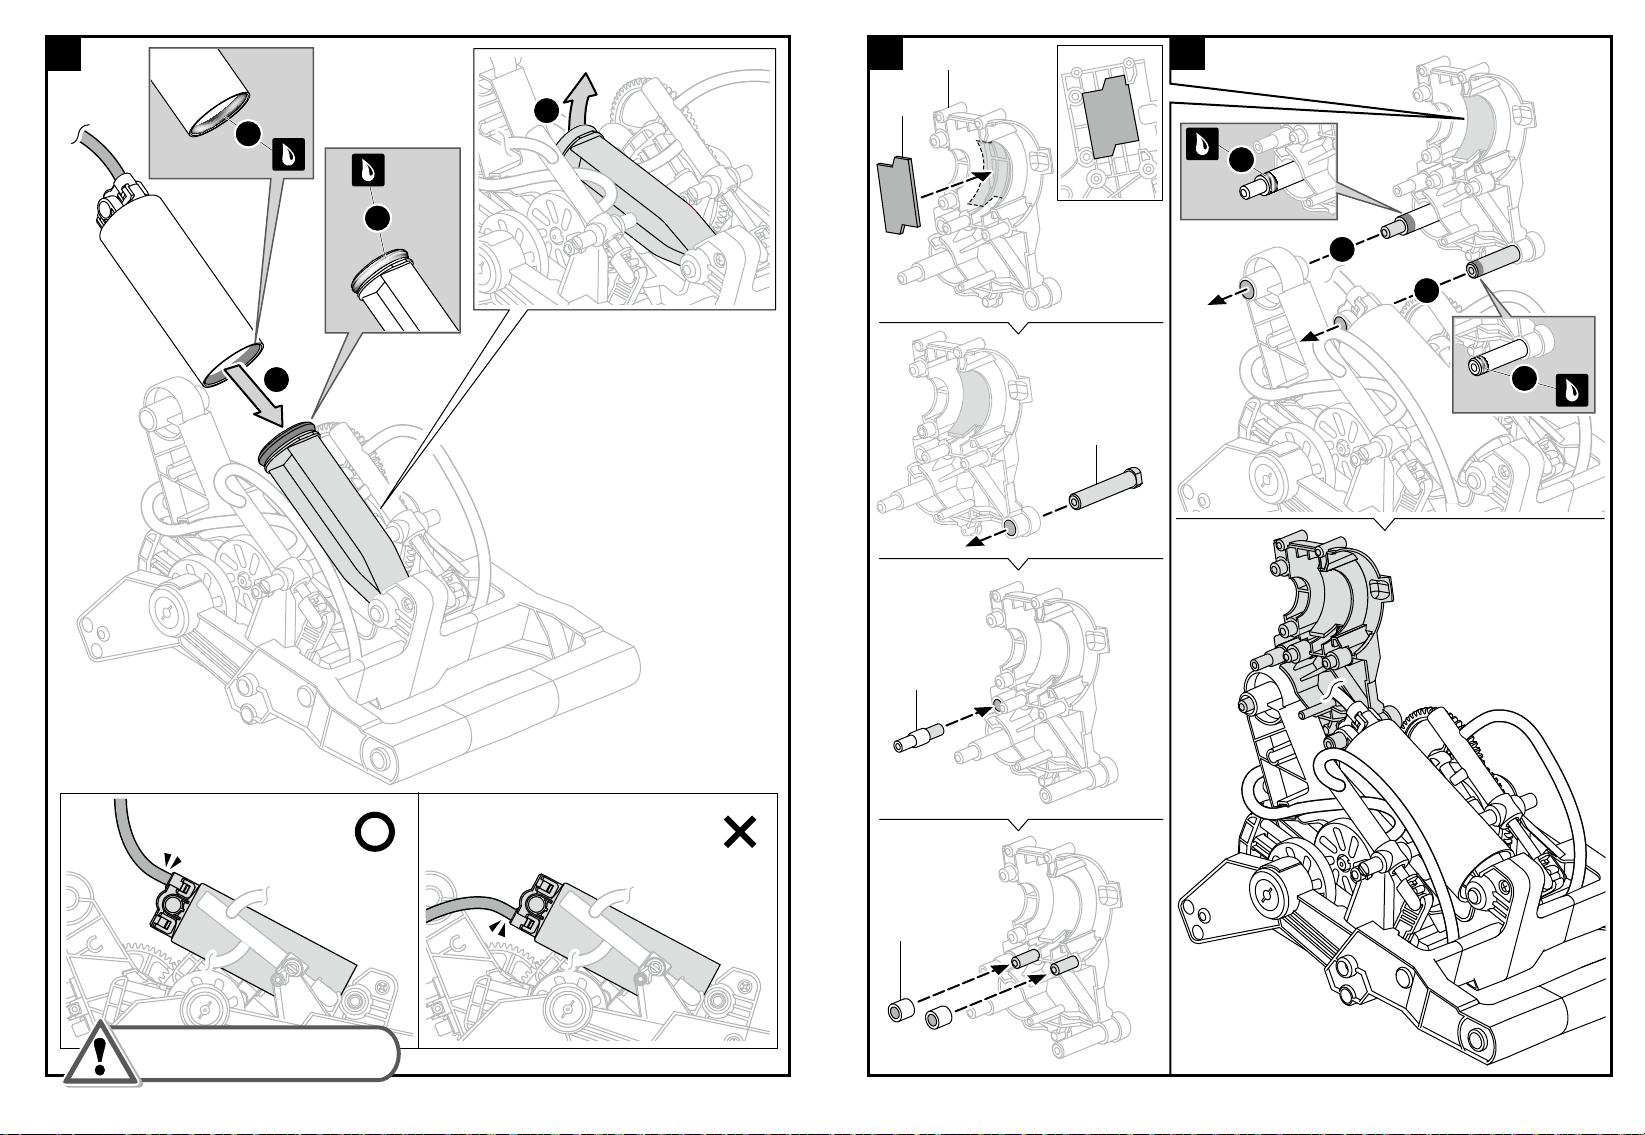
4請將P14(瓶蓋)安裝到空氣瓶並鎖緊
以免漏氣。
Screw P14 to PET bottle tightly to avoid air
leakage.
B8
零件上油 How To Oil The Parts
Do not spill any oil from the B7 oil sink.
Keep oil contained.
Tissue Paper
Do not oil outside the shadow as shown below.
9
6
紙巾
請小心將液壓油倒入B7,請勿溢出
抹油
P16
B8
B7
注意 : 此圖代表零件需抹油
上油處以陰影標示(如下圖),請勿將油塗抹至非上油處
示範
Apply Oil Note : Oil the parts when appears.
Example:

7
D16
P10
請確認P10安裝在正確位置,以免漏氣。
影片示範
請掃描QR code觀看影片,可幫助您組裝更順暢。
https://youtu.be/Zeoa563dsHQ
紅色活塞帽(小)
10
9
10
D12
D20
將D16重複推入及拉出數次,使油均勻
沾附零件,以利後續操作。
2
1
8
Make sure P10 is placed in the
proper direction to avoid air leakage.
Video Tips
Scanning the QR code to help you assemble below
steps smoothly.
Red Cap(Small)
Push & pull the oiled part D16 several
times to make it work smoothly.
B2
P8
11
12 13
E1
03
P19
04
P19
11
注意 : 組裝前請輕拉彈簧兩端
以確認彈簧伸縮性。
注意 : 組裝前請輕拉彈簧兩端
以確認彈簧伸縮性。
Note: Give a slight pull on both ends
of the spring to make sure of good
strength & extension before assembly
4
https://youtu.be/opxoEtfa6Bg
P17
B14
P17
12
E2
P9
O型環
(黑色)
O型環
(黑色)
P9
B14
A3
E2
1 2 3
C5
使用C5協助將P9放到E2
2
1
P4
5
6
氣閥組裝
重要! 請確認P17的組裝方向,以免漏氣。
使用B14安裝P9
將P17壓到底(如圖 )
確認P9 O型環平貼閥門
1
1
將P17推到頂(如圖 )
並確認P9 O型環平貼閥門
2
2
將P4直立於桌上,
將B14壓入P4(如圖示)
請仔細依循以下安裝方式,避免漏氣。
如果P9 O型環並未如上圖平貼閥門,請回到步驟6重做。
A3
Snap E2 to A3 entirely to avoid
air leakage.
4
將E2壓到底
將A3直立於桌上,並將
E2平放於A3上。
E2
A3
1 2
影片示範
請掃描QR code觀看影片,可幫助您組裝更順暢。
O-ring
(Black)
O-ring
(Black)
Use C5 to assist you in setting P9
to E2 entirely.
Ensure the direction of two P17 to
avoid air leakage.
Use B14 to assist
you in setting two P9
entirely.
Push P17 to the bottom
(as per Fig ) and make
P9 to set flatly.
Push P17 to the top (as per Fig )
and make P9 to set flatly.
Straight P4 on the
table, cap B14 to P4
as shown . If P9 (O-Ring) was set improperly as shown in above
wrong fig, re-do step 6 again.
Straight A3 on the table,
and put E2 on A3 flatly.
Press down
E2 to A3 entirely.
Video Tips
Scanning the QR code to help you assemble below steps smoothly.
Vale Assembly
Pay close attention to the following
steeps correctly to avoid air leakage
https://youtu.be/pgkLWs-0nig
13
1
2
P12
D4
D4
1
2
P17
影片示範
請掃描QR code觀看影片,可幫助您組裝更順暢。
紅色活塞帽(大)
當D4推入時,請確認P17是否
依照箭頭指示方向移動。
當D4拉回時,請確認P17是否
依照箭頭指示方向移動。
用手指堵住突起孔
推入D4
D4推入時應有阻力,無法輕易
推入。
漏氣測試─氣閥 Air Leakage Testing – The Valve
Red Cap (Big)
Seal the hole of the boss side with a finger.
Push in the D4.
Make sure that both P17 move to the
direction indicated by the arrows when
the D4 is pushed in.
Make sure that both P17 move in the
direction indicated by the arrows when
the D4 is pulled back.
Confirm that the D4 cannot be
pushed in easily.
Video Tips
Scanning the QR code to help you assemble below
steps smoothly.

14
2
2
1
1
折彎空氣軟管並插入下圖所示位置。
折彎空氣軟管
將折彎的空氣軟管插入洞孔
1
2
1
2
E2
將E2安裝至正確位置(如上圖所示)
用手指堵住凹孔
將D4向外拉
D4外拉時應有阻力,無法
輕易拉回。
Fold the tube and insert it to the hole as shown below.
漏氣測試—空氣軟管模組BAir Leakage Testing – Tube Module B
Fold the tube.
Insert the folded tube to the hole.
Confirm that pulling the D4 back is
hard, or you need more power to pull
the D4 back.
Seal the hole of the concave side with a finger.
Pull the D4 back.
Install E2 at a right position as
shown above.
3
D4
A3
指針停在原處 指針擺動至以上位置
15
漏氣 安裝正確
緊握住A3
將D4重複推入及拉出15~20次將空氣打入
到空氣瓶內,確認壓力表指針是否擺動。
參照下圖所示,可看出空氣管模組B是否安裝
正確或是漏氣。
Pointer stays still Pointer turns to above position
Air Leakage Working Functionally
Using D4 to repeat a “ Push & Pull” movement
15~20 times to collect air into PET bottle.
Check pressure meter and examine the position
that the pointer swings to.
Results shown below will reveal if tube module B is
installed functionally or experiencing air leakage.
Hold A3 firmly!

4請確認以下位置是否有漏氣產生,若有請重新安裝。
回到第8頁,按照步驟5重新安裝。
回到第10頁,按照步驟7~13重新安裝。
回到第12頁,按照步驟1~6重新安裝
測試完成後請將折彎的空氣管及D4從A3移除
將D4放在B7旁邊以避免其他零件沾附到油
1號位置
2
1
D4
16
1號位置
2號位置
2號位置
3號位置
3號位置
Check following positions if air leakage was occurred,
and re-install as below:
Position 1:
Position 1:
Position 2:
Position 3:
Position 2: Position 3:
Put D4 aside B7 to avoid oil spilling with others.
Be sure to remove air tube & D4 from A3
after testing is finished.
Back to page8 , and re-install step 5 again.
Back to page10, and re-install steps 7~13 again.
Back to page12, and re-install steps 1~6 again.
D2
C6
D5
D5
P6
17
1
2
比例1:1
1
2
2
1
如右圖所示,
請將P6六角軸插入D5至底(比例1:1)
請確認D2及D5是相反位置。
Scale 1:1
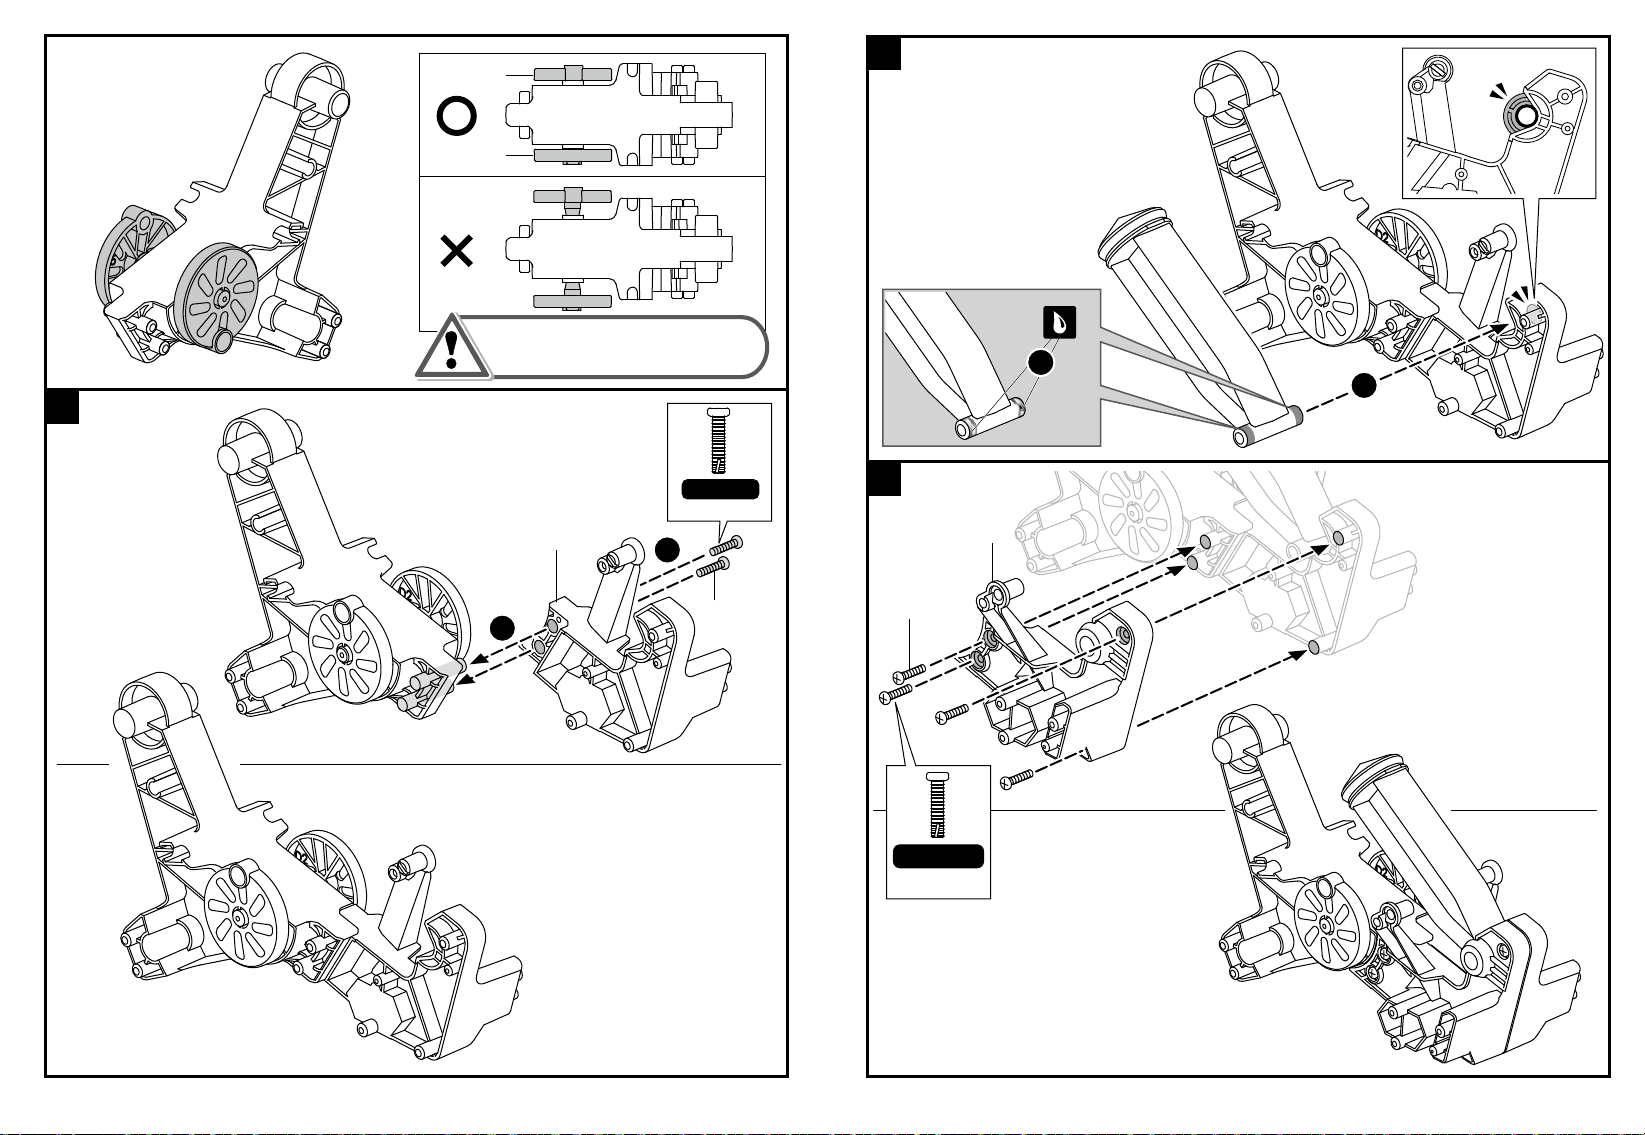
車體組裝 Vehicle Body Module Assembly
Insert P6 hex shaft to the bottom as
indicated in the right fig. ( scale 1:1 )
Make sure parts D2/D5 are at opposite positions.
P1x2
C3
18
3
1
2
D5
D2
比例1:1
如上圖所示,請將D2及D5推到底以貼近車體。
Push parts D5 & D2 to the bottom as
shown above.
Scale 1:1
P1x4
C1
19
4
5
2
1
比例1:1
Scale 1:1
D7
20
6
7
8
P3
D3
C2
P5
D1
將P5插入D1並以鐵鎚輕敲P5至底
D7
D1
P19
08x4
如上圖所示,請將P3穿過D7插入D3至底部
(比例1:1)
如上圖所示,請將P5插到底(比例1:1)
比例1:1
比例1:1
組裝前請將毛邊剪切乾淨。
Cut off the burrs before
assembly.
Slightly hammer P5 into D1.
Scale 1:1
Insert P3 to the bottom to match
fig shown above. ( scale 1:1 )
Scale 1:1
Insert P5 to the bottom to match
fig shown above. ( scale 1:1 )
組裝前請將毛邊剪切乾淨。
Cut off the burrs before
assembly.
D13
21
10
D13
9
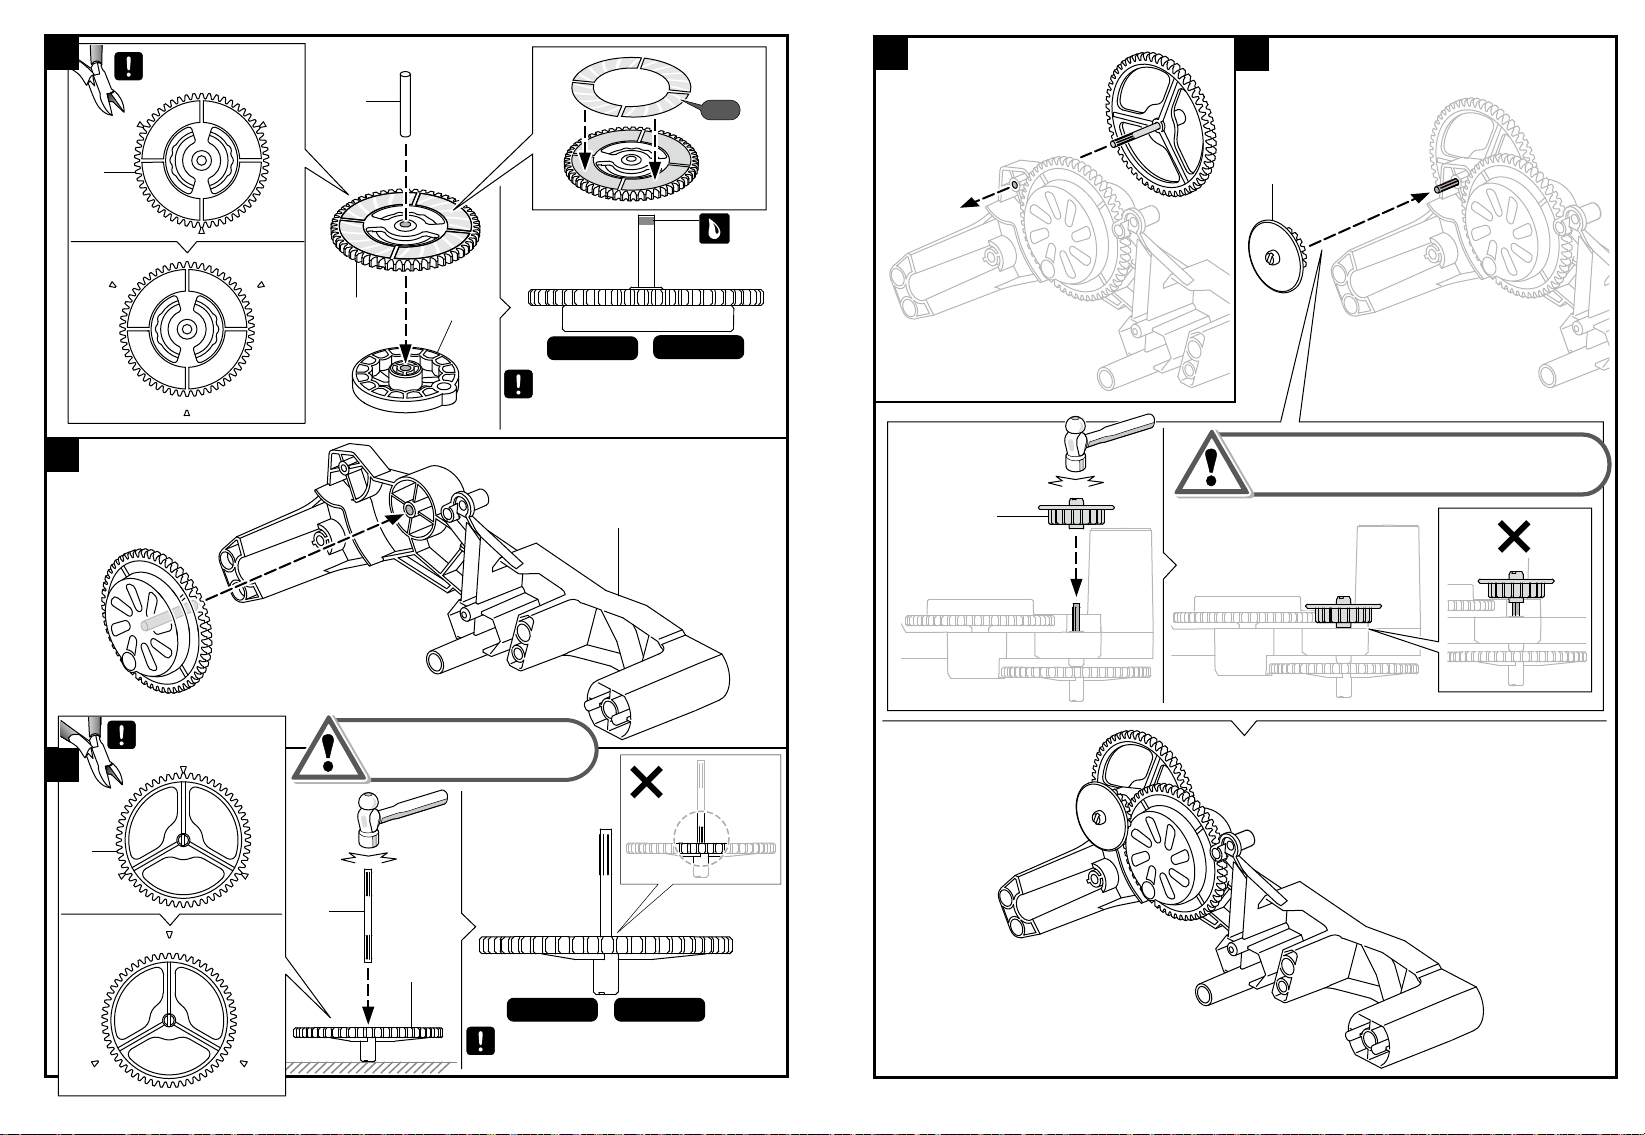
將D13插入圓軸,並以鐵鎚輕敲至底(如下圖示)。
Slightly hammer D13 to the bottom as
shown below.

22
11
12
請務必依照以下步驟組裝P10與B13,並確認組裝結果。
https://youtu.be/bnGIYlT6jBQ
P10
小技巧提醒 :
使用C5協助組裝P10
P10
影片示範
請掃描QR code觀看影片,可幫助您組裝更順暢。
紅色活塞帽(小)
紅色活塞帽(小)
Video Tips
Scanning the QR code to help you
assemble below steps smoothly.
請確認P10組裝方向,以免漏氣。
Ensure P10 is inserted in the proper
direction to avoid air leakage.
請確認P10組裝方向,以免漏氣。
Ensure P10 is inserted in the proper
direction to avoid air leakage.
Make Sure Set P10 and B13 Step By Step As Shown Below.
Red Cap (Small)
Red Cap (Small)
Tip : Use C5 to assist you
in setting P10 easily.
小技巧提醒 :
使用C5協助組裝P10
Tip : Use C5 to assist you
in setting P10 easily.
23
13
C5
請確認P10組裝方向以免漏氣。
請注意: P10在步驟13的方向,與步驟11、12不同。
P10 紅色活塞帽(小)
小技巧提醒 :
若P10在組裝時出現扭轉,請使用C5
協助調整。
小技巧提醒 :
使用C5協助組裝P10
請做2
組
2
Ensure the direction of P10 is correct to avoid air leakage.
Direction of P10 on step 13 is different from step 11 & 12.
Red Cap (Small)
Tip : Use C5 to assist you
in setting P10 easily.
Tip :
Use C5 to make it smooth if P10 was
twisted during assembly.

14
1
1
1
2
2
B10
D8
P2x2
24
P11
15
D9
B13
A2
注意 : 請確認A2及D9確實對位崁入並緊緊扣住。
請勿將D9及D14混淆,請以D9進行組裝。
D9
B13
P10
若P10於組裝時發生扭轉,請將B13
取出並調整P10後,再重新組裝。
紅色活塞帽(中)
請做2
組
比例1:1
Scale 1:1
Red Cap(Medium)
Note:Make sure to lock A2 / D9 entirely.
Do not mix up D9 & D14, make
sure to use D9 for assembly.
2
Take off B13 if P10(Red Cap) was
twisted during assembly.Re-insert
B13 to A2 after P10 was re-set flatly.
25
16
將B10及B13重複推入及拉出數次,使油
均勻沾附零件,以利後續操作。
B13
B10
Push & pull the oiled part B10/B13 several times
to make them work smoothly.

26
17
4
2
3
1
1
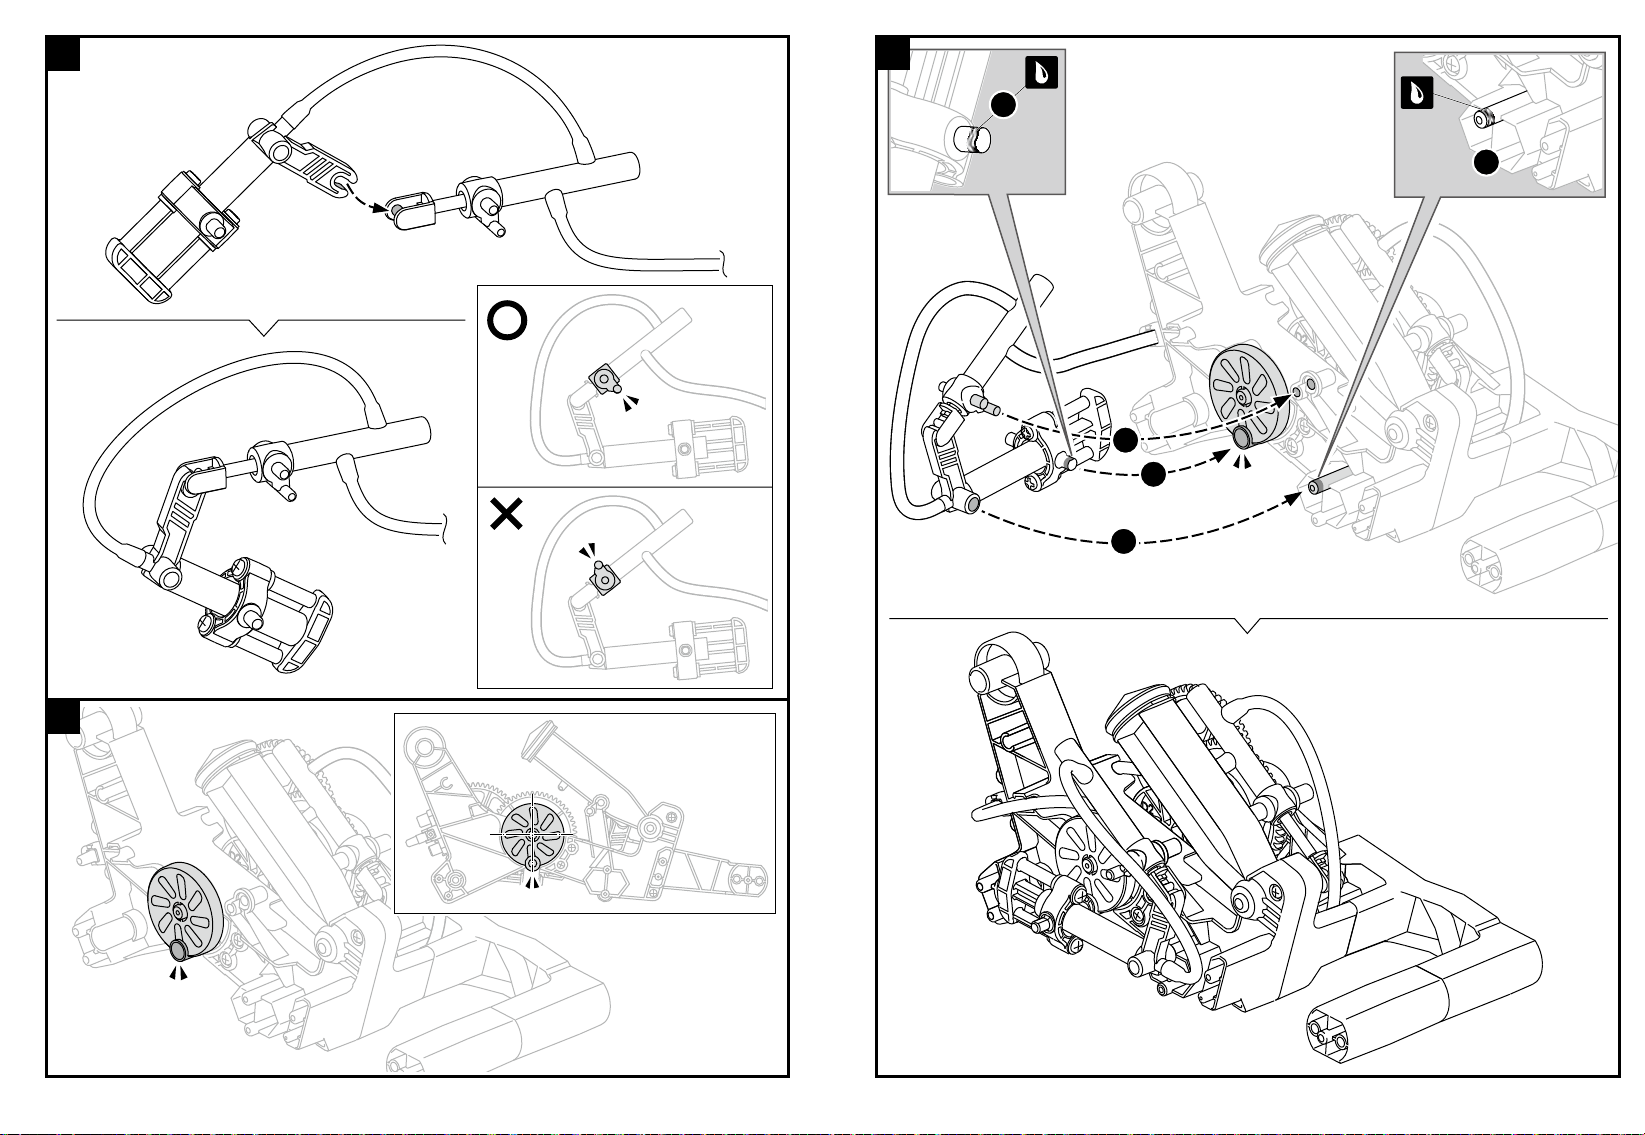
請將空氣軟管置於如上圖所示位置
Route the air tube and have it at the
right position as shown above.
27
18
19
P1x4
2
4
3
1
5
1
請確認空氣軟管朝向正確方向
比例1:1
Scale 1:1
Make sure the air tube is facing the right direction.

D17
1
28
20
21
1
1
2
2
比例1:1
P1
B4
Scale 1:1
22
29
D14
A2
將B10及B13重複推入及拉出數次,使油均勻
沾附零件,以利後續操作 B13
B10
D14
請勿將D9及D14混淆,請以D14進行組裝。
注意 : 請確認A2及D14確實對位崁入並緊緊扣住。
若P10於組裝時發生扭轉,請將B13取出並
調整P10後,再重新組裝B13。
B13
P10
Push & pull the oiled part B10/B13 several times to
make them work smoothly.
Do not mix up D9 & D14, make sure to use
D14 for assembly.
Note: Make sure to lock A2 / D14 entirely.
Take off B13 if P10(Red Cap) was
twisted during assembly.Re-insert B13
to A2 after P10 was re-set flatly.
30
23
24
1
31
25
4
3
2
1

D6
C4
32
26
27
2
3
2
4
5
1
1
6
1
P19
P19
02
02
比例 1:1
P1x5
33
28
29
Top View上視圖
Scale 1:1
34
30
1
3
4
2
請確認空氣軟管位置是否正確
Ensure the right direction of air tube.
D19
D18x2
35
B6
P18
1
2
2
31 32
D10
1

36
33
34
PET空氣瓶
請確認空氣軟管是否安裝於如上圖正確位置。空氣軟管位置
錯誤將導致堵塞,且無法打氣至空氣瓶。
PET Bottle
Make sure air tube is installed at a right position as shown above.
Wrong position may have the air tube be clamped and fail to pump
sucessfully.
比例1:1
比例1:1
Scale 1:1
Scale 1:1
Check if air tubes are clamped during assembly. Slightly pull the tube
(as shown above) to make sure it is freely moving without clamp.
37
1
P18
D11
2
2
2
P2
35
36
P1
P1
組裝時請避免空氣軟管被夾住
組裝後輕拉空氣軟管確認是否可移動,如可移動表示空氣
軟管沒有被夾住。(如上圖所示)
Be careful not to clamp the air tubes
during assembly.
Other Pro's Kit Motorized Toy Car manuals


Popular Motorized Toy Car manuals by other brands

Kyosho
Kyosho Ultima Pro XL manual

Peg-Perego
Peg-Perego CASE IH Agriculture IGCD0554 Use and care guide

Kyosho
Kyosho MINI-Z Racer MR-015 RM Type instruction sheet

Tamiya
Tamiya Rock Socker Assembly instructions

Traxxas
Traxxas CompetitionX KEN BLOCK GYMKHANA FIESTA 7309 owner's manual

Ayk Racing
Ayk Racing Gator Sidewinder Instruction and assembly manual


