Pro-safe 31238165 Manual

PRO-SAFE® SHELTERS
OPERATION / MAINTENANCE MANUAL
PLEASE READ THIS INSTRUCTION MANUAL
CAREFULLY BEFORE ASSEMBLING YOUR PRO-SAFE
SHELTER.
CONTENTS
INTRODUCTION……………………………………………………………………………………1
SAFETY INSTRUCTIONS…………………………………………………………………………2
PRINCIPLES OF OPERATION…………………………………………………………………..4
SHELTER PACKING LIST ………………………………………………………………………..6
SET UP SHELTERS…………………………………………………………………………………..7
CONNECTING MULTIPLE SHELTERS……………………………………………………..10
PRO-SAFE SHOWER…………………………………………………………………………….12
STOWING SHELTERS AFTER USE………………………………………………………….13
MAINTENANCE…………………………………………………………………………………...15
TROUBLESHOOTING / REPAIRS ……………………………………………………..…15
WARRANTY…………………………………………………………………………………………18

1
INTRODUCTION
Thank you for buying a portable inflatable shelter. They have been
designed for rapid deployment and ease of use in emergency hazmat
incidents, offering a top quality multi use compact inflatable structure
constructed with heavy-duty and UV/chemical resistant material for
prolonged use and safety. Shelters could be served as portable points of
dispersal for vaccinations, emergency supplies and other tented function
or situation requiring a rapidly deploy-able shelter like relief shelter,
temporary space and warehouse and decontamination place, etc.
Important Notes
1. Please keep this manual in a secure place and keep it with the unit
permanently.
2. This operation manual should be thoroughly and completely studied
and understood prior to initial use of the unit. If this is your first air
inflatable Shelter, for your own comfort and safety, please ensure that
you obtain handling and operation experience before assuming
command of the unit. Your PRO-SAFE authorized distributor will be
pleased to advise you with competent instruction.
3. If there are any questions or concerns, please contact PRO-SAFE prior
to operation.
4. Please note that we cannot be held responsible for any damage and/or
equipment malfunction, which may result from lack of reviewing and
following instruction manual instructions, and/or from lack /absence of
proper care and maintenance.
5. PRO-SAFE operates a policy of continual product development, and as
such both the product and this manual may be subject to technical
alterations without notice.
6. On scene coordinators are responsible at all times for the correct and
proper use, movement, carry/lift weight per person, cleaning & use in
various dangerous environments. PRO-SAFE® merely supplies set-up,
care, use & maintenance guidelines.

2
ATTENTION: This warning symbol appears in the operating
manual next to operating and safety instructions dealing
with rules, regulations and instructions for the proper
operation of the shelter.
SAFETY INSTRUCTIONS
1. This operation manual should be reviewed and thoroughly
understood prior use of the unit.
2. Products should not be used for other purposes except for the
original design, such as floating equipment.
3. Before setting up, on scene coordinators should assess the safety
of the site environment, and be sure to stay away from landslides,
fire sources, floods and other dangerous environments.
4. When removing shelters from the carrying bag, ensure there are
no sharp objects or glass on the floor that might tear or puncture
the inflatable structure.
5. Shelters require a compressed air/electric inflator/deflator
source to inflate them. Operators should be familiar with the
use of the air source utilized, and aware of any risks associated
with it.
6. The weight of the units varies dependent on the model
purchased. The units are supplied in a carrying bag fitted with
handles to permit two or more people to carry the unit. The
carrying bag is not to be dragged but lifted and carried by the
number of personnel on-sight coordinators deem appropriate.

3
7. When used in a hazmat incident, shelters may come in
contact with substances ‘hazardous to health’. Should this
happen, they should be thoroughly cleaned to prevent
contamination of personnel. Operators should be aware of this
risk, and wear appropriate personal protection to avoid
coming in contact with these substances. On scene
coordinators must manage and be completely responsible
herein.
8. Shelters are fitted with an over pressure valve on the
inflatable structure, to prevent the unit from over-inflating and
possibly bursting. This valve is fully automatic in operation and
must not be blocked or adjusted in any way. If using
compressed air to inflate unit, an operator must stand by at all
times and immediately turn off compressed air source when the
over pressure valve is activated as noted by the “hissing”
sound of escaping air.
9. When deflate, be sure all the people inside the shelter had
left, otherwise it may cause asphyxia.
TEMPERATURE USE GUIDELINES
At different temperatures, the compressed air in the air berm
expands as the temperature rises and shrinks as the
temperature decreases, so temperature affects the use of the
shelter.
COLD WEATHER USE:
Recommended for use in temperatures to -20 degrees C (-4 degrees
F) Fully inflate to the point of the over pressure valve almost being
activated (if activated cease air fill immediately) if being used in
extreme cold weather since the cold air will actually contract
inside the berms and the air berms may feel slightly ‘soft’ to the
touch.

4
WARM WEATHER USE:
Recommended for use in temperatures to +56 C (+132.8 F)
When temperatures during use are to exceed 30 degrees C (86 F) be
aware hot air expands and so manually reduce the air pressure in the
air berms or allow over pressure valves to activate. As the evening
shift arrives in continued use, and air temperature drops re-inflate
the unit as colder air causes internal air pressure to decrease.
AT THE COMMENCEMENT OF EACH SHIFT PRO-SAFE STRONGLY
ENCOURAGES AND RECOMMENDS THAT THE AIR PRESSURE
INTERNALLY BE CHECKED AND ADDRESSED AS ABOVE, AND THAT A
COMPLETE SYSTEMS CHECK OCCUR ON ALL ITEMS IN USE WITH THE
SHOWER OR SHELTER SYSTEM.
ATTENTION: When removing shelter from the carrying bag, ensure
there are no sharp objects or glass on the floor that might tear or
puncture the inflatable structure. Avoid dragging the
unit over rough surfaces. The use of a tarp/groundsheet
is strongly recommended for inexpensive protection
and maximum longevity of the floor and berms.
PRINCIPLES OF OPERATION
Shelters are inflated via the use of a compressed air source/electric
inflator/deflator and inflation time is approximately 45 seconds to 5+
minutes (size of unit dependent). Over-inflation of the structure is
designed to be prevented via the inclusion of a pressure relief valve fitted
to the unit. If using compressed air to inflate unit, an operator must
stand by at all times and immediately turn off compressed air source
when the pressure relief valve is activated as noted by the “hissing”
sound of escaping air. The structure has reinforced air inflated berms.
The structure is usually fitted with two external zipped doors, the first is
the entrance door, and the second is the exit door as determined by on-
scene coordinators.

5
To deflate the unit a valve is so equipped to release the air in the structure,
allowing the shelter to deflate. We suggest using the inflator/deflator
to empty the air berm to minimize the packing volume. The unit can then
be carefully folded and packed into the carrying bag supplied for safe
transportation and storage.
SHELTER DIAGRAMS
AUXILIARY INFLATION
VALUE (for air cylinder & air
guard)
ELECTRIC INFLATOR /
DEFLATOR INLET AND DUMP
VALVE: push in and quarter
turn clockwise to lock valve open. To
deflate, push in and quarter turn
counter clockwise to allow valve to pop
up and close.
SAFETY OVER PRESSURE
VALVE
REMOVABLE CANOPY
TIE DOWNS FOR FASTENING
ROPES TO TIE SHELTER
DOWN IN STRONG WINDS
SIDE DOOR
ENTRANCE / EXIT DOOR
INFLATABLE
STRUCTURE
REMOVABLE FLOOR

6
SHELTER PACKING LIST
Shelters consist of the following items:
1. Shelters in carrying bag
2. Electric inflator/deflator
3. Air guard
4. Stakes bag
5. Stake (qty Depending on the
shelter size)
6. Hammer
7. SCBA High Pressure Air inlet
hose
8. Repair material swatches
(sliver/blue/white for canopy, one
for air tube, one for the floor)
9. Repair clear patch & glue &
brush
10. Manual

7
SET UP SHELTERS
1. To unpack shelter and make ready for
inflation. Undoing carrying bag, roll the
bag upside down, and remove unit.
ATTENTION:
Before undoing the carrying bag, be sure
that:
A:Check the environmental safety, be far
away from fire sources, disaster areas, and falling trees etc.
B:Ensure surface is flat and free of sharp objects, place groundsheet on
ground (if supplied as an option).
NOTE! Do not drag on ground!
C:The carrying bag is not to be dragged but lifted and carried by the
number of personnel on-sight coordinators deem appropriate.
D:Place the unit to suit all site and incident requirements, ensuring
entry/exit doors are aligned in right direction. On-scene coordinator
must make these decisions.
2. Unroll the shelter either onto
groundsheet or onto ground carefully,
pull the four corners flat.
Attention: At any time, do not wear shoes on the shelter.
When open and fold the shelter where it needs to stand on
it, please remove your shoes first, or the sand on the shoes
may pierce the air tube or canopy;

8
3. Locate and open the “Air Control”flap. You will see 3 valves located
on the tube vertically. From top to bottom, they are auxiliary inflation
valve (for air cylinder & air guard), safety over pressure valve and electric
inflator/deflator inlet and dump valve. Inflating the shelter according to
the method of inflating.
METHOD OF INFLATING
USE THE ELECTRIC INFLATOR/DEFLATOR
Please be noticed the direction of the air
flow (see the arrow on the inflator/deflator).
Manufacture supplies 110V 1800W electric
inflator/deflator. Locate and open the
“AIR CONTROL”flag. Remove the twist
cap on the inlet and dump valve. Make the
valve remaining in the close position at this
point.
Extend the hose of the inflator/deflator so
that it is straight. Insert the sharp head
nozzle of the inflator/deflator into the
valve opening, press down and turn right,
then the nozzle will be locked into the valve.
Connect power and start
inflation/deflation. Once the shelter
reaches to rated pressure, remove the
nozzle first, then turn off the power.
Otherwise some air will escape from the air
berm. When finish, please close the valve
cap.
When use electric inflator/deflator to inflate the shelter, the air pressure
inside the tube will reach 2.2-2.5PSI and the pressure relief valve (rated
pressure 4PSI) will not be activated. If the electric inflator/deflator works
for a long time (over 10 minutes) or works under strong sunlight, the
temperature of the machine will rise to 60 ℃(140 ℉) and being
9
overheated. Once the machine overheated and it will stop and should
work again once it cools down.
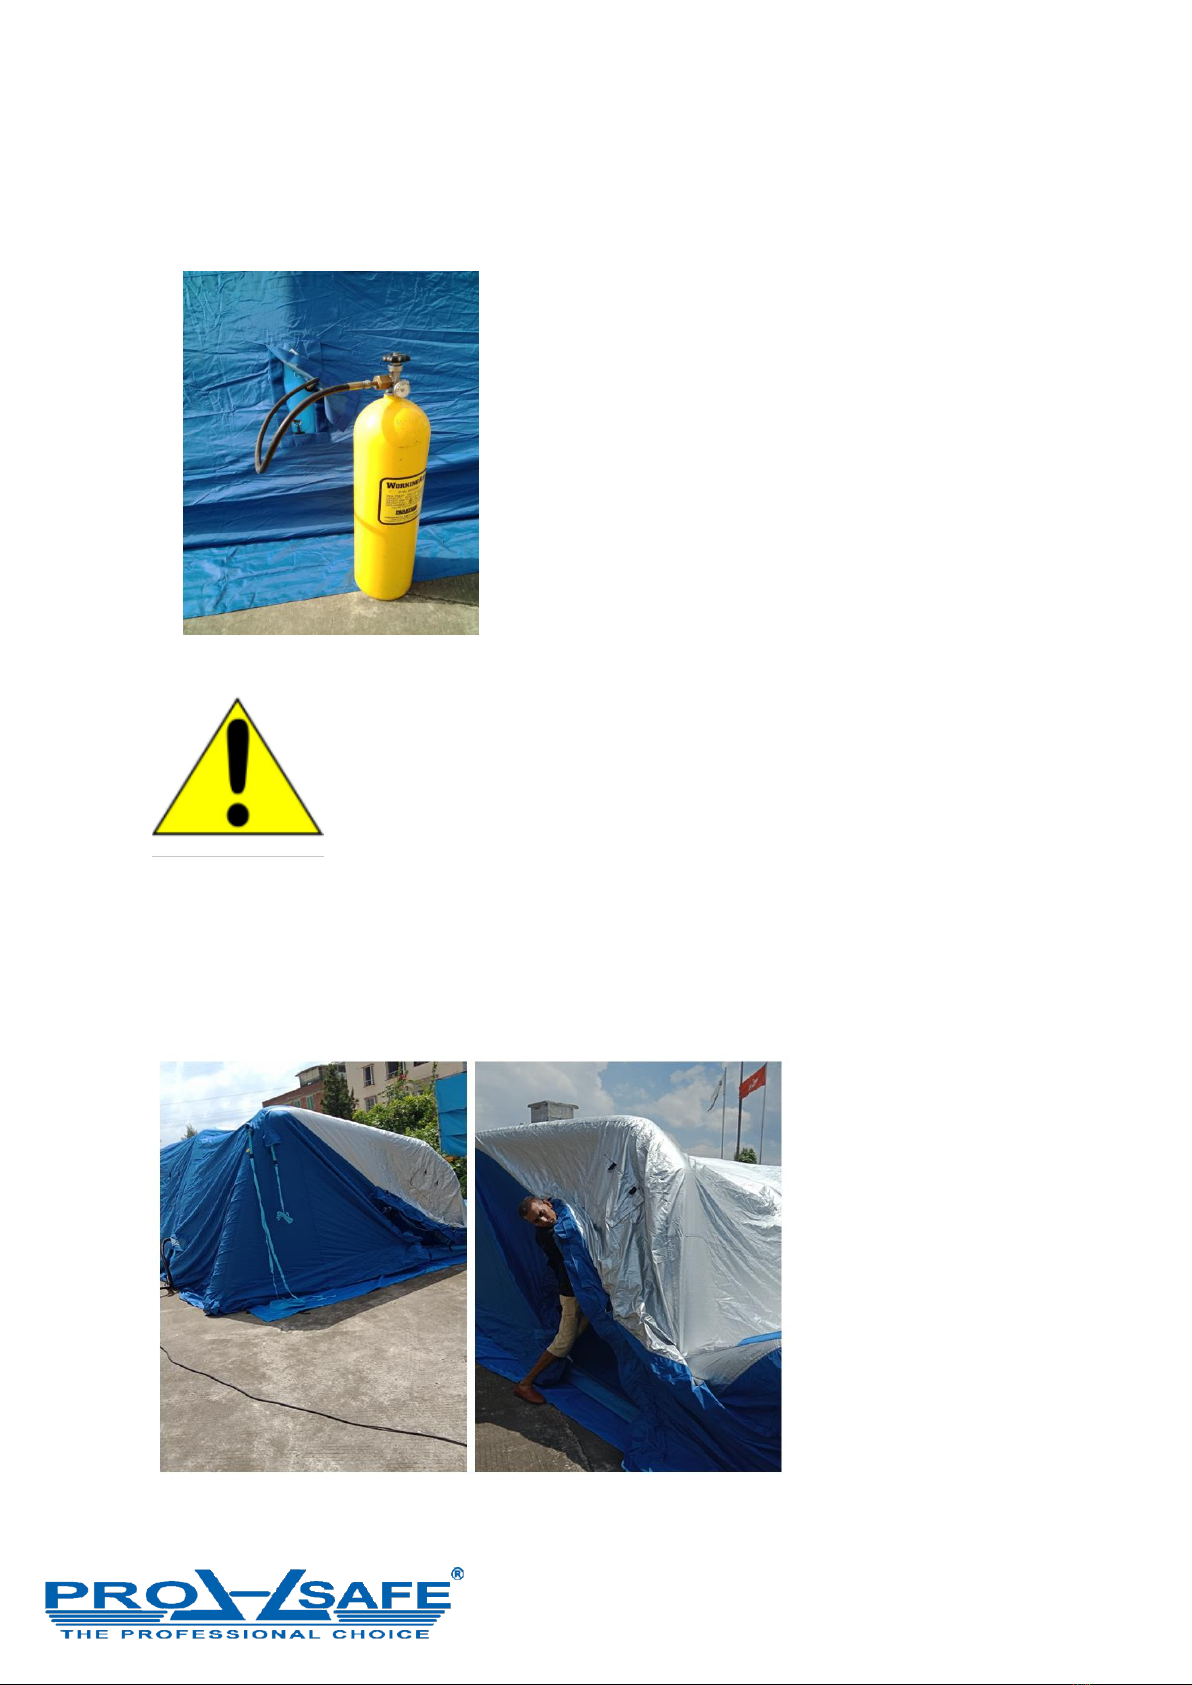
INFLATION USING HIGH PRESSURE COMPRESSED AIR:
With on-scene coordinator oversight,
carefully attach hose to SCBA/dive air
cylinder and lock hose to air berm. Then turn
on cylinder air VERY slowly. Then inflate unit
until pressure relief valve operates - indicated
by sound of escaping air, which can be felt by
hand. IMMEDIATELY turn off compressed air
supply. The pressure relief valve will close
automatically when excess air has escaped
from unit.
NOTE! Never cover/block the pressure relief
valve, as the unit may burst!
Allow a steady, clean flow of air to inflate the unit. It will
take approx. 45 seconds to 5+ minutes to inflate the unit
(size of unit dependent) from an SCBA cylinder, and slightly longer if
using a compressor or the electric inflator/ deflator. Remove inflator /
deflator once unit is fully inflated.
NOTE! Support roof of shelter as it inflates! (helps unit stand)
4. After the
shelter stands up,
pull the four
corners and the
floor flat.

10
Make the following final checks:
1. Check that the unit is upright, and not leaking. If a leak is discovered,
deflate unit and repair before using. (See instructions for notes on how
to repair punctures.)
2. In the event of/in case of windy
conditions, always tie off unit to the
ground using supplied tie down
ropes and stakes, and/or lash to solid
objects (e.g. vehicles).
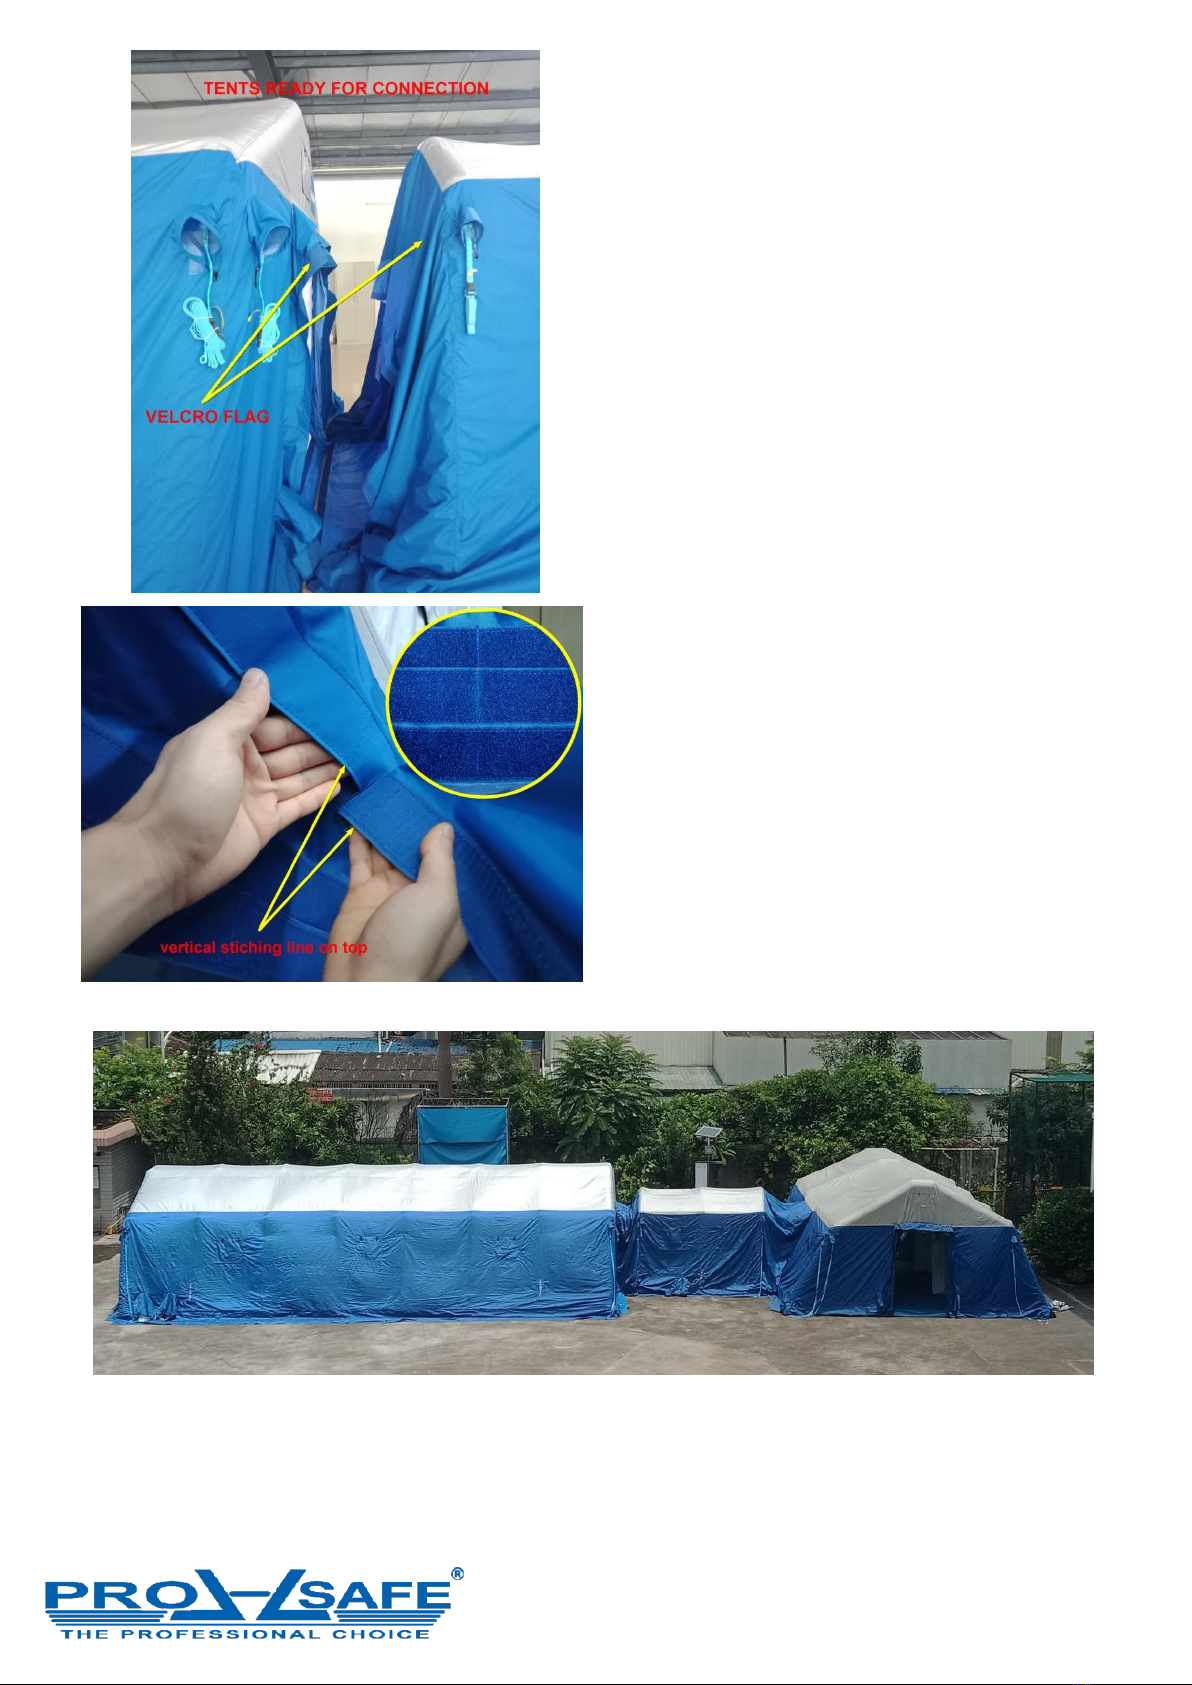
CONNECTING MULTIPLE SHELTERS
Position and unpack all the shelters in the selected configuration. Inflate
and secure each shelter. Locate the Velcro attachments at the end of each
entrance and connect them together.
All shelters can be connected together directly or through item
NO.31238165 anteroom to connect the entrance/exit door or side door
(if available) of each shelter.
Item NO.31238165 anteroom itself could be a normal shelter. It could also
work as a connection shelter to connect multiple shelters
entrance/exit/side doors into a large area.
11
1. On-scene coordinator should decide
shelters placement and the location of
the zipper door;
2. Pull the two doors need to be
connected closely (distance 10-20 cm).
Shelters should be in a straight line.
3. Roll up the zipper door and fasten it
by the door webbing.
4. Pull the Velcro flag off the door.
5. Locate the stitching line
vertically which shows the center of
the flag. Connect the two Velcro
flags from this center point. Do the
connecting smoothly and avoid
wrinkles as far as possible.
6. line up the floor and connect the
floor Velcro smoothly.

12
PRO-SAFE SHOWERS
Showers have been designed for use by personnel with some knowledge
or training in decontamination procedures. On-scene coordinators must
always determine correct use.
The zipper head of the shower will be equipped with a pulling rope made
of webbing to facilitate the operation of the cleaning personnel.
On the outside of the shower,
two small holes will be found,
which are used for sprinkler
and sewage fittings.
After the shower is inflated,
pay attention to the
removable independent
pool inside the shelter. This
pool needs to be inflated
separately, and the valves
are located on one side of
the pool.
The decon liner inside the shower can be taken out separately. When you
think it has been polluted and needs to be replaced, you can untie the
bandage on the liner and install a new one for replacement.

13
There are Velcro
and straps on the
inside and on the
top of the liner,
which are used to
fix the sprinkler
system. Velcro on
the bottom liner
can be attached to
the pool to
prevent sewage
from spilling.
When used in a hazmat incident, shelters may come in contact with
substances ‘hazardous to health’. Should this happen, they should be
thoroughly cleaned to prevent contamination of personnel. Operators
should be aware of this risk, and wear appropriate personal protection to
avoid coming in contact with these substances. On scene coordinators
must manage and be completely responsible herein.
STOWING SHELTERS
1. If using accessories such as air/water heaters/ decon showers,
disconnect and remove all showers, heating, air cooling units and so forth
from inside the shelter or in close proximity to.
2. Wipe up any residual water inside the unit, and make sure interior is
completely dry.
3. Remove all stakes;
4. To deflate unit, make sure the entrance and exit doors are dropped
down and zipped to half of the height.
5. Ideally with one person or more at each end of shelter, open the main
inflation valve. Push and turn the center valve core 1/4 clockwise. The air
will come out automatically.
6. The shelter will rapidly deflate (within 1 minute or so). As the unit
collapses, each person should pull inwards on the end pillars, so the roof
collapses neatly on top of the lower part of the unit.
7. It is best to use the supplied electric inflator/deflator to fully remove

14
air from the unit (1-8 minute, depending on shelter size). After fully
deflate, push and turn the center valve core to pop up, and cover with
the valve cap.
Folding:
1. After fully deflate, put the shelter along the length direction
(perpendicular to the front and rear doors), then fold it inwardly for
two or three times according to the size of the shelter.
→
→
↑
2. Roll from end.
3. Put it in carrying bag and fasten it.
When folding the shelter, be sure below items:
1. Ensure all air has been evacuated from frame. Otherwise could not put
back into the carrying bag.
2. Allow your air shelter to dry thoroughly in the shade before storing,
never in bright sunlight. Store your air shelter in a cool, flat and dry place
with some air in the air chambers if possible.
3. It is important to dry off the unit completely before final packing into
the carrying bag. This may not be feasible immediately after use, and
might be better done back at base. Please note that storing wet shelters
with either water and/or detergent residue on the canopies may result in
the growth of surface mold and an accompanying mold odor on the
surface of the canopies. The canopies themselves will not rot or mildew,
but the growth of surface mildew/mold in/on the residue may occur.
4、You may fold your shelter 3-4 times, depending on actual demands.

15
Cleaning:
The surface of the air shelter should be cleaned with a solution of mild
soap and fresh water after each use. To avoid abrasion and wear, be sure
that all the sand, small rocks, oil and dirt have been flushed away from
the air shelter surfaces, and particularly the inside floor next to the berms.
** WARNING: NEVER USE PETROL OR SOLVENT
FOR CLEANING
MAINTENANCE:
Clean your unit with just fresh water and normal soap.
To get your air berms looking ‘like new’ apply wax for artificial
leather/or use Armor All type products and apply to the unit with a dry,
clean cloth.
When you store the unit for a long time without use, we would
recommend you inflate it monthly and check if it all is as originally left.
Use the enclosed repair kit for small punctures. Clean the fabric around
the area to be repaired using MEK or acetone, then re-clean as
before. Apply a coat of glue to the damaged part and to the patch
material, allowing it to dry for 2 - 3 minutes. It is strongly
recommended that all patch work be allowed to cure at least 24 hours
before re-inflating the unit.
It is recommended that the air shelter be returned to PRO-SAFE or an
authorized PRO-SAFE dealer for all large repairs.
TROUBLESHOOTING / REPAIRS
Your shelter should provide a long and trouble free operational life span.
It has been designed such that no spares need be kept other than
consumable items and accessories you may elect to purchase. However,
under certain circumstances the potential exists for faults to occur; and
their identification and possible rectification are as listed below:

16
INFLATABLE BERM LEAKS:
Identified by the shelter collapsing with time. A “hissing” sound
might be heard if leak is severe.
TO FIND LEAK:
1. Listen for “hissing” sound.
2. Check likely sources of leaks, such as valves. Check
over pressure valve and inflation valve for escaping air.
3. Check that the deflation valve is closed and not
leaking.
4. If valves are OK, check inflatable structure for
obvious signs of damage.
5. If leak cannot be traced, mix a solution of soap and
water. Using a brush, paint solution onto welding joints,
around valves, etc., until solution forms bubbles. This is
the source of the leak.
IF INFLATION/DEFLATION VALVE LEAKS:
Valve may have dirt or dust contamination, preventing
valve spring from closing the valve completely.
Carefully LIFT center of valve with small blunt object,
and clean with high pressure compressed air.
IF OVERPRESSURE VALVE LEAKS:
Valve may have dirt or dust contamination, preventing
valve spring from closing the valve completely.
Carefully LIFT center of valve with small blunt object,
and clean with high pressure compressed air.
TO REPAIR A LEAK:
Once leak has been found, deflate unit fully, and lay unit out flat on the
ground.
Ensure area around leak is dry and free of dirt or contaminants. Clean
area around leak, or LIGHTLY rub area with fine abrasive paper.
Cut a patch approximately 25mm (1”) larger, on all four sides, than the
size of the hole. Spare material is included in the repair kit provided with

17
every shelter unit. For small holes worn out by little sands/sharp objects,
you may use the clear patch first, then cover it by blue patch.
Apply adhesive from the tube provided to BOTH surfaces, ensuring all
areas are adequately covered with glue. Leave for 2–3 minutes until
adhesive is “tacky” to the touch.
Stick the patch over the hole and apply pressure or heavy weight to both
surfaces.
Maintain pressure for several minutes, until adhesive is dry.
Once dry, inflate unit and check for leaks. If all possible, allow all patch
work to cure for at least 24 hours before fully re-inflating and using the
unit.
SEE DETAILS BELOW
SMALL TEARS, CUTS AND PUNCTURE REPAIRS
DESCRIPTION:
Use the enclosed repair kit for small punctures. Clean the fabric around
the area to be repaired using MEK or acetone, then re-clean as
before. Apply a coat of glue to the damaged part and to the patch
material, allowing it to dry for 2 - 3 minutes. It is strongly
recommended that all patch work be allowed to cure at least 24 hours
before re-inflating the unit.
Please repair the leak in a dry/clean environment. If the weather is too
wet, the glue may not be easy to dry.
LARGE REPAIRS OF BERMS AND SEAMS DESCRIPTION:
It is recommended that the air shelter/shower be returned to PRO-SAFE
or an authorized PRO-SAFE dealer for all large repairs.

18
PRO-SAFE Products
LIMITED 2 -YEAR WARRANTY
PRO-SAFE (“Warrantor”) warrants to the original purchaser of all new
PRO-SAFE equipment supplied by Warrantor and to any person to whom
such equipment is transferred, that such equipment shall be free from
defects in materials and workmanship during the two (2) year period
commencing upon the date of manufactured against defects in materials
or workmanship (see the manufacture date and item number on the AIR
CONTROL Location).
PRO-SAFE will repair or replace product at PRO-SAFE’s discretion, which
fails to satisfy this warranty at no charge.
We will not be responsible for wear and tear; any improper installation;
improper use or maintenance; negligence of the owner or user; damage;
or anything else beyond our control. Further, we will not be responsible
for any consequential, incidental or indirect damages including any
damages and loss of profits from any cause whatsoever. No person has
authority to change this warranty.
PRO-SAFE warrants all new PRO-SAFE products for a period of two (2)
year after the date of manufactured against defects in materials or
workmanship (see the manufacture date and item number on the AIR
CONTROL Location). We will repair or replace a product that fails to
satisfy this warranty. Repair/replacement shall be at the discretion of
PRO-SAFE. Products must be returned promptly to PRO-SAFE for
warranty service AT CLIENT’S COST IN PACKAGING SUITABLE AND
CORRECT TO PROPERLY PROTECT THE PRODUCTS DURING THE RETURN
SHIPMENT. DAMAGE CAUSED DURING THE RETURN PROCESS, IF ANY,
WILL BE AT CLIENT’S EXPENSE AND RESPONSIBILITY. IF THE CLAIM IS
INDEED A VALID WARRANTY CLAIM AS DEFINED SOLELY BY PRO-SAFE -
ALL FREIGHT COSTS WILL BE CREDITED BACK TO CLIENT. We will not be
responsible for: wear and tear, improper installation, use, maintenance or
storage, negligence of the owner/user, repair or modifications after

19
delivery, failure to follow instructions or recommendations, or other
misuse or activity beyond our control. PRO-SAFE reserves the right to
change the design or parts of/in its’ products from time to time without
notice and with no obligation to maintain a spare parts inventory or to
make matching changes in products previously manufactured.
Replacement products in whole or in part offered as a one-time warranty
replacement will not be eligible for a second or follow up warranty claim.
PRO-SAFE shelters are offered with carrying bags designed to offer a
basic method to move and transport the product from point A to B. The
bags may also provide basic product protection. In such a capacity PRO-
SAFE carrying bag s are subject to scuffs, rips, tears, stitch pulls, et al.
These are not considered warranty items. Further PRO-SAFE carrying bag
s/SHELTER SLEEVES are not considered a product in and of themselves
and so no limited 2-year warranty is offered on carrying bag s/ shelter
sleeves.
NO OTHER WARRANTIES, EXPRESS OR IMPLIED, OTHER THAT THOSE
INCLUDED IN THE STATEMENT ARE OFFERED. FURTHER, WE DISCLAIM
ANY IMPLIED WARRANTY OF MERCHANTABILITY OR FITNESS FOR ANY
PURPOSE.
Table of contents
Popular Tent manuals by other brands

Chinook
Chinook Santa Ana 3 Assembly instructions

GrowSpan
GrowSpan Gothic Premium H5CRU Assembly instructions

Khyam
Khyam Hub Pitching & Striking Instructions

Mammoth Tents
Mammoth Tents Classic+ 240L Assembly guide

Jackeroo
Jackeroo 42120834 instruction manual

RidgeMonkey
RidgeMonkey ESCAPE BIVVY XF1 instructions


