PRO-SYS JetFloss User manual

PRO-SYS® JetFlossTM Water Flosser
Quick Start Guide & User Manual
Quick Start Guide
& User Manual

2
Welcome ............................................................................ 4
What’s In The Box............................................................5
Product Features............................................................ 6
Quick Start Guide ...........................................................7
Preparing For Use.......................................................... 8
Choosing The Right Tip............................................... 9
Using The 360ºWand ................................................. 10
Operating The Unit........................................................11
Cleaning And Storage......................................... 12 - 13
Troubleshooting ..................................................... 14 - 15
Safety Instructions ................................................ 16 - 17
Warranty............................................................................19
Index

3
THANK YOU
JetFloss by PRO-SYS is designed to elevate your
personal care routine to the next level of clean.
It gently and safely removes plaque and debris
from even the hardest-to-reach spaces. It’s also
an effective solution for cleaning around braces,
veneers or other appliances.
Please read all included instructions thoroughly
prior to using JetFloss to ensure you get the most
from every session.
We sincerely appreciate your purchase.
Welcome
Welcome

4
What’s In The Box
What’s In The Box
1 JetFloss Water Flosser
2 Twelve Oral Tips
3 Quick Start Guide & User Manual
4 Personalizing Your JetFloss Guide

5
Tip Storage
Product Features
Product Features
Power Switch
360ºControl Ring
Intensity Control
WandWater Tube

6
To get the most from your JetFloss, please take a moment to
thoroughly read the entire Quick Start Guide & User Manual and
Personalizing Your JetFloss Guide booklets.
1. Remove the unit and accessories from all packaging.
2. If desired, prior to initial use, remove the water reservoir,
tip storage, and tips from the base. Wash the water reservoir
thoroughly with mild soap and warm water.
Allow to dry thoroughly. Reassemble.
3. Connect the power cord to AC outlet.
4. Fill the reservoir with water.
5. Insert desired tip into wand.
6. Direct jet tip into sink. Turn power on.
7. Place the tip into mouth and clean desired areas. Use the
intensity control to adjust water jet pressure as needed.
8. Turn power off. Empty any remaining water in reservoir.
Disconnect power cord from AC outlet.
9. Regularly clean reservoir and used tips by washing with mild
soap and warm water and allowing them to dry completely.
IMPORTANT: Never expose base to excess moisture or submerge
in water. See complete safety information on pages 16 and 17.
Quick Start Guide
Quick Start Guide

7
Preparing For Use
Preparing For Use
Remove the unit and accessories from all packaging. If desired,
prior to initial use, remove the water reservoir, tip storage, and
tips from the base. Wash thoroughly with mild soap and warm
water. Allow to dry thoroughly before reassembling.
CONNECTTOPOWERSOURCE
Position the base on a level, non-slippery surface in a
convenient location near the desired AC outlet. Be careful to
situate unit so it is not exposed to excess moisture or in danger
of falling or sliding into water as the base should never be
submerged in water.
8
Four types of tips are included in various quantities. To order
replacement tips, visit PRO-SYS.com or call 1-866-776-7971.
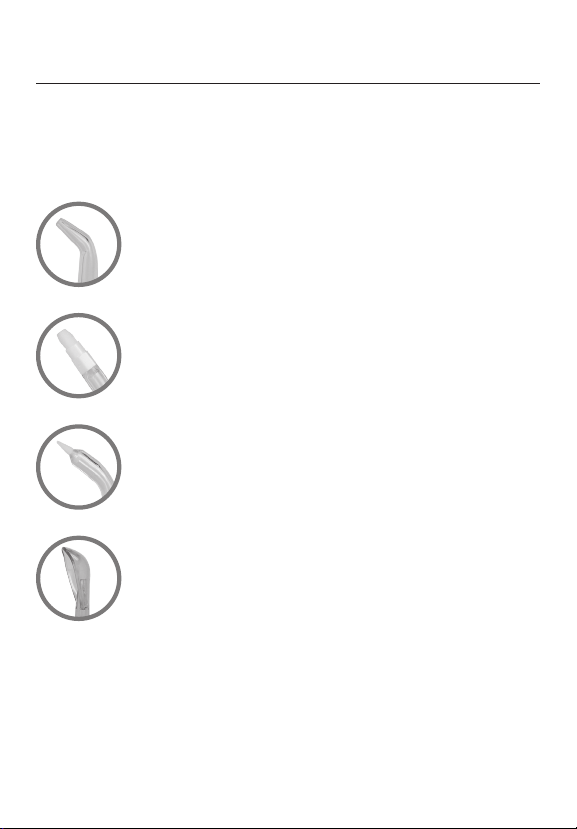
Choosing The Right Tip
Choosing The Right Tip
JET
General purpose. Reaches around teeth
and under the gumline.
ORTHODONTIC
Designed for safe cleaning around braces,
veneers, partials, implants and other orthodontic
appliances.
PERIODONTAL
Massages gums while reaching gently into
pockets.
TONGUE
Helps freshen breath and remove bacteria.

9
ATTACHINGANDREMOVINGTIPS
Hold the wand firmly in one hand. Using your other hand, insert
tip into wand with gentle pressure until you feel a slight click and
there is no visual gap between the wand and the 360ºcontrol
ring. To remove tip, press the tip eject button and pull tip up and
away from the wand.
ADJUSTINGWATERJETPRESSURE
Slide the wand’s water intensity control up to increase pressure
and down to decrease. Choose what is most comfortable or what
your dentist recommends for your oral condition.
DIRECTINGTHEWATERJET
Use the 360ºcontrol ring, located at the top of the wand where
the tip attaches, to change the direction of the water jet without
rotating the entire wand.
Using The 360ºWand
Using The 360ºWand

10
FILLINGTHERESERVOIR
Open the reservoir cover and detach entire reservoir by liing it
up and off the base. Fill with water of desired temperature.
(NEVER use hot or boiling water as it may cause injury and also
damage the unit.) Return the reservoir to the unit and press down
firmly until attached.
FLOSSINGWITHWATERUSINGJETFLOSS
Slide the water intensity control on the wand to its lowest setting.
Direct the tip into sink. Turn the unit’s power on. Lean over the
sink. Place the tip into your mouth and close your lips enough
to prevent water from spraying or splashing. Let water from the
tip flow from your mouth and into the sink. Aim the tip between
teeth and at the gumline, cleaning the areas you would normally
floss. For detailed recommendations, refer to the included
Personalizing Your JetFloss Guide booklet.
AFTERUSE
Empty reservoir of any remaining water and replace onto base.
Direct the tip into the sink and press the power button to turn
the unit on. Operate the unit for a few seconds to flush out
any remaining water in the wand or water tube. Turn power off
when water no longer flows. Remove the tip by pressing the tip
eject button. Unplug power cord. Follow cleaning and storage
instructions on pages 12 and 13.
Operating The Unit
Operating The Unit
Table of contents


