probrand ProTechT XMME-KIT00 Quick start guide

water-resistant marine housing kit
installation instructions and owner’s guide
we play where you playTM
™
MODEL: XMME-KIT001

IMPORTANT!
Self installation instructions and tips are provided for your convenience. It is your
responsibility to determine if you have the knowledge, skills, and physical ability
required to properly perform an installation. SiriusXM shall have no liability for damage
or injury resulting from the installation or use of any SiriusXM or third party products. It is
your responsibility to ensure that all products are installed in adherence with local laws
and regulations and in such a manner as to allow a vessel to be operated safely and
without distraction. SiriusXM product warranties do not cover the installation, removal
or reinstallation of any product.
The ProTechT™ Water-Resistant Marine Housing Kit’s water-resistant marine housing
docks and protects your XM®Radio from damaging water, salt water, salt fog, UV rays,
and dust in normal marine environments.
The ProTechT Marine Kit housing is water-resistant, not waterproof. Because the
housing is water-resistant versus waterproof, there is some risk that in more extreme
marine conditions, water may penetrate the housing. If properly installed and sealed
closed, the ProTechT water-resistant marine housing will protect your XM Radio from
the marine environment, and during light cleaning of your boat.
The design of the radio and housing was intended for normal marine environments
and not intended to be submerged in or soaked with large amounts of water. Damage
caused to the XM Radio by excessive water from large waves, rain, or other marine
hazards are not covered by your XM Radio or SiriusXM 90 day warranty. If you
anticipate encountering such conditions, you should consider removing and storing
your XM Radio to avoid potential water damage. If water gets inside your marine kit
housing, remove your XM Radio immediately, then remove the housing from the mount
and power cable, and dry everything with a soft cloth. Allow all pieces of the unit to air
dry in order to dry out possible water behind the cradle of the housing. Once the marine
kit housing is completely dry, you may reinstall your XM Radio.
3
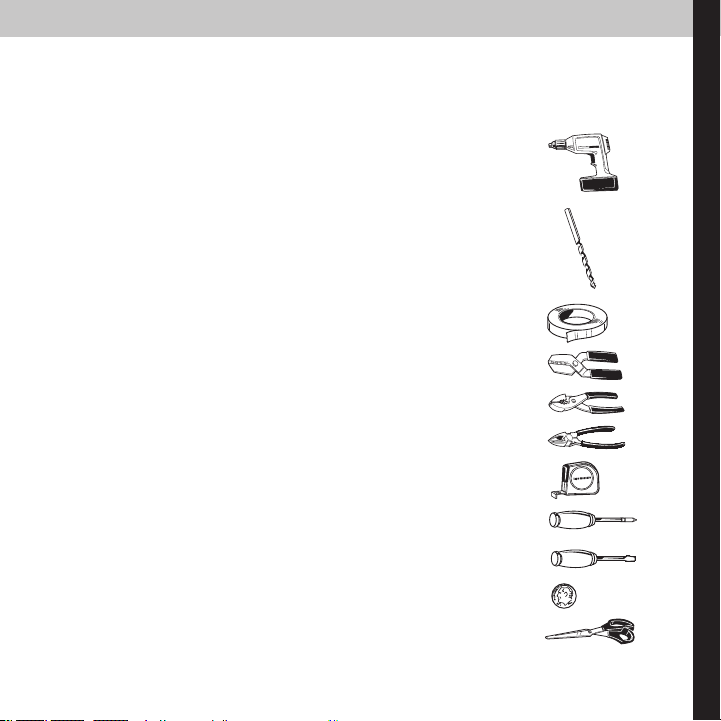
Tools You’ll Need To Install Your ProTechT
Water-resistant Marine Housing Kit
• Electric drill ...........................................................................................................
• ½” (1.27 cm) drill bit ...........................................................................................
• 9
/64” (0.150” = #25) drill bit ...............................................................................
• 3/32” (0.094” = #42) drill bit ...............................................................................
• Masking tape .......................................................................................................
• Wire crimper (or pliers) .....................................................................................
• Pliers .......................................................................................................................
• Wire cutter ............................................................................................................
• 25-ft (7.6 m) tape measure .............................................................................
• #2 Philips head screwdriver............................................................................
• Medium sized at head screwdriver ...........................................................
• A US dime .............................................................................................................
• Scissors .........................................................................................................................

4
What’s In This Manual
Parts List:
These parts come with your ProTechT
water-resistant marine housing kit.
Step One:
Determining the general layout and
connection option.
Step Two:
Choosing a location for your ProTechT
water-resistant marine housing.
Step Three:
Mounting the
XM
marine antenna.
Step Four:
Routing the power wire.
Step Five:
Mounting the mounting bracket.
Step Six:
Connecting the
XM
FM Direct connection
or audio cable to the boat’s stereo.
Step Seven:
Attaching the wires to the ProTechT
water-resistant marine housing.
Step Eight:
Mounting the ProTechT
water-resistant
marine housing to the bracket.
Step Nine:
Connecting the power wire to the power
source.
Step Ten:
Inserting the two AAA batteries (sold
separately) into the remote control.
Step Eleven:
Inserting the XM
Radio into the ProTechT
water-resistant marine housing.
Step Twelve:
Enjoy!
Mounting Templates
Warranty Statement
5
Designation:
A
Quantity:
1
Description:
ProTechT water-resistant marine
housing
Used to:
Protect the XM Radio
Designation:
B
Quantity:
1
Description:
10-ft (3-m) black power wire with
in-line fuse
Used to:
Provide power from the boat
to the ProTechT water-resistant
marine housing
Designation:
C
Quantity:
2 each
Description:
Spade, round and “ag” lugs
Used to:
Terminate the power wire
Designation:
D
Quantity:
1
Description:
Floating, water-proof remote
control
Used to:
Control the XM Radio while in the
ProTechT water-resistant marine
housing
Designation:
E
Quantity:
1
Description:
Self Adhesive Spacer (Black)
Used to:
Augment XPress Rubber Spacer
for Onyx Radio
Designation:
F
Quantity:
1
Description:
ProTechT XM marine antenna
Used to:
Receive XM satellite signal
Designation:
G
Quantity:
1
Description:
25-ft (7.6-m) antenna cable and
connector
Used to:
Connect the XM marine
antenna to the ProTechT
water-resistant marine housing
Designation:
H
Quantity:
1
Description:
Adapter for Delphi RoadyXT®
Used to:
Ensure the Delphi RoadyXT® XM
Radio ts correctly
Designation:
I
Quantity:
1
Description:
Adjustable mounting bracket
Used to:
Mount the ProTechT water-resis-
tant marine housing to your boat
Designation:
J
Quantity:
1
Description:
XM FM Direct Adapter
Used to:
Transmit XM signal from your
ProTechT water-resistant marine
housing to your boat’s FM radio
Designation:
K
Quantity:
1
Description:
Mounting bracket template (#1)
Used to:
Determine where the holes for
the ProTechT water-resistant ma-
rine housing mounting bracket
should be drilled
Parts List
These parts come with your ProTechT water-resistant marine housing kit.

6
Designation:
L
Quantity:
1
Description:
Antenna mounting template (#2);
(If not mast mounting antenna)
Used to:
Determine where the holes for
the
ProTechT
XM
marine antenna
mounting ange should be drilled
Designation:
M
Quantity:
1
Description:
4.9-ft (1.5 m), 3.5 mm-to-3.5 mm
audio cable.
(Longer cable available
from most electronics stores.)
Used to:
Connect audio line-out on the
ProTechT
water-resistant marine
housing to front or rear AUX input
of boat’s stereo
Designation:
N
Quantity:
4
Description:
M4x10 Philips head stainless steel
screws
Used to:
Mount the adjustable bracket to the
ProTechT
water-resistant marine
housing
Designation:
O
Quantity:
4
Description:
#8-18x3/4 Philips pan head stainless
steel screws
Used to:
Mount adjustable bracket to boat
Designation:
P
Quantity:
4
Description:
#8-18x3/4 Philips pan head stainless
steel screws
Used to:
Mount the
XM
marine antenna to
your boat
Designation:
Q
Quantity:
4
Description:
M4x0.7x10 Philips pan head stainless
steel screws
Used to:
Surface mount
ProTechT
XM
marine
antenna or fasten either ange or
pole mount adapter to
ProTechT
XM
marine antenna.
Designation:
R
Quantity:
1
Description:
Cable tie
Used for:
Optional wire management
Designation:
S
Quantity:
5
Description:
Various rubber spacers
Used to:
Secure radio inside the
ProTechT
water-resistant marine housing
and to protect the connector
during storage
Designation:
T
Quantity:
1
Description:
Rubber plug for unused audio
output jack
Used to:
Seal/protect audio output jack on
ProTechT
water-resistant marine
housing when not in use.
Attaches
to head of antenna input jack so it
does not get lost if unplugged.*
Designation:
U
Quantity:
1
Description:
Flange mount adapter
Used to:
Surface mounting XM satellite
receiving antenna
Designation:
V
Quantity:
1
Description:
Pole mount adapter
Used to:
Mast mount
XM
satellite receiv
ing
antenna
*Note: Failure to install this plug when the audio output jack on the ProTechT water-resistant marine housing is not
used will allow water to intrude into the ProTechT water-resistant marine housing!

7
Installation Instructions
Step One:
Determining the general layout and connection option
The lengths of the various cables supplied in your kit determine the relative locations
of your ProTechT water-resistant marine housing,
XM
marine antenna, and, if used, the
XM
FM Direct Adapter.
First, determine your connection option:
• OptionOne(Figure#1):UsingtheXMFMDirectConnectionMethod
The included
XM
FM Direct Adapter sends the
XM
signal to your boat’s stereo’s FM
antenna connection. Use this method if your boat’s stereo lacks an auxiliary (AUX),
input or if accessing this input is otherwise not convenient.
- Follow your
XM
radio’s instructions to set up transmitting the
XM
signal to
your boat’s FM radio. Note: If your Radio came with PowerConnect, you will need
to follow the instructions in the section titled “Using the Vehicle Dock From the
Universal Xpress Car Kit” in the User Guide for your XM Radio to congure your XM
Radio to work correctly with the XM FM Direct Adapter.
• OptionTwo(Figure#2):UsingtheDirectAudioConnectionMethod
If your boat’s stereo has an auxiliary (AUX) input jack, either on the front or the back
of the stereo, we suggest using the supplied 4.9-ft (1.5 m) 3.5-mm-male-to-3.5-mm-
male audio cable to connect the audio output from your ProTechT water-resistant
marine housing to your boat’s stereo. This method provides the highest delity and
performance.
- If a longer cable is required, various lengths of 3.5-mm-female-to-3.5-mm-male
stereo extension cables are available from most electronics stores.
- If your boat’s radio uses RCA-style AUX jacks, an adapter to connect your 3.5-mm-
male-to-3.5-mm-male audio cable to the RCA jacks is available from most elec-
tronics stores.
Second, determine your locations and layout.
- Take a few minutes to identify a location for each of the ProTechT water-resistant
marine housing kit’s components and make sure that each cable will reach each of
its associated components. (See Figure #1 or #2, based on your connection option).

8
Using the XM FM Direct Connection Method (Option One)
Figure #1
• Be sure to account for routing the cables around obstructions or hiding the cables.
• If you are using the
XM
FM Direct antenna connection system, then the ProTechT
water-resistant marine housing can be no more than 9-ft (2.74 m) from the rear of
your boat’s stereo. This is the length of the antenna cable from the
XM
FM Direct
Adapter that connects to your stereo’s antenna input.
ConnectionProceduretoXMRadio
• Connect the cable marked TOXMRADIO on the
XM
FM Direct Adapter into the
XM
Antenna in jack on the ProTechT.
• Connect your boat’s FM/AM antenna cable to the input on the
XM
FM Direct Adapter
labeled FMANTENNA.
• Connect the
XM
FM Direct Adapter cable marked TOFMRADIO into the boat’s FM
radio antenna input.
FMDirectAdapter
PartJ
toAntennaInput
onBoatRadio
BoatAM/FM
Antenna
6ft(1.8m)
25ft(7.6m)–PartG
3ft(.91m)
10ft(3m)
PartB
ProTechT
Water-resistant
MarineHousing
PartA
to12-volt
PowerSource
ProTechTXM
MarineAntenna
PartF

9
• Connect the XM Antenna into the jack marked XMANTENNA located on the side of
the
XM
FM Direct Adapter.
• Your
XM
FM Direct Adapter receives power from your XM Radio Receiver. No ad-
ditional external power source is required.
• The
XM
FM Direct Adapter should be secured to an existing wire harness or other
under-console structure. Use the cable tie and the mounting slot in the
XM
FM Direct
Adapter to secure the it. The
XM
FM Direct Adapter should be restrained in some way to
help prevent it from causing rattles and other noise, or chang on the wiring harness.
Using the Direct Audio Connection Method (Option Two)
Figure #2
• If you use the included mini-plug-to-mini-plug cable to connect your ProTechT
water-resistant marine housing’s audio output directly to your boat’s stereo AUX
input, instead of the
XM
FM Direct connection, the mini-plug-to-mini-plug cable’s
length of 4.9-ft (1.5 m) determines the distance from your boat’s stereo to your
ProTechT water-resistant marine housing unless you are using an optional (not
included), extension cable.
25ft(7.6m)
PartG
4.9ft(1.5m)–PartM
to12-volt
PowerSource
ProTechTWater-resistant
MarineHousing
PartA
ProTechTXM
MarineAntenna
PartF
10ft(3m)
PartB

10
Step Two:
ChoosingalocationforyourProTechTwater-resistantmarinehousing
• Using template #1, identify a suitable location that has a smooth, at area large
enough to accommodate the mount and the ProTechT water-resistant marine hous-
ing. (See Figure #3).
Figure #3
• Ensure that there is nothing behind the surface that will be harmed when you drill
the holes for mounting.
• With scissors, cut out template #1.
• Use masking tape to secure the template to the surface where you are going to
install the mounting bracket.
MountingBracket
Template#1–PartK
11
Step Three:
Mountingthe
XM
marineantenna.
• Determine whether you will ange (surface) mount your
XM
marine antenna or pole
mount it on a mast.
• Regardless of how you mount your antenna, identify an area for the
XM
marine
antenna that aords as clear and unobstructed view of the sky as is possible to help
ensure the best reception of the satellite’s signal. (See Figure #4).
Note: The antenna cannot be mounted further then 25-ft (7.6 m) from the
XM
FM
Direct Adapter or the ProTechT water-resistant marine housing, depending on the
connection option chosen (See Step One.) Be sure that the antenna’s cable will reach
the mounting location of the ProTechT or
XM
FM Direct Adapter.
• Ensure that there is nothing behind or underneath the surface that will be damaged
when you drill the holes to mount the antenna.
Figure #4
Toangemounttheantenna
•
Use masking tape to secure template #2 to the surface you’re mounting the antenna to.
• Use a 9/64” (0.150 cm = #25) drill bit and drill a hole at each of the outer cross hairs
on the antenna mounting template.
•
Prior to mounting the antenna to either the surface of the boat or pole/mast the user
must attach the appropriate adapter (ange or pole-mount adapters) by screwing either
adapter to the antenna using the M4 x 0.7 x 10 Philips pan head stainless steel screws.
AntennaMounting
Template#2–PartL

12
• Select one of the following wire management methods for the antenna cable:
Method One:
• This requires no hole through the boat for the antenna wire. The wire will be routed
on the surface where the antenna mounting ange is located.
• Weave the pig-tail of the XM marine antenna through the center hole of the ange
mount adapter then attach the ange mount adapter to the XM marine antenna
using the four M4 x 0.7 x 10 Philips pan head stainless steel screws (with blue sealant
).
• Route the
XM
marine antenna cable under the groove in the base of the ange
mount adapter (see Figures #5a and #5b). Take caution not to crimp the antenna ca-
ble under the ange mount adapter as you tighten down the ange mount adapter.
The cable must be in the groove on the bottom of the ange mount adapter.
Figure #5a Figure #5b
• Next, locate the black, round, at foam gasket axed to the paper backing. Gently
peel the gasket from the backing. Place the sticky side toward the antenna wire in
the groove in the ange and ax the gasket to the mating channel in the ange.
Press the gasket rmly into place.
• If the surface that you choose for your
XM
marine antenna is wood or berglass, use
the four supplied #8-18 x ¾ stainless steel, self-tapping screws for rmly mounting the
antenna to the chosen surface.
ProTechTXM
MarineAntenna
PartF
Flange
Mount
Adapter
PartU
M4x0.7x10Philips
panheadstainless
steelscrews
PartQ
#8-18x3/4Philipspanhead
stainlesssteelscrews
PartP

13
• To mount the
XM
marine antenna to metal, use marine-grade stainless steel machine
screws and mating lock washers and nuts, available from your local marina, marine
supply, or hardware store.
•
Take care to not over-tighten self-tapping screws to prevent stripping the mounting holes.
• Route the antenna wire to the location of your ProTechT water-resistant marine hous-
ing or XM FM Direct Adapter based on the connection option that you chose in Step
One.
Method Two:
• Weave the pig-tail of the XM marine antenna through the center hole of the ange
mount adapter then attach the ange mount adapter to the XM marine antenna
using the four M4 x 0.7 x 10 Philips pan head stainless steel screws (with blue sealant
).
• If you choose method two, use a ½-inch (1.27 mm), drill bit and drill a hole at the
cross hairs in the center of the antenna mounting template for the antenna cable.
• Locate the black, round, at foam gasket axed to the paper backing. Gently peel
the gasket from the backing. Place the sticky side toward the ange and ax the
gasket to the mating channel in the ange. Press the gasket rmly into place.
• Remove template #2 from the antenna mounting location.
• Route the
XM
marine antenna cable through a center hole (shown on mounting
template #2), and then to the
XM
FM Direct Adapter location or the ProTechT water-
resistant marine housing location, depending on your installation (see “Step One”).
• Securely tighten the 25’ (7.62 m) antenna cable to the pigtail leading out of the
XM
marine antenna.
• If the surface that you choose for your
XM
marine antenna is wood or berglass, use
the four supplied #8-18 x ¾ stainless steel, self-tapping screws for rmly mounting the
antenna to the chosen surface.
• To mount the
XM
marine antenna to metal, use marine-grade stainless steel machine
screws and mating lock washers and nuts, available from your local marina, marine
supply, or hardware store.

14
•
Take care to not over-tighten self-tapping screws to prevent stripping the mounting holes.
•
Route the antenna wire to the location of your ProTechT water-resistant marine hous-
ing or
XM
FM Direct Adapter based on the connection option that you chose in Step
One.
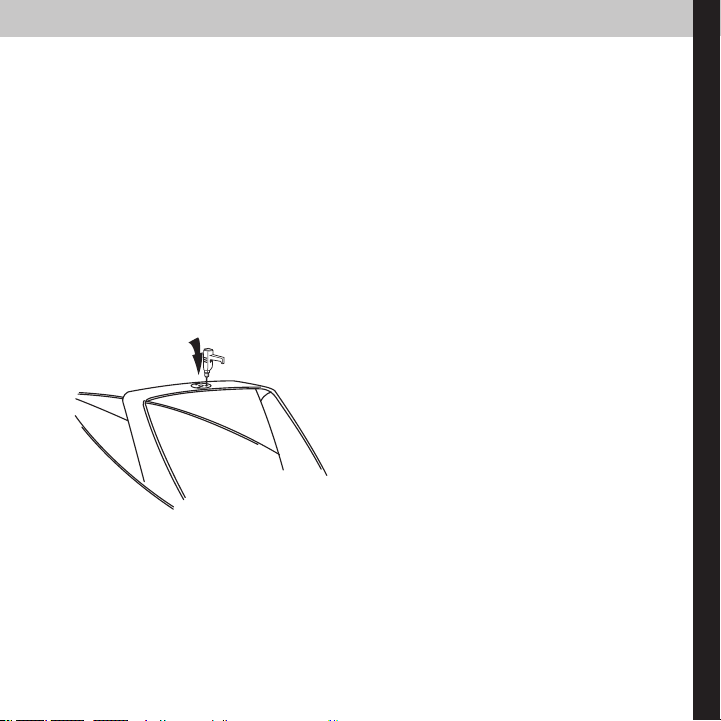
Topoleormastmountingtheantenna:
• Follow the manufacturer’s directions for mounting the mast or pole.
• Weave the pig-tail of the XM marine antenna through the center hole of the thread-
ed pole mount adapter, (see Figure #6) then attach the threaded pole mount adapter
to the XM marine antenna using the four M4 x 0.7 x 10 Philips pan head stainless
steel screws (with blue sealant).
Figure #6
• Before securing the mast to its mounting base, feed the
XM
antenna wire through
the mast so that the connector that mates with the antenna’s pigtail passes out of
the top of the mast.
• Connect the antenna’s pigtail to the connector on the antenna cable that is at the
top of the mast.
• Taking care not to cross the threads, screw the
XM
marine antenna rmly to the mast.
Don’t over-tighten the antenna to the mast.
ProTechTXM
MarineAntenna
PartF
PoleMount
Adapter
PartV
M4x0.7x10
Philipspan
headstainless
steelscrews
PartQ
15
Step Four:
Routingthepowerwire.
• If you wish to use your
XM
Radio with your boat’s ignition turned o and/or the
ignition key removed, then you must choose an “un-switched” connection point that
provides an uninterrupted 12-volt power supply. This will allow you to listen to your
XM
Radio when anchored or drifting with the engine turned o.
• Determine a 12-volt power source location, such as the boat’s fuse/breaker power
distribution panel or other 12-volt connection point, within 10-ft (3-m) of the loca-
tion that you chose in Step One for your ProTechT water-resistant marine housing.
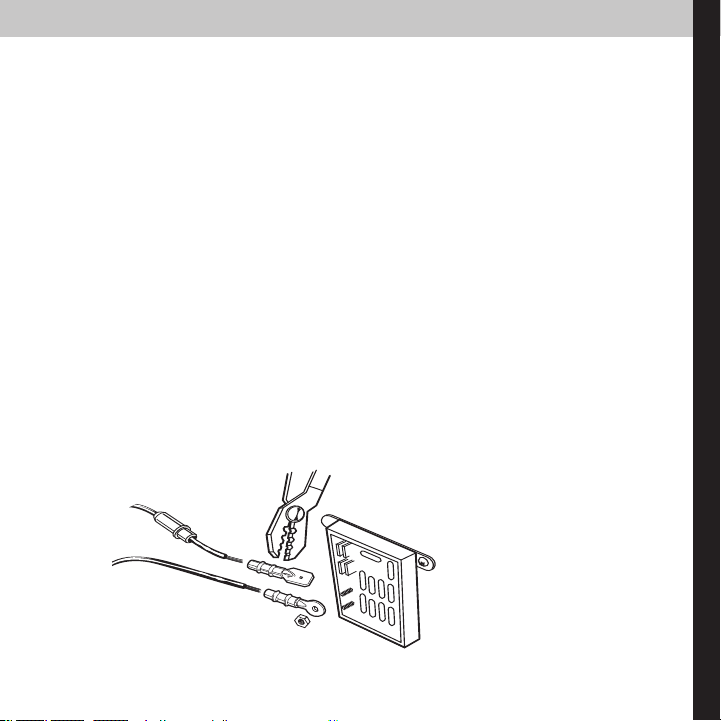
• Enclosed are spade, round, and “ag” connectors that will accommodate most types
of connections. Choose either of the lugs to t a at blade connection or a threaded
post connection, whichever is appropriate for your power source.
• With pliers or wire crimpers, tightly crimp the lug to the stripped end of the positive
wire (see Figure #7). This is the wire with the fuse holder (Type AGC Fast-Acting 3A
250V glass fuse) molded into the wire. The “+” or positive wire on the power cable
also has a white stripe on it.
• Do NOT connect the power wire to the power source at this time.
• Route the other end of the power wire to your ProTechT water-resistant marine hous-
ing location.
Figure #7
Lugs
PartC
10-ft(3-m)power
wirewithin-linefuse
PartB

16
Step Five:
Mountingthemountingbracket.
• Using a 9/64” (0.150 cm = #25) drill bit, carefully drill one hole at each corner of the
template, at the cross hairs (see Figure #8).
• If you prefer that the wires to your ProTechT water-resistant marine housing are
hidden, then using a ½” drill, drill another hole where the wires will pass through the
surface, adjacent to the mounting bracket’s location.
• Remove the template.
• Gather your power wire, antenna wire, or if used, the antenna wire from the
XM
FM
Direct Adapter, or if used, the audio cable.
• Pass the wires through the ½” (1.27 mm) hole.
• We encourage you to seal this hole, once the wires are installed, against water
intrusion, using a method of your own choosing.
• Using four #8 (8-18 x ¾) stainless steel screws, mount the bracket to the chosen
surface (see Figure #9).
Figure #8 Figure #9
MountingBracket
Template#1–
PartK
Adjustable
Mounting
Bracket–PartI
#8-18x3/4
Philipspan
headstainless
steelscrews
PartO

17
Step Six:
Connectingthe
XM
FMDirectconnectionoraudiocabletotheboat’sstereo.
•
XM
FM Direct connection (see Figure #10a below and Figure #1 on page 7):
•
If you are connecting the
XM
FM Direct Adapter to your boat’s stereo, look at the back
of your boat’s stereo and nd the thick black FM antenna wire. Unplug this from the
stereo and plug it into the
XM
FM Direct interface at the jack labeled
FMANTENNA
.
• Then plug the antenna cable labeled TOFMRADIO from the
XM
FM Direct Adapter
into your stereo at the same location where you just removed the boat’s FM antenna.
If you chose to use the 4.9-ft (1.5 m), 3.5 mm-to-3.5 mm audio cable to connect your
ProTechT water-resistant marine housing to your boat’s stereo instead of using the XM
FM Direct Adapter (see Figure #2 on page 8), connect the free end of the audio cable
to the mini-jack on your boat’s stereo (see Figure #10b). (When so equipped, this mini-
jack may be on the front of the boat’s stereo or on the back, depending on the age and
manufacturer of the stereo.)
Figure #10a Figure #10b
XMFMDirect
Adapter–PartJ
4.9-ft(1.5m)Audio
Cable–PartM
18
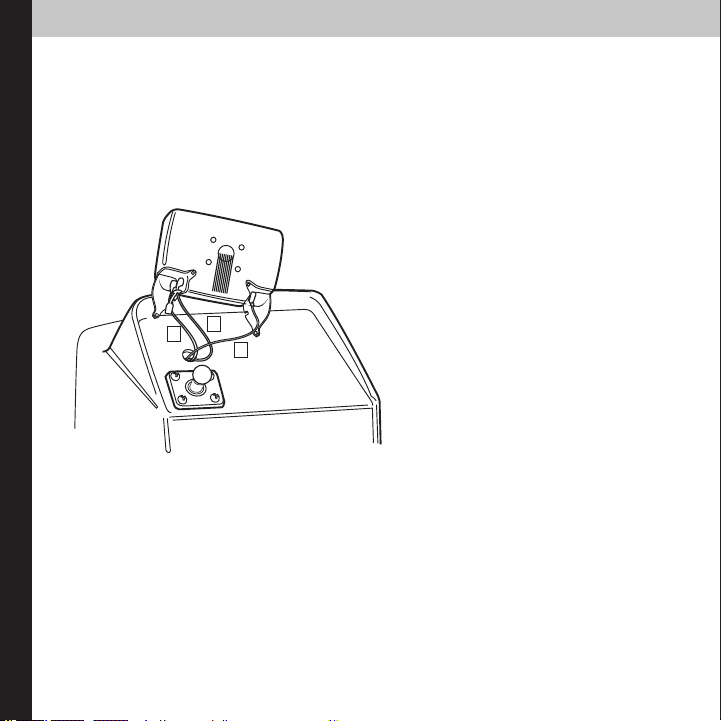
Step Seven:
AttachingthewirestotheProTechTwater-resistantmarinehousing.
• Open the rubber covers on the bottom corners of the ProTechT water-resistant ma-
rine housing by gently lifting the small gray rubber tabs on the back of the ProTechT
water-resistant marine housing, exposing the connection points for the wires (see
Figure #11.)
Figure #11
• Attach the black power wire (the wire with the in-line fuse holder), to the connector
on the right, when viewed from the back. Press the power wire rmly into place.
• Press the wire into the channel in the rubber cover.
• If using the
XM
FM Direct connection, attach the
XM
FM Direct antenna cable;
otherwise connect the antenna wire from the
XM
marine antenna to the antenna
connection on the left side, when viewed from the back. Press the chosen wire rmly
into place.
• Press the wire into the channel in the rubber cover.
12
3
1. Audio line-out
2. XM antenna or FM Direct
3. Power
ProTechTWater-resistant
MarineHousing
PartA
Adjustable
Mounting
Bracket–PartI

19
• If using the mini-plug-to-mini-plug audio connection instead of the XM FM Direct
connection, plug in the mini-plug, rmly, all the way into the jack on the left side,
when viewed from the back, and route the wire through the channel on the left side
rubber cover.
• Close rubber covers and securely press the tabs back into the holes.
• Ifyouarenotusingthemini-plug-to-mini-plugaudioconnection,youmustin-
serttherubberplugintotheaudiojackontheProTechTwater-resistantmarine
housing.FailuretoinstallthisplugwhentheaudiooutputjackontheProTechT
water-resistantmarinehousingisnotusedwillallowwatertointrudeintothe
ProTechT(seeFigures#12aand#12b).
Figure #12a Figure #12b
ProTechTWater-resistant
MarineHousing
PartA
Rubber
Audio
Plug
PartT
XMFMDirectAdapter
PartJ

20
Step Eight:
MountingtheProTechTwater-resistantmarinehousingtothebracket.
•
Attach the mounting bracket plate to the back of the ProTechT water-resistant marine
housing using the M4x10 Philips head stainless steel screws (see Figures #13 and #14).
Figure #13 Figure #14
•
Place the mounting arm into the bracket on the back of the ProTechT water-resistant
marine housing.
• Place the other end of the mounting arm into the mounting bracket on the boat.
• Adjust the angle of the ProTechT water-resistant marine housing by loosening the
bracket knobs, moving the ProTechT water-resistant marine housing to the desired
angle, then tightening the knobs securely.
Adjustable
Mounting
Bracket
PartI
M4x10Philipshead
stainlesssteelscrews
PartN
Table of contents
Popular Marine Equipment manuals by other brands


Siren Marine
Siren Marine SirenSat Offshore Installation & user guide

Raymarine
Raymarine AIS350 installation instructions
-AS user manual")
Hochiki
Hochiki RSM-WSB(RED)-AS user manual

Garmin
Garmin GPSMAP 9 3 Series owner's manual

FHF
FHF AVISA AX08 installation instructions

Taco Marine
Taco Marine NEPTUNE II Installation instruction guide

ComNav
ComNav Commander P2 Installation & operation manual

Selden
Selden Furlex 204TD user manual

TALAMEX
TALAMEX Wave 8P installation instructions

System Sensor
System Sensor EBS Installation and maintenance instructions

Furuno
Furuno ETR-10N Operator's manual

auto maskin
auto maskin Marine Pro 200 Series installation manual