PROCELLA AUDIO P15A User manual

Copyright ©Procella Audio Svenska AB Smedgatan1 827 35 Ljusdal Sweden.
Due to continuous R&D, specifications may change without prior notice. V1.1 October. 2016
P15A
User Guide
“Thank you for purchasing a Procella Audio Active Loudspeaker!”
We recommend that Procella loudspeakers be installed and tuned by a trained Procella technician. Please consult with your
dealer or Procella Audio for assistance with determining the proper speaker setting and positions in your room.
IMPORTANT SAFETY INSTRUCTIONS:
CAUTION: TO REDUCE THE RISK OF ELECTRIC SHOCK, DO NOT REMOVE THE COVER. NO USER- SERVICEABLE
PARTS INSIDE. REFER SERVICING TO QUALIFIED SERVICE PERSONNEL.
WARNING: TO REDUCE THE RISK OF FIRE OR ELECTRIC SHOCK, DO NOT EXPOSE THIS APPARATUS TO RAIN OR
MOISTURE AND OBJECTS FILLED WITH LIQUIDS, SUCH AS VASES, SHOULD NOT BE PLACED ON THIS APPARATUS
TO COMPLETELY DISCONNECT THIS APPARATUS FROM THE AC MAINS, DISCONNECT THE POWER SUPPLY
CORD PLUG FROM THE AC RECEPTACLE.
•Co firm that the Voltage setti g is correct for your cou try a d that the i cluded power cord is suitable.
•Make sure that the ve tilatio ope i gs o top of the amplifier module are free a d that the positio of
the P15A e closure allows air to circulate arou d the amplifier module.
•
A si gle Procella P15A subwoofer should be positio ed o the floor, agai st the fro t wall betwee the
Ce ter a d either the Left or Right scree speaker if o other i structio s have bee provided. We do ot
typically recomme d locati g a si gle subwoofer o the ce terli e of the room. For placeme t of multiple
subwoofers, co tact your Procella dealer or the Procella factory.
•The Procella P15A amplifier is a High-Power, Switched-mode Class-D amplifier. Like a y digital amplifier,
proper mai s, grou di g a d sig al i terco ectio s are esse tial for correct operatio , to avoid hum a d
buzz a d to achieve the best possible sig al to oise ratio.
The power li e should be free from disturba ces caused by other electrical applia ces such as
motors, heaters a d ove s, elevators, refrigerators or similar.
To mi imize grou d-loops, co ect the Procella P15A to the same power outlet as the pre-
amplifier or processor a d ru the sig al cable i parallel with mai s cable.
For the best possible performa ce, it is stro gly recomme ded that the P15A amplifier be
co ected with a professio al XLR-type, shielded 2-wire cable to a bala ced output of the pre-
amplifier. Pi 1=Grou d, Pi 2=Normal polarity (“hot”) a d Pi 3=I verted polarity (“cold”).
Package contents:
-
Procella P
1
5A
active subwoofer
-
Power cord
-
This
User Guide
Copyright ©Procella Audio Svenska AB Smedgatan1 827 35 Ljusdal Sweden.
Due to continuous R&D, specifications may change without prior notice. V1.1 October. 2016
The Procella P15A has a u bala ced Pho o i put to be used with a preamp or processor that o ly
has a u bala ced output. We stro gly recomme d that a shielded 2-wire cable with XLR
co ectors be used, with a adapter at the pre-amplifier e d. This will produce the lowest oise
level a d best sou d quality.
•The u bala ced Pho o output co ector of the Procella P15A should o ly be used for li ki g to additio al
Procella P15A subwoofers.
•The "Sig al"LED is gree whe a i put sig al is detected. Whe the LED
switches to Red, the i put sig al is too high a d the amplifier is clippi g.
CAUTION: Do not run the P15A subwoo er at clip level or extended periods!
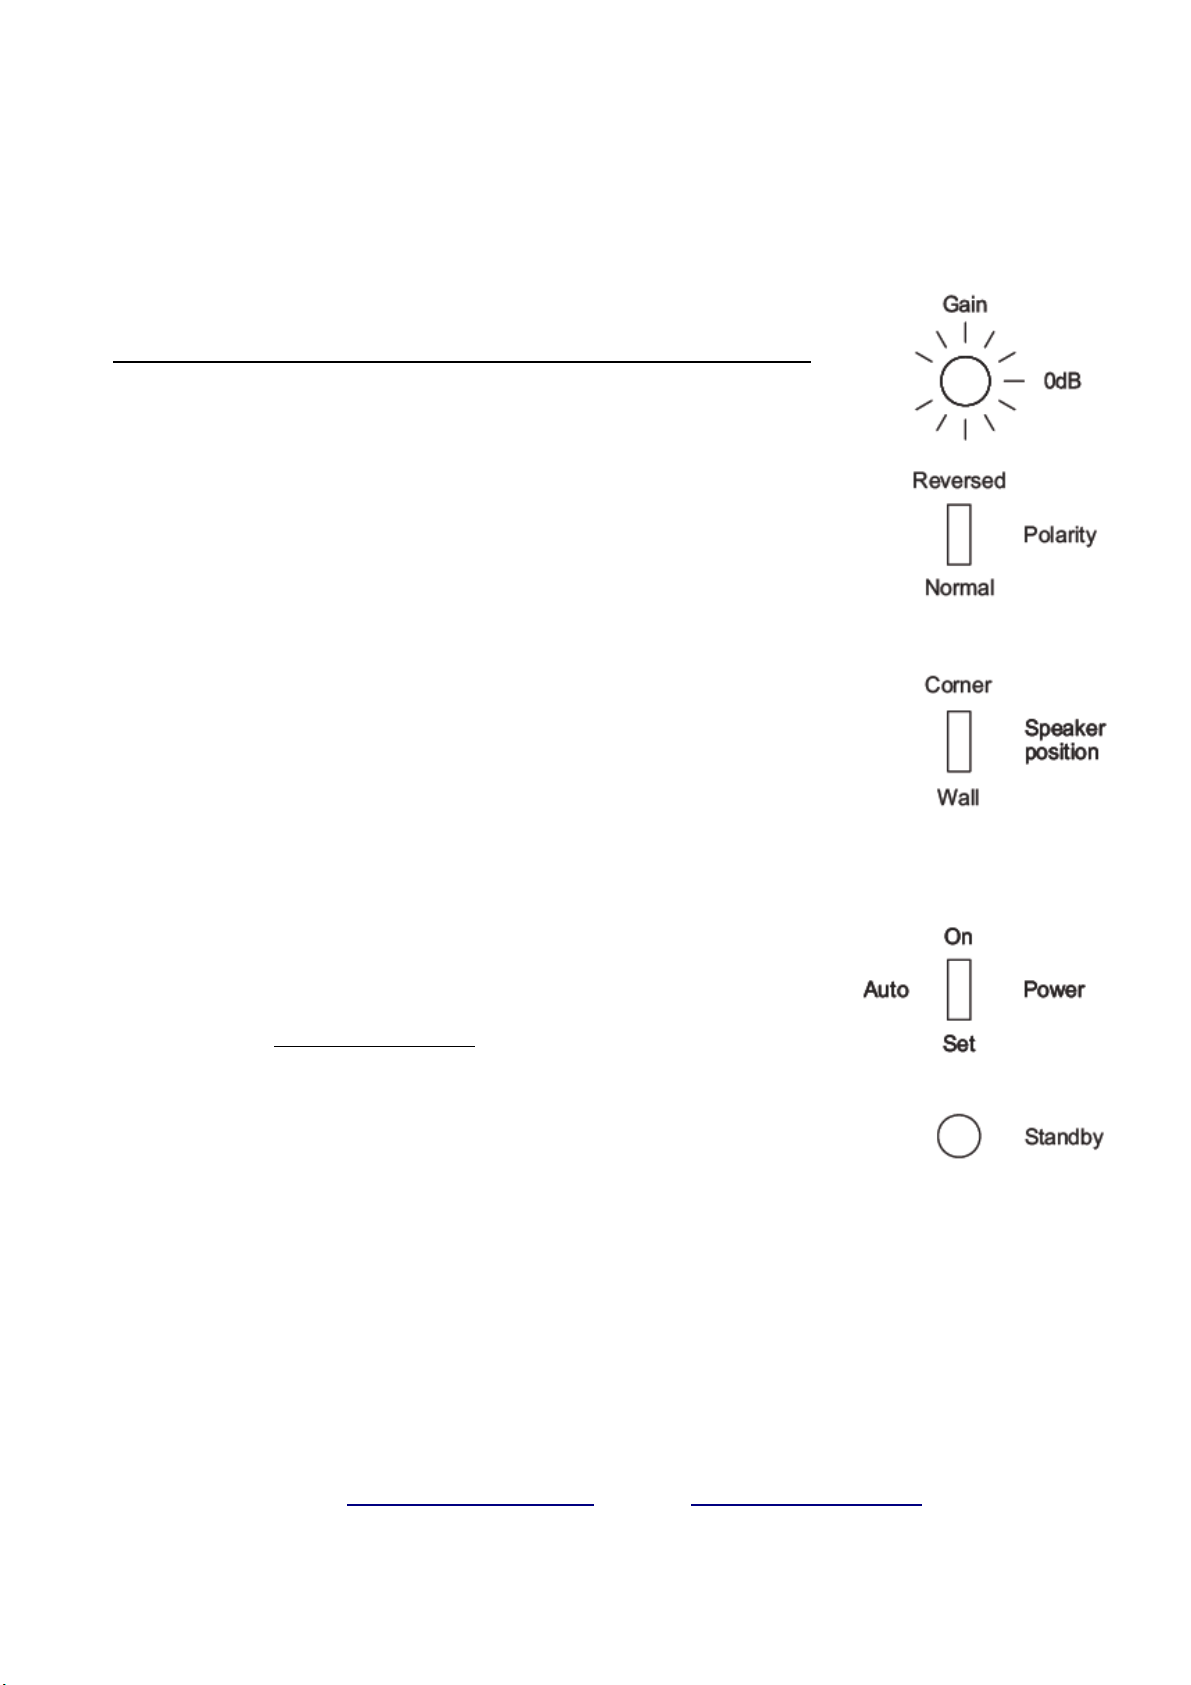
•The “Gai ” co trol should be used to set the level. Whe setti g subwoofer
levels through a preamp or processor, the Gai co trol should be adjusted so
that the SUB output from the processor matches the LCR loudspeakers
output.
•
The "Polarity" switch ca be used to match the polarity of the Procella P15A
to the L-C-R speakers at the liste i g positio . This is importa t because of
variables i the system such as the pre-amplifier, crossover order a d room
positio of both the mai speakers a d the subwoofer.
•
The Procella P15A amplifier has two user-selectable presets for room
positio i g of the subwoofer:
WALL Positio ed o the floor a d agai st a wall.
CORNER Positio ed o the floor, agai st a wall a d close to a cor er.
•Without test equipme t, the correct positio ca be determi ed by a liste er
seated at the mai liste i g positio . With a part er at the subwoofer, play
music with promi e t mid-bass co te t through the system. While liste i g
to the playback, the liste er should i struct the part er whe to cha ge the
Polarity switch, carefully liste i g for cha ges i the mid-bass level. The
switch setti g that produces the greatest bass output is the correct setti g.
•To calibrate the Auto Power O circuit:
1. Co ect the subwoofer cable to the Pre-amp or processor.
2. Set the power switch o the Pre-amp or processor to ON (or out of
Sta dby), with o source playi g.
3. O the subwoofer, move the switch to Set. The Sta dby LED will start
bli ki g rapidly.
4. Whe the LED bli ki g rate slows dow , move the switch to Auto.
•You ca co firm that you have the correct setti g by playi g a y disc a d
verifyi g that the Sta dby LED switches to Gree whe the material starts
playi g. If the LED tur s gree without a y source playi g, check your i stallatio a d cable routi g for AC
mai s or sig al i terfere ce.
The Procella P15A is desig ed for use with a 4th order Li kwitz-Riley, low pass crossover at 80-125Hz. The
proper freque cy depe ds o the mai speakers used a d the desired playback levels. If available, the ‘THX’
TM
setti g i the processor will give the correct characteristics at a freque cy of 80Hz.
Email: sou d@procella-audio.com, web site: www.procella-audio.com.
Table of contents
Other PROCELLA AUDIO Speakers manuals


