Procolored A3-L1800 User manual

*Due to occasional product upgrades, this manual is for reference only.
0
A3-L1800- Roller version Dtf
Printer manual

*Due to occasional product upgrades, this manual is for reference only.
1
Table of Contents
Safety Instructions ...................................................................................................................... 2
Machine Views ............................................................................................................................ 3
Introduction of printer buttons ................................................................................................... 4
1.Connect the printer ..................................................................................................................5
2.Install the drive .........................................................................................................................6
3.Install the rip software .............................................................................................................6
4.Install print curves ................................................................................................................... 8
5.Machine Installation And Setting.........................................................................................10
6.Whole process of printing .....................................................................................................11
7.Maintenance ...........................................................................................................................12

*Due to occasional product upgrades, this manual is for reference only.
2
Safety Instructions
1. Read all instructions.
2. Use the A3 L1800 Roller Printer only for its intended use.
3. To reduce the risk of electric shock, do not immerse the DTF printer in water or
other liquids.
4. Do not disassemble or attempt to repair the DTF printer. Take it to a qualified
service person for examination and repair.
5. This equipment is not intended for use by persons (including children) with
reduced physical, sensory or mental capabilities, or lack of experience and
knowledge, unless they have been given supervision or instruction concerning
use of this equipment by a person responsible for their safety.
6. Close supervision is necessary for any DTF printer being used by or near
children. Do not leave equipment unattended while connected.
7. The A3 L1800 Roller Printer needs routine maintenance, please refer to the
included manual.
*Due to occasional product upgrades, this manual is for reference only.
3
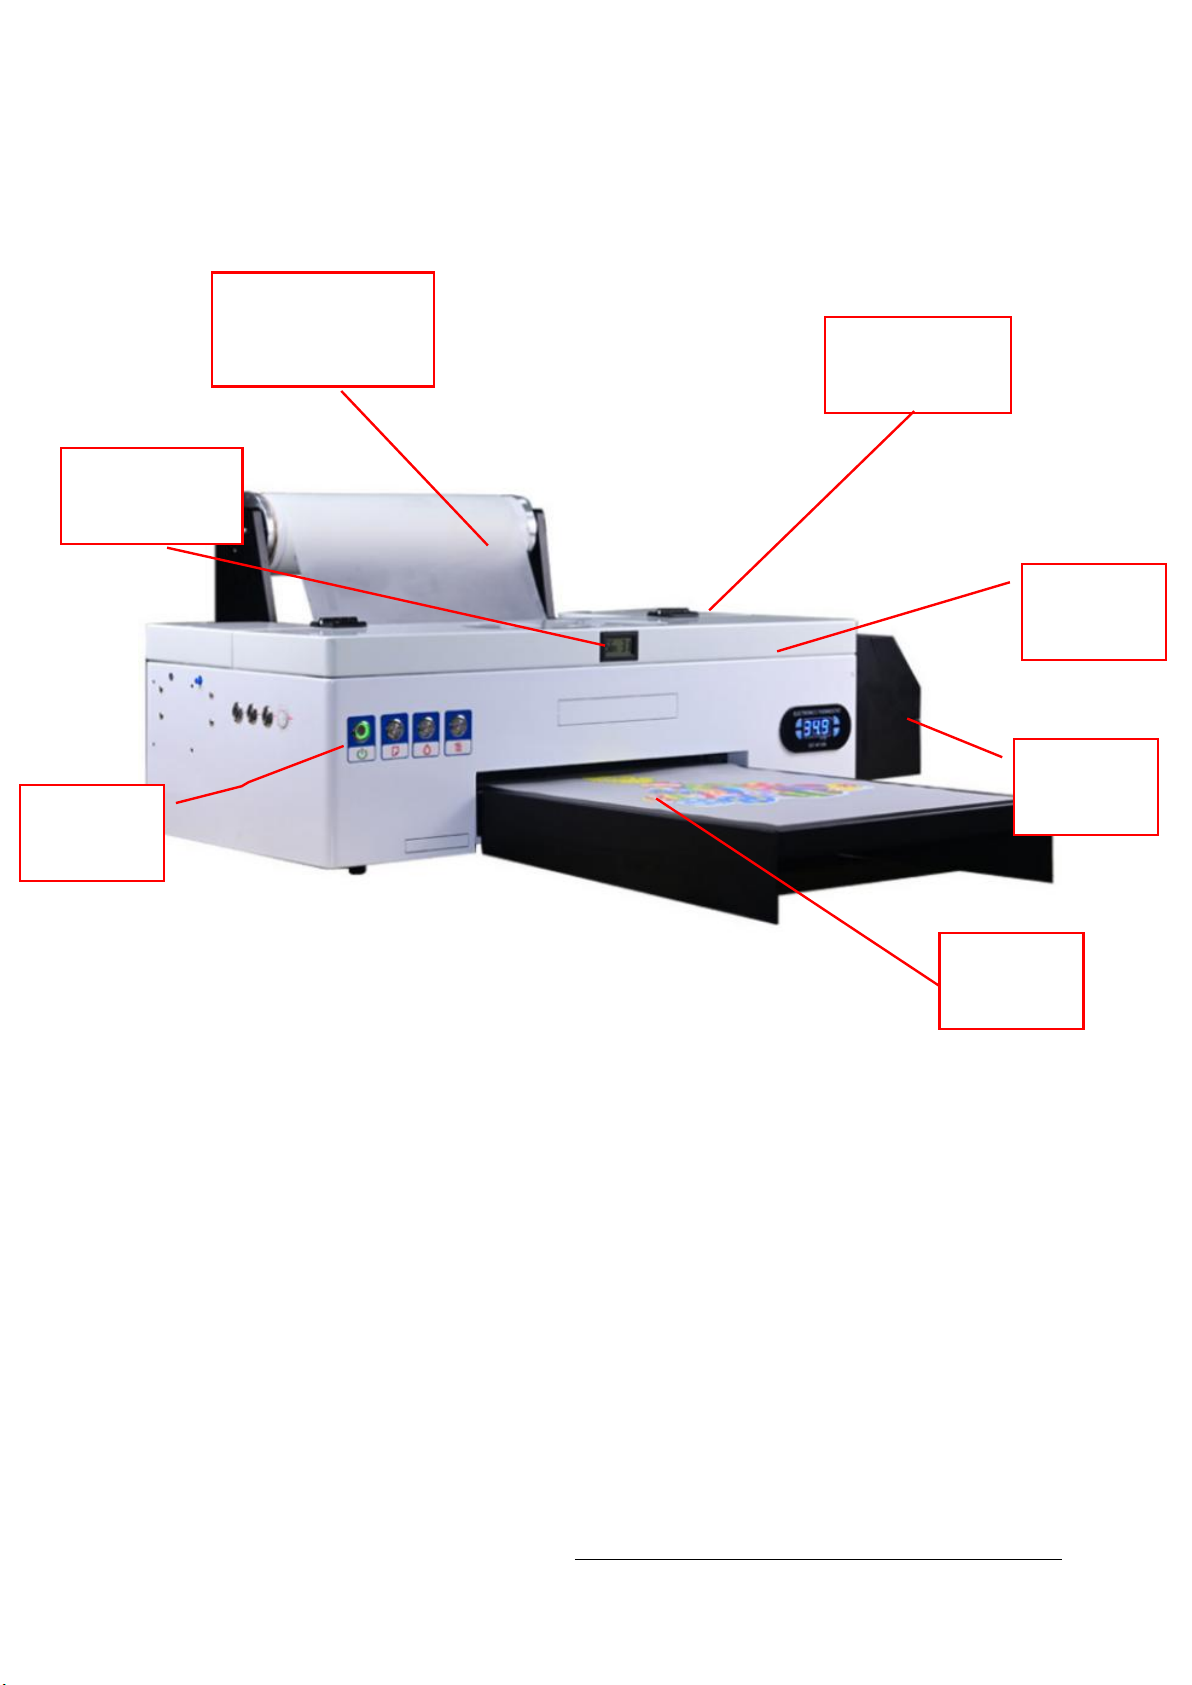
Machine Views
Waste ink
collector
Film feed position
Temperature and
humidity display
Nozzle
position
Ink position
film exit
position
printer panel
buttons
*Due to occasional product upgrades, this manual is for reference only.
4
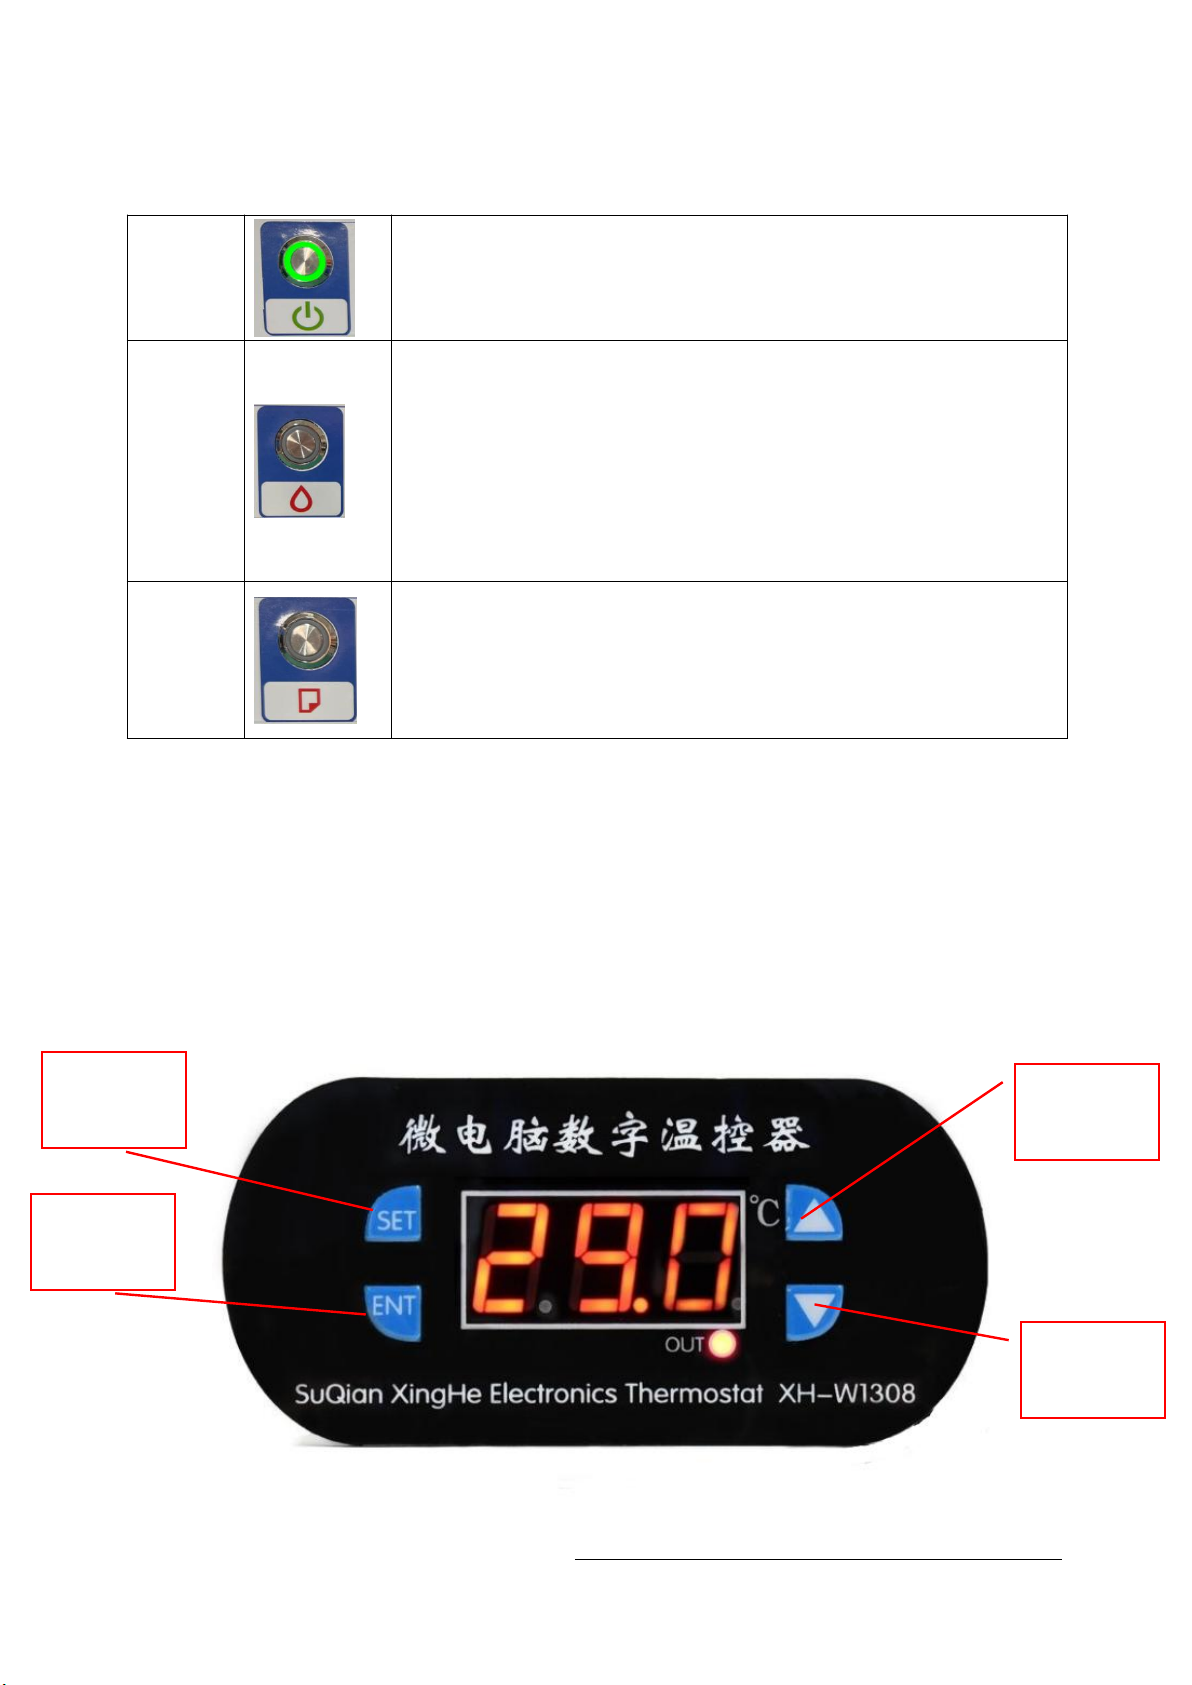
Introduction of printer buttons
start
button Press this button to open and close the printer power
Ink
Press this button to move the print head to the cartridge change
location.
When detecting the service life of the cartridge market, press this button
to print the head to the ink check position.
After changing the cartridge, press this button to return the print head to
the initial position.
When the ink indicator lights go out, press the button for 3 seconds to
clean the print head.
Printing
paper
Press this button to load or pop out the print paper.
You can resume printing if you press this button when there is a lack of
paper error or multiple page feed errors.Press this button when printing
jobs to cancel the print.
set button plus button
OK button
Minus
button
*Due to occasional product upgrades, this manual is for reference only.
5
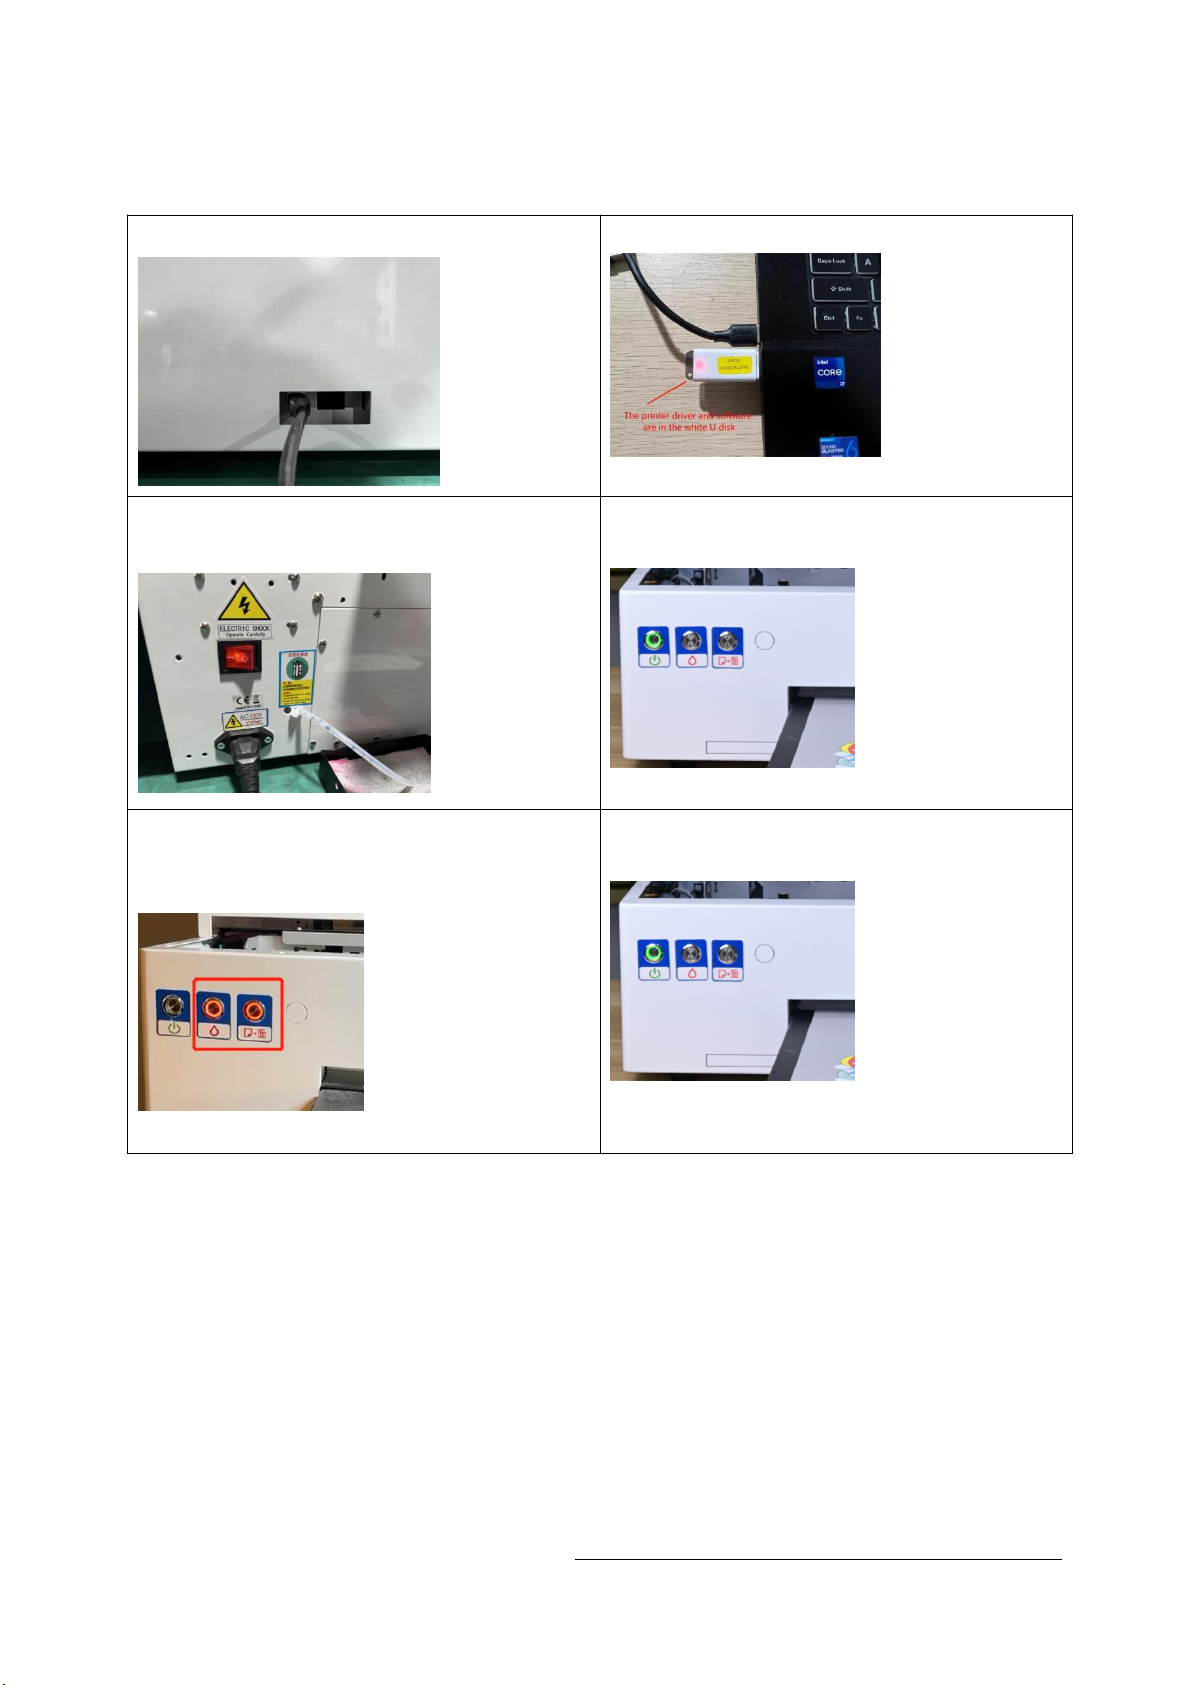
1.Connect the printer
1.1 Connect the printer data cable 1.2 Insert data U disk
1.3 Connect the cable and start the
power supply.
1.4 Click the Start button on the front
of the printer.
1.5 In the process of self-checking, it lights up with
red double flashes. (If the self-check fails, please
contact the salesman in time.)
1.5 The printer is ready once the
power light stops flashing
*Due to occasional product upgrades, this manual is for reference only.
6
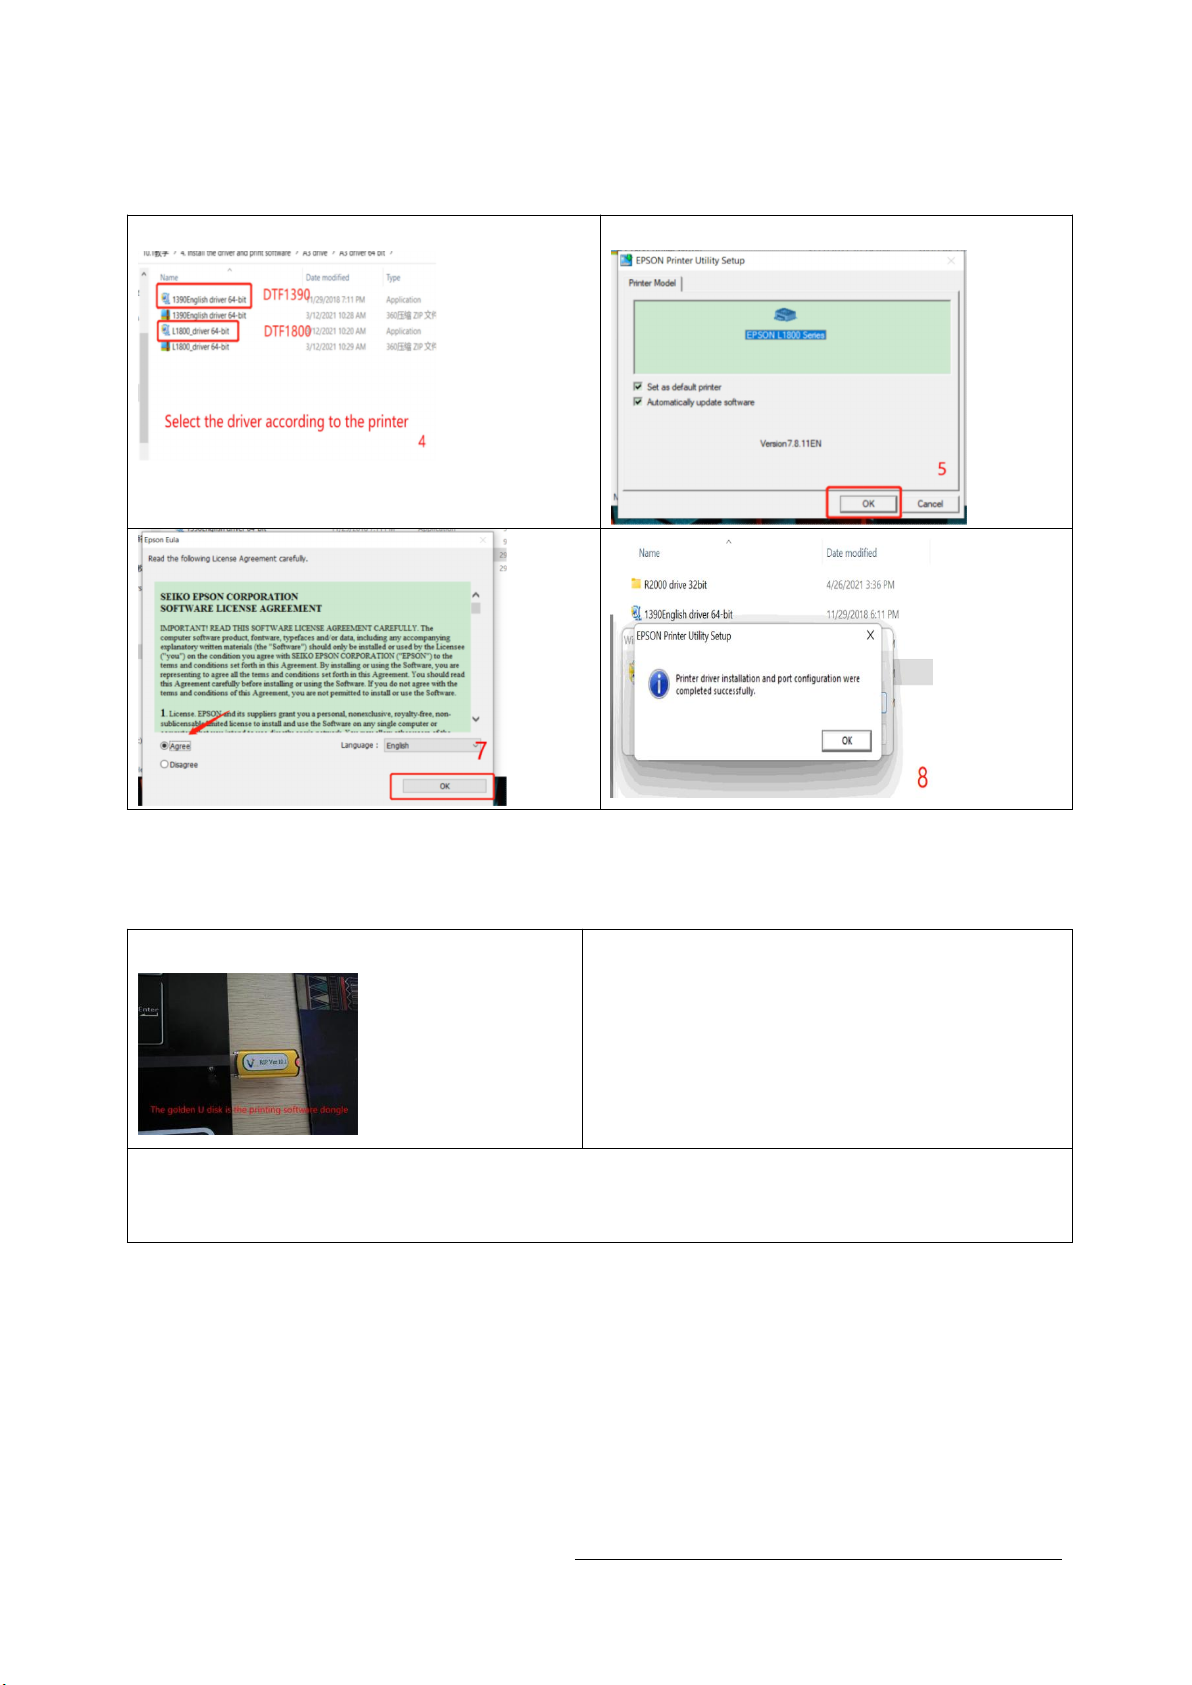
2.Install the drive
2.1 Find the driver file "DTF1800" in the data U disk 2.2 install to C drive
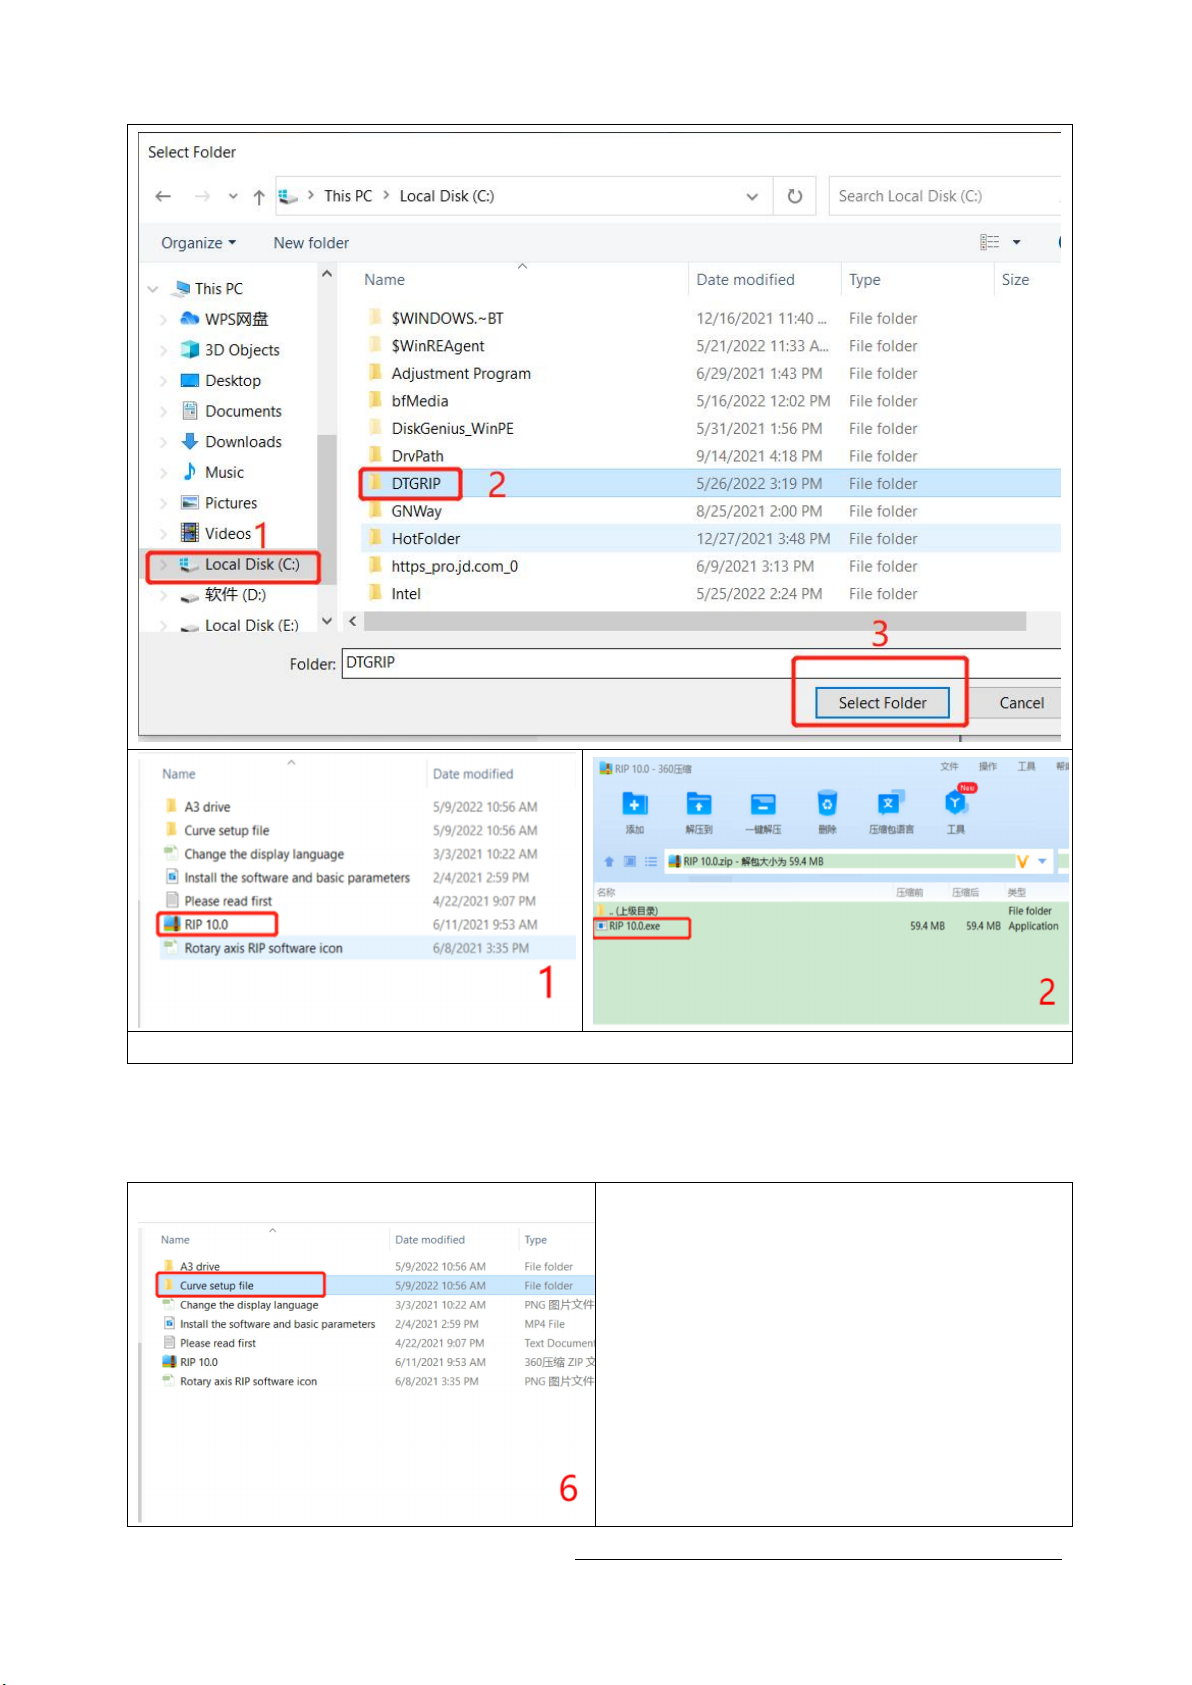
3.Install the rip software
3.1 Insert the dongle 3.2 Before installing the software,Under
the root directory of your Computer's C
drive, create a new folder and name it
"C:\DTGRIP"
3.3 add the "DTGRIP" folder to the white list in your computer
Settings.Settings--Update&Security--Windows Security--Virus & Threat Protection
--Manage Settings-- Add or remove Exclusions--Add an Exclusion --Folder-- Add

*Due to occasional product upgrades, this manual is for reference only.
7
*Due to occasional product upgrades, this manual is for reference only.
8
4.Install print curves
4.1 Find the "curve setup file" in the data U disk 4.2 Find the 2 folders "media" and
"profile" and copy them

*Due to occasional product upgrades, this manual is for reference only.
9
4.3 Find the installation folder of the rip software,
and copy the two folders just copied to the
installation folder of the rip
software.
4.4 After the installation is successful, open the rip
software, you can see the DTF-1390 curve

*Due to occasional product upgrades, this manual is for reference only.
10
5.Machine Installation And Setting
5.1 Installation of waste ink bottle
a. Unscrew the screws
b. Thread the plastic tube into the waste ink
bottle
c. Fasten the screws
5.2 Put one sheet PET film for
testing
P.S. The side with matte of pet film
must put on the front side.
5.3 Put a pet film into the feeder and press
the button of paper shortage to test the
feeder
5.4 Set the preheating temperature
between 35°C to 45°C
5.5 Install the pet film tray 5.6 Install the pet film reel
5.7 Install the battery to display
P.S.Need to buy an LR44 button battery
5.8 Fill the ink respectively
according to the color instructions
5.9 Inject the inks into the ink
cartridges.Use syringes glue syringe
needles and draw out 2-3ml ink from each ink
sarcs respectively.
P.S. Try to avoid the outflow of ink
and hold the hard part of ink sac
during Operation
5.10 Guide the waste ink to the waste ink bin 5.11 Print the test strip
P.S.The test strips need to be clear
and complete
*Due to occasional product upgrades, this manual is for reference only.
11
Note: If the print head test line is not neat, there are too many missing lines.
Go with F12 "Head Cleaning" again and print again
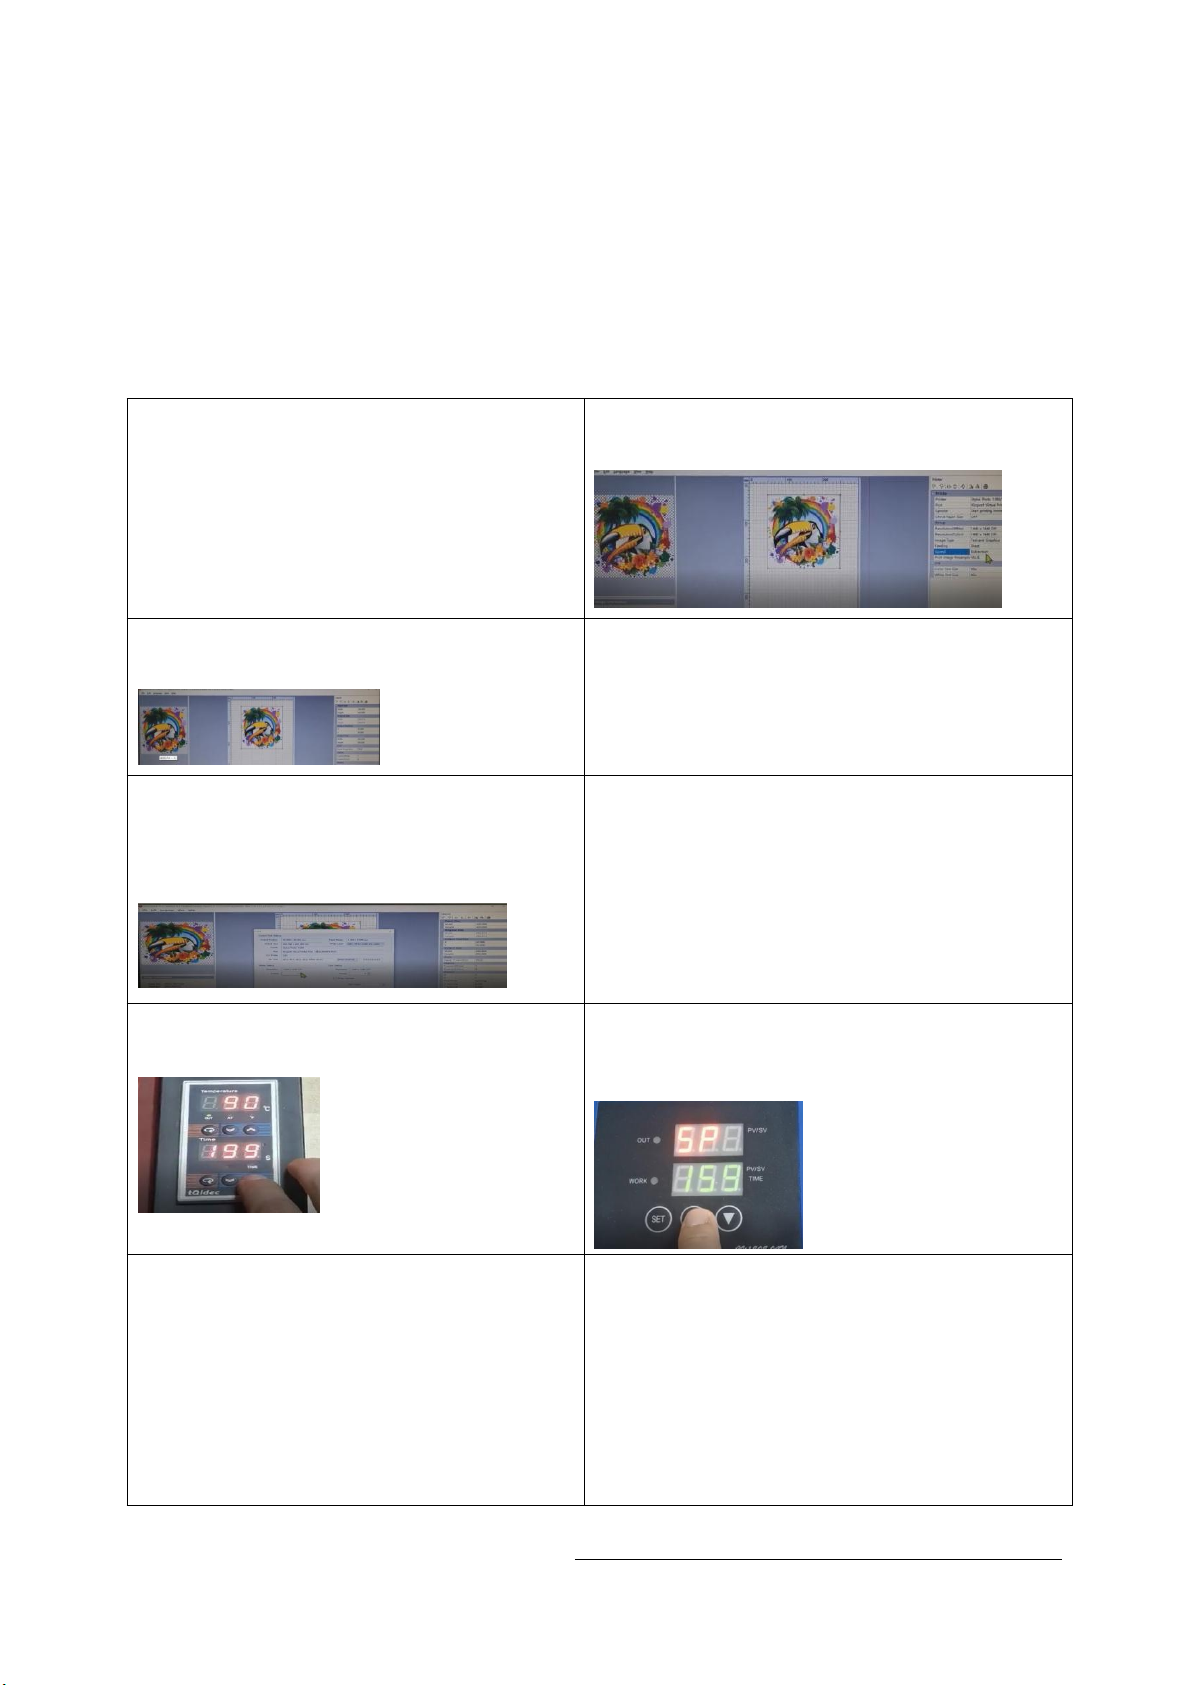
6.Whole process of printing
6.1 Place the pet film with matte on the
front side
6.2 Select the image that you want to
print and adjust the size and position
6.3 Make a simple setup and import the
preset parameters
6.4 Open and check the print setting ,
select correct print port .
6.5 Set white and color to print
simultaneously. Select “print color
first ” and “color+white” , then
press print
6.6 When the printing is done , put the
pet film into powder and shake to
make the powder spread evenly
6.7 Set the oven at 95-100°c for 200
seconds to cure the powder
6.8 Set the heat press machine at 160°
c for 40 seconds to start heat
press transfer.
6.9 When the heat press transfer is
done , cool the pet film for a few
seconds . then tear the pet film
carefully from the textile and you’
ll get a finished product
a. lay a piece of shielding paper on the
heat press machine
b. put the textie on the shielding
paper .put the prilnted pet film on the
textile and adjust the position .
c. put the other shielding paper on the
top and set time /temperature
for heat press transfer

*Due to occasional product upgrades, this manual is for reference only.
12
7.Maintenance
7.1. Work environment The best working environment temperature 25-30 degrees,
humidity above 50%
7.2. The ink Please try to use up the ink within 3 months after opening to avoid
spoilage.
7.3. Shut down the device After the work is completed, please turn off the equipment
in the normal order, first turn off the printer with the button, then turn off
the main power supply, and keep the ink cartridge cart on the right side (this
is to make the print head and the waste ink pump fit closely to prevent the print
head from clogging) .
7.3.1 turn off the printer
with the button
7.3.2 turn off the main
power supply
7.3.3 keep the ink
cartridge cart on the
right side
7.4.clean the ink
7.4.1Regularly clean up the waste ink
cartridge and ink sponge
7.4.2 Clean and suck the ink on the left
side of the machine regularly
7.5.Cleaning guide rails and grating strips
7.5.1 Clean the black lubricating oil on
the ink car guide rail regularly
7.5.2 add new lubricating oil to keep the
ink car guide rail smooth.
7.5.3 Clean the grating strips regularly with alcohol and dust-free cloth to ensure
the printing accuracy.

*Due to occasional product upgrades, this manual is for reference only.
13
Notice:
1. The print head and waste ink pump are not covered by the warranty. Due to the
characteristics of DTF ink, if the print head is not used for a long time, the
print head is easily blocked. Please carefully maintain the print head. If you
do not use it for more than three days, please install the print head moisturizing
solution. , you can contact our after-sales service to get the operation method
2. The work that must be done before printing everyday:
1. Shake the ink bottle to increase ink
activity
2. Start the printer
3. take out the film 4. Press F12 to clean the print head
5. Put a single sheet of film 6. Press F11 to print a test page
7. Test page to see print head status The test page is good
and can be printed normally
Other manuals for A3-L1800
1
Table of contents
Other Procolored Printer manuals


