manuals.online logo
Brands
  1. Home
  2. •
  3. Brands
  4. •
  5. LONGER
  6. •
  7. 3D Printer
  8. •
  9. LONGER LK4 Pro User manual

LONGER LK4 Pro User manual

FINISHED
Install the motor
Quick Start Guide
LONGER LK 4 PRO 3D FDM PRINTER
PACKING LIST
POWER SWITCH
1
2
3
4
5
6
7
8
9
10
11 12 13 14
www.longer3d.com
ATTENTION
Gantry
X-axis beam and frame base
Touch screen
ScraperZ-axis limited switch Test filament
TF card Card reader Power cable Wrench Allen wrench
Screw rod M5*20Cable tie M4*16 M5*6
INSTALLATION STEPS
Preparation:
Gantry, X-axis beam and frame base
Follow the direction of arrow and put the
gantry frame through the X-axis beam
carefully. Note: during installation,Do not
to tear the cables. After assembling, the
cables should be put behind.
2XM4*16
Preparation:
Coupler, motors and screws
FINISHED
Note: the frame with holes is on the left
1
2
PRINTER INTRODUCTION
The working voltage is AC 115V or 230V. Please switch to the right input voltage on the
side of the printer to meet with local voltage. (Default Voltage is AC 230V).
During printing, the temperature of nozzle will reach up to 250 ° C. To ensure your safety,
do not touch the moving parts or the high temperature nozzle kits when printer is printing.
We suggest to turn off the printer for 1-3 hours if the printer is printing for more than 96
hours continutely
Recommend the best environment is temperature at 25 ° C and htumidity is 20% ~ 50%.
󾙓
󾙔
󾙕
󾙖
Use the wrench to toggle the switch to the
RIGHT local voltage Before powered on.
Please check the RIGHT voltage to avoid to
burn down printer.
*Copyright © Shenzhen Longer 3D Technology Co.,Ltd. All Rights Reserved
Thank you for choosing our products.
Please read this manual carefully before use.
Please reference more details on digital manual in TF card about the operation of printer
and installation of slicing software.
Please join our Facebook Group: Longer 3D Official Group
Email: [email protected]
If you have any question, please feel free to contact us as above.
1
2
3
4
5
6
7
8
9
10
11
12
13
14
Extruder
Hot end
Filament holder Touch screen
Hot bed
Power supply
E filament detector
X-axis motor
E extrusion motor
X-axis limited switch
Y-axis limited switch
Y-axis motor
Z-axis motor
Z-axis limited switch
Z-axis motor
and coupler
Filament holder
SETTING
longer 3D Slicer.msi
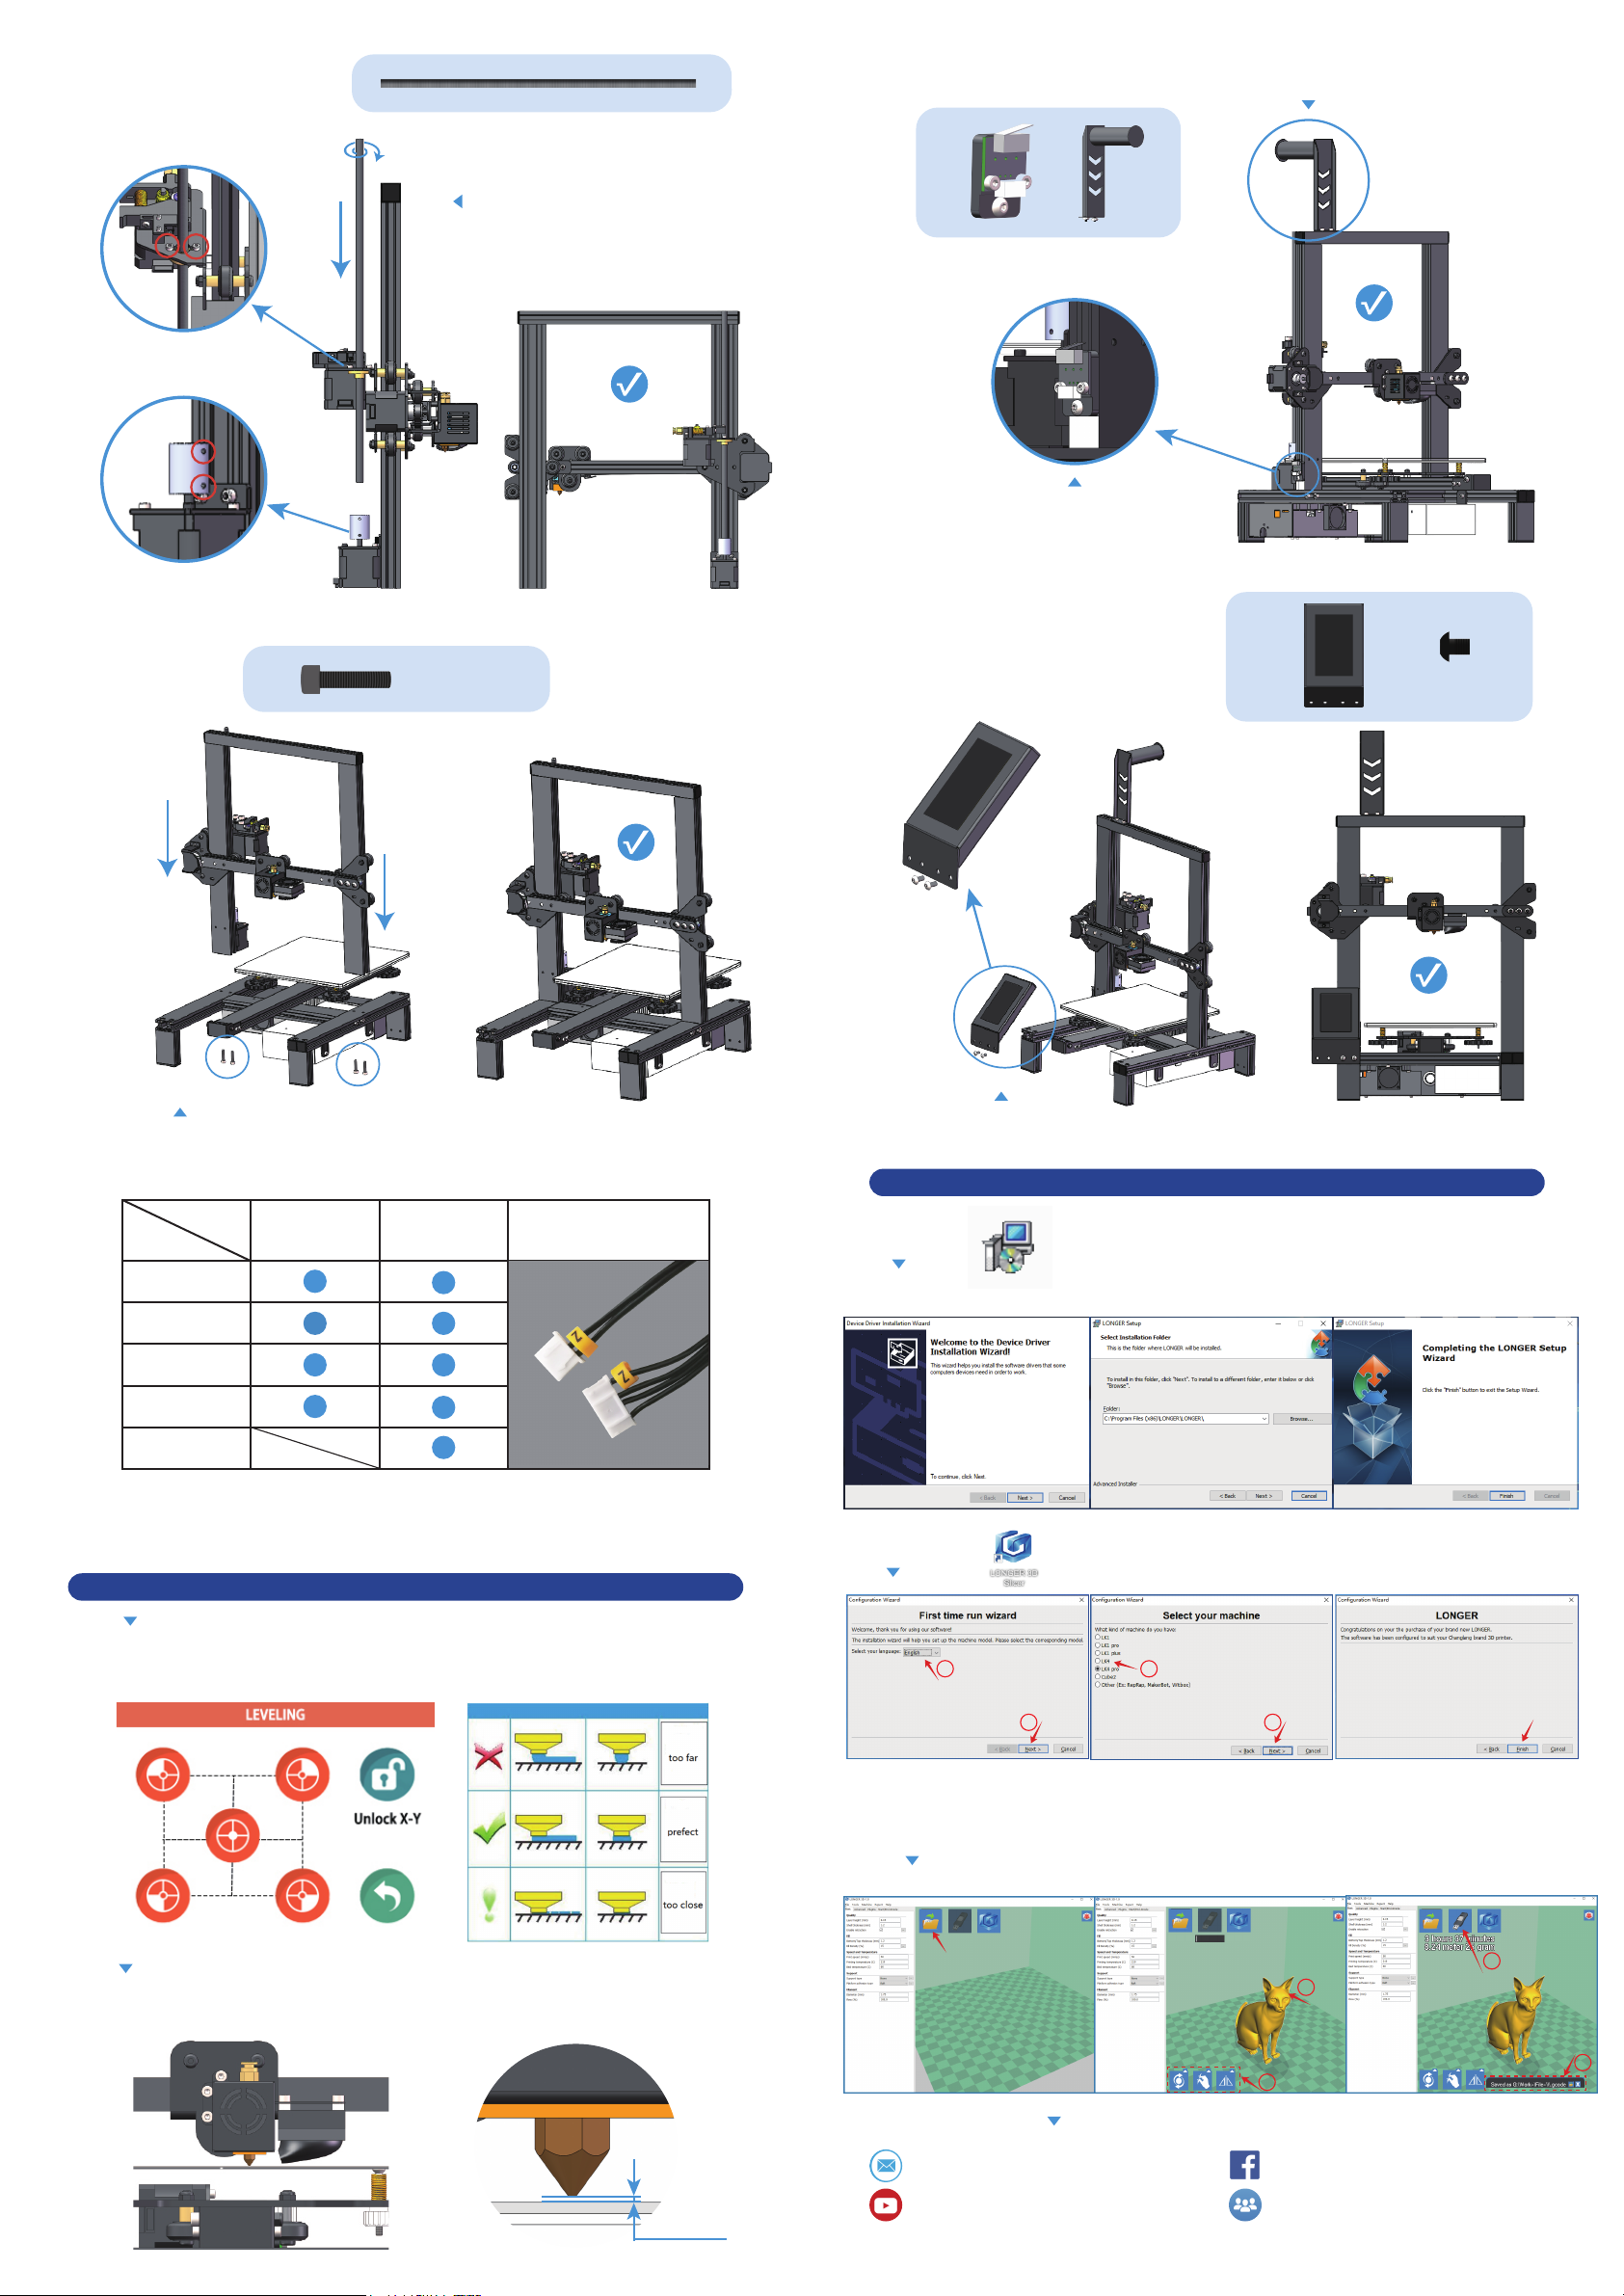
Assembly screw rod
(By rotating the screw rod).
Do not overtighten these two screws.
Tighten the four screws of coupler.
Install the gantry onto the base.
4XM5*20
3
4
5
6
7
E
X
Y
Z
78
9
10
11
12
13
14
0.1-0.2mm
MORE INFORMATION
1
2
1
2
1
2
1
2
Preparation: Screw rod
FINISHED
FINISHED
Preparation:
Screws
FINISHED
FINISHED
FRONT
BACK
Number of
cables
label
Double-click to open the file with .msi , there’s a pop-up window to
appear, click "Next", "Confirm" and "Finish".
Please save as default path when the slice software is installing,
otherwise the slicer is not able to run normally.
*
*
LEVELING
The distance between the nozzle and the platform is controlled to the height of
0.1-0.2mm, about the thickness of A4 paper.
(Put on a A4 paper, feel the slight friction when you pull the paper)
Connect:
Mount the touch screen to the left on base.
SOFTWARE INSTALLATION AND OPERATION
INSTALLATION
Run the program select the software interface language in "English",
select the model "LK4 Pro", select "Finish".
1. Run the slicer of "LONGER 3D Slicer".
2. Modify printing parameters, import model file -> edit model -> export as Gcode file
(save path is on the bottom of slicer window).
3. Copy the file into TF card, insert it into the printer, power on the printer,
select the printed file, and start printing.
PROCEDURE
OF SCLICING
Support Email : suppor[email protected]
Youtube channel: Longer 3D Facebook Group:Longer 3D Official Group
Facebook ID: longer3dprinter
2XM5*6
LCD 5
Preparation: Limited switch and filament holder
Install the filament holder onto
the printer' top beam.
Preparation:
Touch screen, touch screen back cover,
screws
Install the z-axis limit switch. The
installation height is flush with the
upper edge of the white label.
Please reference the printer description and cable terminals with orange rubber letters
to connect the cables.
The numbers from 7 to 14 in the table above correspond to the serial numbers in the
"PRINTER INTRODUCTION" section.
Please click on the touch screen "More"-> "Leveling", starting from the icon in the
lower left corner, click the icons counterclockwise in turn. After each click on the
icon, wait for the nozzle to move to the corresponding position and adjust the
leveling nut. Try to keep the nozzle and the platform at a proper distance.
Two wires Four wires The picture below shows
2-wire cable and 4-wire cable

Other manuals for LK4 Pro

1

Other LONGER 3D Printer manuals

LONGER RAY5 User manual

LONGER

LONGER RAY5 User manual

LONGER LK2 User manual

LONGER

LONGER LK2 User manual

LONGER LK4 User manual

LONGER

LONGER LK4 User manual

LONGER LK1 User manual

LONGER

LONGER LK1 User manual

LONGER LK4 Pro User manual

LONGER

LONGER LK4 Pro User manual

LONGER Orange10 Installation guide

LONGER

LONGER Orange10 Installation guide

LONGER Orange120 User manual

LONGER

LONGER Orange120 User manual

LONGER LK4 User manual

LONGER

LONGER LK4 User manual

LONGER LK4 X User manual

LONGER

LONGER LK4 X User manual

LONGER Cube2 User manual

LONGER

LONGER Cube2 User manual

LONGER LK5Pro User manual

LONGER

LONGER LK5Pro User manual

LONGER Orange30 User manual

LONGER

LONGER Orange30 User manual

LONGER LK1 User manual

LONGER

LONGER LK1 User manual

LONGER Orange10 User manual

LONGER

LONGER Orange10 User manual

Popular 3D Printer manuals by other brands

Industry Supplies SMART3D user manual

Industry Supplies

Industry Supplies SMART3D user manual

Perfect-Office A8-W5 installation guide

Perfect-Office

Perfect-Office A8-W5 installation guide

Anet A8 installation guide

Anet

Anet A8 installation guide

SeeMeCNC Delta manual

SeeMeCNC

SeeMeCNC Delta manual

Kelant S400S product manual

Kelant

Kelant S400S product manual

Creality CR-30 user guide

Creality

Creality CR-30 user guide

VORON 1.8 Assembly manual

VORON

VORON 1.8 Assembly manual

3D Printing Systems UP Plus 2 user manual

3D Printing Systems

3D Printing Systems UP Plus 2 user manual

Phrozen SONIC MIGHTY 8K manual

Phrozen

Phrozen SONIC MIGHTY 8K manual

Geeetech Aluminum Prusa I3 manual

Geeetech

Geeetech Aluminum Prusa I3 manual

RAISE 3D Pro2 Series Replacing Manual

RAISE 3D

RAISE 3D Pro2 Series Replacing Manual

3D Upfitters CR-10 Smart Enclosure Kit installation manual

3D Upfitters

3D Upfitters CR-10 Smart Enclosure Kit installation manual

Shining 3D AccuFab-L4D user manual

Shining 3D

Shining 3D AccuFab-L4D user manual

Carbide 3D BitSetter Installation and setup guide

Carbide 3D

Carbide 3D BitSetter Installation and setup guide

FELIXprinters FELIX Pro 2 quick start guide

FELIXprinters

FELIXprinters FELIX Pro 2 quick start guide

RAISE 3D E2 quick start guide

RAISE 3D

RAISE 3D E2 quick start guide

De Agostini Model Space Idbox pack 10 manual

De Agostini

De Agostini Model Space Idbox pack 10 manual

re:3D Gigabot installation manual

re:3D

re:3D Gigabot installation manual

manuals.online logo
manuals.online logoBrands
  • About & Mission
  • Contact us
  • Privacy Policy
  • Terms and Conditions

Copyright 2025 Manuals.Online. All Rights Reserved.