Profoon PDX-5200 series User manual

USERS MANUAL
PDX-5200
series

MENUGUIDED PROGRAMMING
press NU”
display geeft
“PHONEBK”
press
∇
press
“OK”
display geeft
“HANDSET”
press
∇
press
“OK”
display geeft
“BASE”
press
∇
press
“OK”
display geeft
“KEY LOCK”
press
∇
press
“OK”
display geeft
“BABYCALL”
press
∇
press
“OK”
display geeft
“REGISTER”
press
∇
press
“OK”
NUMMERGEHEUGENS
ADD invoeren geheugens blz. 17
DELETE uitwissen geheugens blz. 17
MODIFY corrigeren geheugens blz. 18
INSTELLINGEN HANDSSET
BEEP attentietoontjes blz. 21
EAR VOL ontvangstvolume blz. 13
RING VOL belvolume handset blz. 19
INT RING belritme handset intern blz. 19
EXT RING belritme handset extern blz. 19
H S NAME handsetnaam blz. 20
AUTO ANS automatisch aannemen blz. 12
LANGUAGE displaytaal blz. 20
INSTELLINGEN BASIS
VOLUME belvolume basis blz. 19
MELODY belritme basis blz. 19
CALL BAR uitbelblokkering blz. 20
DIALMODE toon/puls (niet actief) blz. 13
FLASH R/Flash functie blz. 14
PABX kiespauze blz. 13
PIN CODE PIN-code wijzigen blz. 11
DEL H S afmelden handset blz. 30
SEL BASE basis selecteren blz. 30
DEFAULT fabrieksinstellingen blz. 33
UITSCHAKELEN TOETSENBORD blz. 21
NOODOPROEP blz. 22
HANDSET AANMELDEN blz. 28

INTRODUCTION
The PROFOON PDX-5200 series DECT telephones are cordless telecommuni-
cation systems, based on the DECT (Digital Enhanced Cordless Telephone)
technology.
The telephone can come with one or with multiple handsets and/or may have an
asnwering machine built-in
The PROFOON PDX-5200 series DECT telephones are GAP compatible. Up to
5 handsets can be registered to a single base and each handset can be registe-
red to up to 4 bases.
DECLARATION OF CONFORMITY
The declaration of conformity is available
on the website WWW.PROFOON.COM
DECLARATION OF NETWORKCOMPATIBILITY
The Profoon PDX-5200 series is designed for use on the ‘public switched telep-
hone networks (analogue single-line)’ of telephone- and cable-companies inside
the European Union.
Each country and/or provider might require a different telephoneplug.
The function Caller-ID is based on both the DTMF and the FSK system. It might
be possible that you have to subscribe to this feature.
The Profoon PDX-5200 series complies with the essential requirements and pro-
visions as described in the European Directive 1999/5/EC.
3

INHOUDSOPGAVE
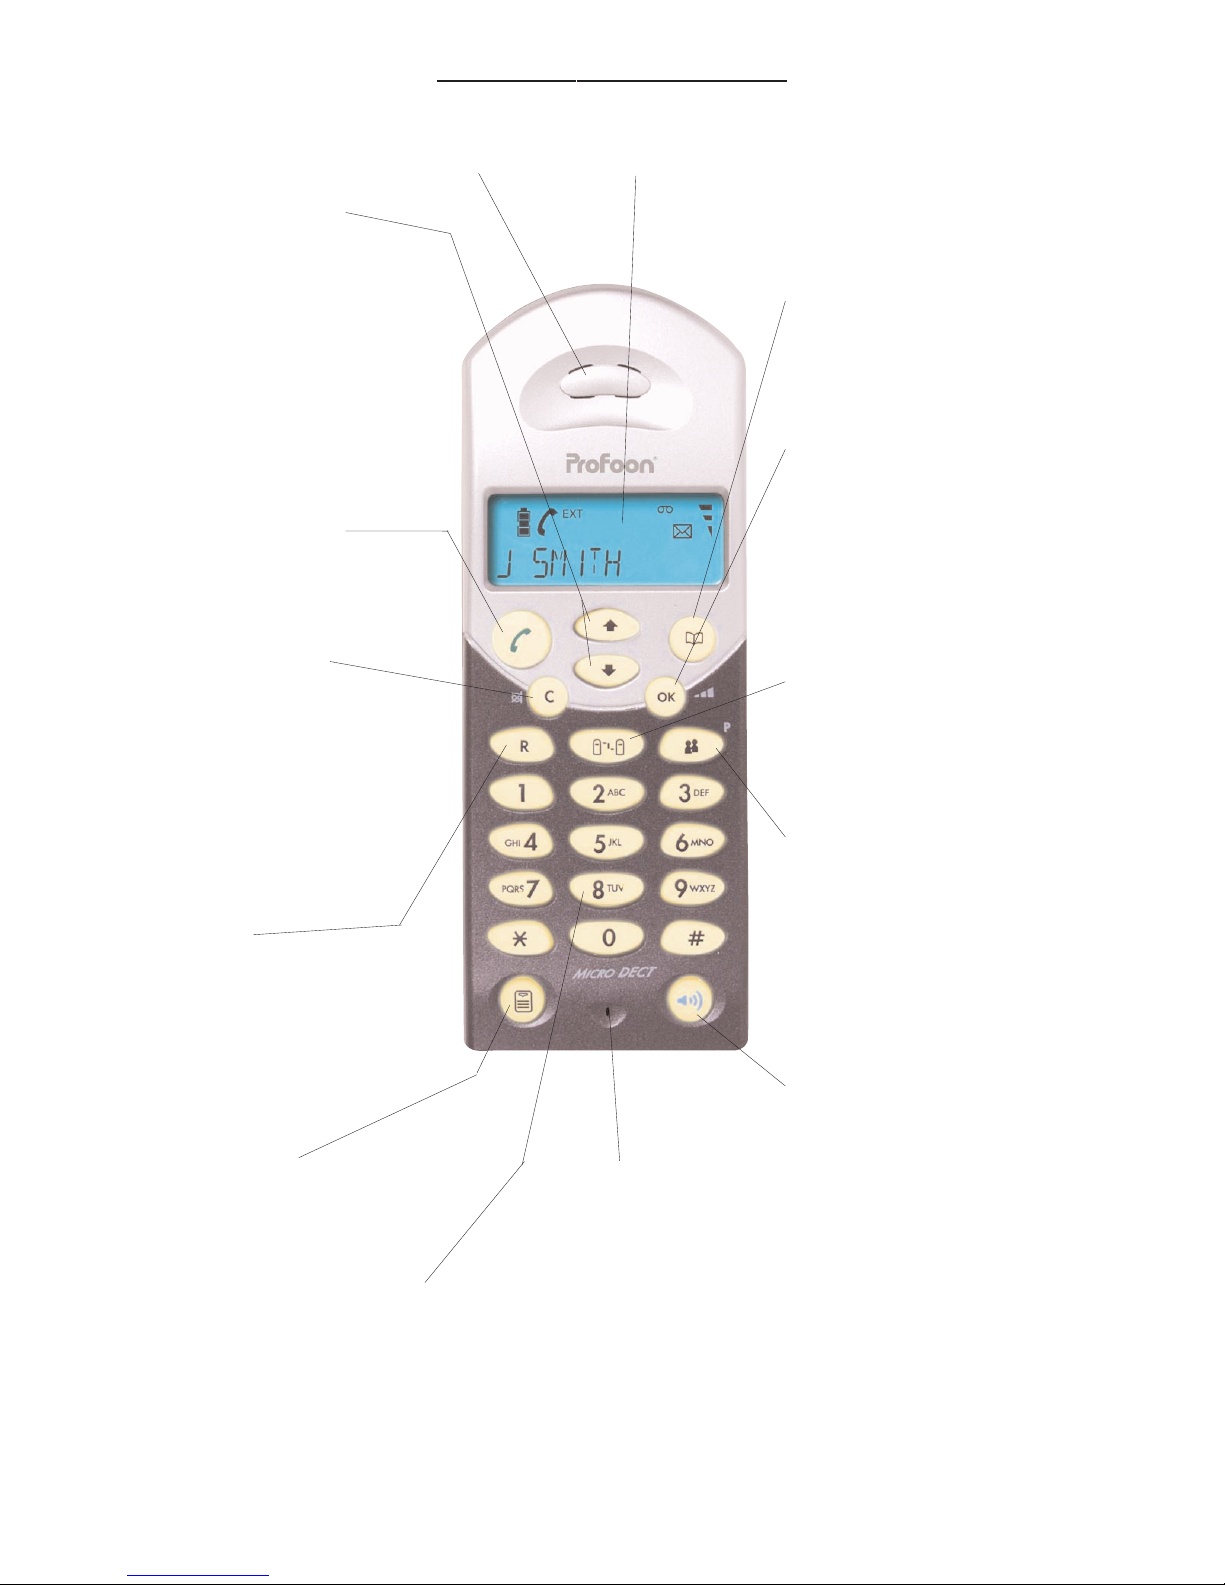
OVERZICHT HANDSET . . . . . . . . . . . . . . . . . . . . . . . . . . . . . . . . . . . . . . 6
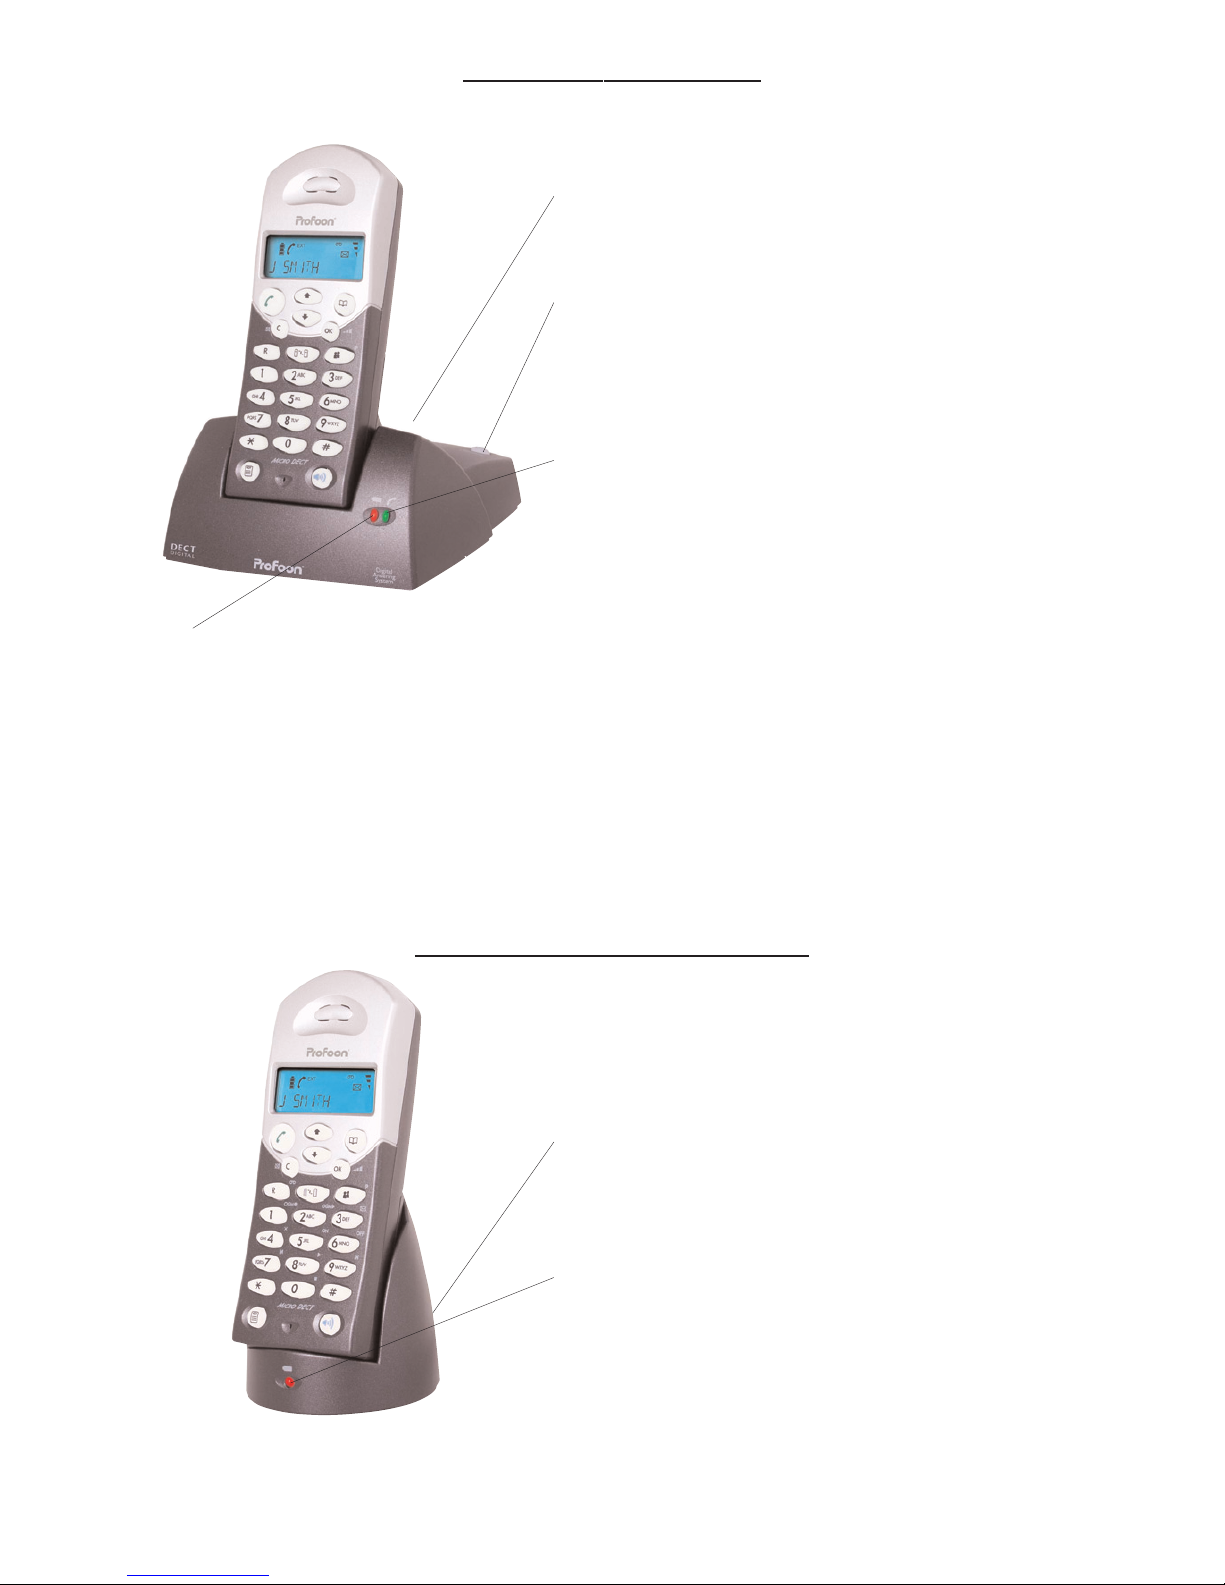
OVERZICHT BASIS . . . . . . . . . . . . . . . . . . . . . . . . . . . . . . . . . . . . . . . . . . 7
OVERZICHT HANDSETHOUDER / OPLADER . . . . . . . . . . . . . . . . . . . . 7
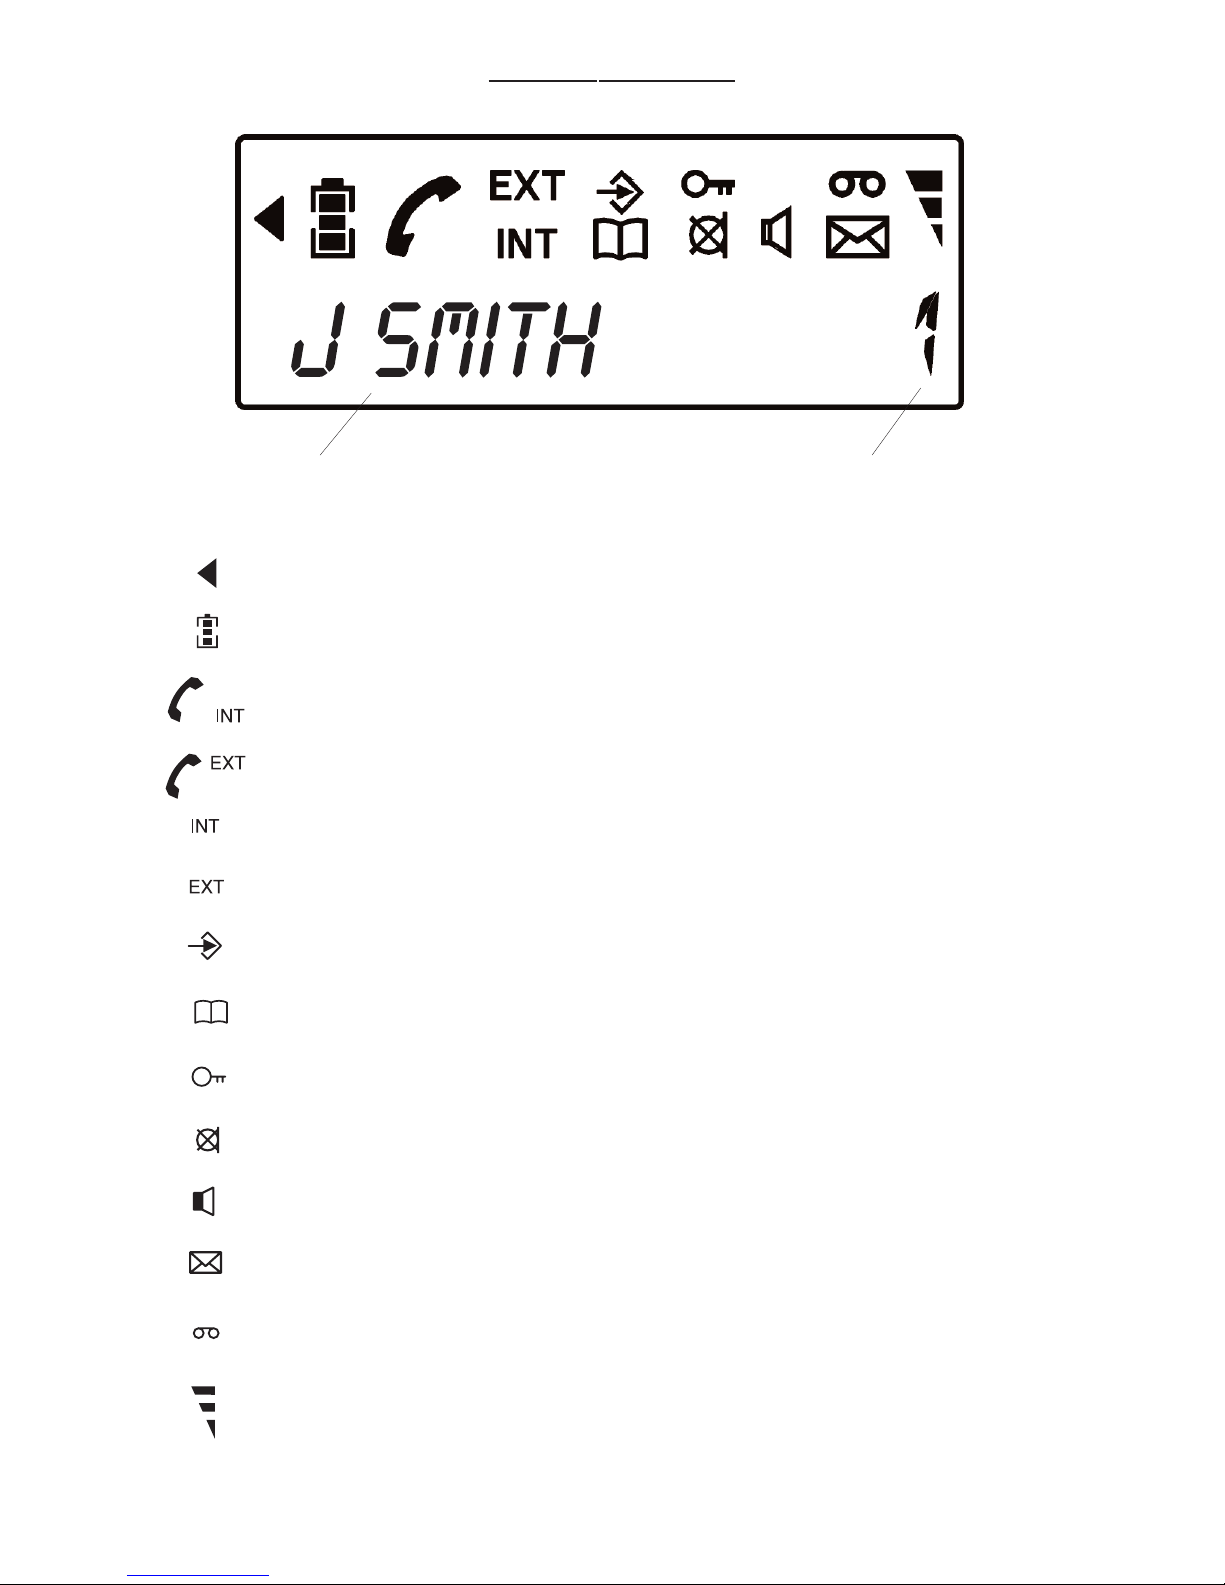
DISPLAYSYMBOLEN . . . . . . . . . . . . . . . . . . . . . . . . . . . . . . . . . . . . . . . . 8
BELANGRIJKE VEILIGHEIDSINSTRUCTIES . . . . . . . . . . . . . . . . . . . . . . 9
INSTALLEREN . . . . . . . . . . . . . . . . . . . . . . . . . . . . . . . . . . . . . . . . . . . . . . 10
PIN-CODE . . . . . . . . . . . . . . . . . . . . . . . . . . . . . . . . . . . . . . . . . . . . . . . . . 11
GEBRUIK
opgebeld worden . . . . . . . . . . . . . . . . . . . . . . . . . . . . . . . . . . . . . . . . 12
nummerkiezen . . . . . . . . . . . . . . . . . . . . . . . . . . . . . . . . . . . . . . . . . . 12
blokkiezen . . . . . . . . . . . . . . . . . . . . . . . . . . . . . . . . . . . . . . . . . . . . . . 12
handenvrij . . . . . . . . . . . . . . . . . . . . . . . . . . . . . . . . . . . . . . . . . . . . . . 13
nummerherhaling . . . . . . . . . . . . . . . . . . . . . . . . . . . . . . . . . . . . . . . . 13
kiespauze . . . . . . . . . . . . . . . . . . . . . . . . . . . . . . . . . . . . . . . . . . . . . . 13
toon/puls . . . . . . . . . . . . . . . . . . . . . . . . . . . . . . . . . . . . . . . . . . . . . . . 13
ruggespraak . . . . . . . . . . . . . . . . . . . . . . . . . . . . . . . . . . . . . . . . . . . . 13
ontvangstvolume . . . . . . . . . . . . . . . . . . . . . . . . . . . . . . . . . . . . . . . . . 13
gesprekstimer . . . . . . . . . . . . . . . . . . . . . . . . . . . . . . . . . . . . . . . . . . . 14
telediensten . . . . . . . . . . . . . . . . . . . . . . . . . . . . . . . . . . . . . . . . . . . . 14
doorschakelen en netwerkdiensten (R/Flash) . . . . . . . . . . . . . . . . . . 14
verbinding verbreken . . . . . . . . . . . . . . . . . . . . . . . . . . . . . . . . . . . . . 14
paging (handset zoekfunctie) . . . . . . . . . . . . . . . . . . . . . . . . . . . . . . . 14
NUMMERWEERGAVE
werking . . . . . . . . . . . . . . . . . . . . . . . . . . . . . . . . . . . . . . . . . . . . . . . . 15
geheugen bekijken . . . . . . . . . . . . . . . . . . . . . . . . . . . . . . . . . . . . . . . 15
nummer wissen . . . . . . . . . . . . . . . . . . . . . . . . . . . . . . . . . . . . . . . . . . 16
terugbellen . . . . . . . . . . . . . . . . . . . . . . . . . . . . . . . . . . . . . . . . . . . . . 16
gegevens . . . . . . . . . . . . . . . . . . . . . . . . . . . . . . . . . . . . . . . . . . . . . . 16
NUMMERGEHEUGENS
programmeren . . . . . . . . . . . . . . . . . . . . . . . . . . . . . . . . . . . . . . . . . . 17
uitkiezen . . . . . . . . . . . . . . . . . . . . . . . . . . . . . . . . . . . . . . . . . . . . . . . 17
uitwissen . . . . . . . . . . . . . . . . . . . . . . . . . . . . . . . . . . . . . . . . . . . . . . . 17
corrigeren . . . . . . . . . . . . . . . . . . . . . . . . . . . . . . . . . . . . . . . . . . . . . . 18
kiespauze . . . . . . . . . . . . . . . . . . . . . . . . . . . . . . . . . . . . . . . . . . . . . . 18
PERSOONLIJKE INSTELLINGEN
belsignalen . . . . . . . . . . . . . . . . . . . . . . . . . . . . . . . . . . . . . . . . . . . . . 19
handsetnaam . . . . . . . . . . . . . . . . . . . . . . . . . . . . . . . . . . . . . . . . . . . 20
uitbelblokkering . . . . . . . . . . . . . . . . . . . . . . . . . . . . . . . . . . . . . . . . . . 20
display-taal . . . . . . . . . . . . . . . . . . . . . . . . . . . . . . . . . . . . . . . . . . . . . 20
4

attentietoontjes . . . . . . . . . . . . . . . . . . . . . . . . . . . . . . . . . . . . . . . . . . 21
uitschakelen toetsenbord . . . . . . . . . . . . . . . . . . . . . . . . . . . . . . . . . . 21
handset uitschakelen . . . . . . . . . . . . . . . . . . . . . . . . . . . . . . . . . . . . . 22
noodoproep . . . . . . . . . . . . . . . . . . . . . . . . . . . . . . . . . . . . . . . . . . . . . 22
BEANTWOORDER
introductie . . . . . . . . . . . . . . . . . . . . . . . . . . . . . . . . . . . . . . . . . . . . . . 23
programmeertip . . . . . . . . . . . . . . . . . . . . . . . . . . . . . . . . . . . . . . . . . 23
meldtekst . . . . . . . . . . . . . . . . . . . . . . . . . . . . . . . . . . . . . . . . . . . . . . 23
antwoordfuncties . . . . . . . . . . . . . . . . . . . . . . . . . . . . . . . . . . . . . . . . . 23
afspelen . . . . . . . . . . . . . . . . . . . . . . . . . . . . . . . . . . . . . . . . . . . . . . . 24
overige functies . . . . . . . . . . . . . . . . . . . . . . . . . . . . . . . . . . . . . . . . . . 25
op afstand bedienen . . . . . . . . . . . . . . . . . . . . . . . . . . . . . . . . . . . . . . 26
geheugen vol . . . . . . . . . . . . . . . . . . . . . . . . . . . . . . . . . . . . . . . . . . . 27
SYSTEEM UITBREIDING
aanmelden extra handset . . . . . . . . . . . . . . . . . . . . . . . . . . . . . . . . . . 28
intercom . . . . . . . . . . . . . . . . . . . . . . . . . . . . . . . . . . . . . . . . . . . . . . . 29
aankloptoon . . . . . . . . . . . . . . . . . . . . . . . . . . . . . . . . . . . . . . . . . . . . 29
doorverbinden / ruggespraak / makelen / conferentie . . . . . . . . . . . . 29
afmelden extra handset . . . . . . . . . . . . . . . . . . . . . . . . . . . . . . . . . . . 30
handset aanmelden aan andere basis . . . . . . . . . . . . . . . . . . . . . . . . 30
basis selecteren . . . . . . . . . . . . . . . . . . . . . . . . . . . . . . . . . . . . . . . . . 30
WETENSWAARDIGHEDEN BIJ MULTIHANDSET . . . . . . . . . . . . . . . . . . 31
ONDERHOUD EN MILIEU . . . . . . . . . . . . . . . . . . . . . . . . . . . . . . . . . . . . 32
SYSTEEMSTORING . . . . . . . . . . . . . . . . . . . . . . . . . . . . . . . . . . . . . . . . . 33
SYSTEEM RESET . . . . . . . . . . . . . . . . . . . . . . . . . . . . . . . . . . . . . . . . . . . 33
FABRIEKSINSTELLINGEN . . . . . . . . . . . . . . . . . . . . . . . . . . . . . . . . . . . . 34
GEBRUIKSTIPS
plaatsing . . . . . . . . . . . . . . . . . . . . . . . . . . . . . . . . . . . . . . . . . . . . . . . 34
afluisteren . . . . . . . . . . . . . . . . . . . . . . . . . . . . . . . . . . . . . . . . . . . . . 34
voeding . . . . . . . . . . . . . . . . . . . . . . . . . . . . . . . . . . . . . . . . . . . . . . . . 34
handset zoekfunctie . . . . . . . . . . . . . . . . . . . . . . . . . . . . . . . . . . . . . . 35
bereik . . . . . . . . . . . . . . . . . . . . . . . . . . . . . . . . . . . . . . . . . . . . . . . . . 35
buiten bereik . . . . . . . . . . . . . . . . . . . . . . . . . . . . . . . . . . . . . . . . . . . . 35
buiten bereik tijdens oproepen . . . . . . . . . . . . . . . . . . . . . . . . . . . . . . 36
TECHNISCHE GEGEVENS . . . . . . . . . . . . . . . . . . . . . . . . . . . . . . . . . . . 36
GARANTIEBEWIJS / VOORWAARDEN . . . . . . . . . . . . . . . . . . . . . . . . . . 37
5

WHERE TO FIND: HANDSET
6
display, see page 8built-in loud-
speaker
button ∆and ∇:
- press to display the last
10 numbers you dialled
- press during program-
ming to move through the
menu’s
-press during a call to
change the volume in the
earpiece
telephonebutton:
- press to begin, answewr
and end a telephone call
C(clear) button:
- press during program-
ming to go back to the
previous option
- to clear digitsfrom the
display
- press during a call to
mute the microphone
R-button:
- press to begin and end
answering machine func-
tions
- pree during a call to use
select services
Menu button:
- press to start and end
the programming menu
Memory button:
- press to make calls to
numbers stored in
memory
OK button:
- press during program-
ming to confirm your
selections
- press and hold to
switch the handset off
intercom button
- press to make an inter-
com call (if more hands-
ets are registered)
Caller display / pause:
- press to display details
of people who have cal-
led you
- press to generate pau-
ses when using the
phone on a PABX
Speakerphone button:
- press to turn the spea-
kerphone on and off
keyboard:
- to dial a number
- to key in the telephonenumbers and names in
programming mode
- to control the answering functions (in answe-
ring mode)
built-in microp-
hone

WHERE TOFIND: BASE
WERE TO FIND: CHARGERPOD
7
charge-LED (red)
- comes on when the handset is
placed in the cradle and the
batteries are being charged
(stays on, even when the batte-
ries are full)
telephone-LED (green)
- comes on during a telephonecall
- flashes when new messages are recorded
or new caller-ID’s have been received (when
you have listened to all messages and vie-
wed the callers list, this LED will go off.
handset locator:
- press to call all handsets
- press and hold to register new handsets
connections for the power adapter and for
the telephonecable (backside base)
connection for the power adapter (backs-
ide chargerpod)
charge-LED (red)
- comes on when the handset is placed in
the cradle and the batteries are being
charged (stays on, even when the batte-
ries are full)

DISPLAYSYMBOLS
handsetname handsetnumber
(free programmable)
There are more than 12 digits, the display shows the last 12 only.
Batterylevel.
You are connected on an intercom call.
You are connected to the telephone line.
your handset is ringing for an intercom call.
Your handset is ringing for an incoming call..
You are programming the handset or base unit.
The phonebookmemory is activated
Your handset’s keypad is locked.
Your handset’s microphone is muted.
Your handset’s loudspeaker is on.
You have received new Caller Display messages.
Steady: The answering machine is switched on.
Flashing: new mesasages recorded
Shows the strength of the signal between the handset and base unit
8

This telephone is not designed for making emergency telephone calls when the
power fails. Make alternative arrangements for access to emergency services.
SAFETY INFORMATION
1. Please read all the instructions of this manual before using this product.
2. Observe all the instructions marked on this product.
3. Install this product on a stable surface and to avoid anyone from stepping
over the telephone line.
4. Do not fix the AC power supply cord to building surfaces with metal fittings.
5. This product should be operated only from the type of power source
indicated on the product. If you are not sure of the type of power supply to
your home, consult your local power company.
6. Do not use this product near water, or when your hands are wet. If the
product comes into contact with any liquids, disconnect the power supply
immediately and contact repair centre.
7. To prevent fire or electrical shock hazard, do not expose this product to rain
or moisture.
8. Before cleaning the product, disconnect it from the telephone jack and
power source. Use a soft, damp cloth to clean the product. Do not use liquid
cleaner, aerosol cleaners or abrasive powder to clean this product.
9. As there maybe electric shock from lightning, avoid using or installing this
product during thunderstorms.
10. If the product is not operating normally or if it is damaged, do not open the
cabinet or try to repair by yourself. This will void your warranty and also
expose you to dangerous electrical shock or other risks. Please contact
repair centre.
11. Do not use any metallic objects to connect the charging terminals on the
Base Station as this may cause fire due to overloading the power source.
12. Do not charge the battery by any devices other than that provided by this
product.
13. Never use ordinary (non-rechargeable) batteries. Only use approved
batteries of the same type (rechargeable), otherwise battery damage can
result.
14. Dispose the damaged battery properly.
15. Do not touch the uninsulated telephone wires or terminals unless the
telephone line and power source has been disconnected.
16. Do not overload wall outlets and extension cords as this can lead to
electrical shock.
17. Medical equipment can be affected by the handset.
9

INSTALLATION
1. Connect the telephone line
cord, one side into the wall
socket, another side to the base
station socket.
2. Power-up the base station by
connecting the AC power adapter to the
mains socket and another side to the power jack of the
base station.
3. Open the handset's battery door and insert the rechargeable battery to the
handset, ensuring correct polarity. Replace the battery door.
NEVER USE NON-RECHARGEABLE BATTERIES.
4. Place the handset to the base station for charging about 15 hours before any
operation. The Battery Icon will start to scroll.
5. The handset is already registered to the base when shipped. The Antenna
Icon should be in steady state to show that the handset is synchronized with
the base. If the Antenna Icon is flashing, than please refer to chaper xxx how
to register the handset to the base (see page xx)
REMARKS:
1. This product operates at frequency 1.89GHz.
2. Place the base in a high location to ensure a maximum operating range.
3. Do not install the base station in bathrooms.
4. The operating range of the Dect Phone may vary depending on the
environment.
10

Your security PIN
You will need the PIN-code for setting or changing some features and to register
new handsets.
The default PIN is 0000. You can change it to any number, up to eight digits.
1 Press the button , the display shows PHONEBK
2 Press the xx button TWICE, the display shows BASE
3 Press the OK button
4 Press the xx button SIX times, the display shows PIN CODE
5 Press the OK button, the display shows PIN
6 Key in the existing PIN (0000 by default) and press the OK button, the
display shows NEW PIN
7 Key in the your new PIN and press the OK button, the display shows
RETYPE
8 Key in the your new PIN again and press the OK button
9 Press the button to go back into standby mode
! If you forget your new PIN, you'll need to reset the system, as described on
page 45, and you'll lose any numbers you've stored in memory.
11

MAKING AND ANSWERING CALLS
Speakerphone function:
When you press the SPEAKERPHONE (xxxx) button, you can listen without
holding the handset to your ear.
You can start a call by pressing the SPEAKERPHONE button, or press it any
time during a call; but you must press the PHONE ( ) button to end a call.
To make a call:
1. Key in the telephone number
If you make a mistake, press button Cto clear digits from the display. To
clear all digits, press and hold button C.
2. Press the PHONE or SPEAKERPHONE button
(You can dial the number after you press the PHONE or SPEAKERPHONE
button if you prefer, but you won't be able to correct any mistakes if you do
it this way.)
To answer a call:
When the handset and base unit ring, Press the PHONE or SPEAKERPHONE
button to answer the call.
To end a call:
Press the PHONE button so that the xx symbol disappears from the display.
Last Number Redial:
To make a repeat call to the last number you dialled:
1. Press the PHONE or SPEAKERPHONE button, you hear the dial tone in the
earpiece.
2. Press the ∇button
To make a repeat call to one of the 10 last numbers you dialled:
1. Press the ∆or ∇button until the number you want is shown on the display
2. Press the PHONE or SPEAKERPHONE button to dial the number
Muting the mouthpiece:
Press the Cbutton once to put a call 'on hold', so that the person on the other
end cannot hear you. While the mouthpiece is muted, xx is shown on the display.
Press the Cbutton again to get back to the call.
Earpiece volume:
During a call, to adjust the volume in the earpiece or speakerphone:
1. Press the OK button
The display shows the current volume level (1 to 5 )
2. Press the ∆or ∇ button to change the volume
3. Press the OK button again
12

Memory dialling
You can store up to 40 numbers in each handset's memory. Each number can
have up to 20 digits, and you can store a name of up to eight characters with the
number.
To store a number:
1. Press the MENU button, the display shows "PHONEBK"
2. Press the OK button, the display shows "ADD"
3. Press the OK button, the display shows "NAME?"
4. Key in the name (see page xx)
5. Press the OK button, the display shows "NUMBER?"
6. Key in the number
Note: if you're using the Caller Display feature (see page xx), you should
store the full number, including the STD dialling code (starting with 0). If it's
a local number, you'll still be charged the Local rate when you dial it from
memory.
7. Press the OK button, the display shows "ADD" again. You can now continue to
store more numbers, or press the MENU button again to go back to standby
mode.
To clear a number from memory:
1. Press the MENU button, the display shows "PHONEBK"
2. Press the OK button, the display shows "ADD"
3. Press the xx button, the display shows "DELETE"
4. Press the OK button
5. Press the xx or xx button until the display shows the number you want to
delete
6. Press the OK button
You can now carry on deleting numbers, or press the MENU button again to go
back to standby mode.
How to key in letters and other characters
When you're keying in names (such as when storing numbers in memory),
the numbered keys 1 to 9 give you letters, depending on how many times
you press them, as follows:
1 gives space, -, 1 2 gives A, B, C, 2 3 gives D, e, f, 3 … etc.
For example, to key in jane - press 5 once, press 2 once, press 6 twice
and press 3 twice.
After keying in a character, wait for the cursor (the flashing line) to move to the
next position before you key in the next one.
C takes you back to the previous character; . (dot) takes you to the next one.
If you need to insert a pause in a number, press the CALLER button.
(You'll only need this if you're using your phone on a PBX.)
13

To make a memory call:
1. Press the MEMORY button, the display shows xx
2. Press the xx or xx button until the display shows the name or number you
want
3. Press the PHONE or SPEAKERPHONE button
To modify (change) a number in memory:
1. Press the MENU button, the display shows "PHONEBK"
2. Press the OK button, the display shows "ADD"
3. Press the xx button TWICE, the display shows "MODIFY"
4. Press the OK button
5. Press the xx or xx button until the display shows the name you want to modify
6. Press the OK button
7. Modify the name if necessary
8. Press the OK button, the display shows the corresponding number
9. Modify the number if necessary then press the OK button
You can now continue to modify numbers, or press the MENU button again to go
back to standby mode.
CALLER DISPLAY
If you subscribe to this feature from your service provider, you can see the
phone numbers of people calling you, before you answer. The telephone will
store the numbers of the last 30 calls so that you can call them back later.
Each Caller Display record includes:
* The caller's name, if it's one you've already stored in your phone's memory.
* The caller's number (up to 20 digits) (a caller's number won't be displayed if
the network they're calling from doesn't support this feature).
* The month, date and time of the call.
When there have been calls you haven't answered, the symbol xx is shown on
the display and the green IN USE light on the base unit flashes.
To check Caller Display records:
1. Press the CALLER button
2. Press the xx or xx button to scroll through the records,
you'll see either names or numbers. If you see a name displayed, to check
the number and the time of the call:
3. Press the OK button once then press it again to show the time
When you reach the beginning or end of the list of records, you'll hear a
warning 'beep'.
Once you've checked all the records, the xx symbol disappears from the display
14

and the IN USE light stops flashing.
To return a call:
To make a return call to someone who's called you:
1. Press the PHONE or SPEAKERPHONE
button while either the name or number is shown on the display.
To delete a Caller Display record:
1. Press the CALLER button, then the xx or xx button, then the OK
button (once or twice), until the time of the call is displayed
2. Press the OK button again, the display shows delete?
3. Press the OK button to delete this record OR press the C
button if you don't want to delete the record
When there are no more Caller Display records, the display shows "EMPTY".
To delete all Caller Display records:
1. Press the CALLER button, the display shows the first Caller Display record
2. Briefly press the Cbutton, the display shows "DEL ALL?"
3. Press the OK button to delete all records OR press the C
button if you don't want to delete all records
When there are no more Caller Display records, the display shows "EMPTY".
ANSWERING MACHINE
The answering machine (if built into your telephone, see the productsticker on
the bottomside of the base unit) is operated through your handset, so you can
record and listen to your messages anywhere within range of the base unit. You
can also dial home from elsewhere to check your messages.
The answering machine has a total of 4 to 6 minutes recording time, which inclu-
des:
* an outgoing message (OGM) up to 40 seconds long
* one memo (a message you record to yourself)
When the 4/6-minute limit is reached, "MEM FULL" will flash once on the display
and the machine switch itself off. It won't record any new messages until you've
cleared some memory to make room. So you should make a habit of deleting
messages after you've listened to them (see also page xx).
! The answering machine won't work until you have recorded an OGM.
Recorded messages will not be lost if the handset's batteries become run down.
Shortcut buttons
15

To control answering machine functions, you first press the button xx
(also labelled R).
You can then scroll through the menus for the functions you want.
Some of the numbered buttons also give you shortcuts for functions you often
use. Just press the button followed by the numbered button, as shown here.
1 OGM Record the outgoing message (OGM)
2 OGM Play the OGM
3 Record a memo
4 X Delete this message
5 ON Turn the answering machine on
6 OFF Turn the answering machine off
7 Go back to the previous message
8 Play back messages and memos
9 Go forward to the next message
0 Stop message playback
Your outgoing message (OGM):
You need to record an outgoing message (OGM) before the answering machine
will work. Your OGM can be up to 40 seconds long.
To record an OGM:
1. Press the xx button, the display shows "MSG PLAY"
2. Press the 1button OR press the xx button then the OK button, the display
shows "OGM REC"
3. Wait until you hear a 'beep' (the display also flashes)
4. Record your OGM, speaking clearly into the microphone
5. Press the 0button to stop recording
6. Press the xx button to go back to standby mode
! You must complete steps 1 to 5 in the correct order.
If you interrupt OGM recording before you've finished, you will lose any OGM
already recorded and your answering machine won't work. Go back and start
again from step 1.
To play back your OGM:
1. Press the xx button, the display shows "MSG PLAY"
2. Press the 2 button OR press the xx button TWICE then press the OK button
"OGM PLAY" flashes on the display as your OGM is played.
3. Press the xx button to go back into standby mode
Switching the machine on and off:
To switch ON:
1. Press the xx button, the display shows "MSG PLAY"
2. Press the 5 button OR press the xx button three times so the display shows
"TAM ON" then press the OK button
16

The display shows messages 0 (or the current number of recorded messages)
and the symbol while the machine is switched on.
If "MEM FULL" flashes momentarily on the display, and you hear a warning
'beep', the machine's memory is full. You'll need to delete some or all recorded
messages before you can switch on (see page xx).
To switch OFF:
1. Press the button xx, the display shows "MSG PLAY"
2. Press the 6 button OR press the xx button four times so the display shows
"TAM OFF" then press the OK button
The display shows the handset's name. If there are still new messages, the sym-
bol xx flashes on the display.
NOTE: When the machine is switched off, it will answer incoming calls after 12
rings and give a 'beep'. This is so that you can switch it on using remote opera-
tion (see page xx).
To set Answer Only mode:
In Answer Only mode, the answering machine does not record messages from
callers; it just plays the OGM (such as 'Please call back later') then drops the
call.
! If you set 'answer only' mode, say clearly in your OGM that callers can't leave
messages.
1. Press the button xx, the display shows "MSG PLAY"
2. Press the xx button TWICE, the display shows "ANS ONLY"
3. Press the OK button, the display shows the current setting "NO" or "YES"
4. Press the xx or xx button to change the setting
5. Press the OK button
6. Press the button xx to go back to standby mode
To intercept a call:
When someone calls you, they hear your OGM followed by a 'beep' and they
can then leave a message. To interrupt recording and speak to the caller, press
the PHONE or SPEAKERPHONE button or lift the handset of any other phone
connected to the same line as the PDX-5200.
To record a memo:
You can have only one memo recorded at a time. So, before recording a new
one, you'll need to delete any memo you've recorded previously. See page xx for
more information.
1. Press the button xx, the display shows "MSG PLAY".
2. Press the 3 button OR press the xx button six times then press the OK button,
"MEMO REC" flashes on the display.
3. Record your memo, speaking clearly into the microphone
4. Press the 0button to stop recording
17

5. Press the button xx to go back to standby mode
Message playback:
While the answering machine is switched on, the total number of recorded mes-
sages (new and old, and including a memo, if you have recorded one) is shown
on the display.
When there are new messages, the symbol xx flashes on the display, and the
green IN USE light on the base unit flashes.
1. Press the button xx, the display shows "MSG PLAY"
2. Press the 8button or the OK button, if there are new messages, they will be
played back. If there are no new messages, any old messages will be played
back. As each message is played, its sequence number (01, 02, etc.) is
shown on the display. 'memo' indicates that this is a memo.
You can press the SPEAKERPHONE button to turn off the speakerphone and
listen using the earpiece; or the xx or xx buttons to adjust the volume.
When all messages have been played, you hear two 'beeps'.
While playing messages …
You can press:
. to GO BACK to the previous message
. to SKIP to the next message
. to play the current message AGAIN
. to STOP playback
. to return to standby mode
Settings for the answering machine:
The number of rings:
The answering machine can answer calls after two to nine rings. If you don't set
a number, it will answer after six rings.
If you'll want to dial in and check your messages while you're away, you can set
Toll Saver - if there are new messages, the telephone will answer after two rings;
if there are no new messages, it will answer after five rings. So, if you call in and
you don't get an answer after two or three rings, you can hang up and save on
call charges.
1. Press the button xx, the display shows "MSG PLAY"
2. Press the xx button THREE times, the display shows "RING NUM"
3. Press the OK button
4. Press the xx or xx button to select the number of rings you want or tolsaver
5. Press the OK button to confirm
6. Press the button xx to go back to standby mode
To set the maximum length:
With the maximum incoming message length set to 40 seconds, the machine
18

can record up to 13 messages; with the maximum length set to 60 seconds, it
can record up to 8 messages.
1. Press the button xx, the display shows "MSG PLAY"
2. Press the xx button FOUR times, the display shows "ICM LENGTH"
3. Press the OK button, the display shows the current setting (default 40 sec)
4. Press the xx or xx button to select the setting you want
5. Press the OK button
6. Press the xx button to go back to standby mode
Your remote security code:
This is the three-digit code you'll need to key in if you dial in and check your
messages when you're away from home. The default security code is 000; you
can change it to any three digits you'll easily remember
1. Press the button xx, the display shows "MSG PLAY"
2. Press the xx button, the display shows "SEC CODE"
3. Press the OK button, the display shows "CODE ?"
4. Key in the current security code and press the OK button
If you key in the correct code (default 000), the display will show
"NEW PIN". If you key in the wrong code, you'll hear a long 'beep' and you'll
need to try again.
5. Key in your new code and press the OK button, the display shows "RETYPE"
6. Key in your new code again and press the OK button, you hear a 'beep' to
confirm.
7. Press the button xx to go back to standby mode
Deleting messages:
To delete a message:
* Press the 4 button while the message is being played back
To delete ALL stored messages
1. Press the xx button, the display shows "MSG PLAY"
2. Press the xx button five times, the display shows "DEL ALL"
3. Press the OK button, the display shows "CONFIRM"
4. Press the OK button to delete all messages OR press the C button if you don't
want to delete all messages
While the messages are being deleted, the display shows deleting. This can
take up to 45 seconds.
While the messages are being deleted, you cannot program any answering
machine functions and the machine will not automatically answer incoming
calls. You can make and answer calls manually as normal.
5. Press the xx button to go back to standby mode
Remote operation:
To dial home from elsewhere and check your messages:
1. Using a tone dialling phone, dial your home phone number
19

2. While your OGM is playing, press xx, your OGM stops playing.
3. Key in your remote security code (see page xx)
If there are new messages, they will be played back. If there are no new
messages, any old messages will be played back. When all messages have
been played, you'll hear two 'beeps'.
4. During new message playback, you can use these keys:
Skip forward to the next message 9
Play the current message again 8
Delete the message currently being played back 4
Stop playback 0
5. After your new messages have been played back, you can use the keys listed
overleaf
Notes:
* During remote operation, do not leave more than 8 seconds between key
presses, or the machine will cut off your call.
* If you key in the wrong code at step 3, your OGM will be played again and you
can try again. You have a total of three attempts.
* If you press 3, 5 or # during message playback, your call will be cut off.
Keys to use after new messages have been played back:
Play all recorded messages (new and old) 8
Play the current message again 8
Skip forward to the next message 9
Go back to the previous message 7
Delete the message currently being played back 4
Record a new OGM 1
Play back the OGM 2
Stop playback or recording 0
Switch the answering machine on 5
Switch the answering machine off 6
To switch the machine on remotely:
1. Using a tone dialling phone, dial your home number, the machine will answer
after 12 rings. You'll hear a long 'beep'.
2. Key in your remote security code (see page xx)
If you key in the wrong code, the machine will cut off your call. You'll need
to redial and try again.
3. Press xx to switch on, the machine will start playing your messages. You can
press keys for all the remote operation functions on page xx and above???.
Note: If the machine is switched off when you dial in, this may be because its
memory is full. So you should delete each message by pressing 4 as it's being
played back (you can do this just as it finishes, so as not to miss any of it).
20
Other manuals for PDX-5200 series
1
Table of contents
Other Profoon Cordless Telephone manuals