Profoto Air Remote TTL-O User manual

Forotherlanguagesvisit:
www.profoto.com/support
User guide
AirRemoteTTL-O/P

Air Remote TTL-O/P
2
www.profoto.com

Air Remote TTL-O/P
3
www.profoto.com
Congratulations on your new
Profoto product!
Regardless ifyou chose a newflash or a new light shaping tool,know
thatalmosthalfacentury’sworthofexperiencewasputintoitsmaking.
If the years have taught us one thing, it is to never neglect a single
detail.We only put ourname on a product in whichwe have the fullest
confidence. Before shipping, every one of our products passes an
extensive and strict testing program. Unless it complies with the
specified performance,qualityand safety,it is a no-go.
As a result, we are confident that your new Profoto product will stay
withyouforyearsand helpyougrowasaphotographer. Butgettingthe
productisonlythe beginningofthatjourney. Usingitforlightshapingis
therealadventure.Thatiswhywetakeprideinprovidingyouwithsuch
awideassortmentoflightshapingtools,allowingyoutoshape thelight
in anywayyou can imagine.
The almost infinite possibilities might seem bewildering at first, but
we’re certain you will soon get the hang ofit.
Still, I encourage you to sign up for our newsletter at www.profoto.
com/newsletter orvisit our blog at www.profoto.com/blog so thatwe
can share our experience from almost 50 years of light shaping and
hopefullyinspireyouto growevenfurther. EnjoyyourProfotoproduct!
ConnyDufgran,founder

Air Remote TTL-O/P
4
www.profoto.com
General safety instructions
Safety Precautions!
Donot operate the equipment beforestudying the instruction manual and these safetyinstructions.Make
surethatProfotoSafetyInstructionsisalwaysaccompaniedtheequipment!Profotoproductsareintended
forindoorconditions use.Donot place oruse the equipmentwhereit can be exposedto moisture,extreme
electromagneticfields,orin areaswith flammable gasesor dust! Do notexpose the equipment to dripping
orsplashing.Donotexposetheequipment tohastytemperaturechangesinhumid conditionsas thiscould
leadtocondensationwaterintheunit.Donotconnect thisequipment toflashequipmentfromotherbrands.
Equipment must only be serviced,modified orrepaired by authorized and competent service personnel.
Caution – Risk of explosion if the battery is replaced by incorrect type.
Note about RF!
This equipment makes use of the radio spectrum and emits radio frequency energy. Proper care
should be taken when the device is integrated in Systems. Make sure that all specifications within this
documentarefollowed,especiallythose concerningtemperatureandsupplyvoltagerange.Makesure
the device is operated according to local regulations.The frequency spectrum this device is using is
shared with otherusers.Interference cannot be ruled out.
Final Disposal
When the product reaches end of service, do not dispose of it with your other household waste.
Equipment contains battery, electrical and electronic components that could be harmful to the
environment.Equipment may be returned to Profoto distributors free of charge for recycling. Follow
local legislation fordisposal of batteries, electrical and electronic components, respectively.

Air Remote TTL-O/P
5
www.profoto.com
Table of Contents
General safety instructions.............................................................................................4
System description & compatible products............................................................. 7
General notes on wireless operation with Profoto Air............................................8
Nomenclature .....................................................................................................................9
Operating instructions .....................................................................................................11
Quick guide........................................................................................................11
Power on/o.....................................................................................................12
Channel selection...........................................................................................12
Sync selection .................................................................................................12
HSS......................................................................................................................12
Mode selection (TTL or Manual) ............................................................... 13
Operation in TTL mode (Automatic mode)............................................ 13
Operation in MAN mode.............................................................................. 15
Test sync........................................................................................................... 16
Other .....................................................................................................................................17
Factory reset.....................................................................................................17
Battery check & built-in power saving.....................................................17
Check Firmware ..............................................................................................17
Upgrade Firmware..........................................................................................17
Technical data................................................................................................................... 18
Regulatory information .................................................................................................20

Air Remote TTL-O/P
6
www.profoto.com

Air Remote TTL-O/P
7
www.profoto.com
System description & compatible
products
The small,lightweightAir Remote TTL-O/P is designed to make flash
easy.Mounted on the camera hot shoe,it acts as a wireless extension
ofyour camera to your Profoto flashes,combining TTL (Through-The-
Lens) exposure control with the option to manually adjust and sync
yourProfoto lights.
• The Air Remote TTL-O/P is specially designed for Olympus/
Panasonic cameras.
• Some camera models may not be supported or have limited
functionality.Createafreeuseraccountonprofoto.com/myprofoto
to check and install latest firmware version or download release
notewith updated listing of supported cameras.
• The Air Remote TTL-O/P operates with Profoto flash units and
generators, with built-in Profoto Air functionality according to the
table below.
• TheAirRemoteTTL-O/Pcanalsobeused totriggertheAirRemote
and AirSync ProfotoAir transceivers.
• The Air Remote TTL-O/P is not compatible with Olympus/
Panasonic Speedlights orother non-Profoto flashes.
• TheAirRemoteTTL-O/Pis not compatiblewith any3rdpartyradio
triggering systems.
Air labeling on
Profotoflash
Enabled features onAir Remote TTL-O/P
Manual sync Remote control TTL HSS
AirTTL X X X X
Air X X
AirS X

Air Remote TTL-O/P
8
www.profoto.com
General notes on wireless operation with
Profoto Air
TheProfotoAirchannels[1-8]useeightspecificfrequenciesin the 2.4
GHz band and have an operating range ofup to 300 meters (1000ft).
Thefrequenciesareevenlydistributedovertheentirefrequencyband.
Since each channel uses a different radio frequency, it is possible
to select a channel without interference from other photographers
using ProfotoAir,WLAN/Bluetooth devices orotherradio equipment
operating on the 2.4 GHz frequency band.
• Keep cables and cords awayfrom antennas.
• Maintain line of sight between the AirRemote TTL-O/P and theflash
unitwheneverpossible
• When hiding the flash from view, try to not hide it behind or against
metal orwater-filled objects as this will affect the radio range.

Air Remote TTL-O/P
9
www.profoto.com
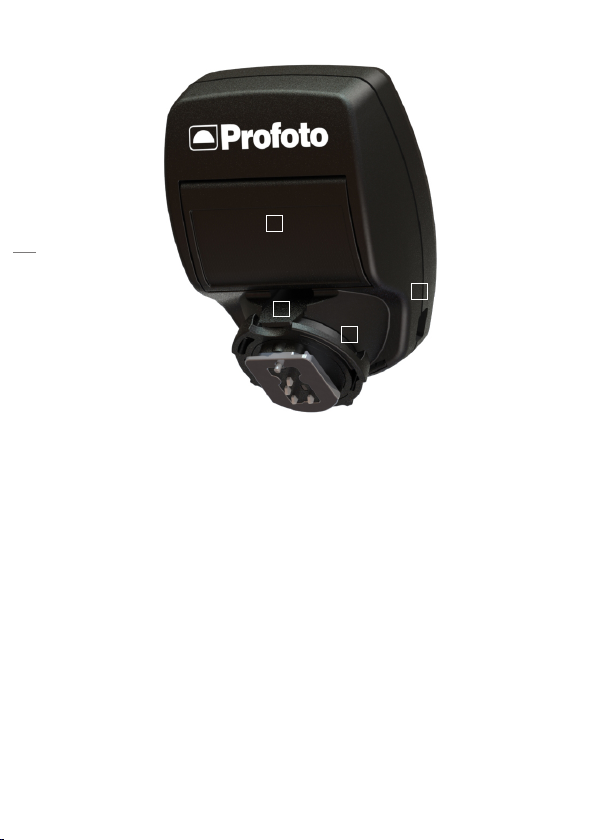
Nomenclature
1
2
3
4
5
6
7
9
10
8
1. ON button
2. Display
3. Energybuttons
4. Group buttons (A,B,C)
5. Test button
6. Mode button
7. Sync button
8. Channel button
9. Head button
10. Model button
Air Remote TTL-O/P
10
www.profoto.com
11
12
13
14
11. Batterycompartment
12. Hot shoe connector
13. USB port
14. Locking mechanism

Air Remote TTL-O/P
11
www.profoto.com
Operating instructions
Quickguide
Fordetailed instructions,refer to the subsequent sections.
ProfotoFlashsetups
1. Set the flash to synchronization via Radio/Air (may differ by flash
models).
2. Select the same radio channel on all flashes.
3. Selectthesamegroup(A,BorC)foralllampheadstobecontrolled
simultaneously.
AirRemoteTTL-O/P
4. Slide the hot shoe connector on theAir Remote TTL-O/Pinto the
hotshoeofthecamera.Turnthelockingmechanism[14]tosecure
the device.
5. Switch on the remote.
6. Select the same radio channel on the remote as on theflashes.
7. Pressthe Mode button[6]totogglebetweenTTL(Automatic)and
MAN (Manual) mode.
8. Press the A,B or C button to select the corresponding group.
9. When a group is selected:
a)PresstheHEADbutton[9]toturnon/offthelampheads/flashes.
b) Press the MODEL [10] button to turn on/offthe modeling light.
c) Press the ENERGY buttons [3] to adjust the energy level for
the group in relation to the other groups (TTL mode) or the energy
level for the group (MAN mode). Since energy adjustments work
differently in TTL mode and Manual mode we recommend to
carefullyreadthe detailedinstructionsforoperationin bothmodes
on page 13-16 ofthis user guide.
10. Press the TEST button [5] to manually transmit a sync signal, in
orderto test the settings.

Air Remote TTL-O/P
12
www.profoto.com
Poweron/off
1. PressandholddowntheON button[1]toswitchon/offtheremote.
Note!
The remote automatically turns off after 30 minutes of inactivity. The auto power off can be deactivated by
pressing and holding the“Energy+”button [3] when starting the remote. Deactivation is confirmed by two short
beeps.
Note that when auto power offis deactivated new batteries will drain in approximately 20 hours ofinactive use.
The camera should not be in a silent drive mode.
Channelselection
The currentlyselected channel is shown in the CHANNELsection on
the Display[2].
1. Press the Channel button [8] repeatedlyuntil the desired channel
is displayed.
Syncselection
The selected sync setting (cameras sync setting) is shown in the SYNC
section on the Display[2].
Press the Sync button [7] to cycle through the sync options:
• 1st: Theflashes firewhen the first shuttercurtain is fully open.
• 2nd: The flashes fire when the second shutter curtain is about to
close.
• Hi-S: HSS is selected.
NOTE:
InTTLmode,thecamera selects SYNCstatus.InMAN mode,theuser can toggle the HSS settingwith theSYNC
button.If the camera is in a mode where HSS can’t be used, the remote will switch off HSS automatically.
HSS(FPflash)
HSS enables shooting with flash at a faster shutter speed than the
fastest external flash sync speed (x-sync) of the camera, all the way
down to 1/8000s (may differ between camera models). This option
can be extremely useful to limit the influence of ambient light when
shooting in bright conditions.

Air Remote TTL-O/P
13
www.profoto.com
Note!
* During a HSS flash,the flash is pulsing to provide a constant light output during the time when the shutter is
open.To ensure a perfect exposure and a stableflash pulse,the flash uses only the upperpart of its power range
when in HSS Mode.Exact range may differ between flash models.
* Frequent use of HSS will have an impact on the life-time of theflash tube.
*YourremoteandAirTTLflashmayrequire a firmwareupdate in orderto use thisfeature.The lastest updates and
a list of compatible cameras is available on profoto.com/myprofoto.Create your personal account and login to
access all new upgrades.
Modeselection(TTLorManual)
The currently selected mode is shown in the MODE section on the
Display[2].
1. PresstheModebutton[6]totogglebetweenTTLandMAN mode.
• TTL mode: The camera dictates the light output of the flashes.
Therelationshipbetweenthe energylevelsforgroupA,B andC
can be adjusted.
• MAN mode: The light output for group A, B and C can be
controlled manually.
OperationinTTLmode(Automaticmode)
InTTLmodethecameradictatesthe lightoutputoftheflashes.Ifmore
than one light is used the relationship between the energy levels for
group A, B and C can be adjusted. This can, for example, be used to
achieve more light on one side ofthe object.
• Press the A, B or C Group button [4] to select the group you want
to adjust.
• Use the ENERGY buttons [3] to set the relative light output for the
selected group, in relation to the other groups. The relations can
be set ±2.0 f-stop for each group A, B or C. Relations should not be
confused with exposure compensation.Carefully read all the notes
in the end of this section!
• To change the total flash exposure, use the flash exposure
compensationfunction inthe camera.Refertothe cameramanual
fordetails.
• Press the Model button [10] to turn on/offthe modeling light in the
selected group.
Air Remote TTL-O/P
14
www.profoto.com
• Press the Head button [9] to turn on/off the lamp heads in the
selected group (if the heads in a group are turned off, the relation
valuefor that group will display‘--’)
• When changing from MAN mode to TTL mode, the previous TTL
relationvalue is displayed.
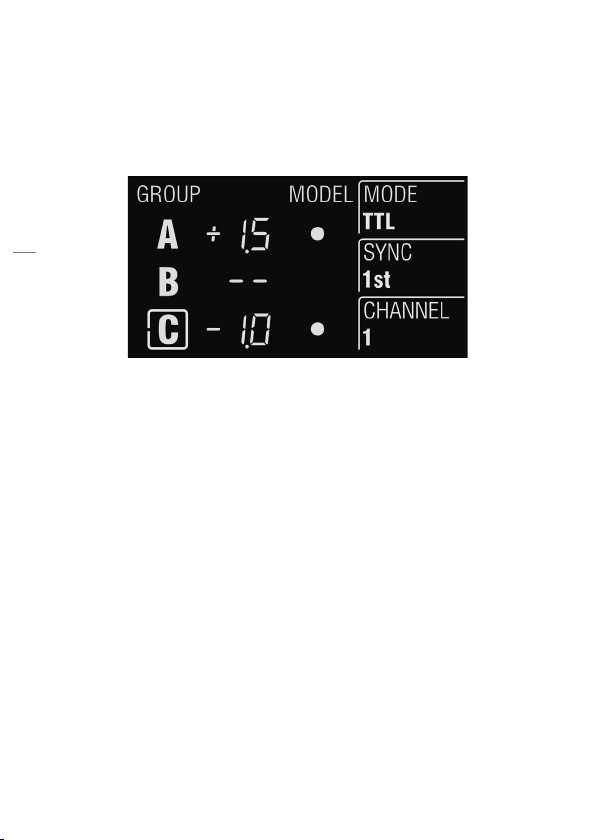
Example ofremote Display[2] settings in TTLmode operation
The figure shows the Display[2] when:
• TTL mode,1st-curtain sync and channel 1 are selected.
• Group C is selected to be adjusted.
• The relative light output from lights in group A is set to 2.5 f-stops
more than lights in group C.(A to +1.5 f-stops and C to -1.0 f-stops).
• Lights/Heads in Group B are turned off.
• The modeling light is turned on in both group Aand C.
NOTE:
• Relation values should not be mistaken for flash exposure compensation. To compensate the total flash
exposurealwaysuse theflashexposurecompensationfunctionin thecamera.Refertocameramanualfordetails.
• If flashes without Profoto AirTTLsupport are used in combination with Profoto AirTTLflashes in TTL mode,
the flash outputs of the non-TTLflashes are added to the totalflash exposure.Such flashes can forinstance be
used to manually set the exposure on the background.
• If a Profoto AirTTLcompatible flash is set to group D,E or F,it will be synchronized but not be part of theTTL
calculation.The flash outputs oftheseflashes areadded to the totalflashexposure andcan forinstance be used
to manually set the exposure on the background.
• If the camera is in a mode where TTL can’t be used,the remote will switch to MAN automatically.
Air Remote TTL-O/P
15
www.profoto.com
OperationinMANmode
With the Air Remote TTL-O/P set to MAN mode, the light output for
groups A,B and C can be adjusted manually. By alternating between
TTL and MAN mode,you can test yourway to the perfect light.
• Press the A, B or C Group button [4] to select the corresponding
group.
• To select all groups,press one of the Group button [4] two times.
• Usethe ENERGYbuttons[3]toadjustthelight outputforthegroup.
Theadjustment(increase/decrease)alwaysstartsfromthecurrent
lightoutputsettingandtheadjustmentvalueis momentarilyshown
in the ENERGYsection on the Display [2].
• Press the Model button [10] to turn on/offthe modeling light in the
selected group.
• Press the Head button [9] to turn on/off the lamp heads in the
selected group (if the heads in a group are turned off, the relation
valuefor that group will display‘--’)
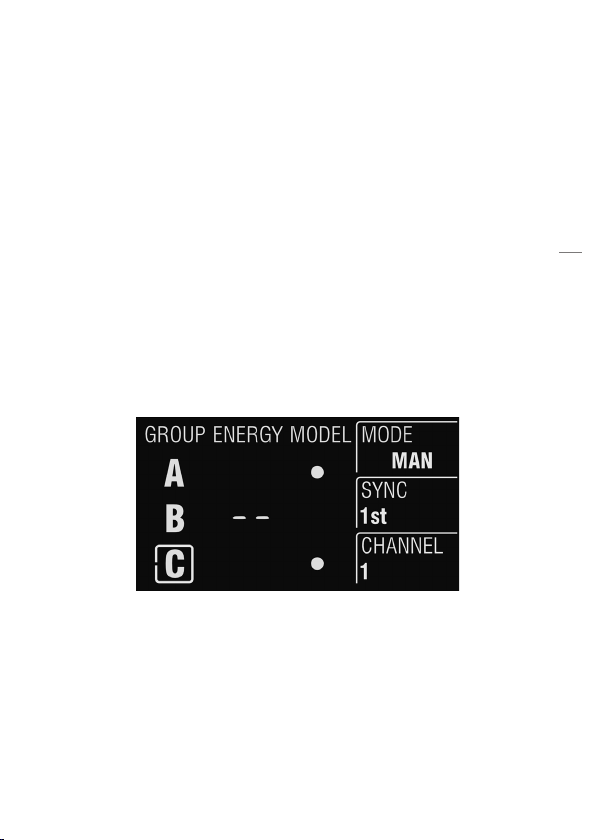
Example ofremote Display[2] settings in MANmode operation

Air Remote TTL-O/P
16
www.profoto.com
The figure shows the Display[2] when:
• MAN mode,1st-curtain sync,and channel 1 are selected.
• Group C is selected to be adjusted.
• Lights/Heads in Group B are turned off.
• The modeling light is turned on in both group A and C. If the light
outputforgroupAorCisadjusted,theenergychangewillbeshown
momentarily.
NOTE:
• Press the ENERGYbutton to increase/decrease in 1/10 f-stop increments.
• Press and hold down the ENERGY button to increase/decrease in 1 f-stop increments.
• Ifalightoutput cannotbesetbytheflash becauseitis outsideits energyrange,theAirRemoteTTL-O/Pbeeps
to signal that the command was not executed.The light output of all flashes in the selected group then remains
unchanged.
• When all groups are selected the remote will also control lights in group D,E orF (selected on flash).
• Iftheremotebeepswhentryingto exit MANmode,itmeansthattheMAN modewasrequestedbythecamera.
Check the selected drive mode inyour camera’s menu.
Testsync
• Press theTest button [6] to manually transmit a sync signal.

Air Remote TTL-O/P
17
www.profoto.com
Other
Factoryreset
Reset theAir Remote TTL-O/Pto factory settings:
• Switch offthe AirRemoteTTL-O/P.
• Press and hold down the Group Button C [4] and the ON button [1]
simultaneously.
Batterycheck&built-inpowersaving
Thelowbatterysymbolis displayedwhen the batteryvoltagereaches
a critical level.
To save battery, the display is partially dimmed after 20 seconds of
inactivity. Turns inactive after 2 minutes of inactivity. Press the ON
button [1] to switch on the display.The display also switches on when
any of the function buttons are used.
CheckFirmware
Press and hold the MODE button [6] for 5 seconds when the remote
is turned on.
UpgradeFirmware
We recommend that you look for firmware upgrades before you start
usingyournewAirRemoteTTL-O/P.
To access the latest free upgrades you create yourpersonal account on
profoto.com/myprofoto.Onceyouhaveanaccountyoucanregisteryour
products and be sure you get noticed when newupgrades are released.
Upgrade of firmware is made via the USB port [13] on the remote,
following the instructions provided in the upgrade application
downloaded from profoto.com/myprofoto. You can always contact
yourlocal dealer or distributor for professional service.
ToupgradeyourOlympus/Panasoniccameratothelatestversion,visit
the Olympus/Panasonicwebpage.

Air Remote TTL-O/P
18
www.profoto.com
Technical data
Specifications
Frequencyband 2.4 GHz (2404 to 2479.3 MHz)
No offrequencychannels 8 (1-8)
Radio Power Output: Maximum 10 mW
No of groups per channel 3 (A-C)
Operation modes TTL & Manual
CameraTTLcompatibility Find the latest firmware upgrades
and a complete list ofOlympus/
Panasonic camera models that are
approvedwith AirRemoteTTL-O/P
in the latest release notes on profoto.
com/myprofoto
Sync modes: Set the camera’s Flash Mode to 1st,
2nd,Hi-S.
Camera mount/
Connectors
Hot shoe mount for Olympus/
Panasonic.USB mini connectorfor
firmware upgrades.
Range Up to 300 m (1000ft) for normal
triggering
Up to 100 m (330ft) for remote
control andTTL
Batterytype 2xAAA,1.5V (Not lithium)
Typical battery lifetime 30 hours
Antenna type Integrated
LCD display Yes
Auto power off Remote:Turns off after30 min of
inactivity (Can be deactivated)
Display: Partiallydimmed after 20
seconds of inactivity.Turns inactive
after2 minutes of inactivity.

Air Remote TTL-O/P
19
www.profoto.com
Supported ProfotoAir functionality
Flash Sync/Trigger Yes,Air RemoteTTL-O/PtriggersAir
Remote &Air Sync transceivers plus
all Profotoflashes labeled AirTTL,Air
andAirS.
Remote control Yes,Air RemoteTTL-O/Pworks as a
manual remote control for all Profoto
flashes labeled AirTTL &Air.
TTL control TTLwith group controlfor all Profoto
flashes labelled AirTTL.
HSS HSS for all Profoto flashes labelled
AirTTL.
Measurements
Dimensions 75x60x35 mm / 2.9x2.3x1.4 in
Weight 75 g / 2.6 oz including batteries
All figures are to be considered as nominal and Profoto reserves the right make changes
without further notice.

Air Remote TTL-O/P
20
www.profoto.com
Regulatory information
World-wideUsageofRadioSpectrum
TheProfotoAirsystemsoperateon the license-free2.4GHz ISM band
for SRD (Short Range Devices).This band may be used in most parts
of theworld.Regional restrictions mayapply.
NOTE
Refertonational regulationsfortheregionwherethe ProfotoAirRemoteTTL-O/Pshall
be operated and make sure that they are followed.
EUDeclarationofConformity
Hereby,Profoto AB declares that the radio equipment type Profoto Air
RemoteTTL-O/Pis in compliance with Directive 2014/53/EU.
The full text of the EU declaration of conformity is available at the
following internet address:
https://profoto.com/int/support/declaration-of-conformity
UnitedStatesandCanada
FCCSuppliersDeclarationofConformity(SDoC)
ProfotoAB
Transmitter / Receiver
MODEL: ProfotoAir Remote TTL-O/P
PRODUCTNO: PCA5388-0000
Contains FCC ID: W4G-RMI3
and IC: 8167A-RMI3
Designed and manufactured in Sweden.
ResponsibleParty-U.S.ContactInformation
ProfotoUS
Profoto US
220 ParkAve
Suite 120
Florham Park NJ 07932
+1 973-822-1300
us-info@profoto.com
This manual suits for next models
1
Table of contents
Other Profoto Recording Equipment manuals


