Promaker PRO-SB1800 User manual

Table Saw
User’s Manual
Model No.: PRO-SB1800
English: 2 I Español: 50

2
NOTE:
This product is for non-commercial
use only.
READ THE USER'S MANUAL
COMPLETELY AND CAREFULLY
BEFORE ATTEMPTING TO
INSTALL OR OPERATE YOUR
NEW POWER TOOL. ALL
OPERATORS OF THIS
EQUIPMENT SHOULD READ
AND UNDERSTAND ALL SAFETY
RULES PRINTED ON THE
MACHINE AND IN THE USER'S
MANUAL BEFORE USING IT.
SAVE THESE INSTRUCTIONS.
Technical Data
Voltage 120V / 60Hz
Power 1800W (15 Amps)
Speed 5000rpm
Blade Diameter 10”
Shaft Size 5/8”
Depth of cut
at 90º 3.5”(89mm)
Depth of cut
at 45º 2.4”(60mm)
Weight 46.2Lbs
Cable 2m
SAFETY GUIDELINES
Be sure to read and understand this
manual for your safety. When using
this product, it is important to read
and understand this information.
It will protect you and help prevent
any problems
• KNOW YOUR POWER TOOL:
Read the user manual carefully.
Learn the applications and
limitations of the saw, as well as
the specific potential hazards
related to this tool.
• PROTECT YOURSELF AGAINST
ELECTRIC SHOCK BY
AVOIDING BODY CONTACT
WITH GROUNDED SURFACES.
For example, pipes, radiators,
stoves, refrigerators.
• KEEP GUARDS IN PLACE and in
good working order.
• REMOVE THE ADJUSTMENT
WRENCHES.
Make a habit of checking that the
adjusting keys are removed from
the tool before turning it on.
• KEEP THE WORK AREA
CLEAN. Cluttered areas and
benches cause accidents. DO
NOT leave tools or pieces of wood
on the saw while it is running.
• DO NOT USE IN HAZARDOUS
ENVIRONMENTS. Do not use
power tools in damp or wet
locations or expose them to rain.
Keep the work area with good
lighting.
• KEEP CHILDREN AND VISITORS
AWAY. All operators must wear
safety glasses and keep a safe
distance from the work area. Do
not touch the tool or extension
cord while it is in operation.

3
• MAKE YOUR WORKSHOP CHILD-
SAFE with locks and master switches, or
by removing the ignition keys.
These are the guidelines to help you
understand the symbols used in this
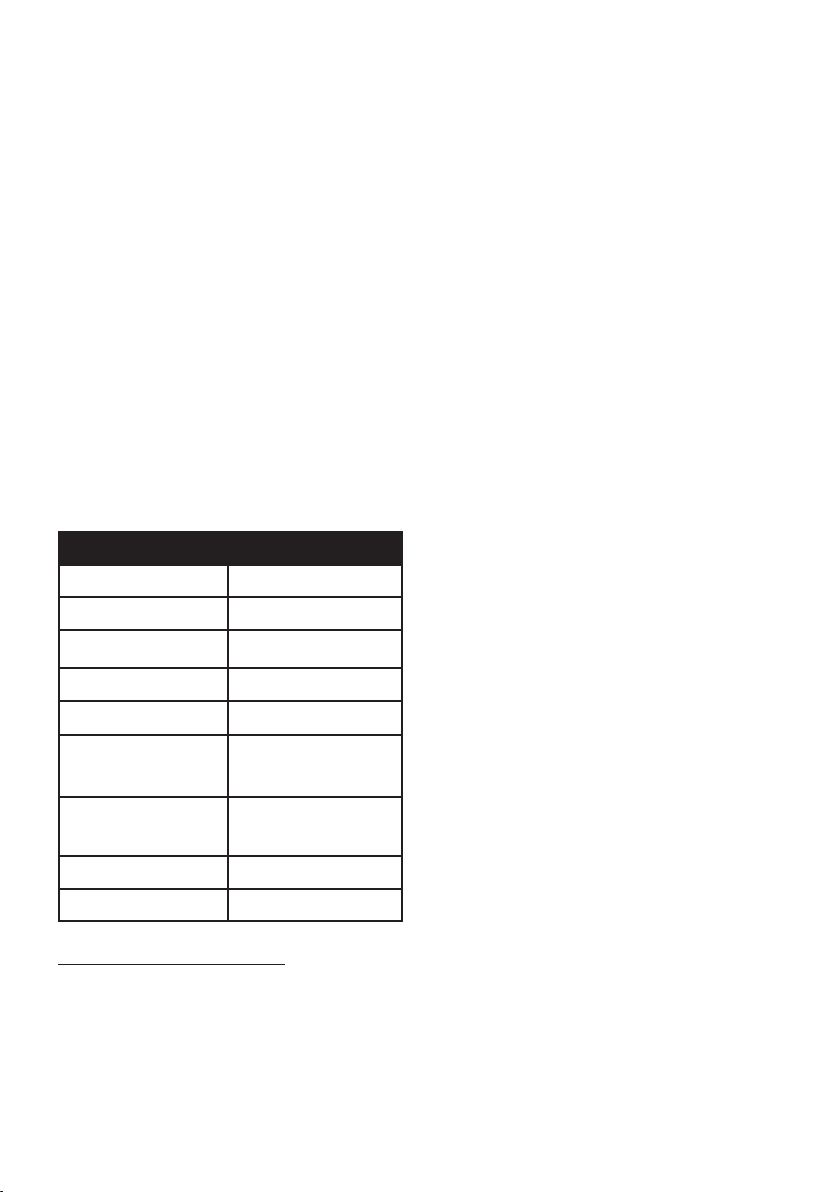
guide.
DANGER!
Indicates a potentially dangerous
situation that could result in death or
serious injury.
WARNING!
IIndicates a situation that could result
in death or serious injury.
CAUTION!
IIndicates a potentially dangerous
situation that could result in minor to
moderate injury.
NOTICE:
When used without the symbol
Safety Alert, indicates a potentially
dangerous situation which, if not
avoided, may result in property
damage.
• DO NOT FORCE THE TOOL.
It will do the job better and safer at the
feed rate it was designed for.
• USE THE RIGHT TOOL. Do not force
the tool or accessory to do a job for
which it was not designed. Do not use it
for an unintended purpose.
• USE THE PROPER EXTENSION
CORD. Make sure the extension cord is
in good condition. Use only a cord
heavy enough to carry the current your
product will draw. An undersized cable
will cause a drop in line voltage,
resulting in loss of power and
overheating. A wire gauge size
(A.W.G.) of at least 14 is recommended
for an extension cord 25 feet or less in
length. When in doubt, use the heaviest
gauge. The smaller the gauge number,
the heavier the wire.
•DRESS PROPERLY. Do not wear loose
clothing, gloves, ties, or jewelry. They can
get caught and lure you into moving parts.
Rubber gloves and non-slip footwear are
recommended when working outdoors.
Also use hair protection to contain long
hair.
•ALWAYS WEAR SAFETY GLASSES
WITH SIDE SHIELDS. Everyday glasses
only have impact resistant lenses, they are
NOT safety glasses.
•SECURE THE WORKPIECE. Use
clamps or a vise to clamp the work when
practical. It is safer than using your hand
and frees both hands to operate the tool.
•DO NOT OVEREXTEND. Maintain
posture and balance at all times.
•MAINTAIN TOOLS WITH CARE. Keep
tools sharp and clean for better and safer
performance. Follow the instructions for
lubricating and changing accessories.
•DISCONNECT THE TOOLS. All tools
should be unplugged when not in use, and
before servicing, or when changing
accessories, blades, bits, cutters, etc.
•AVOID ACCIDENTAL STARTING. Make
sure the switch is off when connecting any
tools.
•USE RECOMMENDED ACCESSORIES.
See the instruction manual for
recommended accessories. Using
inappropriate accessories can cause
injury.
• NEVER STAND ON THE TOOL.
Serious injury can occur if the tool
tips over or if the cutting tool

4
accidentally comes into contact.
CHECK FOR DAMAGED PARTS.
Before using the tool, a guard or other
damaged part should be carefully
checked to determine if it will function
properly and perform its intended
function. Check the alignment of
moving parts, bonding of moving parts,
breakage of parts, mounting, and any
other conditions that may affect their
operation. A guard or other part that is
damaged should be repaired or
replaced by an authorized service
center to avoid the risk of personal
injury.
• USE THE CORRECT DIRECTION OF
PLACEMENT. Just position the
workpiece toward the blade or cutter
against the direction of rotation of the
blade or cutter.
• NEVER LET THE TOOL RUN
UNATTENDED. TURN OFF THE
POWER. Do not leave the tool until it
comes to a complete stop.
• PROTECT YOUR LUNGS. Wear a
face or dust mask if the cutting
operation is dusty.
• PROTECT YOUR EARS. Wear
hearing protection during extended
periods of operation.
• DO NOT ABUSE THE CABLE. Never
yank the cord to disconnect it from the
power source. Keep the cord away from
heat, oil and sharp edges
• WHEN OPERATING AN OUTDOOR
POWER TOOL, USE AN EXTENSION
CORD MARKED “W-A” or “W”. These
cables are designed for outdoor use
and reduce the risk of electric shock.
•KEEP BLADES CLEAN, SHARP,
AND IN SUFFICIENT PLACEMENT.
Sharp blades minimize stalling and
kickback.
•KEEP HANDS AWAY FROM
CUTTING AREA. Keep your hands
away from the leaves. Do not try to grip
the workpiece under, around, or on the
blade while the blade is rotating. Do not
attempt to remove cut material when
blade is in motion.
SPECIFIC SAFETY RULES
• NEVER perform any “hands-free”
operation, which meant using only your
hands to support or guide the
workpiece. Always use the cutter guide
or miter gauge to position and guide
the workpiece.
• NEVER stand or have any part of
your body in line with the path of the
saw blade.
• NEVER reach behind, above, or
within three inches of the blade or
cutter with any hand for any reason.
• MOVE THE CUTTING GUIDE
out of the way when making a cross
section.
• DO NOT USE THE MITER
INDICATOR AND CUTTING GUIDE
during the same operation.
• NEVER attempt to free a jammed
blade from the saw without first turning
the saw off and disconnecting the saw
from the power source

5
PROVIDE ADEQUATE SUPPORT to
the rear and sides of the saw table for
wide or long workpieces.
• AVOID KICKBACK (workpieces
thrown at you) by:
a) Keep the blade sharp
b) Keep the cutting guide parallel to the
saw blade.
c) Keep riving knife, anti-kickback
pawls, and blade guard in place and
operating.
d) Do not release the work before it is
pushed past the saw blade using a
push rod.
e) Do not cut the workpiece that is
crooked, warped or does not have a
straight edge to guide along the guide.
DANGER!
Rolling the Cutting Tool Can Be Dangerous.
Apply the brake immediately to stop the
cutting tool when the switch is turned off.
• IF THE POWER SUPPLY CORD
IS DAMAGED, it must be replaced
only by the manufacturer or an
authorized service center to avoid
risks.
•AVOID UNCOMFORTABLE
OPERATIONS AND HAND
POSITIONS where a sudden slip
could cause your hand to move in the
cutting tool.
• USE THE ONLY RECOMMENDED
ACCESSORIES mentioned in this
manual or appendices. The use of
accessories that are not listed may
cause the risk of personal injury.
Instructions for the safe use of
accessories are included with the
accessory.
• MAKE SURE THE WORK AREA
IS BRIGHTLY LIGHTED to view the
work piece and that no obstructions
interfere with safe operation
BEFORE performing any work using
the table saw.
• ALWAYS TURN THE SAW OFF
before unplugging to avoid accidental
starting when plugged in again
• USE ONLY SHEETS within the
thickness range stamped on the saw
blade and in the instruction manual.
• THIS TOOL must have the following
warnings:
a) Wear eye protection.
b) Use the saw blade guard and
dividing knife for every operation for
which it can be used, including all
sawing through the workpiece.
c) Keep your hands out of the line of
the saw blade.
d) Use a dipstick when necessary.
•push
•e) Pay particular attention to the
instructions to reduce the risk of
kickback.
•f) Do not perform any free hand
operation.
•g) Never work around or on the saw
blade.
•h) Never operate the saw on the
ground or below waist height.
• NEVER CUT MORE THAN ONE
PIECE OF MATERIAL AT A TIME.
• SAVE THESE INSTRUCTIONS.
Refer to them frequently and use
them to educate other users. If
you loan someone this tool, loan
them these instructions as well.

6
Some of the following symbols may be
used on this tool. Please study them
and learn their meaning Proper
interpretation of these symbols will
allow you to operate the tool better and
in a safer way.
SYMBOL NAME EXPLANATION
Security Alert Indicates
a possible risk
of personal injury
Read the User
Manual
To reduce the
risk of injury
user must read
and understand
user manual
before using this
product.,
Eye Protection Always wear eye
protection with
marked side
shields to comply
with ANSI Z87.1.
V Volts Voltage
A Amperes Stream
HZ Hertz Frequency
(cycles per second)
min Minutes Weather
~ Alternating
Current
Type of current
nºNo Load Speed Rotation speed,
no load
.../min Per Minute Revolutions, runs,
surface speed,
orbits, Etc,
per minute.
GUIDELINES FOR THE USE OF THE
EXTENSION CORD
Do not abuse extension cords and do
not pull on any cords to disconnect.
Always disconnect the extension cord
from the power source before
disconnecting the product from the
extension cord. When using a power
tool at a considerable distance from the
power source, use an
extension cord heavy enough to handle
the current drawn by the tool. An
excessively small extension cord will
cause a drop in line voltage, resulting
in a loss of power and causing the
motor to overheat. Use the chart
provided below to determine the
minimum wire size required in an
extension cord. Only round cables
listed by Underwriter’s Laboratories
(UL) should be used.
**Amperage (on the face plate of the tool)
Cable
length
0-2.0 2.1-
3.4
3.5-
5.0
5.1-
7.0
7.1-
12.0
12.1-
16.0
Wire Size (A.W.G.)
25’ 16 16 16 16 14 14
50’ 16 16 16 14 14 12
100’ 16 16 14 12 10 -
**Used on 12 gauge - 20 amp circuit
NOTE: AWG = American Wire Gauge
Before using an extension cord,
inspect it for loose or exposed wires
and cut or worn insulation.
WARNING!
Keep the extension cord out of the work
area. Position the cable so that it is not
trapped
on wood, tools, or other obstructions
while working with a power tool. Failure
to do so can result in serious personal
injury.
WARNING!
Check extension cords before each
use. If they are damaged, replace them
immediately. Never use the product with
a damaged cord, as touching the
damaged area could cause an electric
shock that could cause serious injury.
ELECTRICAL CONNECTION
This product is powered by a precisely
constructed electric motor. It must
be connected to a power source
that is 120V, AC only (normal
household current),

7
60Hz. Do not operate this product on
direct current (DC). A substantial
voltage drop will cause a loss of power
and the motor will overheat.
If the saw does not work when plugged
into an outlet, check the power source.
SPEED AND WIRING
The no-load speed of this tool is
approximately 5,000 rpm. This speed
is not constant and decreases under a
load or with lower voltage. For voltage,
the wiring in a shop is as important as
the motor’s horsepower rating. A line
intended only for lights cannot properly
carry a power tool motor. Wire that is
heavy enough for a short distance will
be too light for a greater distance. A
line that can support one power tool
may not be able to support two or three
tools.
FOR ALL DOUBLE-INSULATED
TOOLS
Replacement Parts
When servicing only use identical
replacement parts.
Polarized Plugs
To reduce the risk of electric shock, this
equipment has a polarized plug in Fig. 1
(one blade is wider than the other). This
plug will fit in a polarized outlet only one
way. If the plug does not fit fully in the
outlet, reverse the plug. If it still does
not fit, contact a qualified electrician to
install the proper outlet. Do not change
the plug in any way.
120 V POLARIZED
OUTLET
Fig. 1
FEATURES
KNOW YOUR TABLE SAW
Safe use of this product requires an
understanding of the information on the
tool and in this operator's manual, as well
as a knowledge of the project you are
attempting. Before using this product,
familiarize yourself with all the operational
features and safety regulations.
ANTI-KICKBACK PAWLS - Kickback is a
hazard where the workpiece is thrown
back toward the operator. The teeth of the
removable anti-kickback pawls point away
from the workpiece. If the workpiece must
be pulled back toward the operator, the
teeth dig into the wood to help prevent or
reduce the possibility of kickback.

8
BEVEL SCALE - The easy-to-read scale
on the front of the cabinet shows the
exact angle of the blade.
BLADE - This saw is equipped with a
10 inch 24 tooth carbide blade.
The blade is raised and lowered with
the height / bevel adjustment wheel.
Bevel angles are locked with the bevel
lock lever.
WARNING!
Do not use blades rated lower
than the speed of this
tool.Failure to follow this
warning could result in
personal injury.
BLADE GUARD - Always keep the
removable blade guard on the saw
blade for sawing cuts.
HEIGHT/BEVEL ADJUSTING HANDWHEEL
-Located on the front of the cabinet,
use this handwheel to lower and raise
the blade for height adjustments or
blade replacement.
This steering wheel also makes it easy
to adjust for bevel angles.
MITER GAUGE - The miter guide aligns
the wood for a cross cut.
The easy-to-read indicator shows the
exact angle for a miter cut.
MITER SLOTS - The miter gauge fits
into the slots in the saw table.
CUTTING GUIDE - A sturdy metal guide
guides the workpiece and is secured
with the locking lever.
DIVIDER KNIFE - A removable metal
piece of the blade guard, slightly thinner
than the saw blade, which helps keep
the cut open and prevent kickback.
When it is in the middle of sawing, or in
the "up" position, it is higher than the
saw blade. When it is in the no saw, or
"down" position, it is below the teeth of
the saw blade.
SCALE - Located on the front rail, the
easy-to-read scale provides accurate
measurements for fine cuts.
SWITCH MOUNTING - This saw has
an easily accessible power switch
located under the front rail. To lock the
switch in the OFF position, remove the
key from the switch. Place the wrench
in a place inaccessible to children and
others not qualified to use the tool
OPERATING COMPONENTS
The top of the blade protrudes through
the table and is surrounded by an insert
called a table top. The height of the
sash is adjusted with a steering wheel
on the front of the cabinet. To
accommodate the wide panels, the saw
table has rails on each side. Detailed
instructions for basic cuts are provided
in the Operation section of this manual:
cross cuts, miter cuts, bevel cuts, and
compound cuts. The cutting guide is
used to position the workpiece in
longitudinal cuts.
A scale on the front rail shows the
distance between the cutting guide and
the blade. It is very important to use the
blade guard assembly for all continuous
cutting operations. Blade guard
assembly includes: riving knife, anti-
kickback pins, and plastic sheet
protector.

9
SWITCH ASSEMBLY
See Figure 3.
This saw is equipped with aswitch
assembly that has an integrated locking
feature. This feature is designed to
prevent unauthorized and possibly
dangerous use by children and others.
• With the switch key inserted into the
switch, lift the switch to turn it on ( l ).
TO TURN OFF YOUR SAW:
• Press the switch down to turn off ( O).
TO LOCK YOUR SAW:
•Press the switch down to turn off (O).
•Remove the key from the breaker
switch and store in a safe and secure
place.
WARNING!
ALWAYS remove the key from the
switch when the tool is not in use
and store it in a safe place. In case
of power failure, turn off switch (O)
and remove key. This action
prevents the tool from accidentally
starting when the light returns.
WARNING!
ALWAYS make sure that your
workpiece is not in contact with the
blade before operating the switch to
start the tool. Failure to heed this
warning can cause the workpiece to
be thrown towards the operator and
result in serious personal injury.
WARNING!
To reduce the risk of accidental starting,
ALWAYS make sure the switch is in the
off (O) position before plugging the tool
into the power source.
BLADES
For best performance, it is
recommended to use the carbide tipped
10-inch 24 tooth combination blade
provided with your saw. Additional
blade styles of the same high quality
are available for specific operations
such as ripping
ASSEMBLY AND ADJUSTMENTS
TOOLS NEEDED
TO TURN YOUR SAW ON:

10
ASSEMBLY AND ADJUSTMENTS
REQUIRED TOOLS
LOOSE PARTS UNPACKING
This product requires assembly.
I raised out of the cardboard and place
it on a level work surface
NOTE: This tool is heavy. To avoid
back injury, keep your knees bent and
lift with your legs, not your back, and
get help when needed
WARNING!
Do not use this product if any of the
parts in the Loose Parts Lists are
already mounted on your product
when you unpack it. The parts in this
list are not assembled to the product
due to manufacturer and require
customer installation. Using a product
that may have been improperly
assembled could result in personal
injury.
• Inspect the tool carefully to ensure
that no breakage or damage
occurred during shipping.
Do not dispose of the packing material
until you have carefully inspected the
tool, identified all loose parts, and
operated the tool satisfactorily
NOTE: Remove the foam block from
between the saw housing and the
motor by first beveling the blade.
The saw is adjusted at the factory for a
precise cut. After mounting, check for
accuracy. If your transportation has
influenced the settings, refer to the
specific procedures explained in this
manual.
WARNING!
IIf any part is damaged or missing, do
not operate this tool until the parts are
replaced. Using this product with
damaged parts or missing could result
in serious personal injury.
WARNING!
Do not try to modify this tool or create
accessories not recommended for use
with this tool. Any such alteration or
modification is misuse and could lead
to a dangerous condition that could
cause serious personal injury.
WARNING!
Do not connect to power supply until
assembly is complete. Failure to
follow this rule can lead to accidental
starting and possible serious
personal injury.
WARNING!
Never stand directly in line with the
blade or allow your hands to come
within 3 inches of the blade. Do not
reach over or over the other side of
the blade. Failure to heed this warning
can result in serious personal injury.
WARNING!
To avoid serious personal injury,
always make sure the table saw is
securely mounted on a workbench or
on an approved leg stand. NEVER
operate the saw on the ground.

11
MOUNTING THE TABLE SAW BASE
ON THE LEG STAND
See Figure 8.
• Take the following from the base of
the table saw: 8 hex screws.
NOTE:
• Place the table saw base on the leg
support. Line up the holes in the
table.
• Put a bolt in each hole. Hand
tighten.
• Repeat for the three remaining
holes. Tighten all hardware firmly
with socket rachet.
TO INSTALL THE HANDLE
See Figure 7.
Insert the screw into the handle using a
Phillips-head screwdriver.
Then insert the screw attached to the
handle into the hole in the bevel / height
adjustment handwheel.
Place the nylon nut on the back of the
hole and tighten the screw.
Tighten until it stops so that the handle
turns freely when you turn the steering
wheel.
Remember to place the plastic cap on
the front of the handle to avoid
accumulation of dust or sawdust.

12
TO REMOVE / REPLACE THE
TABLE INSERTION
See Figure 10.
• Lower the blade by turning the
height / bevel adjusting wheel
to the left.
• Remove the worn insert from the
table.
TO TO CHANGE THE POSITIONS
OF THE DIVIDER KNIFE
See Figure 11.
This saw is supplied with a dividing
knife which should be placed in the
down position for grooving and in the
up position when full cuts of material
are required for the work of this saw.
• Unplug the saw.
To place in the “up” position for
the entire cut:
• Remove the insert from the table.
•Raise the saw blade by turning the
bevel / height adjustment wheel to
the right.
•Unlock the release lever by pulling
it up.
•Hold the dividing knife and pull it to
the right side of the saw to release
the dividing knife from the spring-
loaded divider clamp.
•Pull the dividing knife upward until
the internal pins are engaged and
the dividing knife is above the saw
blade.
•Lock the release lever by pushing
the lever down.
•Reinstall the table insert.
To place the riving knife in the
"down" position for grooved cuts:
• Remove the insert from the table.
• Raise the saw blade by turning the
bevel / height adjustment wheel to the
right.

13
•Hold the dividing knife and pull it to
the right side of the saw to release
the dividing knife from the spring-
loaded divider clamp.
•Push the dividing knife down until it
is at the same height as the saw
blade.
Lock the release lever by pushing
the lever down.
•Reinstall the table insert.
CHECK SAW BLADE INSTALLATION
See Figure 12.
NOTICE: For proper operation, the
saw blade teeth must point down
toward the front of the saw. Failure to
do so could cause damage to the saw
blade, saw, or workpiece.
• Unplug the saw.
• Lower the saw blade and remove the
insert from the table.
• Make sure the bevel lock lever is
pushed all the way to the
right.Raise the saw blade to its full
height by turning the bevel / height
adjusting wheel clockwise.
• Place rthe dividing knife in the "up"
position.
To loosen the saw blade:
• Insert the closed end wrench into
the saw blade washer.
• Insert the key of the closed end
saw blade over the disc nut.
Holding both keys firmly, pull the
closed end key toward the front of
the machine.
•
To tighten the blade:
•Insert the closed end wrench into
the washer on the saw blade.
•Insert the closed end saw blade
wrench over the saw blade
nut.Holding both keys firmly, push
the closed end key toward the rear
of the machine.Make sure the nut
on the saw blade is tight. Don't
over-tighten it.
• Reinstall the table insert.
• Check all clearances for free
rotation of saw blade
TO INSTALL THE BLADE GUARD AND
ANTI-KICKBACK RATCHETS
See Figure 13 - 15.
WARNING!
Replace blunt anti-kickback pawls
or damaged. Dull or damaged ratchets
may not stop kickback, increasing the
risk of serious personal injury.

14
•Unplug the saw.
•Raise the saw blade by turning the
bevel / height adjustment wheel to the
right.
•Place the dividing knife in the "up"
position.
•Reinstall the table insert.
To install anti-kickback pawls:
• Press and hold the button on the
right side of the anti-kickback pawls.
• Align the slot in the pawls over the
rear hole in the riving knife.
• Push the pawl handle down,
snapping them into place and
release the button.
NOTE: Pull on the ratchet handle to
make sure the ratchets are securely
locked.
TO INSTALL THE BLADE GUARD:
•Lift the safety lever to unlock it.
• With the front of the blade guard
raised, lower the rear of the guard into
the middle hole of the riving knife. Push
the front of the guard down until it is
parallel to the table (see figure 15). If
the blade guard is not parallel to the
table, the dividing knife is not in the "up"
position.
• Lock the guard in place by pressing
the safety lever down.
NOTE: Blade alignment can be
adjusted for different blade widths.
See: To Check and Align the Divider
Knife and Saw Blade. Check blade
guard assembly for clearance and free
movement.
TO CHECK AND ALIGN THE
DIVIDER KNIFE AND SAW BLADE
See Figures 16 - 17.
To check alignment of the
dividing knife:
• Unplug the saw.
•Raise the saw blade by
turning the bevel / height
adjustment wheel to the right.
•Remove the anti-kickback pawls
and blade guard assembly. Place a
carpenter's square or straight edge
against both the saw blade and the
riving knife
NOTE: Place the carpenter's square
between the carbide teeth and the
blade. This step will ensure that the
carpenter's square is straight against
the blade from the front to the back of
the blade.

15
The saw blade and dividing knife are
aligned when the joiner's square
contacts both the blade and the dividing
knife evenly without gaps. If the dividing
knife is not aligned with the saw blade,
an adjustment is necessary. The
dividing knife should be aligned front to
back (horizontally) and top to bottom
(vertically).
To adjust (horizontally and vertically):
• Remove the anti-kickback pawls and
blade guard assembly.
• Hold the output support with both
hands and pull it out until it is fully
extended.
• From the rear of the saw, loosen the
screws that hold the mounting bracket.
• Reposition the dividing knife to the left
or right as necessary to align the
dividing knife with the saw blade.
• Once properly aligned, retighten all
screws.
• Check the square shape again and
continue adjusting if necessary.
KEY AND BLADE STORAGE
See Figure 18

16
Insert the blade and wrench into the
holes on the side of the table saw and
securely tighten the screws. Push rod
and power cord have onboard storage
as shown in Fig. 18.
WARNING!
Don't let familiarity with the tools make
you careless. Remember that a
fraction of carelessness in a second is
enough to inflict serious injury.
WARNING!
Always wear protection to eyes with
side shields marked to meet ANSI
Z87.1. Failure to do so could throw
objects into your eyes, which could
cause serious injury.
WARNING!
Do not use attachments or
accessories not recommended by the
manufacturer of this tool. The use of
non-recommended attachments or
accessories can result in serious
personal injury.
WARNING!
Although many of the illustrations in
this manual are shown with the blade
guard removed for clarity, do not
operate the saw without the blade
guard unless specifically instructed to
do so.
APPLICATIONS
You can use this tool for the purposes
listed below:
• Straight line cutting operations such
as cross cutting, rip cutting, miter
cutting, bevel cutting and compound
cutting.
• Manufacture of cabinets and
carpentry.
NOTE: This table saw is designed to
cut only wood and wood composition
products.
BASIC OPERATION OF THE TABLE
SAW
The polarized plug must be plugged
into an outlet that is properly installed
and grounded in accordance with all
local codes and ordinances.
Improper connection of equipment can
cause electric shock. Do not modify the
plug if it does not fit into the outlet.
Have the outlet properly installed by a
qualified electrician. See the Electrical
section in this manual.
CAUSES OF KICKBACK
Kickback can occur when the blade
stops or binds, throwing the workpiece
at you with great force and speed. If
your hands are near the saw blade,
they can be shaken off the workpiece
and may come into contact with the
blade. Kickback can cause serious
injury. Use precautions to avoid risks.
Kickback can be caused by any action
that jams the blade into the wood, such
as:
• Make a cut with the wrong blade
depth.
• Sawing into knots or nails in the
workpiece.
• Twist the wood while making a cut.
Not supporting what you are cutting.
• Force a cut.
• Wet wood cutting.
• Using the correct blade for the type of
cut.
• Failure to comply with proper
operating procedures.

17
• Misusing the saw.
•Failure to use the anti-kickback
pawls.
• Cut with a dull or improperly
positioned blade.
AVOIDING KICKBACK
•Always use the correct blade depth
setting. The tops of the blade teeth
should protrude from the workpiece
1/8 inch to 1/4 inch.
•Inspect the workpiece for knots or
nails before beginning a cut.
•Remove any loose knots with a
hammer. Never cut into a loose knot
or nail.
•Always use the cutting guide when
cutting. Use the miter gauge when
making a cross cut. This helps
prevent the wood from twisting in the
cut.
•Always use clean, sharp, and well-
placed blades. Never cut with dull
blades
•To avoid binding of the blade,
support the work properly before
starting a cut.
•When making a cut, use constant,
even pressure. Never force cuts.
•No wet or warped wood.
•Be very careful when cutting some
composite or pre-finished wood
products, as anti-kickback pawls
may not always be effective.
• Always guide the workpiece with both
hands or with push rods and / or push
blocks. Keep your body in a balanced
position to be ready to resist kickback
should it occur. Never stand directly in
line with the blade.
• Using a wooden board will help hold
the work piece firmly against the saw
table or fence.
• Clean the saw, the blade guard,
under the table insert, and any areas
where dust from the saw or workpieces
can collect.
• Use the correct type of blade for the
cutting in progress.
• Always use the dividing knife for
every operation where it is allowed.
Using this device will greatly reduce the
risk of kickback.
CUTTING AIDS
See Figure 19.
Push rods are devices that can be
used to push a workpiece through the
blade in any rip cut. Pushers are
devices that can be used to push a
workpiece through the blade in any cut
so that your hands are no closer than 3
inches from the saw blade. They can
be made in various sizes and shapes
from scrap wood and used on a
specific project. The rod should be
narrower than the workpiece, with a 90
notch at one end and the shape of a
grip at the other end.
A push block has a handle held by
recessed screws from the bottom. Use
push blocks for narrow cuts and all
non-cross cuts.

18
NOTICE: Make sure the screws on a
push block are recessed to avoid
damaging the saw or workpiece.
AUXILIARY GUIDE
An auxiliary guide is a device used to
bridge the gap between cutting guide
and saw table. Always make and use
an auxiliary fence when ripping 1/8 inch
or thinner.
HOW TO MAKE AND ATTACH AN
AUXILIARY GUIDE (FOR CUTTING
RIP WITH A THIN WORKPIECE)
See Figure 20.
The holes in the cutting guide are used
to secure an auxiliary guide that
requires a piece of wood 1/2 inch thick,
1 inch wide, and 18-1 / 2 long to make.
To attach the auxiliary guide to the
cutting guide:
• Place the wood against the rip fence
and firmly on the saw table.
•From the rear of the cut guide,
secure the wood to the guide using
1-1 / 2 inch wood screws.
HOW TO MAKE A A GUIDE (TO
STRIP THE NARROW
WORKPIECE)
See Figure 21.
If ripping a narrow workpiece places
your hands too close to the blade, a
guide will need to be made and used.
To make a guide:
•Attach a handle to a long straight
piece of wood and secure from the
bottom using recessed screws.
• Cut off the shape of the fence side.
To use a guide:
•Place the workpiece on the table with
the edge flush against the fence and
against the stop.
• Holding the fence handle and using a
push block, rip as described on page
76 later in this section. Push blocks
are sold separately.

19
WOODEN BOARD
A wooden board is a device used to
help control the workpiece by holding it
firmly against the table or fence. Wood
boards are especially useful when
cutting small pieces of work and for
completing full cuts. The end is angled
with a number of short notches to give
frictional hold on the workpiece and
they are locked in place on the table
with a C clamp. Test to make sure you
can resist kickback.
HOW TO MAKE A WOODEN BOARD
See Figure 22.
The wooden board is an excellent
project for the saw. Select a piece of
solid wood that is approximately 3/4
inches thick, 2-1 / 2 inches wide, and 12
inches long. Mark the center of the
width at one end of the material. Make a
miter cut the width of 70 ° (see “Making
a Miter Cut” for information on miter
cuts). Prepare the saw for ripping as
discussed in the “Making a Miter Cut”
section. Adjust the cutting guide to allow
approximately a 1/4-inch “finger” to be
cut into the material.
Feed material only to the previously
made 6-inch mark. Turn the saw off and
allow the blade to stop rotating
completely before removing the
material. Readjust the cutting guide and
spaced rips in the workpiece to allow
approximately 1/4 inch in the fingers
and 1/8 inch gaps between the fingers.
WARNING!
Mount the wooden board in front of the saw
blade. If positioned incorrectly, it can cause
kickback of the wood board by squeezing the
pieceof work and causing union of the blade
in the saw cut. Failure to heed this warning
can result in serious personal injury.
HOW TO ASSEMBLE A WOODEN
BOARD
See Figure 23.
.
Fully lower the saw blade. Set the
cutting guide to the desired setting for
the cut to be made and lock. Place the
workpiece against the fence and over
the saw blade area.
Adjust the wood board to apply
resistance to the workpiece just in front
of the blade. Securely tighten the
clamp adjustment knob to secure the
wood board in place. Attach the C-
clamps to further secure the wood
board at the edge of the saw table.
TYPE OF CUTS
See Figure 24.
There are six basic cuts: 1) the cross
cut, 2) the rip cut, 3) the miter cut, 4)
the bevel cut, 5) the bevel rip cut, and
6) the compound miter cut (bevel). All
other cuts are combinations of these
six basics. Operating procedures for
performing each type of cut are given
later in this section.

20
WARNING!
Always make sure the blade guard and
anti-slam pawls are in place and working
properly when making these cuts to avoid
possible injury.
Cross cuts are 90 ° straight cuts made
through the grain of the workpiece. The
wood is introduced into the cut at an angle
of 90 ° to the Rip cuts are made with the
grain of the wood. To avoid kickback when
ripping, make sure one side of the wood
fits firmly against the cutting guide.
Miter cuts are made with
The wood at any angle to the blade other
than 90 °. The blade is vertical. Miter cuts
tend to "slip" while cutting. This can be
controlled by holding the workpiece firmly
against the miter gauge.
WARNING!
Always use a push rod with small
pieces of wood, and also to finish the
cut when ripping a long, narrow piece
of wood to keep your hands from
getting close to the blade.
Bevel cuts are made with an angled
blade. Bevel cross cuts are made
through the wood grain, and bevel cut
cuts are made through the grain.
Compound (or chamfer) miter cuts are
made with a blade at an angle on
wood leaning to the blade. Be
completely familiar with making cross
cuts, cuts rip, bevel cuts, and miter
cuts before attempting a compound
miter cut.
CUTTING TIPS
Rebate cuts are partial cuts that can be
rip cuts or cross cuts. Carefully read
and understand all sections of this
operator's manual before attempting
any operation.
WARNING!
Do not use blades rated lower than the
speed of this tool.Failure to follow this
warning could result in personal injury.
• The cut (the cut made by the blade in
the wood) will be wider than the blade
to prevent overheating or sticking.
Consider the cut when you measure
the wood.
•Make sure the cut is made on the
waste side of the measurement line.
•Cut the wood with the finished side up.
•Remove all loose knots with a
hammer before making the cut.
•Always provide adequate support for
the wood as it exits the saw.
•
TO CHANGE THE DEPTH OF THE
BLADE
See Figure 25.
Table of contents
Languages:
Other Promaker Saw manuals