Promate VocalMic-3 User manual

User Guide
VocalMic-3
Multi-Function Wireless Karaoke
Microphone with Built-In Speaker
HD Speaker • Equalizer Controls • MicroSD Card Slot • For iOS and Android Devices

Introduction
Start a karaoke party anywhere with this lightweight and portable karaoke microphone that can
also double us as a speaker. Perfect for any party, and you do not need extra speakers. Easy to use
controls to adjust treble, bass, volume and reverberation that makes any voice sound sweeter
than ever. Get your party grooving with VocalMic-3
Packaging Contents
• VocalMic-3
• AUX Cable
• USB Charging Cable
• User Guide
Specifications
Bluetooth Version: 4.2V
Bluetooth Chipset: JIELI(JL)
Bluetooth Frequency: 90Hz-10Khz
Bluetooth Profiles: A2DP/AVRCP/HSP/HFP
Battery Type: Cylindrical Lithium ion battery
Battery Capacity: 2000mAh
Power Input: DC 5V
Speaker Output: 3W*2
Impedance:4 Ω
Operating Distance: 10m
Usage Time: Upto 9.5H (Max Volume)
Charging Time: 5H
English

English
2
Features
Portability Guaranteed:
Start a karaoke party anywhere with this lightweight and portable karaoke
microphone that can be carried easily in your bag.
Powerful Speaker:
A multi-function 6watt speaker that takes your music listening experience on to the
next level
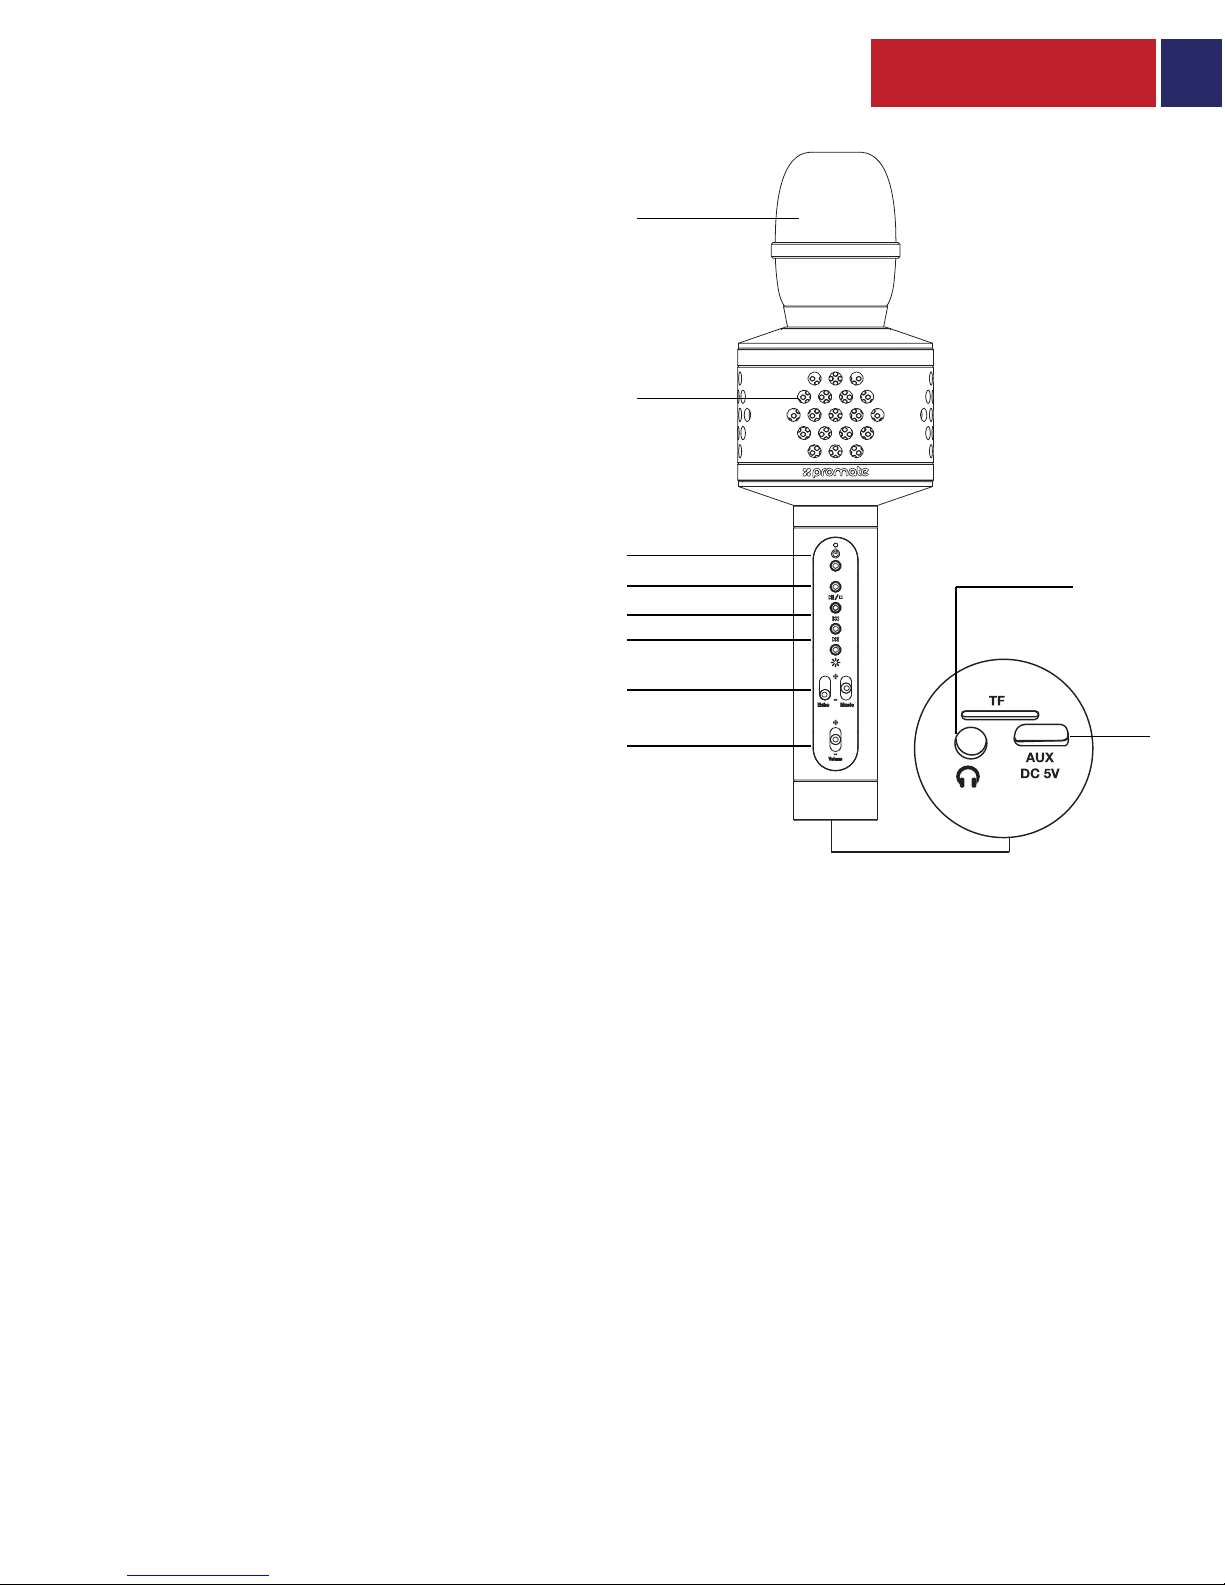
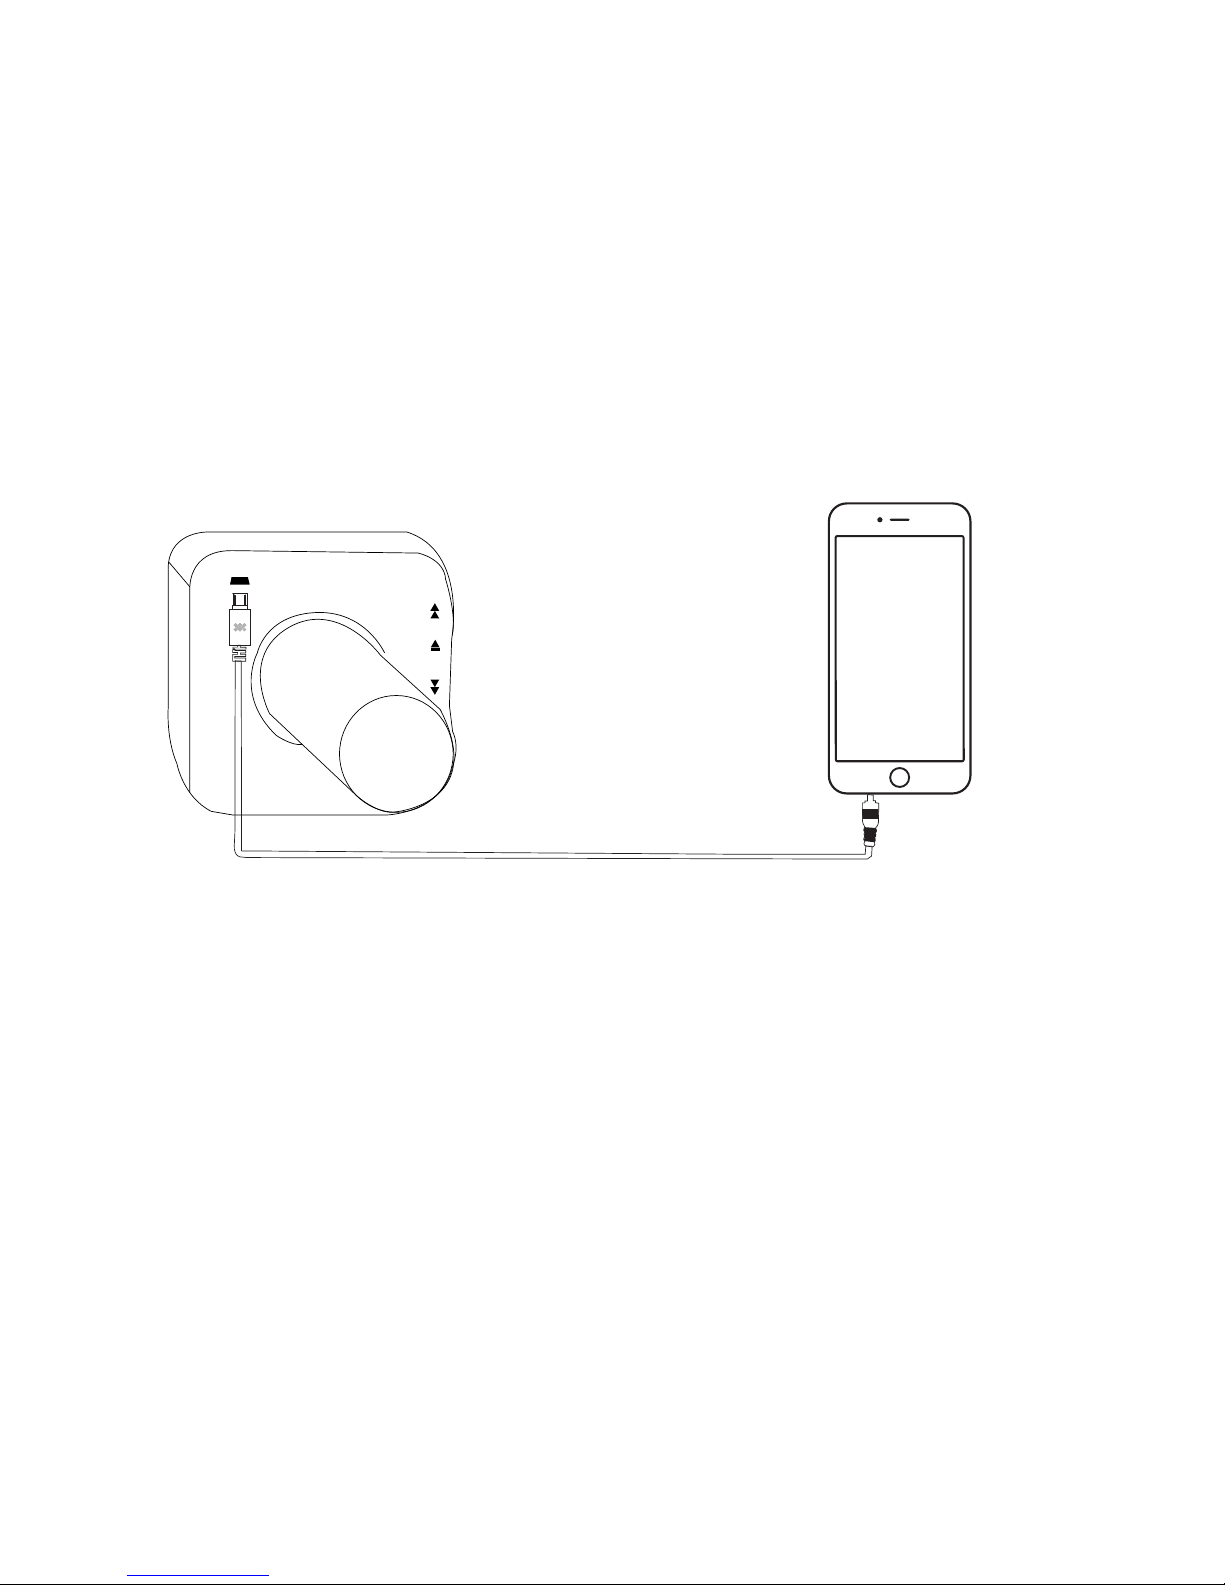
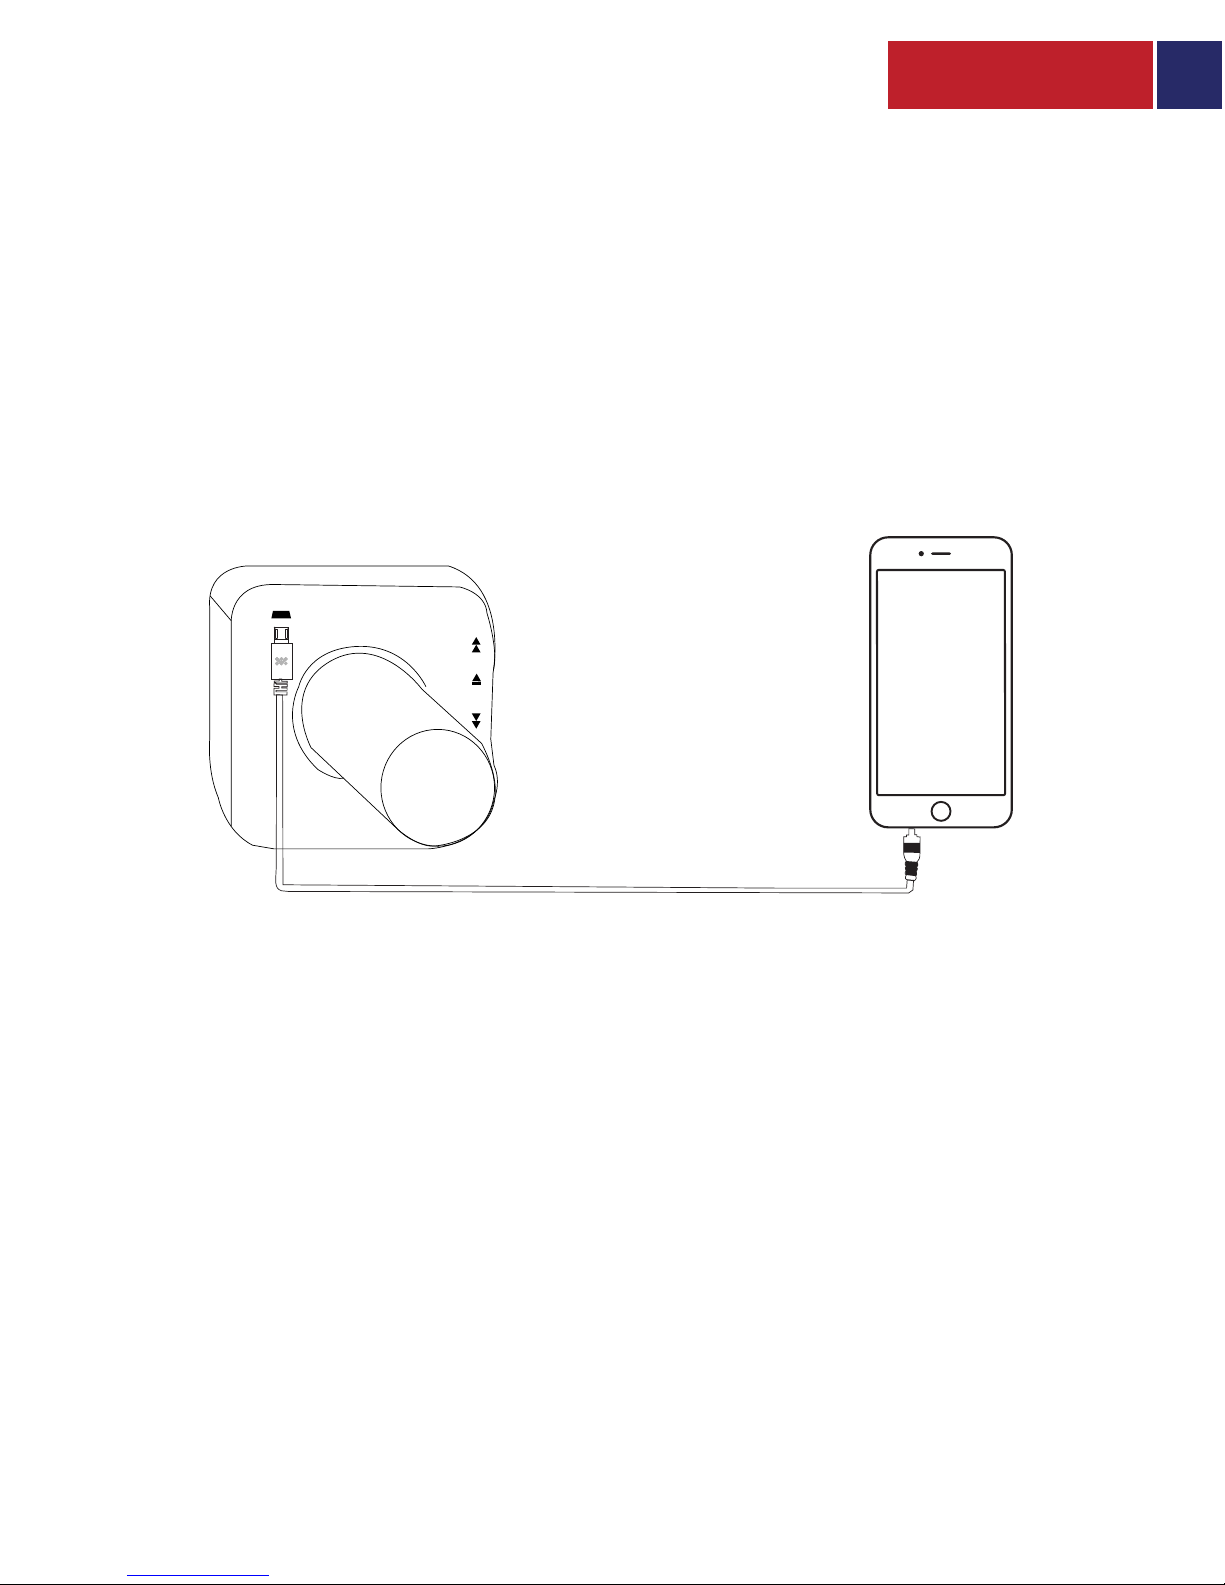
Multiple Connectivity Options:
Sing along to your favourite tracks via various connectivity options available with
VocalMic-3. Use it wirelessly, via the 3.5mm audio jack or using the MicroSD Card Slot.
Easy Tuning Controls:
Easy to use controls to adjust treble, bass, volume and reverberation.
2-in-1 Functionality:
Use the karaoke microphone as a portable wireless speaker.
Built-in Backup Battery:
Groove along to your favourite tracks for up to 4 hours with a built-in 2000mAh rechargeable
lithium-polymer battery
Universal:
Works with all karaoke apps like Smule, Yokee, StarMaker and with iOS or Android devices.
Precautions
Please read all safety instructions and warnings thoroughly before using this product.
Improper use of this product may result in damage to this or attached products.
• Do not disassemble the device or attempt to fix it.
• Kindly use the included cable to charge the product.
• Do not attempt to replace any part of this product.
• Do not crush, puncture or dispose of in fire.
• Do not store or use the battery in a high-temperature environment, including
intense sunlight or heat.
• Avoid excessive drops, bumps, abrasions and impacts.
• If there is any reason to believe that there is internal damage to the device,
discontinue using immediately.
• If you find that the device is too hot, is emitting an odour, or is deformed,
punctured or exhibits any suspicious or abnormal behaviour, discontinue use
immediately and contact our customer service.
• Always charge this product before extended storage.

English
3
Appearance & Interface Description
1. Microphone
2. Speaker
3. Power Button
4. Play/Pause and Stop Button
5. Previous Track
6. Next Track
7. Reverberation Control
8. Volume Control
9. Micro-USB AUX Port
10.Headphone Port
Operation Instructions
1. Charging VocalMic-3
• Use the provided cable to charge VocalMic-3.
•Connect one end of the USB Cable provided to VocalMic-3 and the other end
to any 5V/1A USB Power Socket.
• The Red LED indicator turns on when charging and will turn off when the device
is fully charged.
2. Turning VocalMic-3 On/Off
• To turn on VocalMic-3, press and the Power button for 2 seconds
• Press and hold the Multi-Function button again for 2 seconds to turn off VocalMic-3.
3. Bluetooth Pairing
• VocalMic-3 automatically enters Bluetooth pairing mode once powered on.
• The LED indicator will begin flashing when in pairing mode.
• Turn on the Bluetooth function on your device and select “VocalMic-3” in the available
devices list.
• Some Bluetooth devices may require you to enter a passcode to pair your device
to VocalMic-3. Enter “0000” and press submit.
• Once your device is successfully paired, the LED indicator will stop flashing
9
10
8
7
6
5
4
3
2
1

4
4. Using the Karaoke Function Under Bluetooth Mode:
• Once VocalMic-3 is paired with your smartphone or tablet via Bluetooth, use any
karaoke app and adjust the volume or echo using the controls on the microphone
• Certain karaoke apps may not function over Bluetooth mode. In such situations,
use the karaoke function under wired connection mode.
5. Using the Karaoke Function Under Wired Connection Mode:
• Ensure the microphone is not connected over Bluetooth to any smartphone or tablet.
• Connect one end of the Micro-USB cable as shown to the microphone and the other
end to your smartphone.
• Turn on the microphone.
• Install and use any karaoke app through your smartphone or tablet and adjust the
volume or echo using the controls on the microphone.
Troubleshooting
1. VocalMic-3 does not pair with a Bluetooth device:
• Check if the Bluetooth hardware on your device supports A2DP profile which is
necessary for sound transmission over Bluetooth.

English
5
Correct disposal of this Product
(Waste Electrical & Electronic Equipment (WEEE)
Your product is designed and manufactured with high quality materials and components
which can be recycled and reused.
This symbol means that electrical and electronic equipment, at their end of-life should be
disposed of separately from your household waste.
Please dispose of this equipment at your local community waste
collection/recycling center.
This product complies with European safety and electrical interference directives
This product does not contain environmentally hazardous materials (lead, mercury,
cadmium, hexavalent chromium and brominated flammable agents: PBB and PBDE).

Spanish
6
Apariencia y descripción de la Interface
1. Micrófono
2. Parlante
3. Botón de encendido
4. Botón de Reproducir/Pausa y Detener
5. Pista anterior
6. Pista siguiente
7. Control de Reverberación
8. Control de Volumen
9. Puerto Micro-USB AUX
10.Puerto de auricular
Instrucciones de operación
1. Carga del VocalMic-3
•Use el cable que se suministra para cargar el VocalMic-3.
• Conecte un extremo del Cable USB que se provee al VocalMic-3 y el otro
extremo a cualquier enchufe de alimentación 5V/1A USB.
• El indicador de LED rojo se enciende durante la carga y se apaga cuando el
dispositivo está completamente cargado.
2. Encendido/Apagado del VocalMic-3
• Para encender el VocalMic-3, presione el botón de Encendido durante 2 segundos
• Presione y mantenga presionado nuevamente el botón Multifunción
durante 2 segundos para apagar el VocalMic-3
3. Asociación a Bluetooth
• El VocalMic-3 entra automáticamente a modo de asociación a Bluetooth una
vez que se lo enciende.
• El indicador LED comenzará a destellar cuando esté en modo de asociación.
• Active la función Bluetooth en su dispositivo y seleccione “VocalMic-3” en la
lista de dispositivos disponibles.
• Algunos dispositivos Bluetooth pueden llegar a requerir el ingreso de una
contraseña para asociar su dispositivo al VocalMic-3. Ingrese “0000” y presione enviar.
• Una vez que su dispositivo esté exitosamente asociado, el indicador LED
dejará de destellar.
9
10
8
7
6
5
4
3
2
1

Spanish
7
4.Uso de la Función Karaoke en Modo Bluetooth:
•Una vez que el VocalMic-3 esté asociado a su smartphone o Tablet vía Bluetooth,
use cualquier aplicación de karaoke y ajuste el volumen o el eco usando los controles
en el micrófono.
•Ciertas aplicaciones de karaoke posiblemente no funcionen en modo Bluetooth. En
tales situaciones, use la función karaoke en modo conexión con cable.
5.Uso de la Función Karaoke en Modo Conexión con cable
gúrese de que el micrófono no esté conectado vía Bluetooth a ningún
smartphone o tableta.
• Conecte un extremo del cable Micro-USB al micrófono tal como se muestra y el
otro extremo a su smartphone.
• Encienda el micrófono.
• Instale y use cualquier aplicación de karaoke existente en su smartphone o tableta
y ajuste el volumen o el eco usando los controles existentes en el micrófono.
Resolución rápida de problemas
1.El VocalMic-3 no se asocia con un dispositivo Bluetooth:
•Verifique si el hardware de Bluetooth en su dispositivo soporta un perfil A2DP el
cual es necesario para la transmisión de sonido vía Bluetooth.

French
8
Aspect & Description Interface
1. Microphone
2. Haut-Parleur
3. Bouton Arrêt / Marche
4. Bouton Play/Pause et Stop
5. Piste Précédente
6. Piste Suivante
7. Contrôle de Réverbération
8. Contrôle de Volume
9. Port Auxiliaire Micro-USB
10.Port Écouteurs
Mode d’emploi
1 Chargement du VocalMic-3
• Utilisez le câble fourni pour charger le VocalMic-3.
• Connectez une extrémité du Câble USB fourni au VocalMic-3 et l’autre extrémité à
une prise de courant USB 5V/1A.
• L’indicateur LED Rouge s’allume quand l’appareil est en charge et s’éteint quand il
est complètement chargé.
2. Allumer et Eteindre le VocalMic-3
• Pour allumer le VocalMic-3, appuyez pendant 2 secondes sur le bouton Marche / Arrêt.
• Pour éteindre le VocalMic-3, appuyez pendant 2 secondes sur le bouton Marche / Arrêt.
3. Appairage Bluetooth
• Le VocalMic-3 passe automatiquement en mode appairage Bluetooth lorsqu’il est allumé.
• L’indicateur LED commencera à clignoter lorsqu’il sera en mode appairage.
• Activez la fonction Bluetooth de votre appareil et sélectionnez le “VocalMic-3”
sur la liste des appareils disponibles.
• Certains appareils Bluetooth demandent un mot de passe pour l’appairage avec le
VocalMic-3. Si tel est votre cas, entrez “0000” et appuyez sur valider.
• Une fois que votre appareil est correctement appairé, l’indicateur LED arrête
de clignoter.
9
10
8
7
6
5
4
3
2
1

French
9
4.Utilisation de la Fonction Karaoké en Mode Bluetooth :
• Une fois votre VocalMic-3 appairé avec votre smartphone ou tablette via Bluetooth,
vous pouvez utiliser n’importe quelle application de karaoké et ajuster le volume ou l’écho
en utilisant les touches de contrôle du microphone.
• Certaines applications karaoké peuvent ne pas fonctionner en mode Bluetooth. Si vous
vous retrouvez dans une situation comme celle-ci, utilisez la fonction karaoké en mode câblé.
5.Utilisation de la Fonction Karaoké en Mode Connection Câblée :
• Vérifiez que votre microphone n’est pas connecté via Bluetooth à un smartphone
ou tablette.
• Connectez une extrémité du câble Micro-USB comme indiqué au microphone et
l’autre extrémité à votre smartphone.
• Allumez le microphone.
• Installez et utilisez n’importe quelle application de karaoké à travers votre
smartphone ou tablette et ajustez le volume ou l’écho grâce aux boutons de
contrôle du microphone.
Dépannage :
1.Impossibilité d’Appairage du VocalMic-3 à un appareil Bluetooth :
• Vérifiez si le hardware Bluetooth de votre appareil prend en charge le profil A2DP nécessaire
à la transmission de sons via Bluetooth

German
10
Beschreibung von Aussehen & Interface
1.Mikrofon
2.Lautsprecher
3.Netztaste
4.Play-/Pausen- und Stopp-Taste
5Voriges Stück
6.Nächstes Stück
7.Nachhallregelung
8.Lautstärkenregelung
9.Micro-USB AUX Anschluss
10.Kopfhörer-Anschluss
Bedienungsanleitung
1.Das VocalMic-3 aufladen
• Nutzen Sie das mitgelieferte Kabel, um das VocalMic-3 aufzuladen.
• Schließen Sie das eine Ende des mitgelieferten USB-Kabels an das
VocalMic-3 und das andere Ende an eine 5V/1A USB-Netzsteckdose an.
• Die rote LED-Anzeige schaltet sich während des Ladevorgangs ein und sie
schaltet sich aus, wenn das Gerät voll aufgeladen ist.
2.Das VocalMic-3 ein-/ ausschalte
•Um das VocalMic-3 einzuschalten, halten Sie die Netztaste 2 Sekunden lang eingedrückt.
• Halten Sie die Multifunktionstaste wieder 2 Sekunden lang eingedrückt, um das
VocalMic-3 auszuschalten
3.Bluetooth-Kopplung
• Nach dem Einschalten geht das VocalMic-3 automatisch in den Bluetooth-Kopplungsmodus.v
• Im Kopplungsmodus beginnt die LED-Anzeige zu blinken.
• Schalten Sie die Bluetooth-Funktion an Ihrem Gerät ein und wählen Sie „VocalMic-3“
in der Liste der verfügbaren Geräte.
• Einige Bluetooth-Geräte verlangen von Ihnen eventuell die Eingabe eines Passwortes,
um Ihr Gerät an das VocalMic-3 zu koppeln. Geben Sie „0000“ ein und drücken Sie
auf „Abschicken“.
• Nach der erfolgreichen Kopplung Ihres Geräts hört die LED-Anzeige zu blinken auf.
9
10
8
7
6
5
4
3
2
1

German
11
4. Die Karaoke-Funktion im Bluetooth-Modus benutzen:
• Wenn das VocalMic-3 über Bluetooth an Ihr Smartphone oder Tablet gekoppelt ist,
können Sie jede Karaoke-App benutzen und die Lautstärke oder das Echo über
die entsprechenden Steuerungen am Mikrofon regeln.
• Einige Karaoke-Apps funktionieren vielleicht nicht im Bluetooth-Modus. Nutzen Sie
in solchen Situationen die Karaoke-Funktion im Kabelanschluss-Modus.
5. Die Karaoke-Funktion im Kabelanschluss-Modus benutzen:
Fehlersuche
Das VocalMic-3 koppelt sich nicht an ein Bluetooth-Gerät:
• Kontrollieren Sie, ob die Bluetooth-Hardware auf Ihrem Gerät das
A2DP-Profil unterstützt. Dieses wird zur Tonübertragung über Bluetooth gebraucht.
• Sorgen Sie dafür, dass das Mikrofon nicht über Bluetooth mit einem Smartphone oder
Tablet verbunden ist.
• Schließen Sie ein Ende des Micro-USB-Kabels an das Mikrofon an, wie angezeigt, und
das andere Ende an Ihr Smartphone.
• Schalten Sie das Mikrofon ein.
• Installieren und nutzen Sie eine Karaoke-App über Ihr Smartphone oder Tablet und
passen Sie Lautstärke oder Echo über die Steuerungen am Mikrofon an.

Portuguese
12
Aparência & Descrição da Interface
1. Microfone
2. Microfone
3. Botão de Ligar
4. Botão de Ligar/Pausar e Parar
5. Trilha Anterior
6. Próxima Trilha
7. Controle de Reverberação
8. Controle de Volume
9. Porta AUX Micro-USB
10.Porta para o Fone de Ouvido
Instruções de Operação 9
10
8
7
6
5
4
3
2
1
1. Carregando VocalMic-3
• Use o cabo fornecido para carregar o VocalMic-3.
• Conecte uma extremidade do cabo USB fornecido ao
VocalMic-3 e a outra extremidade a qualquer soquete de energia USB 5V / 1A.
• O indicador LED Vermelho se acende durante o carregamento e desligará quando o
dispositivo estiver totalmente carregado
2.Ligando/Desligando o VocalMic-3
• Para ligar o VocalMic-3, pressione e o botão liga / desliga por 2 segundos
• Pressione e mantenha pressionado o botão Multi-Function novamente por 2
segundos para desligar o VocalMic-3.
3.Emparelhamento Bluetooth
• O VocalMic-3 entra automaticamente no modo de emparelhamento Bluetooth
uma vez que esteja ligado.
• O indicador LED comecará a piscar quuando estive no modo emparelhamento.
• Ligue a função Bluetooth no seu aparelho e selecione “VocalMic-3”na lista de
aparelhos disponíveis.
• Alguns aparelhos com Bluetooth podem precisar que seja digitado uma senha para
emparelhar seu aparelho ao VocalMic-3. Digite “0000” e pressione enviar.
• Uma vez que o aparelho esteja emparelhado com sucesso, o indicador
de LED parará de piscar.

Portuguese
13
4.Usando a Função Karaoke Function no Modo Bluetooth:
• Uma vez que o VocalMic-3 esteja emparelhado com o seu smartphone ou tablet
via Bluetooth, use qualquer app de karaoke e ajuste o volume ou o eco usando
os controles o microfone.
• Certos apps de karaoke apps podem não funcionar no modo Bluetooth mode.
Nestas situações, use a função de karaoke no modo de conexão com fio.
5.Usando a Função Karaoke no Modo de Coneção com Fio:
• Assegure-se de que o microfone não esteja conectado no Bluetooth em qualquer
smartphone ou Tablet.
• Conecte uma extremidade do cabo Micro-USB como mostrado no microfone e
a outra extremidade no seu smartphone. cable as shown to the microphone.
• Ligue o microfone.
• instale e use qualquer app de karaoke no seu smartphone ou tablet e ajuste
o volume ou eco usando os controles do microfone.
Problemas e Soluções
• VocalMic-3 não emparelha com o Bluetooth do aparelho:
• Verifique se o hardware do Bluetooth hardware no seu aparelho support perfil
A2DP o qual é necessário para a transmissão de som com Bluetooth.

Romanian
14
Prezentare și Descrierea interfeței
1. Microfon
2. Difuzor
3. Buton de pornire
4. Buton de Redare/Pauză și Oprire
5. Piesa anterioară
6. Piesa următoare
7. Control reverberație
8. Control volum
9. Port auxiliar micro-USB
10.Port pentru căști
Instrucțiuni de utilizare
1. Încărcarea VocalMic-3
•Folosiți cablul furnizat pentru a încărca VocalMic-3.
• Conectați un capăt al cablului USB furnizat la VocalMic-3, iar celălalt capăt
la o sursă de alimentare pe USB de 5V/1A.
• Indicatorul LED de culoare roșie se aprinde în timpul încărcării și se va stinge
când dispozitivul este complet încărcat.
2. Pornirea/Oprirea VocalMic-3
•Pentru a porni VocalMic-3, țineți apăsat timp de 2 secunde pe butonul Pornire
• Apăsați și țineți apăsat butonul multifuncțional, timp de 2 secunde, pentru a
opri VocalMic-3.
3. Asocierea prin Bluetooth
• VocalMic-3 intră automat în modul de asociere prin Bluetooth, imediat după pornire.
• Indicatorul LED va începe să lumineze intermitent atunci când dispozitivul este
în modul de asociere.
• Porniți funcția Bluetooth de pe dispozitivul dvs. și selectați „VocalMic-3” din lista de
dispozitive disponibile.
• Unele dispozitive cu funcția Bluetooth v-ar putea solicita să introduceți o parolă înainte de a
asocia dispozitivul cu VocalMic-3. In]troduceți „0000” și apăsați Submit (Trimitere).
• După ce dispozitivul a fost asociat cu succes, indicatorul LED nu va mai lumina intermitent.
9
10
8
7
6
5
4
3
2
1

Romanian
15
4. Utilizarea funcției de Karaoke în modul Bluetooth:
• După ce VocalMic-3 a fost asociat cu succes cu telefonul dvs. smart
sau cu tableta, prin conexiunea Bluetooth, puteți utiliza orice aplicație de
karaoke și puteți ajusta volumul sau ecoul folosind butoanele de pe microfon.
• Este posibil ca unele aplicații de karaoke să nu funcționeze prin conexiunea
Bluetooth. În această situație, utilizați funcția karaoke în modul de conectare prin cablu.
5. Utilizarea funcției de Karaoke în modul de conectare prin cablu:
• Asigurați-vă că microfonul nu este conectat prin Bluetooth la un telefon smart sau tabletă.
• Conectați un capăt al cablului micro-USB la microfon, așa cum se arată în figură, iar
celălalt capăt la telefonul dvs. smart.
• Porniți microfonul.
• Instalați și utilizați orice aplicație de karaoke prin intermediul telefonului smart sau
al tabletei, și ajustați volumul sau ecoul folosind butoanele de pe microfon.
Remedierea problemelor
1. VocalMic-3 nu se asociază cu un dispozitiv cu Bluetooth:
• Verificați dacă sistemul Bluetooth de pe dispozitivul dvs. permite profilul A2DP, care
este necesar în vederea transmiterii sunetului prin funcția Bluetooth.

Romanian
16

Russian
17
Внешний вид и описание интерфейса
1. Микрофон
2. Громкоговоритель
3. Кнопка питания
4. Кнопка воспроизведение/пауза и стоп
5. Предыдущая дорожка
6. Следующая дорожка
7. Управление реверберацией
8. Управление громкостью
9. AUX-порт Micro-USB
10.Порт для наушников
Инструкция по эксплуатации
1. Зарядка VocalMic-3
• Используйте комплектный кабель для зарядки VocalMic-3.
• Подключите один конец комплектного USB-кабеля к VocalMic-3, а другой
конец к любой силовой розетке на 5В/1А.
• Красный светодиодный индикатор включается при зарядке и выключается
при полной зарядке устройства.
2. Включение/выключение VocalMic-3
• Чтобы включить VocalMic-3, нажмите кнопку "Питание" на 2 секунды
• Нажмите и удерживайте "Многофункциональную" кнопку повторно на 2
секунды, чтобы выключить VocalMic-3.
3. Сопряжение по Bluetooth
• VocalMic-3 автоматически входит в режим сопряжение по Bluetooth при
включении питания.
• Светодиодный индикатор начнёт мигать в режиме сопряжения.
• Включите функцию Bluetooth на своём устройстве и выберите "VocalMic-3"
из перечня доступных устройств.
• Некоторые устройства Bluetooth могут потребовать ввести код доступа для
сопряжения вашего устройства с VocalMic-3. Введите "0000" и нажмите запустить.
• После того, как ваше устройство будет успешно сопряжено, светодиодный
индикатор перестанет моргать.
9
10
8
7
6
5
4
3
2
1

Russian
18
4. Использование функции "Караоке" в режиме Bluetooth:
• После того, как VocalMic-3 был сопряжён с вашим смартфоном или планшетом
через Bluetooth, используйте любое приложение для караоке и отрегулируйте
громкость или эхо с помощью органов управления на микрофоне.
• Некоторые приложения караоке могут не работать в режиме Bluetooth.
В таких ситуациях используйте функцию караоке в режиме проводного подключения.
5. Использование функции "Караоке" в режиме проводного подключения:
• Убедитесь, что микрофон не подключен через Bluetooth ни к какому
смартфону или планшету.
• Подключите один конец кабеля Micro-USB, как показано, к микрофону, а
другой конец к своему смартфону.
• Включите микрофон.
• Установите и используйте любое приложение караоке через свой смартфон
и отрегулируйте громкость или эхо с помощью органов управления микрофона.
Неполадки и способ их устранения
1.VocalMic-3 не сопрягается с устройством Bluetooth:
• Проверьте, поддерживает ли аппаратная часть вашего устройства профиль
A2DP, который необходим для передачи звука через Bluetooth.

Turkish
19
Dış Görünüm & Arayüz Tanımları
1. Mikrofon
2. Hoparlör
3. Güç Düğmesi
4. Oynat/Duraklat ve Durdur Düğmesi
5. Önceki Parça
6. Sonraki Parça
7. Yankı Kontrolü
8. Ses Kontrolü
9. Mikro-USB AUX Yuvası
10.Kulaklık Yuvası
Kullanım Talimatları
1. VocalMic-3 Şarj Etme
• VocalMic-3’ü şarj etmek için kutudan çıkan kabloyu kullanın.
• USB kablosunun bir ucunu VocalMic-3 ‘e diğer ucunu da herhangi bir 5V/1A USB Güç
soketine takın.
• Şarj olurken kırmızı LED gösterge yanacaktır. Tam şarj olduğunda sönecektir.
2. VocalMic-3’ü Açma/Kapama
• VocalMic-3’ü açmak için Güç düğmesine 2 saniye süreyle basın
• VocalMic-3’ü kapatmak için Çoklu-Fonksiyon tuşuna 2 saniye basılı tutun.
3. Bluetooth Eşleştirme
• VocalMic-3 açıldığında otomatik olarak Bluetooth eşleştirme moduna girer.
• Eşleştirme modundayken LED gösterge yanıp sönecektir.
• Cihazınızdaki Bluetooth fonksiyonunu açın ve uygun cihazlar listesinden
“VocalMic-3”’yi seçin.
• Bazı Bluetooth cihazları VocalMic-3 ile eşleştirmek için bir parola girişine gereksinim
duyabilir. “0000” girin ve onayla tuşuna basın.
• Cihazınız birkez başarıyla eşleşince, LED gösterge yanıp sönmeyi kesecektir.
9
10
8
7
6
5
4
3
2
1
Table of contents