PROPOINT 8340507 User manual

Please read this manual before use.
User Manual
V 3.04 8340507
1/2 IN. DR ELECTRIC
IMPACT WRENCH

2 For technical questions call 1-800-665-8685
V 3.04 8340507
1/2 IN. DR ELECTRIC
IMPACT WRENCH
SPECIFICATIONS
Legally required CUL CUL E310690
Voltage Rating 120 volt
Drive Size 1/2 in.
No Load Speed 2,800 RPM
Max. Torque 360 ft-lb
Variable Speed Yes
Frequency Rating 60 Hz
Current Rating 6 A
Features Side handle for added control.
IMPORTANT SAFETY PRECAUTIONS
WARNING! Read and understand all instructions before using this
tool. The operator must follow basic precautions to reduce the risk of
personal injury and / or damage to the equipment. Before allowing
someone else to use this tool, make sure they are aware of all
safety information.
WARNING! The warnings, cautions and instructions discussed in this
instruction manual cannot cover all possible conditions and situations
that may occur. Common sense and caution are factors that cannot be
built into this product, but must be supplied by the operator.

1/2 IN. DR ELECTRIC IMPACT WRENCH
Visit www.princessauto.com for more information 3
8340507 V 3.03
IMPORTANT! Keep this manual for the safety warnings, precautions and
operating, inspection and maintenance instructions. When this manual
refers to a part number, it refers to the included parts list.
WORK AREA
1. Operate in a safe work environment. Keep your work area clean
and well lit.
2. Keep anyone not wearing the appropriate safety equipment away
from the work area.
IMPORTANT! Minimize distractions in the work environment
Distractions can cause you to lose control of the tool.
3. Always lock up tools and keep them out of the reach of children.
PERSONAL SAFETY
CAUTION! Wear protective equipment approved by the Canadian
Standards Association (CSA) or American National Standards Institute
(ANSI) when using this tool.
1. Dress properly, wear protective equipment. Use breathing, ear, eye,
face, foot, hand, and head protection. Always wear ANSI approved
impact safety goggles, which must provide both frontal and side
protection. Protect your hands with suitable gloves. Wear a full
face shield if your work creates metal filings or wood chips. Protect
your head from falling objects by wearing a hard hat. Wear an ANSI
approved dust mask or respirator when working around metal,
wood and chemical dusts and mists. Wear ANSI approved earplugs.
Protective, electrically non-conductive clothes and non-skid
footwear are recommended when working. Wear steel-toed boots
to prevent injury from falling objects.
2. Control the tool, personal movement and the work environment to
avoid personal injury or damage to the tool. Stay alert, watch what
you are doing and use your common sense.
3. Keep articles of clothing, jewellery, hair, etc., away from moving
parts to avoid entanglement with the tool.
4. Do not operate any machine / tool when tired or under the
influence of drugs, alcohol or medications.
5. Do not overreach when operating a tool. Proper footing and
balance enables better control of a tool in unexpected situations.
6. Use clamps or other practical ways to support or secure the work
piece to a stable platform. Holding the work piece by hand or
against your body is not stable and may lead to loss of control
and injury.

1/2 IN. DR ELECTRIC IMPACT WRENCH
4 For technical questions call 1-800-665-8685
V 3.03 8340507
SPECIFIC SAFETY PRECAUTIONS
1. Do not over-tighten nuts. They could shatter and cause damage
to the tool or work piece or cause injury. Use a torque wrench to
torque the nut after using the impact wrench.
2. Do not use any additional force upon the wrench in order to
remove a nut.
3. Do not allow the wrench to run without load for an extended
period of time, as this will shorten its life.
4. This tool will not stop moving immediately. Do not lay the tool
down or leave it unattended until it has come to a complete stop. A
part that is moving could make the tool jump or grab a surface and
pull the tool out of your control.
5. When operating the tool, use proper eye and hearing protection as
well as protective gloves.
6. To maintain complete control, firmly hold your tool with both
hands. Do not place hands over air vents. Do not touch the
metal parts.
7. Never point the tool towards yourself. If it should slip, part of your
body could come in contact with moving parts.
8. Never force the tool. Excessive pressure could bend or break the
tool or accessory resulting in damage to the tool, your work piece,
or serious personal injury. If your tool runs smoothly under no load
but does not run smoothly under load, then excessive pressure is
being used.
9. Use an appropriate dust respirator when working for an extended
period of time. This will help prevent breathing in the fine dust
created while working.
10. After changing the sockets and accessories or making adjustments,
make sure any other adjustment devices are securely tightened.
Loose adjustment devices could be violently thrown.
11. Always use the correct socket that matches the drive size.
Improper use could lead to possible injury to the operator, and
damage to the tool or work piece.
12. Always check sockets and accessories for damage before each use.
Damaged sockets and accessories can break during use and cause
serious injury.

1/2 IN. DR ELECTRIC IMPACT WRENCH
Visit www.princessauto.com for more information 5
8340507 V 3.03
ELECTRICAL SAFETY
1. Disconnect power supply. Disconnect the tool from the power
supply when not in use, before cleaning, servicing, or changing any
parts or accessories.
2. Protect yourself against electric shocks when working on electrical
equipment. Avoid body contact with grounded surfaces such as
pipes, radiators, cooking stoves, and refrigerators. There is an
increased chance of electrical shock if your body is grounded.
3. Double insulated tools are equipped with a polarized plug (one
blade is wider than the other). This plug will fit in a polarized outlet
only one way. If the plug does not fully fit in the outlet, reverse the
plug. If it still does not fit, contact a qualified electrician to install
a polarized outlet. Do not change the plug in any way. Double
insulation eliminates the need for a three-wire grounded power
cord and grounded power supply system.
4. Grounded tools must be plugged into an outlet that is properly
installed and grounded in accordance with all codes and
ordinances. Never remove the grounding prong or modify the plug
in any way. Do not use any adapter plugs. Check with a qualified
electrician if you are in doubt as to whether the outlet is properly
grounded. If the tool should electronically malfunction or break
down, grounding provides a low resistance path to carry electricity
away from the user.
5. Do not abuse the cord. Never use the cord to carry tools or pull
the plug from an outlet. Keep the cord away from heat, oil, sharp
edges, or moving parts. Do not operate this tool if the power
cord is frayed or damaged. Replace damaged cords immediately.
Damaged cords increase the risk of electric shock. Do not modify
the plug in any way.
6. When operating a power tool outside, use an outdoor extension
cord marked “W-A” or “W”. These cords are rated for outdoor use
and reduce the risk of electric shock. Use in conjunction with a
Ground Fault Circuit Interrupter (GFCI). If operating a power tool in
a damp location is unavoidable, the use of a GFCI reduces the risk
of electric shock. It is recommended that the GFCI should have a
rated residual current of 30 A or less.
7. Avoid using an unnecessarily long extension cord. Choose a cord
that is appropriate for the situation. A cord that is too long and
running across the floor can be more dangerous than helpful. Using
a cord that is too long or too thin could damage the tool. Unroll the
cord completely to prevent it from overheating.
8. Place the electrical cord in a position that prevents it from coming
into contact with the tool and from getting caught by the work
piece. The cord should always stay behind the tool.

1/2 IN. DR ELECTRIC IMPACT WRENCH
6 For technical questions call 1-800-665-8685
V 3.03 8340507
VIBRATION PRECAUTIONS
This tool vibrates during use. Repeated or long-term exposure
to vibration may cause temporary or permanent physical injury,
particularly to the hands, arms, and shoulders.
1. Anyone using vibrating tools regularly or for an extended period
should first be examined by a doctor and then have regular medical
check-ups to ensure medical problems are not being caused by,
or worsened from, tool use. Pregnant women or people who have
impaired blood circulation to the hands, past hand injuries, nervous
system disorders, diabetes, or Raynaud’s Disease should not use
this tool. If you feel any medical symptoms related to vibrations
(such as tingling, numbness, and white or blue fingers), seek
medical attention as soon as possible.
2. Do not smoke during use. Nicotine reduces the blood flow to the
hands and fingers, and increases the risk of vibration-related injury.
3. Wear suitable gloves to reduce the vibration effects on the user.
4. Use tools with the lowest amount of vibration when there is a
choice between different processes.
5. Do not use for extended periods. Take frequent breaks when using
this tool.
6. Let the tool do the work. Grip the tool as lightly as possible (while
still keeping safe control of it).
7. To reduce vibrations, maintain the tool as explained in this manual.
If abnormal vibrations occur, stop using this tool immediately.
TOOL USE AND CARE
WARNING! Do not use the tool if the trigger does not function properly.
Any tool that cannot be controlled with the ON / OFF switch is
dangerous and must be repaired.
1. Use the correct tool for the job. Maximize performance and safety
by using the tool for its intended task.
2. This tool was designed for a specific function.
Do Not:
a. Modify or alter the tool, all parts and accessories are designed
with built-in safety features that may be compromised
if altered.
b. Use the tool in a way for which it was not designed.
3. Avoid unintentional starts. Be sure the trigger switch is in the OFF
position when not in use and before connecting it to any
power source.
1/2 IN. DR ELECTRIC IMPACT WRENCH
Visit www.princessauto.com for more information 7
8340507 V 3.03
UNPACKING
1. Carefully remove the tool from the package.
a. Retain the packing material until you have carefully inspected
and satisfactorily installed or operated the tool.
2. Make sure that all the items in the parts list are included.
3. Inspect the parts carefully to make sure the tool was not damaged
during shipping.
WARNING! If any parts are missing, do not operate the tool until the
missing parts are replaced. Failure to do so could result in serious
personal injury.
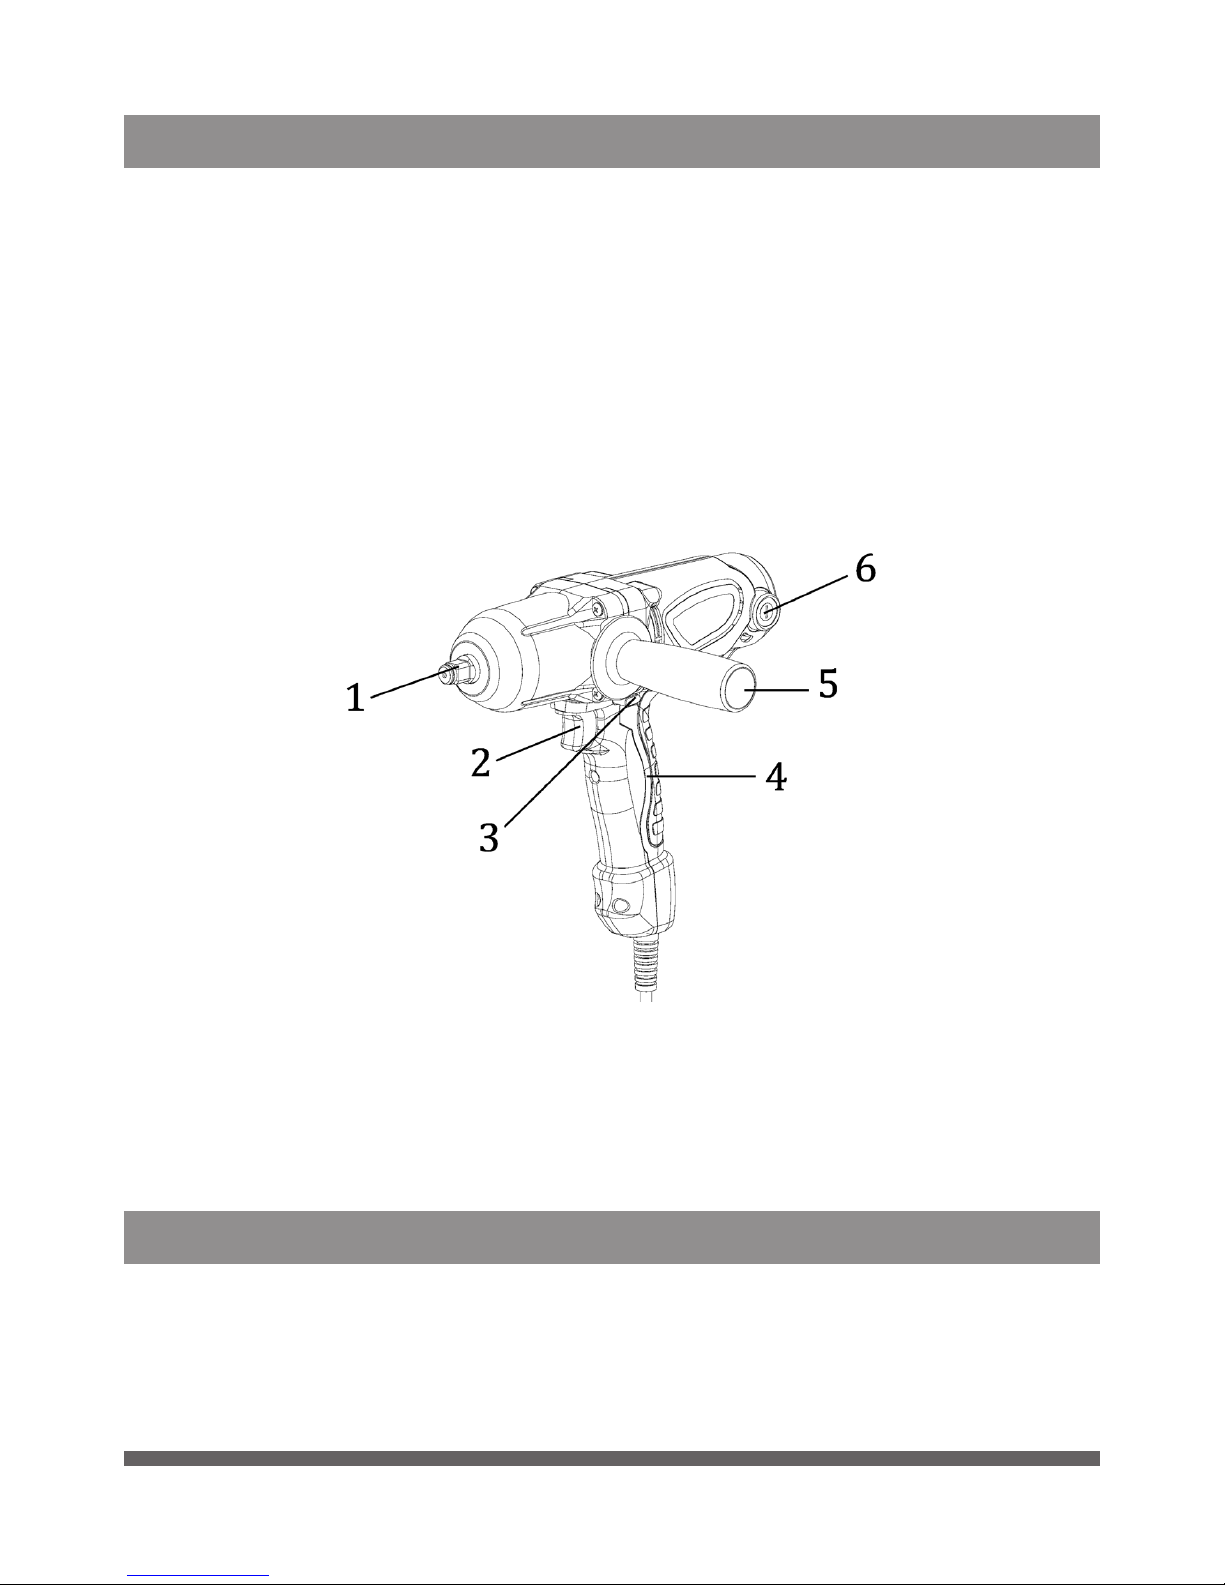
PARTS IDENTIFICATION
1. Socket Holder
2. Trigger Switch
3. Forward/Reverse Rod
4. Non-Slip Handle
5. Side Handle
6. Carbon Brush Nut
ASSEMBLY
1. Choose the correct socket size based on the bolts and nuts
being used. If the improper socket is used, it will not grip the bolt
properly causing inconsistent torque and could possibly damage
bolts or nuts.

1/2 IN. DR ELECTRIC IMPACT WRENCH
8 For technical questions call 1-800-665-8685
V 3.03 8340507
2. Installation and removal of the socket
a. The tool must be turned off and unplugged before
any assembly.
b. Press the socket onto the drive shaft.
c. To remove the socket, pull out and pull off.
OPERATION
1. Tightening torque is different according to the type and size of
bolt being used, as well as the materials being tightened. If you are
unsure of the torque required, use a torque wrench to measure the
force exerted.
2. Firmly grip the tool and place the socket on the bolt or nut. Turn on
the machine by squeezing the trigger to start tightening
(see Figure 1).
Fig.1

1/2 IN. DR ELECTRIC IMPACT WRENCH
Visit www.princessauto.com for more information 9
8340507 V 3.03
3. When working with small screws, carefully regulate the pressure on
the trigger switch to ensure the work piece is not damaged.
4. Use the tool intermittently, continuous operation can damage the
tool. Allow proper cooling time.
5. Tightening torque is affected by many factors:
a. Voltage – If the voltage decreases, the tightening torque
will decrease.
b. Socket – If the incorrect size of socket is used, it can damage
the socket and the bolt as well as reduce the ability to torque.
c. Bolt – Tightening torque will be different according to class,
length, and material.
d. Accessories – Use of accessories can reduce tightening force
to an extent.
6. Grip the tool and properly align the socket on the work piece to
ensure maximum torque.
REVERSE SWITCH OPERATION
1. Check the rotation direction before operating the tool.
2. The switch can only be reversed when the machine is completely
stopped. The tool could be damaged if the direction of the rotation
is changed before the machine stops.
3. For clockwise rotation, press the reversing switch as indicated by
the letter A in Figure 2. For counterclockwise rotation, press the
reversing switch as indicated by the letter B in Figure 2
(see Figure 2).
Fig.2

1/2 IN. DR ELECTRIC IMPACT WRENCH
10 For technical questions call 1-800-665-8685
V 3.03 8340507
MAINTENANCE
Before making any adjustments or changing any accessory, turn
off the tool and unplug it from its power source.
1. Check for damaged parts. Before using any tool, any part that
appears to be damaged should be carefully checked to determine
that it would operate properly and perform its intended functions.
Check for alignment and binding of moving parts, for broken parts
or mounting fixtures, or for any other condition that may affect
proper operation. Any part that is damaged should be repaired or
replaced by a qualified technician.
2. When servicing, use only identical replacement parts. Only use
accessories intended for use with this tool. Replace damaged
parts immediately.
3. Keep the tool clean. Wipe the tool with a clean cloth and
periodically blow out all areas with compressed air. If compressed
air is not available, use a brush to remove dust from all areas.
Do not use harsh chemicals or solvents to clean the tool. These
chemicals could seriously damage the plastic housing.
4. Regularly inspect all mountings and screws to ensure tightness.
Should any screws become loose, tighten immediately.
5. If repairs are required, bring your tool to an authorized
service center.
6. Keep the vent passage clear from dirt. Clean off the accumulated
dust and oil dirt periodically.
7. During normal operation, if anything unusual happens, the power
supply should be cut off at once and the tool should be checked
and repaired.
8. Clean the tool after each use.
REPLACING CARBON BRUSHES
CAUTION! The tool should be turned off and disconnected from the
power source before replacing the carbon brushes.
1. Loosen the carbon brush nut with a screwdriver by turning it
counterclockwise (see Figure 3).
2. Remove the carbon brush (see Figure 4).
3. Insert the new carbon brush into the housing and replace the
carbon brush nut (see Figure 5).
4. Replace the carbon brush nut and tighten it with a screwdriver by
turning it clockwise (see Figure 6).
Table of contents
Languages:
Other PROPOINT Impact Driver manuals

PROPOINT
PROPOINT 8972432 User manual

PROPOINT
PROPOINT 9058421 User manual

PROPOINT
PROPOINT 1" User manual

PROPOINT
PROPOINT 9067976 User manual

PROPOINT
PROPOINT 8327827 User manual

PROPOINT
PROPOINT 9082710 User manual

PROPOINT
PROPOINT 8306052 User manual

PROPOINT
PROPOINT 3/4 IN. User manual

PROPOINT
PROPOINT 9040643 User manual

PROPOINT
PROPOINT 8972440 User manual


