manuals.online logo
Brands
  1. Home
  2. •
  3. Brands
  4. •
  5. PS Audio
  6. •
  7. Amplifier
  8. •
  9. PS Audio Stellar Gold Quick start guide

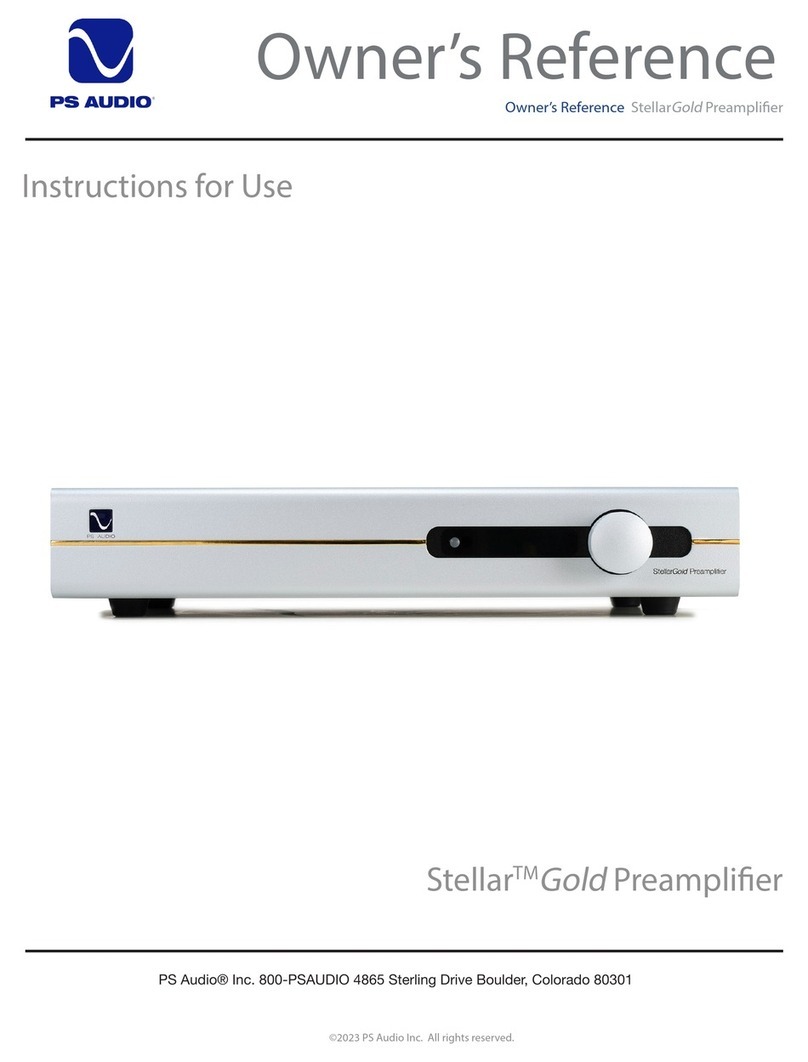
PS Audio Stellar Gold Quick start guide

Owner’s Reference
©2023 PS Audio Inc. All rights reserved.
Owner’s Reference Stellar
Gold
Preamplier
PS Audio® Inc. 800-PSAUDIO 4865 Sterling Drive Boulder, Colorado 80301
Instructions for Use
StellarTM
Gold
Preamplier
©2023 PS Audio Inc. All rights reserved.
Introduction
PS Audio® Inc. 800-PSAUDIO 4865 Sterling Drive Boulder, Colorado 80301
Owner’s Reference Stellar
Gold
Preamplier
ii
Read these instructions
Heed all warnings
Follow all instructions
WARNING. TO REDUCE THE RISK OF FIRE OR ELECTRICAL SHOCK, DO NOT EXPOSE THIS
APPARATUS TO RAIN OR MOISTURE.
Clean only with a dry cloth. For the Piano Finish Top refer to the instructions on page 8 of the
Quick Start Guide.
Do not place ammable material on top of or beneath the component.
All PS Audio components require adequate ventilation at all times during operation. Rack
mounting is acceptable where appropriate.
Do not remove or bypass the ground pin on the end of the AC cord unless absolutely necessary
to reduce hum from ground loops of connected equipment. This may cause RFI (radio frequency
interference) to be induced into your playback setup. Removing or bypassing the ground pin on
any electrical component is potentially dangerous and should be avoided for safety reasons. A
polarized plug has two blades, one wider than the other. A grounding type plug has two blades
and a third grounding prong. All PS products ship with a grounding type plug. If the provided
plug does not t into your outlet, consult an electrician for replacement of the obsolete outlet.
Protect the power cord from being walked on or pinched particularly at plugs, convenience
receptacles, and the point where they exit from the apparatus. Unplug this apparatus during
lightning storms or when unused for long periods of time.
When making connections to this or any other component, make sure all components are o. Turn
o all systems’ power before connecting the PS Audio component to any other component. Make
sure all cable terminations are of the highest quality.
THERE ARE NO USER-SERVICEABLE PARTS INSIDE ANY PS AUDIO PRODUCT. REFER ALL
SERVICING TO QUALIFIED SERVICE PERSONNEL
Please contact your authorized dealer, distributor, or PS Audio if you have any questions not
addressed in this reference manual.
This product is manufactured in the United States of America. PS Audio® is a registered trademark of PS Audio International Inc., and is
restricted for use by PS Audio International, Inc., its subsidiaries, and authorized agents.
Rev.5E
Safety Instructions
©2023 PS Audio Inc. All rights reserved.
Introduction
PS Audio® Inc. 800-PSAUDIO 4865 Sterling Drive Boulder, Colorado 80301
Owner’s Reference Stellar
Gold
Preamplier
iii
The PS Audio StellarGold Preamplier is an aordable state-of-the-art Preamp.
The StellarGold Preamplier features two hand crafted discrete audio amplication stages,
both enjoying extremely high slew rate, high bandwidth, low distortion signal handling
capabilities that honor the music.
Based on a combination of JFET and BJT devices along with hand-selected purist
components, the musical signal is delivered without the interference of capacitors in the
signal path. Each amplication stage is based on a minimal global feedback design that
achieves its low distortion status through careful balancing and high current design choices.
Its high current class A output stage is more than capable of driving long cable lengths
without compromise so that your power amplier enjoy all the benets StellarGold
Preamplier has to oer.
Nearly as important in this level of Preamp is its power supply. Here, StellarGold Preamp
enjoys the performance enhancement aorded by multiple two-stage linear power
regulators for both the analog and digital sections. Feeding these ultra low noise 2-stage
regulators is an oversized toroidal power transformer with separate windings for analog and
digital.
The PS Audio StellarGold Preamp represents a major step up in performance for any
music lover who cares about the sonic qualities aorded their systems. We believe this new
instrument will further our company's quest to bring audio excellence to the world and will
provide years of musical ecstasy.
Welcome
Table Of Contents
©2023 PS Audio Inc. All rights reserved.
PS Audio® Inc. 800-PSAUDIO 4865 Sterling Drive Boulder, Colorado 80301
Owner’s Reference Stellar
Gold
Preamplier
iv
Installation Considerations 1
Connecting StellarGold Preamp 2
Connecting the Output 3
Control and Operation 4
Front Panel Idle Button 4
Main display 4
Main Menu 5
Main Menu: Balance 5
Main Menu: Filter 6
Main Menu: Phase 6
Main Menu:Versions 6
Sub-Menu: Audio 7
Sub-Menu: System 8
Sub Menu: Network 8-9
Remote Control 10
Menu Flow Charts 11-13
USB not connecting 14
Warranty Information 15-16
Service Information 17
International Warranty & Service 17
Quick Start Guide
©2023 PS Audio Inc. All rights reserved.
PS Audio® Inc. 800-PSAUDIO 4865 Sterling Drive Boulder, Colorado 80301
Owner’s Reference Stellar
Gold
Preamplier
1
• ThefollowingitemsareincludedwiththeStellarGoldPreamplier:
• Power Cord
• Stellar Remote
• Quick Start Guide
• Carefully unpack the unit and place in the chosen location.
• Careshouldbetakentokeepitawayfrompowerampliersorlargepotentially
hum inducing products.
• The IR infrared receiver is located to the right of the menu button. A direct line
of sight will help with the Preamp's IR sensor when using the remote.
•Connect inputs to your analog sources using the appropriate connections.
• There are 4 analog inputs,which are accessible via the 2 balanced XLR inputs
and 2 single ended RCA connectors. Connect your sources to the appropriate
connection.
• Connectoutputstoyourpoweramplierusingtheappropriateconnections.The
Preamp features two output types: RCA and XLR.
• The RCA connector delivers a single ended output for compatible power
ampliers.
• The XLR connector delivers a balanced signal to compatible power
amplicationdevices.
• They can both be connected at the same time, allowing you to connect one to
apoweramplierandtheothertoasubwoofer(forexample).
• Please be advised that the XLR output has twice the output voltage as the
RCA output. Typically this results in 6dB louder sound through units connected
via the XLR input. Care should be taken to match levels accordingly.
•Connect the AC cable into the receptacle in back and plug the unit into your Power
Plant or into the wall.
• While the supplied cord is of good quality, it is recommended that you replace
it with a high-end power cord for optimum performance. It is also recommended
that you connect your new StellarGold Preamplier to one of PS Audio's award-
winning AC power products such as the P12, P15, or P20 Power Plants.
• Connectpowerampstotriggerports(thisisoptional).Therearetwotriggerports
on the rear panel. Each of the two trigger jacks outputs a +12V signal to connected
equipment when the Stellar
Gold
Preamplierfrontpanelstandbybuttonisactivated.
The+12VsignalwillstopwhenthePreamplierisinstandbymode.Thesetrigger
Unpacking and
Connections
Quick Start Guide
©2023 PS Audio Inc. All rights reserved.
PS Audio® Inc. 800-PSAUDIO 4865 Sterling Drive Boulder, Colorado 80301
Owner’s Reference Stellar
Gold
Preamplier
2
Register the Unit
outputsaretypicallyusedtoswitchon/ocompatiblepoweramplierswhenthe
Stellar
Gold
Preamplierisactive.
Onceeverythingisconnected,itsitimetopoweruptheStellarGoldPreamplier.Switchthe
master power switch, located on the rear panel of the unit, to on.
• We recommend the master power switch be left in the On position and AC
powercontinuetobesuppliedevenwhenthepreamplierisnotinuse.Instead,
pushthefrontPSLogobuttontoputthepreamplierinReadyorStandbymode
when not in use. This will keep the power on to critical circuitry.
Onceon,PSAudioashesacrossthedisplayandthenthemaindisplayappears.
• Themaindisplayshowsthevolume.Turningthevolumeknobchangesthevolume(1-
100).
• When you modify certain settings, such as the balance, the main display will indicate
thiswithanicon(seebelowimage).
• To change the input, do a quick press of the menu button. Then press it again to scroll
through the input options (RCA 1 or 2, XLR 1 or 2) until you land on the input you want.
Changes take eect immediately.
To enter the menu system, execute a long press of the menu button. To scroll through
menu items, do another quick press of the menu button. Use the volume knob to change
an item's value. Changes typically take eect immediately.
For more on operating the Preamp and navigating menus, see the Operating section of this
manual (pages 3-7).
To register your new unit, look on the back panel of Stellar
Gold
Preamp and note the serial
number. Using any web browser, go to www.psaudio.com, click on Support and select
Product Registration from the drop down menu. Once you have completed the registration
process, you can go to the PS website and look at the My Registered Products page. The
link to this page is located at the top right hand corner of the website once you are logged
in. If you do not have web access, you may register the unit via mail or phone. Notication
of software upgrades to this product will be available only to registered owners via the web
and email.
Power Up the Unit
Main Display
menu button
volume
current input
AC coupling
selected
balance >0
Menu
Operating Guide
©2023 PS Audio Inc. All rights reserved.
PS Audio® Inc. 800-PSAUDIO 4865 Sterling Drive Boulder, Colorado 80301
Owner’s Reference Stellar
Gold
Preamplier
3
The front panel PS logo button, located on the upper left hand corner of the unit, is the Ready/
Operational Mode control for Stellar
Gold
Preamp. This control has two modes: Ready Mode
and Operational Mode. Ready Mode (Idle) is designed to keep power on to critical internal
circuitry, including power supply capacitors, thermally sensitive semiconductors and integrated
circuits.
Press this front panel button to activate the Ready Mode or to place Stellar
Gold
Preamp in
Operational Mode. When pressed to activate the Ready Mode, the display as well as the
outputs are turned o, but all the unit’s critical internal circuitry remains active.
If you wish to conserve energy consumed by Stellar
Gold
Preamp, it will be necessary to
use the rear panel power switch. Using this rear panel switch will remove power from critical
components. In order to gain maximum performance levels, you will need to turn the power on
at least 1 hour before use.
Should the Preamp need to be rebooted, use the rear panel power switch to power cycle the
instrument. It's best to wait 30 seconds before powering back on.
The main display shows you the volume. Turning the volume knob right or left changes the
volume (0-100).
To select an input, execute a quick press of the menu button to the left of the display.
Continue pressing until you land on the input you want (RCA 1 or 2, XLR 1 or 2).
Alternatively, you can use the remote.
The Stellar
Gold
Preamp features a menu display
system that is accessible using the menu button.
To access the menu, execute a long press of the
menu button. A gear icon (see arrow) will appear in
the upper right corner showing that you are in the
Settings menu.
Once in the menus, a long press of the menu button (holding for more than two seconds)
will also exit the menus and return the unit to the Home screen. The menu screen will also
Reboot
Front Logo
Button
Menus
Main display
Select Input
Operating Guide
©2023 PS Audio Inc. All rights reserved.
PS Audio® Inc. 800-PSAUDIO 4865 Sterling Drive Boulder, Colorado 80301
Owner’s Reference Stellar
Gold
Preamplier
4
time out after 15 seconds of inactivity. Note that changes to settings are typically saved in
real time as the changes are made.
To scroll through menu items, press the menu button once in the menus. To change an
item's values, use the volume knob. The main menu has the below features.
• Balance
• Coupling
• Versions (informational only)
• Audio (sub-menu)
• System (sub-menu)
The Balance feature allows you to adjust the center location of the stereo image. Turn the
knob to the left to reduce the gain of the right channel, thus making the image come more
from the left channel, and turn the knob right to reduce the gain of the left channel, thus
making the image come more from the right
channel. The balance steps are each 1/4dB and
the range is 48 steps each way for a maximum
shift of 12dB.
When the balance is set to anything other than
the center position (0), there will be an icon on the Home screen to indicate this state (see
blue arrow).
Use the volume knob to choose either AC or DC coupling. When coupling is set to AC, a
sine wave icon will appear on the home screen (see green arrow).
This menu display shows the versions of the Stellar
Gold
Preamp's operating rmware. If
you need to contact our customer service team for help with your unit, please have this
information ready.
There are 2 sub-menus that can be accessed from the main menu. They are:
• Audio
• System
Click the menu button twice to enter a sub-menu. To click through sub-menu items, do a
quick press of the menu button. If you need to go back one level to the previous menu, do
two quick presses of the menu button.
The Audio sub-menu allows you to change the below:
• Input Names (sub-menu)
• Input Trim (sub-menu)
• DAC Input
• Phono Input
Main Menu
Coupling
Audio Sub-Menu
Balance
Versions
Sub-Menus
Operating Guide
©2023 PS Audio Inc. All rights reserved.
PS Audio® Inc. 800-PSAUDIO 4865 Sterling Drive Boulder, Colorado 80301
Owner’s Reference Stellar
Gold
Preamplier
5
• RCA 2 Fixed Vol
• Max Volume
Input Names (sub-menu)
This feature allows you to rename the inputs (XLR 1, XLR 2, RCA 1, RCA 2) using a preset
list with items like CD, DVD, Blu-ray, Phono, SACD, etc. This option has a sub-menu, so do
two quick presses of the menu button to enter it. To use this feature:
• Use the volume knob to scroll through the inputs until you land on the input you want to
rename. Press the menu button to select it.
• Use the volume knob to scroll through the list of names until you land on the name you
want. Press the menu button to select it.
• A pop up will appear to ask if you want to rename it. Click the menu button to choose
okay or use the volume knob to navigate to cancel rst if you change your mind.
• The input has now been renamed. Do a long press of the menu button to return to the
main display.
Input Trim (sub-menu)
This feature is helpful if one of your sources has a much higher or lower output than the
others. Input trim allows you to adjust the dB level on that input to better match the levels
of your other sources. This way when you switch between inputs the sound level will be
consistent. To use this feature:
• Use the volume knob to nd the input you would like to trim.
• Click the menu button once to select it.
• Use the volume knob to add or take away dBs (make it louder or quieter).
• Changes take eect immediately.
DAC Input
Use the volume knob on the Preamp to select which input on the Preamp your DAC is
attached to. Once selected, whenever the Preamp sees a valid DAC input IR code (when
you use your remote), the Preamp will automatically switch to this input. You can also select
"O" to disable this feature.
Phono Input
Use the volume knob on the Preamp to select which input on the Preamp your Phono is
attached to. Once selected, whenever the Preamp sees a valid Phono input IR code (when
you use your remote), the Preamp will automatically switch to this input. You can also select
"O" to disable this feature.
RCA 2 Fixed Volume
©2023 PS Audio Inc. All rights reserved.
PS Audio® Inc. 800-PSAUDIO 4865 Sterling Drive Boulder, Colorado 80301
Owner’s Reference Stellar
Gold
Preamplier
6
Operating Manual
Use the volume knob to set RCA 2 to a xed volume. Options are 1-100. To disable this
feature, scroll down to 0 or O.
Max Volume
Setting this value limits the maximum volume when using the up volume control. Use the
volume knob to set the max volume (1-100). Set to 100 to disable this feature. This value is
ignored if the Fixed Volume setting is enabled.
The System sub-menu allows you to change the below:
• Backlight
• Trigger
• IR Enable
• Factory Reset (sub-menu)
Backlight
The brightness of the display and logo button can be adjusted to suit your room. The range
is from 1 to 10, with 10 as the brightest.
Trigger Timeout
This feature allows the trigger output to be delayed a period of time after the Stellar
Gold
Preamp is activated. In other words, you can adjust the time it takes for any other units
plugged into the trigger output of the Stellar
Gold
Preamp to turn on once the Preamp is
powered up. The time delay can be adjusted in increments from 0 to 60 seconds.
IR Enable
There are 3 options - O, IR1, and IR2. If you experience interference with your other
devices and your Stellar
Gold
Preamp when using the remote, you can change this setting.
• O: This makes it so that no remote works with the Stellar
Gold
Preamp.
• IR1: This is the default setting. If you are not experiencing interference with your other
devices, leave this setting.
• IR2: This changes the remote to a dierent code set. If your remote is interfering with
other devices, for example, turning o your television, change to this setting.
Factory Reset
This feature allows you to reset all of the conguration settings back to what they were
when the Stellar
Gold
Preamp was shipped from the factory. Any input names and other
settings you have changed will be erased.
Do two quick presses of the menu button to start the factory reset. It will ask "Factory
System Sub-
Menu
Operating Guide
©2023 PS Audio Inc. All rights reserved.
PS Audio® Inc. 800-PSAUDIO 4865 Sterling Drive Boulder, Colorado 80301
Owner’s Reference Stellar
Gold
Preamplier
7
Reset System?" Use the volume
knob to select reset and then
press the menu button. After
a few seconds, your unit will
automatically restart with factory
settings restored.
Your Stellar
Gold
Preamp comes
with a full-function remote
control. In addition to operating
your Stellar
Gold
Preamp, this
remote works with all Stellar
products and most functions will
translate to the PerfectWave line.
Remote Code Settings:
Your Stellar
Gold
Preamp comes
with a default code set. If your
remote is interfering with other
devices, you can switch to the
second code set. To do so, press
the Light Bulb button (bottom of
the remote) and the circular O
button (top center of the remote)
at the same time. If the remote
backlight ashes green once, you
are on code set 1. If it ashes
green twice, you are on code set
2.
Button Guide
On: Takes the Preamp out of
Ready (Idle) mode and puts it in
Operational mode. In addition, it
undoes the Dim function.
O: Puts the Preamp in Ready
(idle) mode.
Dim: Dims the logo button and
turns o the screen and control
navigation backlight. Press On to
Remote
Reference
©2023 PS Audio Inc. All rights reserved.
Owner’s Reference Stellar
Gold
Preamplier
PS Audio® Inc. 800-PSAUDIO 4865 Sterling Drive Boulder, Colorado 80301
8
Physical:
Unit Weight 24.1 lbs or 10.9 kg
Unit Dimensions 17"W x 3.3"H x 13"D (with knob, without
knob 12"D)
[43.18 cm x 8.38 cm x 33.02 (with knob,
without 30.48 cm)]
Shipping Weight 27.6 lbs or 12.5 kg
Shipping Dimensions 22"W x 8"H x 17"D
[55.88 cm x 20.32 cm x 43.18 cm]
Power Requirements:
Input Power Model specic 100VAC, 120VAC, or
230VAC 50 or 60Hz
Power Consumption 20W
Connectors:
Audio Inputs RCA / Single-Ended: 2 pair
XLR / Balanced: 2 pair
Audio Outputs RCA / Single-Ended: 2 pair
XLR / Balanced: 2 pair
Trigger Output 2
USB For USB rmware update only
Performance:
Max Gain 12.6dB
Frequency Response 15Hz-150kHz, +/- 0.1dB
Input Impendance 50K Ohm RCA / Single-Ended
100K Ohm XLR / Balanced
Bandwidth 5Hz-500kHz, -3dB
Product
Specications
Reference
©2023 PS Audio Inc. All rights reserved.
Owner’s Reference Stellar
Gold
Preamplier
PS Audio® Inc. 800-PSAUDIO 4865 Sterling Drive Boulder, Colorado 80301
9
THD < .0002% @ 1kHz, 1VRMS input
THD+N < .0003% @ 1kHz, 1VRMS input
IMD .0005% @ 1VRMS input, CCIF, 20kHz
mean,1kHzdierence
Crosstalk -115dB, One channel driven
Output level 10VRMS Single-ended / 20VRMS Balanced
@ 1% THD+N
Reference
©2023 PS Audio Inc. All rights reserved.
Owner’s Reference Stellar
Gold
Preamplier
PS Audio® Inc. 800-PSAUDIO 4865 Sterling Drive Boulder, Colorado 80301
10
Navigating the Menus:
• To enter the menus, do a long
press of the menu button. A gear
icon will appear in the right corner
of the screen to show you are in
the menus. Do another long press
to leave the menus. Note: Menus
time out after 15 seconds of
inactivity.
• Scroll through menu and sub menu items using one press of the menu button. Use the
volume knob to change values for specic items.
• Unless otherwise specied, scrolling to your choice and leaving it on the screen updates
your settings.
• Menu items with sub-menus are indicated by a right arrow. Press the menu button
twice to enter them.
• Two quick presses of the menu button take you back one menu level. For example, if
you are in the Audio sub-menu and press the menu button twice, you will return to the
top level menu.
Note
: You do not enter the menus to change the input. Instead, do a quick press of the
menu button. Continue pressing until you land on the input you want (RCA 1 or 2, XLR 1 or
2). Alternatively, you can use the remote.
Top Level Menu
Press the menu button once to scroll through menu and sub-menu items. Use the
volume knob to change menu item values.
Balance • Turn knob left to reduce the gain of the right channel, thus
making the image come more from the left channel.
• Turn the knob right to reduce the gain of the left channel,
thus making the image come more from the right channel.
Coupling Turn knob to select AC or DC coupling.
Versions
(Informational Only)
Turn knob to scroll through the operating rmware versions.
Audio (Sub-Menu) Hit menu button twice to access the below settings:
• Input names
• Input Trim
• DAC Input
• Phono Input
• RCA2 Fixed Volume
• Max Volume
Menu Charts
Top Level
Menu
Menu Button Volume Knob
Indicates Sub-Menu Item
In Menu Icon
Reference
©2023 PS Audio Inc. All rights reserved.
Owner’s Reference Stellar
Gold
Preamplier
PS Audio® Inc. 800-PSAUDIO 4865 Sterling Drive Boulder, Colorado 80301
11
System (Sub-Menu) Hit menu button twice to enter this sub-menu and access the
below settings:
• Backlight
• Trigger Timeout
• IR Enable
• Factory Reset
Audio Sub-Menu
From the main menu, nd Audio then press the menu button twice to enter the Audio
sub-menu. Hit the menu button once to scroll through the sub-menu options.
Input Names
(Sub-Menu)
• Hit the menu button twice to enter Input Names.
• Use volume knob to scroll through inputs and highlight the input
you want to change.
• Once the name is highlighted, hit the menu button once.
• Use the volume knob to scroll through the naming options.
• Once the name you want is highlighted, hit the menu button once
to select it.
• A pop up will appear and ask "Rename....?" Hit the menu button
to select OK or use the volume knob to highlight Cancel rst if you
change your mind.
Input Trim • Use the volume knob to highlight the input you would like to trim.
• Hit the menu button once to select it.
• Turn the volume knob right to add dBs and left to lower dBs.
DAC Input Use the volume knob to nd the input your DAC is attached to. Now
when you hit buttons relating to the DAC on your remote, the Preamp
will automatically switch to that input.
Phono Input Use the volume knob to nd the input your Phono is attached to. Now
when you hit buttons relating to the Phono on your remote, the Preamp
will automatically switch to that input.
RCA2 Fixed
Volume
Use the volume knob to select a xed volume (1-100) for RCA2. To
disable this feature, scroll to 0 or o.
Max Volume Use the volume knob to select a max volume (1-100). If undesired,
select 100 to disable.
Audio
Sub-Menu
Top Level
Menu
Continued
Reference
©2023 PS Audio Inc. All rights reserved.
Owner’s Reference Stellar
Gold
Preamplier
PS Audio® Inc. 800-PSAUDIO 4865 Sterling Drive Boulder, Colorado 80301
12
System Sub-Menu
From the main menu, nd System then press the menu button twice to enter the System
sub-menu. Hit the menu button once to scroll through the sub-menu options.
Backlight Use the volume knob to select a brightness setting for the
display and logo button. Options are 1-10, where 10 is the
brightest.
Trigger Timeout
(delay output to other
devices for short period
after StellarGold Preamp
activated)
Use the volume knob to select 0 seconds to 1 minute for
trigger timeout. Select o to disable.
IR Enable Use the volume knob to select O (no remote works), IR1
(default) or IR2 (if remote is interfering with other devices).
Factory Reset • Hit the menu button twice to select factory reset.
• A pop up will appear and ask "Factory Reset System?"
To continue with the reset, use the volume knob to
highlight Reset and press the menu button. If you
changed your mind, leave Exit highlighted and hit the
menu button.
• After hitting the menu button, there will be a about a 5
second dealy and then your Preamp will automatically
switch o and then back on.
System
Sub-Menu
Warranty
©2023 PS Audio Inc. All rights reserved.
PS Audio® Inc. 800-PSAUDIO 4865 Sterling Drive Boulder, Colorado 80301
Owner’s Reference Stellar
Gold
Preamplier
13
Product registration
By registering your product, you are validating the start date of your limited
warranty.Thislimitedwarrantyisineectfor3yearsfromthedatetheunitwas
rstpurchasedfrom PS Audio or its dealers and agents. If you do not register
your product within 30 days of service, a copy of your purchase receipt from an
authorized PS Audio dealer may be used as proof of purchase to establish the
warranty start date. If no proof of purchase from an authorized PS audio dealer
or registration is provided, the production date of the product will be used to
determine the warranty start date. You can register your product online, by phone,
by mail, or by email.
What this warranty covers
This warranty covers defects in material and workmanship for products purchased
from PS Audio or its authorized dealers and agents. In the event your product
fails, your sole remedy under this limited warranty shall be to return the product
to PS Audio or an authorized PS Audio repair center. At the option of PS Audio,
the product will be repaired without charge for parts or labor, replaced, or the
purchase price refunded through the original point of purchase.
Shipping
You are responsible to pay for the safe and proper shipment of the warrantied
product to PS Audio or its authorized repair center. Under this limited warranty,
PS Audio or its authorized repair center will pay the cost of returning the repaired
or replacement product to you.
What this warranty does not cover
This warranty does not cover damage due to:
• Accidents, carelessness, improper transportation, misuse, neglect, or abuse
• Failure to follow the operating instructions that are provided by PS Audio in
theOwner’sReferenceManual(availablefordownloadatwww.psaudio.com)
• Use in any manner inconsistent with PS Audio’s operating instructions
(availablefordownloadatwww.psaudio.com)
• Lack of routine maintenance
• Connection to an improper voltage supply
• Alterationsormodicationstotheunit
• Improper or unauthorized repair, including repairs not authorized by PS Audio
or a PS Audio authorized repair center
Registering
Coverage
Shipping
Not Covered
Warranty
©2023 PS Audio Inc. All rights reserved.
PS Audio® Inc. 800-PSAUDIO 4865 Sterling Drive Boulder, Colorado 80301
Owner’s Reference Stellar
Gold
Preamplier
14
• Fire,lightning,ood,“ActsofGod,”orothercontingenciesbeyondthecontrol
of PS Audio
• Productspurchasedthroughanunauthorizedsource(ifyouhavequestionsas
to whether or not a dealer is authorized, please contact customer support at
www.psaudio.com
• Products with a factory-applied serial number that has in any way been altered,
defaced, or removed
Limitations under this warranty
InnoeventwillPSAudio’sliabilitytoyouexceedtheoriginalpurchasepriceof
your unit. This warranty does not cover the cost of custom installation, customer
instruction, setup adjustments, or signal reception problems. Consequential and
incidental damages are not covered under this warranty. However, some states
donotallowtheexclusionorlimitationofincidentalorconsequentialdamages,so
thislimitationorexclusionmaynotapplytoyou.Intheeventthatyourwarrantied
product cannot be repaired, PS Audio will either replace or refund the cost of the
unit. We reserve the right to replace any out-of-stock, discontinued, or limited
edition products with a comparable product. Discontinued products may not be
available for warranty
Warranty transfer
Thiswarrantyisforthebenetoftheoriginalpurchaseroftheproduct.Thewarranty
may be transferred to a subsequent purchaser during the 3 year warranty period.
To do this, you must contact PS Audio directly to set up a transfer of warranty
registration.
Warranty Transfer
Limitations
Service
©2023 PS Audio Inc. All rights reserved.
PS Audio® Inc. 800-PSAUDIO 4865 Sterling Drive Boulder, Colorado 80301
Owner’s Reference Stellar
Gold
Preamplier
15
If you require
service in North
America
Obtain an RMA
number
State law
Use original
packing
If you are
outside the US
Warranty Service within North America
Please contact PS Audio customer support for service assistance, help with
locating an authorized PS Audio repair center, help with the operation of a product,
or for more information.
Obtaining an RMA#
Inordertoreceivewarrantyservice,youmustrstobtainaReturnMerchandise
AuthorizationNumber(RMA#)priortoreturninganyitem.PleasecontactPSAudio
oranauthorizedPSAudiorepaircentertoreceiveanRMA#.TheRMA#mustbe
on all returned items. If it is not clearly marked, PS Audio will return the package
back to you, freight collect.
Packaging and Shipping
Original packaging should be used for the safe transit of your PS Audio unit to
the repair center. If you do not have the original packaging, PS Audio can sell and
ship replacement packaging to you. You are responsible for the cost of shipping
the product to a PS Audio authorized repair center. You should insure the product
for its full retail cost, in the event it gets lost or damaged in transit. PS Audio is
not responsible for damage incurred during the transit of products sent to us.
Shipping your product in non-PS Audio packaging may void this warranty. PS
Audio reserves the right to charge you for new factory packaging to return your
product after a repair.
State Law
Thiswarrantygivesyouspeciclegalrights.Youmayalsohaveotherrights,which
vary from state to state.
International Warranty Service
PS Audio has authorized distribution in many countries of the world. In each
country, the authorized importing distributor has accepted the responsibility for
warranty of the products sold by that distributor. Warranty service should be
obtained where the product was purchased.
Changes to Our Products
PS Audio reserves the right to modify the design of any product without obligation
to purchasers of previously manufactured products, and to change the prices or
specicationsofanyproductswithoutnoticeorobligationtoanyperson.
Thanks for being a part
of the PS Audio Family
At PS Audio, we’re family.
Not just a family that runs in bloodlines, but in frequencies.
Because while we may not all share the same genes here, we are all related by
a passion, nay, obsession with listening to the music we love at the highest,
most breathtaking quality possible.
And in our minds, that makes us kin.
In fact, we believe that every nutty, hertz counting audiophile out there is part
of our tribe.
That’s how we’ve built our company over the last 50 years - with the kind of
care and respect that you give to your family.

Other manuals for Stellar Gold

3

Other PS Audio Amplifier manuals

PS Audio PCA-2 User manual

PS Audio

PS Audio PCA-2 User manual

PS Audio Stellar M1200 Quick start guide

PS Audio

PS Audio Stellar M1200 Quick start guide

PS Audio Stellar M700 Quick start guide

PS Audio

PS Audio Stellar M700 Quick start guide

PS Audio GCC-500 User manual

PS Audio

PS Audio GCC-500 User manual

PS Audio GCA-MC Quick start guide

PS Audio

PS Audio GCA-MC Quick start guide

PS Audio Stellar Quick start guide

PS Audio

PS Audio Stellar Quick start guide

PS Audio Stellar Gold Quick start guide

PS Audio

PS Audio Stellar Gold Quick start guide

PS Audio BHK Signature Preamplifier User manual

PS Audio

PS Audio BHK Signature Preamplifier User manual

PS Audio BHK Signature 250 Quick start guide

PS Audio

PS Audio BHK Signature 250 Quick start guide

PS Audio Stellar S300 User manual

PS Audio

PS Audio Stellar S300 User manual

PS Audio NuWave DSD User manual

PS Audio

PS Audio NuWave DSD User manual

PS Audio PCA-2 User manual

PS Audio

PS Audio PCA-2 User manual

PS Audio BHK Signature 250 Quick start guide

PS Audio

PS Audio BHK Signature 250 Quick start guide

PS Audio GCA Power Amplifier Series Quick start guide

PS Audio

PS Audio GCA Power Amplifier Series Quick start guide

PS Audio Sprout User manual

PS Audio

PS Audio Sprout User manual

PS Audio Classis 250 User manual

PS Audio

PS Audio Classis 250 User manual

PS Audio GCC Power Amplifi er Series Quick start guide

PS Audio

PS Audio GCC Power Amplifi er Series Quick start guide

PS Audio GCP Stereo Quick start guide

PS Audio

PS Audio GCP Stereo Quick start guide

PS Audio PERFECTWAVE BHK M600 User manual

PS Audio

PS Audio PERFECTWAVE BHK M600 User manual

PS Audio Sprout100 Quick start guide

PS Audio

PS Audio Sprout100 Quick start guide

PS Audio HCA-2 User manual

PS Audio

PS Audio HCA-2 User manual

PS Audio C-100 User manual

PS Audio

PS Audio C-100 User manual

PS Audio Classic 250 User manual

PS Audio

PS Audio Classic 250 User manual

PS Audio Stellar Strata Quick start guide

PS Audio

PS Audio Stellar Strata Quick start guide

Popular Amplifier manuals by other brands

Hill Audio IMA-400 V2 user manual

Hill Audio

Hill Audio IMA-400 V2 user manual

Renegade RXA1500 user manual

Renegade

Renegade RXA1500 user manual

ITC TI-1206S Operation manual

ITC

ITC TI-1206S Operation manual

Kenwood KA-995 instruction manual

Kenwood

Kenwood KA-995 instruction manual

ECdesigns PowerDAC-RX user guide

ECdesigns

ECdesigns PowerDAC-RX user guide

Channel Vision CVT-2/8WB instructions

Channel Vision

Channel Vision CVT-2/8WB instructions

Studiomaster QX Series owner's manual

Studiomaster

Studiomaster QX Series owner's manual

Art TUBEOPTO 8 user guide

Art

Art TUBEOPTO 8 user guide

Perreaux SM5 Specifications

Perreaux

Perreaux SM5 Specifications

Millennia LOC Analog Legacy owner's manual

Millennia

Millennia LOC Analog Legacy owner's manual

Audio Research SP4 user manual

Audio Research

Audio Research SP4 user manual

Televes OVERLIGHT 2x user manual

Televes

Televes OVERLIGHT 2x user manual

Univox TV-200 installation guide

Univox

Univox TV-200 installation guide

Opal Audio PLX3.0 user manual

Opal Audio

Opal Audio PLX3.0 user manual

DTC Audio TRamp-USD user manual

DTC Audio

DTC Audio TRamp-USD user manual

Bryston BR-20 Firmware update instructions

Bryston

Bryston BR-20 Firmware update instructions

JAMO JDA-500 owner's manual

JAMO

JAMO JDA-500 owner's manual

DR. Z Amplification Signature Series manual

DR. Z Amplification

DR. Z Amplification Signature Series manual

manuals.online logo
manuals.online logoBrands
  • About & Mission
  • Contact us
  • Privacy Policy
  • Terms and Conditions

Copyright 2025 Manuals.Online. All Rights Reserved.