PSK KXONE User manual

USER´S MANUAL
MANUAL DE USUARIO

IMPORTANT SAFETY INSTRUCTIONS
CAUTION:
To reduce the risk of electric shock, do not remove the top cover (or the rear section).
No user serviceable parts inside; refer servicing to qualied personnel.
WARNING:
To reduce the risk of re or electric shock, do not expose this appliance to rain and
moisture. The apparatus shall not be exposed to dripping or splashing and no objects
lled with liquids, such as vases, shall be placed on the apparatus.
This symbol, wherever it appears, alerts you to the presence of uninsulated dangerous
voltage inside the enclosure-voltage that may be sucient to constitute a risk of shock.
This symbol, wherever it appears, alerts you to important operation and maintenance
instructions in the accompanying literature. Please read the manual.
DETAILED SAFETY INSTRUCTIONS:
1) Read and Keep these instructions
2) Heed all warnings
3) Follow all instructions
4) Do not use this apparatus near water
5) Clean only with dry cloth
6) Do not block any ventilation openings
7) Do not install near any heat sources such as radiators, heat registers, stoves, or other apparatus
(including ampliers) that produce heat.
8) Do not defeat the safety purpose of the polarized or grounding-type plug.
A polarized plug has two blades with one wider than the other. A grounding type plug has
two blades and a third grounding prong. The wide blade or the third prong are provided
for your safety. If the provided plug does not t into your outlet, consult an electrician
for replacement of the obsolete outlet.
9) Protect the power cord from being walked on or pinched especially near the plugs,
convenience receptacles, and the point where they exit from the apparatus.
10) Only use attachments/accessories specied by the manufacturer.
11) Unplug this apparatus during lightning storms or when unused for long periods time.
12) Refer all servicing to qualied service personnel. Servicing is required when the apparatus has
been damaged in any way, such as power supply cord or plug is damaged, liquid has been spilled
or objects have fallen into the apparatus, the apparatus has been exposed to rain or moisture, does
not operate normally, or has been dropped.
ENGLISH

CAUTION:
We would like to point out that high volumes can permanently damage your sense of
hearing and/or your headphone or speaker systems. Therefore, please turn the
MAIN control in the MIC/MAIN section all the way to the left before turning on the mixer.
And please exercise caution and common sense when setting volume levels.
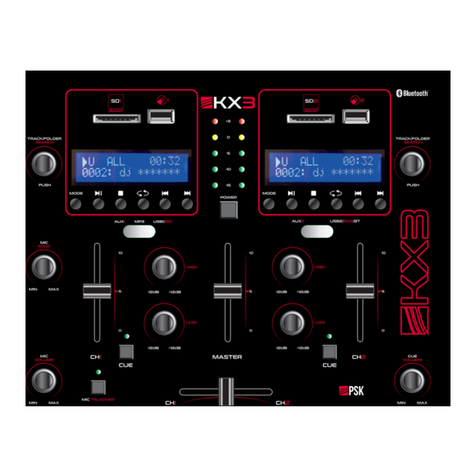
FRONT PANEL:
1.- Microphone Balance. control two MIC level balance or close one MIC input.
2.- Microphone LEVEL control adjusts the volume of the microphone signal.
3.- Channel 1 fader adjusts the nal channel volume.
4.- PHONO/LINE switch
5.- Channel 2 fader adjusts the nal channel volume.
6.- PHONO/LINE switch
7.- Channel USB fader adjusts the nal channel volume.
8.- Mono/Stereo output switch.
9.- Output Meter: Indicate the levels of Left and Right Master channels.
10.- The POWER ON switch turns on the MP3 MIXER
11.- Power supply LED.
12.- USB port.
13.- Next.
14.- Previous
15.- Play and Pause.
16.- To choose play USB or bluetooth source
17.- LEVEL control determines the volume of the headphones signal.
18.- CROSSFADER is used to fade between channels 1 and 2.
19.- Microphone talkover
1
2
3
4 6 8 10
11
9
12
17 16
19 15 14 13
18
5 7
ENGLISH

REAR PANEL:
20.- Power supply: Only use the power adapter provided with the unit to power the unit. When
connecting and disconnecting the power cord, be sure the power of the unit is o. Connect the
cord to the rear of the unit and then connect it to the outlet.
21.- Use the AMP output to connect the unit to an amplier.
22.- Antenna
23.- PHONO inputs for channel 2 and are only for turntable connection. The LINE inputs may be
used for connecting tape decks, CD or MD players etc.
24.- PHONO inputs for channel 1 and are only for turntable connection. The LINE inputs may be
used for connecting tape decks, CD or MD players etc.
25.- MIC1 MIC2 INPUT connector is a balanced 1/4”TRS socket for microphone connection.
26.- GND connection allows grounding of a turntable.
SIDE PANEL:
27.- Headphones
BUTTON CONTROLS AND FUNCTIONS
1. MODE BUTTON
This button lets you toggle a working mode, USB play mode, Bluetooth mode. This lets you choose
which music source device will play. The LEDS will verify which mode is activated.
2. PLAY BUTTON
This button has four functions depending on these dierent modes as below.
A.- USB Play Mode/Play
Each press of the PLAY BUTTON causes the operation to change from play to pause or from
pause to play.
B.- Bluetooth mode/Play
Each press of the PLAY BUTTON causes the operation to change from play to pause or from
pause to play.
20
27
21 23 24 25
26
22
MODE LED1 LED2
USB play mode ON OFF
Bluetooth mode Sets search FLASH OFF
Connecting ON ON
ENGLISH

3. PREV BUTTON - This button has seven functions depending on these dierent modes as
below.
(a) USB Play Mode---PREV and FB
Use this button to select previous track.
The unit will fast backward play if press and holding the button for more than 3 seconds.
(b) Bluetooth Mode----PREV and Volume down
Use this button to select previous track.
The volume of Bluetooth will turn down if press and holding the button for more than 3
seconds.
4. NEXT BUTTON - This button has six functions depending on these dierent modes as below.
(a) USB Play Mode---NEXT and FF
Use this button to select next track.
The unit will fast forward play if press and holding the button for more than 3 seconds.
(b) Bluetooth Mode----PREV and Volume down
Use this button to select previous track.
The volume of Bluetooth will turn up if press and holding the button for more than 3 seconds.
Additional Notes and Warnings
1.- The unit will auto play when USB is inserted into the device (include mp3 les) in
USB mode.
2.- The unit will not auto play when connected to Bluetooth device in Bluetooth mode,
you will need to press play button.
ENGLISH

INSTRUCCIONES DE SEGURIDAD IMPORTANTES
PRECAUCIONES:
Para reducir el riesgo de descarga eléctrica, no quite la tapa (o la parte posterior).
Solicite servicio de personal cualicado si es necesario.
ADVERTENCIA:
Para reducir el riesgo de incendio o descarga eléctrica, no exponga este aparato a lluvia
o humedad.
INSTRUCCIONES DETALLADAS DE SEGURIDAD:
1) Lea y guarde estas instrucciones
2) Tenga en cuenta todas las advertencias
3) Siga todas las instrucciones
4) No utilice este aparato cerca del agua
5) Limpie sólo con un paño seco
6) No bloquee las aberturas de ventilación
7) No instale cerca de fuentes de calor, como radiadores, calentadores, estufas u otros aparatos
(incluyendo amplicadores) que produzcan calor.
8) No anule la toma de tierra.
9) Tenga especial cuidado con el cable de alimentación.
10) Utilice solamente los accesorios especicados por el fabricante.
11) Desenchufe el aparato durante las tormentas eléctricas o cuando no lo utilice durante
un período largo de tiempo.
12) Cualquier reparación debe ser llevada a cabo por personal cualicado.
ESPAÑOL

PRECAUCIONES:
Altos volúmenes pueden dañar permanentemente la audición. Por favor ponga al
mínimo la ganancia del micrófono antes de encender la mesa de mezclas.
PANEL FRONTAL:
1.- Balance de micros 1 y 2.
2.- Control de volumen de micrófonos.
3.- Ajuste de volumen del canal 1.
4.- PHONO / LINE en Canal 1.
5.- Ajuste de volumen del canal 2.
6.- PHONO / LINE en Canal 2.
7.- Ajuste de volumen en canal USB.
8.- MONO / ESTEREO en salida.
9.- Niveles de salida de los canales.
10.- Interruptor de encendido.
11.- Led de encendido.
12.- Puerto USB.
13.- Siguiente.
14.- Anterior.
15.- Reproducción y Pausa.
16.- Modo USB o modo Bluetooth
17.- Ajuste de volumen de Auriculares.
18.- Crossfader canales 1 y 2.
19.- Talkover de micrófono
1
2
3
4 6 8 10
11
9
12
17 16
19 15 14 13
18
5 7
ESPAÑOL

PANEL TRASERO:
20.- Entrada de corriente para alimentar la unidad.
21.- Use esta salida para conectar la unidad a un amplicador.
22.- Antena
23.- Entrada para el canal 2.
24.- Entradas para el canal 1.
25.- Entrada para Micros (1/4 " balanceada).
26.- Conexión a tierra GND.
PANEL FRONTAL INFERIOR:
27.- Toma de Auriculares.
BOTONES DE CONTROL Y FUNCIONES
1. MODE
Este botón le permite seleccionar entre el modo de reproducción USB y el modo Bluetooth.
Esto le permite elegir la fuente de música. Los LED vericar qué modo se ha activado.
2. PLAY/PAUSE
A.- Modo USB / Play y Pausa
B.- Modo Bluetooth / Play y Pausa
3. PREV
A.- Modo USB / Pista anterior y Retroceso rápido
Selecciona la pista anterior.
Retroceso rápido si mantiene presionado el botón durante más de 3 segundos.
B.- Modo Bluetooth / Pista anterior y Bajar Volumen
Selecciona la pista anterior.
Baja el volumen en el modo Bluetooth si mantiene presionado el botón durante más de 3 segundos.
20
27
21 23 24 25
26
22
MODE LED1 LED2
MODO USB ON OFF
Modo Bluetooth Buscando FLASH OFF
Conectando ON ON
ESPAÑOL

4. NEXT
A.- Modo USB / Pista siguiente y Avance rápido
Selecciona la pista siguiente.
Avance rápido si mantiene presionado el botón durante más de 3 segundos.
B.- Modo Bluetooth / Pista siguiente y Subir volumen
Selecciona la pista siguiente.
Sube el volumen en el modo Bluetooth si mantiene presionado el botón durante más de 3 segundos.
Notas y Advertencias adicionales
1.- Reproducción automática cuando se inserta el dispositivo USB en el modo USB.
2.- En el modo Bluetooth no hay reproducción automática cuando se inserta el dispositivo USB, tendrá que
pulsar el botón de reproducción.
ESPAÑOL

Table of contents
Languages:
Other PSK Dj Equipment manuals
Popular Dj Equipment manuals by other brands

Light Emotion
Light Emotion COB150RGBW User instruction manual

Lightmaxx
Lightmaxx Vector Silent PAR ARC user manual

Great Stage Light
Great Stage Light GLM015 user manual
Event Lighting
Event Lighting SToRM user manual

Harman
Harman Martin ERA 800 Performance Safety and installation manual
American Audio
American Audio PSX User guide and reference manual

