PSK KX3 User manual
USER´S MANUAL
MANUAL DE USUARIO

IMPORTANT SAFETY INSTRUCTIONS
CAUTION:
To reduce the risk of electric shock, do not remove the top cover (or the rear section).
No user serviceable parts inside; refer servicing to qualied personnel.
WARNING:
To reduce the risk of re or electric shock, do not expose this appliance to rain and
moisture. The apparatus shall not be exposed to dripping or splashing and no objects
lled with liquids, such as vases, shall be placed on the apparatus.
This symbol, wherever it appears, alerts you to the presence of uninsulated dangerous
voltage inside the enclosure-voltage that may be sucient to constitute a risk of shock.
This symbol, wherever it appears, alerts you to important operation and maintenance
instructions in the accompanying literature. Please read the manual.
DETAILED SAFETY INSTRUCTIONS:
1) Read and Keep these instructions
2) Heed all warnings
3) Follow all instructions
4) Do not use this apparatus near water
5) Clean only with dry cloth
6) Do not block any ventilation openings
7) Do not install near any heat sources such as radiators, heat registers, stoves, or other apparatus
(including ampliers) that produce heat.
8) Do not defeat the safety purpose of the polarized or grounding-type plug.
A polarized plug has two blades with one wider than the other. A grounding type plug has
two blades and a third grounding prong. The wide blade or the third prong are provided
for your safety. If the provided plug does not t into your outlet, consult an electrician
for replacement of the obsolete outlet.
9) Protect the power cord from being walked on or pinched especially near the plugs,
convenience receptacles, and the point where they exit from the apparatus.
10) Only use attachments/accessories specied by the manufacturer.
11) Unplug this apparatus during lightning storms or when unused for long periods time.
12) Refer all servicing to qualied service personnel. Servicing is required when the apparatus has
been damaged in any way, such as power supply cord or plug is damaged, liquid has been spilled
or objects have fallen into the apparatus, the apparatus has been exposed to rain or moisture, does
not operate normally, or has been dropped.
ENGLISH
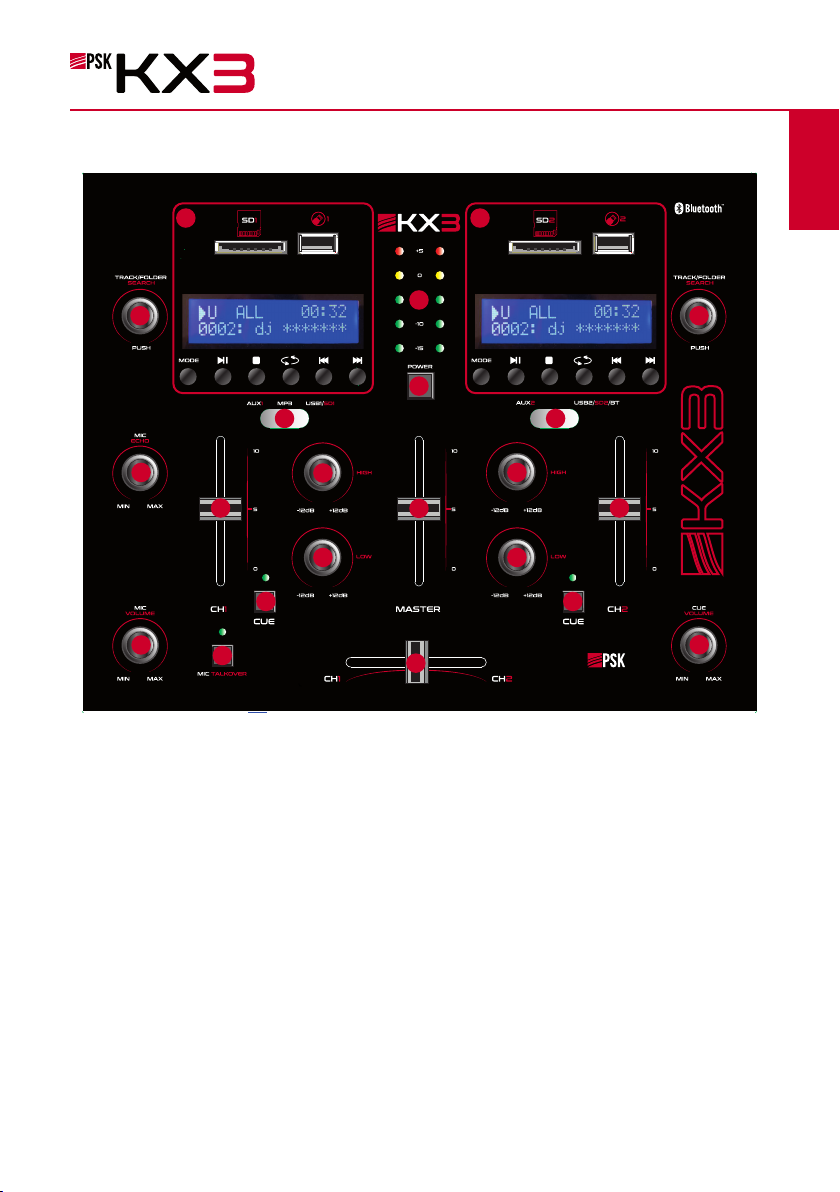
FRONT PANEL:
1.- USB/SD CARD/Bluetooth control console
There are two USB / SD Card Control Consoles, Channel 1 and Channel 2. After inserting a USB
ash drive / SD Card into the input terminal press the mode button to choose between audio
from the USB or SD Card input or Bluetooth. If you want to use the bluetooth in USB 2,you can
press the MODE button under the ID3 screen and enter into BLUETOOTH mode.
The screen shows“BLUETOOTH CONNECTED” when it paired. Bluetooth function is available
on USB 2 only. Use the other controls, play/pause, stop, repeat (Current track / All tracks),
previous track & next track to play audio from the USB ash drive / SD Card.
2 2
1 1
5
6
14 15
16
1010
9
12
4
3
8
7 13
8
9
1111
ENGLISH

USB/SD CARD/BLUETOOTH CONTROL CONSOLE
(1) Search mode: When the word FOLDER is ashing on the screen, the unit is in FOLDER SEARCHING mode.
Turn the FOLDER/TRACK knob to search through the folder. Press the FOLDER / TRACK knob to choose a
track.
Upon exiting the folder mode, the word ALL will appear on the screen. This indicates that the unit will play all
the tracks from the USB ash drive / SD Card.
When the REPEAT button is pressed, there will be 6 dierent displays depending on the setting you choose;
ALL / NORMAL / SINGLE / FOLDER / RANDOM / BROWSE.
(2) Input Source: The display will show U when set to USB mode and S when set to SD card mode. Press the mode
button to switch from one input to the other.
(3) Track Number: The track number (for all tracks on the entire ash drive) will appear here. In the picture above
the unit is playing track number 1.
(4) Track or Folder Information: The name of the folder will appear here. In the picture above the folder being
played is named MUSIC.
(5) Elapsed Time: The elapsed time of the current track will display here.
2.- TRACK/FOLDER searching
Turn this knob clockwise to search through all of the tracks inside the USB ash drive / SD Card. Each track will
appear by the name of the track. It will show the tracks or folders chronologically (from when the les were
loaded onto the USB ash drive / SD Card. Press the knob to begin playing the desired track.
First the tracks on the root le will be displayed and then the tracks that are in folders.
Press this knob to activate the folder searching function. Once pressed the word “ FOLDER”will begin ashing on
the display screen. Then, turn this knob clockwise to search the folders inside the USB ash drive / SD Card. Press
the knob to begin playing the tracks from that folder.
3.- Level Meter: The VU-meter (with LED indicators) will display the strength of the output signal.
4.- Power Button: Press this button to power the unit on and o.
5.- Microphone Echo Volume Control: Turn this knob to adjust the microphone echo volume level.
6.- Microphone Volume Control: Turn this knob to adjust the volume of microphone
7.- Channel 1 Input Selector: Use the selector to choose the desired inputs source. Channel 1 has
three dierent input sources, AUX1 (Red and White RCA inputs on the rear of the unit),
MP3 (1/8” input on the rear of the unit) and USB1 & SD1 (USB ash drive / SD Card inputs
for Channel 1).
8.- Treble Control: Turn this knob to adjust the high frequencies of Channel 1& Channel 2.
ENGLISH

9.- Bass Control: Turn this knob to adjust the low frequencies of Channel 1 & Channel 2.
10.- Cue Selector: Press this button to monitor the audio via the headphone connector.
11.- Channel Fader: Move the fader up and down to adjust the volume of each channel.
12.- Master Volume Fader- Move the fader up and down to adjust the master volume.
13.- Channel 2 Input Selector: Use the selector to choose the desired inputs source.
Channel 2 has two dierent input sources, AUX2 (Red and White RCA inputs on the rear of the unit)
and USB2 / SD2 (USB ash drive / SD Card inputs for Channel 2) & Bluetooth. To switch between
USB, SD and Bluetooth press the mode button on the CH 2 control console.
14.- Microphone Talkover: When this button is pressed, all signal sources except the microphone
will be reduced to 20dB. The Microphone Talkover is ideal for making announcements without
stopping the music.
15.- CH1 / CH2 Crossfader: Slide the crossfader to determine the balance between Channel 1 and
Channel 2. To only play the audio from Channel 1 push the crossfader slider all the way to the left.
To only play the audio from Channel 2 push the crossfader all the way to the right. To have an
even balance of audio from Channel 1 and Channel 2 set the crossfader to the center position.
16.- Headphones Volume Control Knob: Turn this knob to set the volume of the headphone output.
17.- Power Supply: Connect the DC12V adaptor here
18.- RCA Audio Output Terminals: Connect this output to the input on your equalizer, preamplier
or amplier.
19.- RCA Audio Input Terminals for AUX2: Connect the audio output from your signal source
(DVD player, MP3 player, etc.) to this audio input for Channel 2.
20.- RCA Audio Input Terminals for AUX1: Connect the audio output from your signal source
(DVD player, MP3 player, etc.) to this audio input for Channel 1.
21.- 1/8” (MP3) Input Terminal: Connect the audio output from a MP3 player/ computer to this
audio input for Channel 1.
22.- ¼” Microphone Input: Connect the microphone to this input terminal.
23.- Headphone Input: connect the headphone to this output terminal.
24.- Grounding Connector
ENGLISH

Input / Output Connections
Connecting Audio Source(s) to the KX3 Mixer
Channel 1 has RCA, 1/8”, USB and SD Card inputs.
Channel 2 has RCA, USB, SD Card & Bluetooth inputs.
USB & SD Card Inputs
There are input jacks for a USB ash drive or SD card on the top panel of the KX3 allowing you
enjoy your music in just a matter of seconds. The USB ash drive & SD Card should
not be larger than 32GB. The KX3 will only play .mp3 and .wma les from the USB ash
drive or SD Card storage devices. Do not attempt to play any other le types as this will cause
the unit to cease playback.
AUX & MP3 Input (RCA& 1/8”)
The AUX IN can be used to connect a MP3 player using the 1/8” input on the top panel or a
stereo signal device such as a CD / DVD player using the RCA inputs (on Channel 1) on the
rear panel. After connecting your device to the AUX IN, set the Channel 1 input selector to AUX.
You can adjust the volume using the Channel 1 volume control & the master volume control.
Bluetooth Input (1/8” & RCA)
The Bluetooth input will allow you to connect a Bluetooth compatible device to channel 2 of
the KX3. First set the Channel 2 input selector to USB2/SD2/BT. Then press the mode
button to set the input to Bluetooth. Finally open your Bluetooth device and search for Bluetooth
connections. Locate the KX3 and pair with it.
ENGLISH

INSTRUCCIONES DE SEGURIDAD IMPORTANTES
PRECAUCIONES:
Para reducir el riesgo de descarga eléctrica, no quite la tapa (o la parte posterior).
Solicite servicio de personal cualicado si es necesario.
ADVERTENCIA:
Para reducir el riesgo de incendio o descarga eléctrica, no exponga este aparato a lluvia
o humedad.
INSTRUCCIONES DETALLADAS DE SEGURIDAD:
1) Lea y guarde estas instrucciones
2) Tenga en cuenta todas las advertencias
3) Siga todas las instrucciones
4) No utilice este aparato cerca del agua
5) Limpie sólo con un paño seco
6) No bloquee las aberturas de ventilación
7) No instale cerca de fuentes de calor, como radiadores, calentadores, estufas u otros aparatos
(incluyendo amplicadores) que produzcan calor.
8) No anule la toma de tierra.
9) Tenga especial cuidado con el cable de alimentación.
10) Utilice solamente los accesorios especicados por el fabricante.
11) Desenchufe el aparato durante las tormentas eléctricas o cuando no lo utilice durante
un período largo de tiempo.
12) Cualquier reparación debe ser llevada a cabo por personal cualicado.
ESPAÑOL

PANEL FRONTAL:
1.- Consola de control USB/SD CARD/Bluetooth
Disponemos de dos consolas de control USB / SD Card, Canal 1 y 2. Después de conectar el dispositivo
USB o SDCARD presiona el botón de modo para seleccionar entre entrada USB/SD o Bluetooth.
Si quiere usar Bluetooth en USB2, puede presionar el botón de modo y seleccionar modo Bluetooth.
La pantalla mostrará“BLUETOOTH CONNECTED” cuando este emparejado. La función Bluetooth solamente
esta disponible en USB2. Use los demás controles, Play/Pause, Stop, Repeat (Pista actual / Todas las pistas),
PREV y NEXT para reproducir pistas desde el conector USB/SD.
2 2
1 1
5
6
14 15
16
1010
9
12
4
3
8
7 13
8
9
1111
ESPAÑOL

CONSOLA DE CONTROL USB/SD CARD/BLUETOOTH
(1) Modo de búsqueda: Cuando el nombre de la carpeta esté parpadeando en la pantalla, la unidad estará en
el modo de búsqueda de carpeta. Gire el botón para buscar a través de la carpeta.
Presione el botón Track/Folder para elegir una pista.
Al salir del modo de carpeta, “ALL” aparecerá en la pantalla. Esto indica que la unidad reproducirá todas
las pistas de la tarjeta SD o dispositivo USB.
Cuando pulse el botón REPEAT, habrá seis pantallas diferentes en función de la conguración que elija;
ALL / NORMAL / SINGLE / FOLDER / RANDOM / BROWSE.
(2) Fuente de entrada: La pantalla mostrará“U” cuando se congure el modo USB y “S” cuando esta congurado
el modo SD. Presione el boton MODE para cambiar entre una conguracion u otra.
(3) Número de pista.
(4) Información: Aquí es donde aparecerá el nombre de la carpeta actual.
(5) Tiempo transcurrido de la pista.
2.- TRACK/FOLDER Búsqueda
Girar Este botón permite movernos a través de todas las pistas girando este mismo hacia la derecha.
Se mostrará el nombre de la pista. Tanto pistas como carpetas cargados desde el dispositivo USB o SD
aparecerán en orden cronológico. Presione para empezar a reproducir la pista.
Press Este botón activa la función de búsqueda de carpeta. Una vez presionado aparecerá “ FOLDER”.
Entonces, gire el botón para buscar carpetas dentro del dispositivo USB o SD. Presione para empezar a
reproducir las pistas de la carpeta seleccionada.
3.- Medidor de nivel: Indica el nivel de la salida de señal
4.- ON/OFF
5.- Control de nivel de Eco del micrófono.
6.- Control de volumen del micrófono.
7.- Selector de entrada Canal 1: Use el selector para elegir la fuente deseada. El canal 1 posee
tres fuentes de entrada diferentes. AUX1 (RCA), MP3 (Entrada en la parte trasera 1/8 "),
USB1 y SD1.
8.- Control de agudos del canal 1 y canal 2.
ESPAÑOL

9.- Control de graves del canal 1 y canal 2.
10.- Selector CUE: Presione este botón para monitorizar la pista via auriculares.
11.- Fader de canal: Ajusta el volumen de cada canal.
12.- Fader de volumen Master: Ajusta el volumen master.
13.- Selector de entrada de Canal 2: Use el selector para elegir la fuente deseada. El canal 2 posee
dos fuentes de entrada diferentes: AUX2 (RCA), USB2/SD2 y Bluetooth.
14.- Talkover: Cuando se pulsa este botón, todas las señales, excepto el micrófono
se reducirán a 20 dB.
15.- Crossfader Cana 1 y 2: Deslice el crossfader para determinar el balance entre el Canal 1
y el Canal 2.
16.- Control de volumen de Auriculares
17.- Alimentación DC12v
18.- Salida RCA.
19.- Entrada RCA para AUX2 .
20.- Entrada RCA para AUX1.
21.- Entrada 1/8”(Canal 1).
22.- Entrada Micrófono ¼”.
23.- Entrada Auriculares.
24.- Conexión a tierra.
ESPAÑOL

Conexiones de Entrada/Salida
Canal 1(RCA, 1/8 ", Entrada USB y Tarjeta SD).
Canal 2 (RCA, USB, Tarjeta SD y Bluetooth).
Entradas USB y SD
Tanto el dispositivo USB como la tarjeta SD no deben ser mayor de 32GB. KX3 acepta los formatos
MP3 y WMA.
Entrada Auxiliar (RCA y 1/8”)
Después de conectar el dispositivo a la toma Auxiliar, ajuste el selector de entrada del canal 1
a AUX. Puede ajustar el volumen con el control de volumen del canal 1 y el control de
volumen principal.
Entrada Bluetooth (1/8”y RCA)
La entrada de Bluetooth le permite conectar un dispositivo compatible con Bluetooth al canal 2 de
la KX3. Primero ajuste el selector de entrada del canal 2 para USB2/SD2/BT. A continuación, pulse
el botón de modo para ajustar la entrada de Bluetooth. A continuación debe sincronizarlo.
ESPAÑOL

Table of contents
Other PSK Dj Equipment manuals


