Pulsar WM60 User manual

CAL. WM60
DIGITAL QUARTZ
ENGLISH
lTime/calendar
lDual time
l Alarm
lCountdown timer
lStopwatch
lPacer
l Illuminating light (Electroluminescent panel)
NSD38_E.indd 1 08.9.22 10:42:18 AM

2
English
3
English
BUTTONS AND DISPLAYS
TIME/CALENDAR SETTING
Press and hold for 2 seconds to show the TIME/CALENDAR
SETTING mode.
C
s
Press to adjust the ashing digits.
D
s
C
Press to conrm the settings and return to the TIME/CALENDAR
mode.
B
D
C
AM or PM
Alarm mark
Month
Second or
Day of the week
Minute
TIME/CALENDAR MODE
NOTES
uIf the watch is left untouched in the TIME/CALENDAR SETTING mode for about
3 minutes, it will automatically exit the TIME/CALENDAR SETTING mode.
A
Hourly chime signal mark
• The Day of the Week starts flashing.
Press to move on to the next item.
A
s
Setting sequence
Day of the Week Year
Month
Date
Minute Hour
�
�
�
�
�
Hour
Day
NSD38_E.indd 2-3 08.9.22 10:42:19 AM

4
English
5
English
CHANGEOVER BETWEEN 12-/24- HOUR INDICATION DISPLAY
With each press of button D, the time indication format in the
TIME/CALENDAR display can be alternately selected between the
12-hour indication or the 24-hour indication.
D
With each press of button B, the Day of the Week or the Second is
alternately displayed.
B
CHANGEOVER BETWEEN DAY Of THE WEEk AND SECOND DISPLAY
DUAL TIME MODE
Press to enter the DUAL TIME mode.
The dual time mode indicator will appear on the display.
D
C
A
A
Dual time mode
indicator
AM or PM for
dual time
PM for normal time
Dual time
Normal time
NOTES
uIn the DUAL TIME mode, only the Second is displayed, and the Day of the Week
cannot be selected.
NSD38_E.indd 4-5 08.9.22 10:42:20 AM

6
English
7
English
Press and hold for 2 seconds to show the DUAL TIME SETTING
mode.
Press to change the hour to be adjusted.
C
s
D
s
CPress to conrm the dual time setting and return to the TIME/
CALENDAR mode.
• The Hour starts flashing.
DUAL TIME SETTING
NOTES
uIf the watch is left untouched in the DUAL TIME SETTING mode for about 3
minutes, it will automatically exit the DUAL TIME SETTING mode.
CHANGEOVER BETWEEN 12-/24- HOUR INDICATION DISPLAY
With each press of button D, the time indication format in the
DUAL TIME mode can be alternately selected between the 12-hour
indication or the 24-hour indication.
D
ALARM MODE
Press to enter the ALARM mode.
The alarm mode indicator will appear on the display.
B
D
C
A
Alarm mark
A
Alarm mode indicator
PM for normal time
Alarm time
Normal time
Hourly chime signal mark
AM or PM for
alarm time
NSD38_E.indd 6-7 08.9.22 10:42:21 AM

8
English
9
English
ALARM ENGAGEMENT/DISENGAGEMENT
DEach time you press in the ALARM mode, the alarm is alternately
engaged and disengaged.
Press to stop the alarm while sounding.
• While the alarm is engaged, the alarm mark will appear on the display.
HOW TO SET THE HOURLY CHIME SIGNAL
BPress to activate the hourly chime signal in the ALARM mode.
The hourly chime signal mark will appear on the display.
HOW TO STOP THE ALARM WHILE SOUNDING
D
ALARM TIME SETTING
C
Press and hold for 2 seconds to show the ALARM SETTING mode.
s
D
s
A
s
• The Minute starts flashing.
Press to select the minutes to be adjusted.
C
Press to conrm the alarm setting and return to the ALARM mode.
Press to set the minutes to be adjusted.
• The Hour starts flashing.
DPress to change the hour to be adjusted.
s
NOTES
uIf the watch is left untouched in the ALARM mode, it will automatically return to
the TIME/CALENDAR mode in 3 minutes.
NSD38_E.indd 8-9 08.9.22 10:42:22 AM

10
English
11
English
COUNTDOWN TIMER MODE
Press to enter the TIMER mode.
The countdown timer mode indicator will appear on the display.
B
D
C
A
A
Countdown timer mode
indicator
Hour
Elapsed time
Normal time
Past time alert
NOTES
uExcept when the countdown timer is counting, if the watch is left untouched for
about 3 minutes, it will automatically return to the TIME/CALENDAR mode.
TIMER SETTING
Press and hold for 2 seconds to show the TIMER SETTING mode.
• The Minute starts flashing.
Press to select the minutes to be adjusted.
Press to conrm the timer setting and return to the TIMER mode.
Press to set the minutes to be adjusted.
• The Hour starts flashing.
Press to change the hour to be adjusted.
C
s
D
s
A
s
C
D
s
PM for normal time
NSD38_E.indd 10-11 08.9.22 10:42:23 AM

12
English
13
English
STOPWATCH MODE (CHRONO)
Press to enter the STOPWATCH mode.
The stopwatch mode indicator will appear on the display.
Start/Stop/
Restart
B
D
Split/Reset
A
Stopwatch mode indicator
Hour
Minute Second
1/100 Second
Normal time
NOTES
uExcept when the stopwatch is running, if the watch is left untouched for about 3
minutes, it will automatically return to the TIME/CALENDAR mode.
Press to reset the stopwatch to 00’00”00 before use.
B
CView split times
s
TIMER OPERATION
D
s
D
s
B
Press to start counting down.
Press to stop counting down.
Press to reset the display to the starting value.
NOTES
u When the timer finishes counting down, the alarm will sound. Unless you stop
the timer by pressing the button D, the timer starts counting up. The elapsed
time since the timer started counting up will be shown on the display. At the
same time, "UP" appears on the display indicating that the time currently shown
on the display is the elapsed time since the timer started counting up.
NSD38_E.indd 12-13 08.9.22 10:42:24 AM

14
English
15
English
PACER MODE
Press to enter the PACER mode.
The pacer mode indicator will appear on the display.
A
B
D
Pacer mode indicator
Normal time
Pace
NOTES
uExcept when the pacer is working, if the watch is left untouched for about 3
minutes, it will automatically return to the TIME/CALENDAR mode.
uThe PACER mode is excellent to use as a metronome or to keep a good walking/
running pace.
STOPWATCH OPERATION
<Standard measurement >
START STOP RESET
DB
D
<Split time measurement>
START STOP
SPLIT RESET
DBD B B
lUp to 4 split times can be measured.
l Press button B to view the split time displayed under SP 1 to SP4 heading.
To return to ongoing measuring display, press button B again.
SPLIT
C
BTo view the total elapsed time, press button B.
To reset the stopwatch, press button B once again.
After nishing the measurement, press button C to view the
split time(s) taken.
NSD38_E.indd 14-15 08.9.22 10:42:25 AM

16
English
17
English
B
s
Press to change the digits to the right pace for you.
D
s
Press to start the pacer.
DPress again to stop the pacer.
PACER OPERATION
ILLUMINATING LIGHT (ELECTROLUMINESCENT PANEL)
B
BPress to turn the Electroluminescent backlight on for about 3
seconds.
BATTERY CHANGE
Battery life : Approx. 2 years
Battery : CR2025
2
Years
lAs the battery is inserted at the factory to check the function and performance
of the watch, its actual life once in your possession may be less than the
specified period.
lWhen the battery expires, be sure to replace it as soon as possible to prevent
any malfunction.
lWe recommend that you contact an AUTHORIZED PULSAR DEALER for battery
replacement.
NSD38_E.indd 16-17 08.9.22 10:42:26 AM

18
English
19
English
WARNING
lDo not remove the battery from the watch.
lIf it is necessary to take out the battery, keep it out of the reach of
children. If a child swallows it, consult a doctor immediately.
lNever short-circuit, tamper with or heat the battery, and never ex-
pose it to re. The battery may burst, become very hot or catch re.
CAUTION
l The battery is not rechargeable. Never attempt to recharge it, as this
may cause battery leakage or damage to the battery.
TO PRESERVE THE QUALITY Of YOUR WATCH
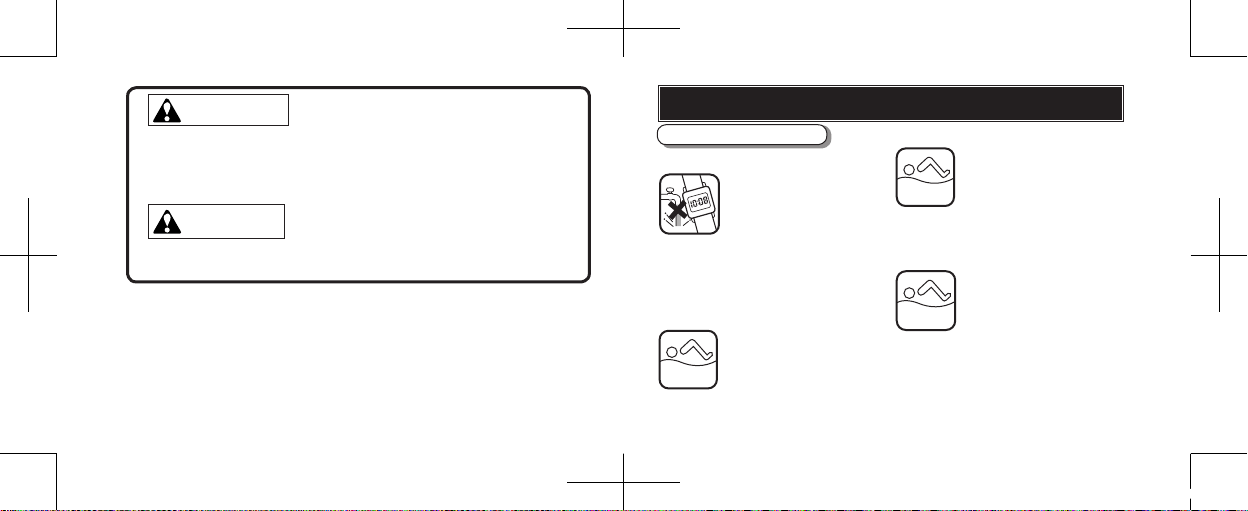
WATER RESISTANCE
lNon-water resistant
lWater resistance (5 bar)*
If “WATER RESISTANT 5 BAR” is
inscribed on the case back, your
watch is designed and manu-
factured to withstand up to 5 bar
and is suitable for swimming, yachting and taking
a shower.
If “WATER RESISTANT 10 BAR”,
“WATER RESISTANT 15 BAR” or
“WATER RESISTANT 20 BAR” is
inscribed on the case back, your
watch is designed and manufactured
to withstand up to 10 bar/15 bar/20 bar and is suitable
for taking a bath, shallow diving, but not for scuba
diving. We recommend that you wear a PULSAR
Diver’s watch for scuba diving.
l
Water resistance (10 bar/15 bar/20 bar)*
If “WATER RESISTANT” is not
inscribed on the case back, your
watch is not water resistant, and
care should be taken not to get
it wet as water may damage the
movement. If the watch becomes wet, we suggest
that you have it checked by an AUTHORIZED
PULSAR DEALER or SERVICE CENTER.
If “WATER RESISTANT” is inscribed on
the case back, your watch is designed
and manufactured to withstand up to
3 bar, such as accidental contact with
splashes of water or rain, but it is not designed for
swimming or diving.
lWater resistance (3 bar)
3bar WR
5 bar WR
10/15/20
bar WR
NSD38_E.indd 18-19 08.9.22 10:42:28 AM

20
English
21
English
MAGNETISM
CARE OF CASE AND BRACELET
Your watch will not be
affected by magnetism.
To prevent possible
rusting of the case and
bracelet caused by dust,
moisture and perspira-
tion, wipe them periodi-
cally with a soft dry cloth.
* Before using the water resistance 5, 10, 15 or 20 bar watch in water, be sure the
crown is pushed in completely.
Do not operate the crown when the watch is wet or in water. If used in sea water,
rinse the watch in fresh water and dry it completely.
* When taking a shower with the water resistance 5 bar watch, or taking a bath with
the water resistance 10, 15 or 20 bar watch, be sure to observe the following:
• Do not operate the crown when the watch is wet with soapy water or shampoo.
• If the watch is left in warm water, a slight time loss or gain may be caused. This
condition, however, will be corrected when the watch returns to normal tem-
perature.
NOTE:
Pressure in bar is a test pressure and should not be considered as corre-
sponding to actual diving depth since swimming movement tends to increase
the pressure at a given depth. Care should also be taken on diving into water.
Light activities will not
affect your watch, but be
careful not to drop your
watch or hit it against
hard surfaces, as this
may cause damage.
Be careful not to expose
the watch to solvents,
mercury, cosmetic spray,
detergents, adhesives or
paints. Otherwise, the
case, bracelet, etc. may
become discolored, deteriorated or
damaged.
SHOCKS & VIBRATION
CHEMICALS
Operational temperature
range: Between -5° C
(+23° F) and 50° C (122°
F)
TEMPERATURES
Display temperature
range: Between 0° C (+32°
F) and 40° C (+104° F)
F u n ct i on a l tem p er a tur e
range of alarm and LED
light: Between 5° C (+41°
F) and 50° C (+122° F)
NS
+40°C
0°C
+50°C
5°C
NSD38_E.indd 20-21 08.9.22 10:42:31 AM

22
English
It is recommended
that the watch be
checked once every 2
to 3 years. Have your
watch checked by an
AUTHORIZED PULSAR DEALER or
SERVICE CENTER to ensure that
the case, buttons, gasket and crys-
tal seal remain intact.
PERIODIC CHECK
I f y ou r w at c h h a s a
protective film and/or a
sticker on the case back,
be sure to peel them off
before using your watch.
PRECAUTION REGARDING
CASE BACK PROTECTIVE FILM
The IC (Integrated
Circuit) used in
your watch will be
affected by static
electricity which may
disturb the display. Keep the
watch away from close contact
with objects such as TV screens
which emit strong static electric-
ity.
STATIC ELECTRICITY
2 - 3
Years
NSD38_E.indd 22 08.9.22 10:42:33 AM
Table of contents
Other Pulsar Watch manuals

Pulsar
Pulsar V33J User manual

Pulsar
Pulsar VD84 User manual

Pulsar
Pulsar N94J User manual

Pulsar
Pulsar Z021 User manual

Pulsar
Pulsar W860 User manual

Pulsar
Pulsar YM91 User manual

Pulsar
Pulsar 5Y67 User manual

Pulsar
Pulsar W860 User manual

Pulsar
Pulsar VK68 User manual

Pulsar
Pulsar Y621 Operating instructions