Puretec R Series User manual

User Guide
Puretec Radfire UV Water Sanitiser
R Series
For correct operation & installation it is essential to observe these instructions.
MAY2019

2Installation & Operation Manual Copyright © Puretec Pty Ltd 2019
Introduction
Puretec Customer Service
Thank you for purchasing a Radre UV (ultraviolet) Water Steriliser. Your UV Water
Steriliser is a proven performer, manufactured from highest quality materials and will
give years of trouble free service if maintained properly.
This UV Water Steriliser can be used in a wide variety of dierent applications. Regular
maintenance of your Radre UV Water Steriliser includes regular replacement of lter
cartridges. If you have trouble dening what you need, contact your stockist. Replace
cartridges when water ow is reduced, when taste or odour returns to water (carbon
cartridges only) or at six monthly intervals which ever comes rst.
Customer Service Helpline 1300 140 140 (Australia) 0800 130 140 (New Zealand).
What's Inside
Applications .......................................................................................................................................... 3
Installation ............................................................................................................................................ 4
Maintenance......................................................................................................................................... 5
UV Lamp Replacement Procedure ........................................................................................... 6
Application Warning......................................................................................................................... 7
Operation Guidelines....................................................................................................................... 7
Notes........................................................................................................................................................ 8
Warranty................................................................................................................................................. 9

3
Puretec Radfire R Series
Copyright © Puretec Pty Ltd 2019
Applications
Applications
Puretec Radre UV Water Sterilisers are designed to suit a wide range of applications,
always install with a sediment removal lter before your Radre unit.
Typical Radre applications are:
• hospitals
• aquaculture
• nursing homes
• restaurants
• homes and apartments
• laboratories
• schools
• hotels and resorts
• community water supplies
• agriculture
Note: The minimum requirement of preltration for an ultraviolet system is a 5 micron
sediment lter. If bacteria has been present prior to the installation of this system, we
recommend ushing the pipelines with Puretec TankSafe.
1. Prior to performing any work on the steriliser, always disconnect the power supply
rst and give the system time to cool.
2. Do not look directly into ultraviolet rays emitted from the UV lamp as they can
damage unprotected eyes.
3. This treated water will seem warm at rst ow for a short period when it is not
used, as the lamp creates heat; you can ush before use.
4. Power supply is water resistant, however if installing outdoors, it must be covered.
4Installation & Operation Manual Copyright © Puretec Pty Ltd 2019
Installation Guide
Installation
1. Before attempting installation, check all components are intact and have not been
damaged in transit.
2. The UV water steriliser should be installed aer any ltration or reverse osmosis
systems. In a pressurised system, the chamber can be installed horizontally or
vertically.
3. Determine an installation location remembering to allow 350 mm clearance to the
side of the unit for lamp changes (lamp exit and entry point can be determined by
the installer). A power outlet is required.
Avoid touching the quartz (glass) sleeve and lamp surface as marks and ngerprints may
interfere with UV transmission. If lamp is soiled, please clean lamp with an alcohol-based
cleaner.
4. Unscrew the metal nuts on each end of the chamber.
5. Take the quartz sleeve out of its packaging and slide one of the two O-rings over
one end of the quartz sleeve.
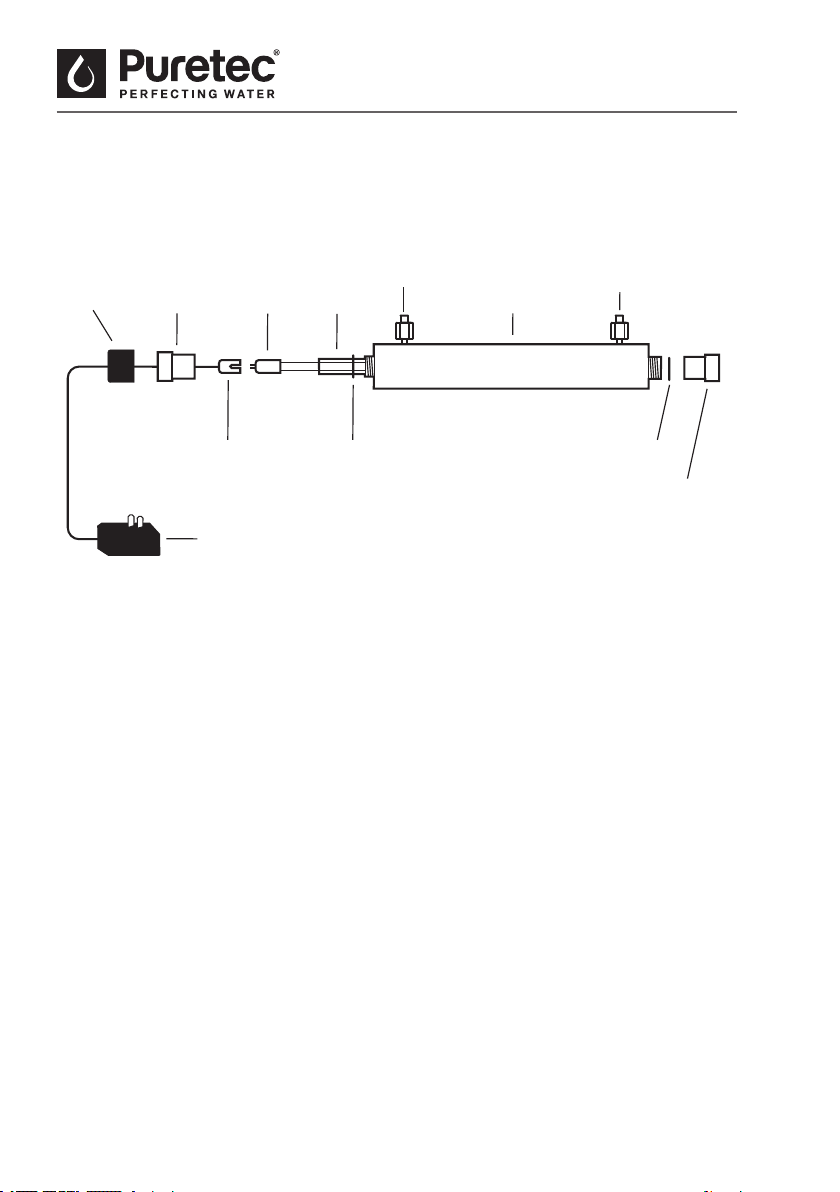
Aluminium
Nut
Water Outlet
O-RingLamp
Power
Connector
Quartz
SleeveUV Lamp
Aluminium
NutCap
Ballast
Stainless Steel
Chamber
O-Ring
Water Inlet
Fig. 1

5
Puretec Radfire R Series
Copyright © Puretec Pty Ltd 2019
Maintenance
6. Carefully slide the quartz sleeve into the chamber via the end with no O-ring and
attach the second O-ring onto the end once it is in place.
7. Screw the metal nuts back onto each end of the chamber.
8. Connect the lamp connector to the pins on the lamp. Slowly insert the UV lamp
provided into the chamber through the hole of the aluminium nut end.
9. Secure the the safety cap on the aluminium nut end.
10. Turn the water on once your set up is complete and let the water ow through -
opening the downstream tap to ush the unit for 1-2 minutes.
11. Visually inspect for any leaks.
12. Turn on point of use to let water ow through the unit an wait for 2-3 minutes to
release air and impurities from the system.
13. Plug in the power connector with ballast and make sure that the LED is illuminated
steadily to start operation. Installation should be completed by a qualied
tradepersons only.
Clean the Quartz Sleeve Regularly
To ensure high sterilising rate with best water quality, check sleeve regularly (about
every 3 months depending on quality of water source) to see it is clean and does
not have dirt accumulated. Clean with alcohol based cleaner if necessary.
Quartz Sleeve Maintenance Procedure
1. Unplug the power supply and allow the system to cool. Remove UV lamp before
taking out the quartz sleeve and pour out water. Turn the aluminium nuts both sides
of the chamber counter-clockwise, remove the O-rings and carefully remove the
quartz sleeve.
2. Soak a piece of cloth in vinegar or citric to clean the quartz sleeve.
3. Put the quartz sleeve back into the stainless steel chamber with equal distance at
both ends of the chamber. Replace the O-Rings on either end of the quartz sleeve.
4. Dampen the seal O-ring at each end of the quartz sleeve then replace the
aluminium nuts.

6Installation & Operation Manual Copyright © Puretec Pty Ltd 2019
UV Lamp Replacement Procedure
5. Check all connections for leakage.
6. Plug in the power connector with ballast and make sure that the LED is illuminated
steadily to start operation. Turn on point of use to let water ow through the unit an
wait for 2-3 minutes to release air and impurities from the system.
7. Insert UV lamp into stainless steel chamber and push on the rubber cap.
UV Lamp Replacement Procedure
To ensure high sterilizing rate with best water quality, the UV lamp should be replaced
every year. Avoid turning the lamp on and o uncessessarily as this will shorten the service
life of the UV lamp.
1. Turn o and unplug the system, allowing it to cool. Place a container below the unit,
in case of drips.
2. Pull the black lamp ballast o slowly, being careful not to detach the lamp inside.
Do not use a twisting motion as this will unscrew the metal nut underneath, simply
pull outward. Re-tighten the metal nut once the lamp connector is removed, if
required.
3. Remove the old lamp from the connector and dispose of accordingly.
4. Remove the new lamp from its packaging and insert the metal prongs into the black
lamp connector.
5. Carefully re-insert the lamp back into the chamber and securely t the black lamp
connector back onto the metal nut.
6. Turn the water on once your set up is complete and let the water ow through
- opening the downstream tap to ush the unit for 1-2 minutes. Then check the
system thoroughly for leaks.
7. Visually inspect for any leaks.
8. Turn on point of use to let water ow through the unit an wait for 2-3 minutes to
release air and impurities from the system.
9. Plug in the power connector with ballast and make sure that the LED is illuminated
steadily to start operation.

7
Puretec Radfire R Series
Copyright © Puretec Pty Ltd 2019
Application Warning
Application Warning
Application warning; minimum water characteristics must be met before installation of
Radre™ to ensure proper operation and continuous protection.
Iron less than 0.3 mg/l
Hydrogen Sulphide less than 0.05 mg/l
Suspended Solids less than 10mg/l
Manganese less than 0.05 mg/l
Hardness less than 110mg/l
Operating Guidelines
• Minimum operating pressure 10 kPa.
• Maximum operating pressure 900 kPa.
• Do not allow exposure to temperatures below 4 °C.
• Maximum operating temperature 90 °C.
• Filter prior to UV must be as a minimum 5 microns.
• This system must be installed according to local plumbing codes on the cold
water line.
• This system requires regular replacement of the pre-lter cartridge to
maintain proper operation.
• Be sure to change the UV globe every 12 months and lter cartridge at
least every 8,000 litres or 6 months which ever occurs rst; or whenever
you detect a change in taste, odour, or decrease in ow. 8,000 litres is
approximately equal to using 20 litres daily for one year.
• This system is weather resistant, not weather proof.
• If installed outside in the weather we recommend to protect the electrical
components as a minimum from weather.
• Turn o power to the UV when not using the system for an extended period
of time. Flush the system when turning it back on.
• Connection to a start/stop pump controlled electrical power supply is not
recommended and may shorten the life of the power supply and/or the lamp.

8Installation & Operation Manual Copyright © Puretec Pty Ltd 2019
Notes
Puretec water care products are designed, manufactured and supported by Puretec
Pty Ltd the name you can trust for viable and proven water solutions. The complete
range of Puretec products are developed, rened, made to meet and exceed stringent
specications for the worldwide market.
Important: Sales of products are subject to our Terms and Conditions which are available
upon request. All specications, information and photos are a guide only and are subject
to change without notice. Please ring to conrm details. Warning: For correct operation of
this appliance it is essential to observe manufacturer’s instructions.
Notes

9
Puretec Radfire R Series
Copyright © Puretec Pty Ltd 2019
WARRANTY
Any claim under this warranty must be made within 2 years of the date of purchase of
the product. This product is warrantied to be free of defect of material and workmanship
for 2 years from date of purchase. To make a claim under the warranty, take the product
and proof of purchase to place where you purchased the product, and they will lodge a
Warranty Request with Puretec. 2 year warranty is 1 year parts and labour, plus 1 year
parts only. Excludes consumables.
Puretec will pay your reasonable, direct expenses of claiming under this warranty.
You may submit details and proof of your expense claim to place of purchase for
consideration.
The warranty only applies if the product was used and/or installed in accordance with
the user guide and/or installation instructions. This warranty is given in lieu of all other
express or implied warranties and manufacturer shall in no circumstance be held liable
for damages consequential or otherwise or delays caused or faulty manufacturing
except as excluded by law.
Applicable to all above, is that the warranties need to be approved by Puretec to ensure
product was not incorrectly used, installed or claimed. False and incorrect claims will
be pursued at Puretec’s discretion, including chargeable inspection and labour costs
incurred.
Warranty
WARRANTY/AUSTRALIA
This warranty is given by Puretec Pty Ltd, ABN 44 164 806 688, 37-43 Brodie Road,
Lonsdale SA 5160, telephone no. 1300 140 140 and email at [email protected].
This warranty is provided in addition to other rights and remedies you have under
law: Our goods come with guarantees which cannot be excluded under the Australian
Consumer Law. You are entitled to replacement or refund for a major failure and to
compensation for other reasonably foreseeable loss or damage. You are also entitled to
have the goods repaired or replaced if the goods fail to be of acceptable quality and the
failure does not amount to a major failure.
WARRANTY/NEW ZEALAND
This warranty is given by Puretec Ltd, Reg. No 4464398, PO Box 875 Cambridge 3450
NZ, telephone no. 0800 130 140 and email at [email protected].
This warranty is provided in addition to other rights and remedies you have under
law: Our goods come with guarantees which cannot be excluded under the Consumer
Guarantees Act. You are entitled to replacement or refund for a major failure and to
compensation for other reasonably foreseeable loss or damage. You are also entitled to
have the goods repaired or replaced if the goods fail to be of acceptable quality and the
failure does not amount to a major failure.

10 Installation & Operation Manual Copyright © Puretec Pty Ltd 2019
This page was intentionally le blank.
Table of contents
Other Puretec Accessories manuals


