Pyle PBTSD86 Owner's manual

IMPORTANT: Pack carefully in original package if possible. We are not
responsible for damage incurred in returning items for repair. A letter
stating your exact street address, daytime phone number, and the
problem you are experiencing should be included. You must also
enclose a copy of the original receipt as proof of date of purchase.
USER’S MANUAL
Bluetooth Wireless Audio Streaming
Clock Radio W/ FM Receiver & Alarm Clock
PBTSD86
www.pyleaudio.com
PBTSD86+AF8- PYLE+AF8-IB draft Rev05.indd1 8 - 161 2012-5-24 14:41

PBTSD86+AF8- PYLE+AF8-IB draft Rev05.indd2 8 - 215 2012-5-24 14:42

13
Compliance with FCC Regulations
This device complies with Part 15 of the FCC Rules. Operation is subject to the following
two conditions:
1. this device may not cause harmful interference, and
2. this device must accept any interference received, including
interference that may cause undesired operation.
NOTE : This equipment has been tested and found to comply with the limits for a Class B
digital device, pursuant to Part 15 of the FCC Rules. These limits are designed to provide
reasonable protection against harmful interference in a residential installation. This
equipment generates, uses and can radiate radio frequency energy and, if not installed and
used in accordance with the instructions, may cause harmful interference to radio
communications. However, there is no guarantee that interference will not occur in a
particular installation. If this equipment does cause harmful interference to radio or
television reception, which can be determined by turning the equipment off and on, the
user is encouraged to try to correct the interference by one or more of the following
measures:
- Reorient or relocate the receiving antenna.
- Increase the separation between the equipment and receiver.
- Connect the equipment into an outlet on a circuit different from that to which the
receiver is connected.
- Consult the dealer or an experienced radio/TV technician for help.
CAUTION: Changes or modifications not expressly approved by the party responsible for
compliance could void the user’s authority to operate the equipment.
2
Important Safety Instructions
When used in the directed manner, this unit has been designed and manufactured to ensure
your personal safety. However, improper use can result in potential electrical shock or fire
hazards. Please read all safety and operating instructions carefully before installation and
use, and keep these instructions handy for future reference. Take special note of all
warnings listed in these instructions and on the unit.
1. Water and Moisture
The unit should not be used near water. For example: near a bathtub, washbowl,
kitchen sink, laundry tub, swimming pool or in a set basement.
2. Ventilation
The unit should be situated so that its location or position does not interfere with its
proper ventilation. For example, it should not be situated on a bed, sofa, rug or similar
surface that may block the ventilation openings. The ventilation should not be impeded
by covering the ventilation openings with items, such as newspapers, table-cloths,
curtains, etc. Also, it should not be placed in a built-in installation, such as a bookcase
or cabinet, which may impede the flow of air through the ventilation openings.
3. Heat & Flame
The unit should be situated away from heat sources such as radiators, heat registers,
stoves or other appliances (including amplifiers) that produce heat.
No naked flame sources, such as lighted candles, should be placed on the apparatus.
4. Power Source
The unit should be connected to a power supply only of the type described in the
operating instructions or as marked on the appliance.
Where the AC/DC Adaptor is used as the disconnect device, the disconnect device shall
remain readily operable.
5. Power Cord Protection
Power supply cords should be routed so that they are not likely to be walked on or
pinched by items placed upon or against them. It is always best to have a clear area
from where the cord exits the unit to where it is plugged into an AC outlet.
6. Cleaning
The unit should be cleaned only as recommended. See the section "Care and
Maintenance" of this manual for cleaning instructions.
7. Object and Liquid Entry
Care should be taken so that objects do not fall and liquids are not spilled into any
openings or vents located on the product. It shall not be exposed to dripping or splashing
and that no objects filled with liquids, such as vases, shall be placed on the apparatus.
8. Attachments
Do not use attachments not recommended by the product manufacturer.
9. Lightning and Power Surge Protection
Unplug the unit from the wall outlet and disconnect the periods of time. This will
prevent damage to the product due to lightning and power-line surges.
10. Overloading
Do not overload wall outlets, extension cords, or integral convenience receptacles as
this can result in a risk of fire of electric shock.
11. Damage Requiring Service
This unit should be serviced by qualified service personnel when:
A. The power supply cord or plug has been damaged.
B. Objects have fallen into or liquid has been spilled into the enclosure.
C. The unit has been exposed to rain.
D. The unit has been dropped or the enclosure damaged.
E. The unit exhibits a marked change in performance or does not operate normally.
12. Periods of Nonuse
If the unit is to be left unused for an extended period of time, such as a month or longer,
the power cord should be unplugged from the unit to prevent damage or corrosion.
13. Servicing
The user should not attempt to service the unit beyond those methods described in the
user's operating instructions. Service methods not covered in the operating
instructions should be referred to qualified service personnel.
PBTSD86+AF8- PYLE+AF8-IB draft Rev05.indd3 8 - 143 2012-5-24 14:42

3
Featu r es
Thank you fo r pu r ch as in g the Blu etooth S pea ker S ystem with Al ar m Cl ock R a di o.
The model i nco r po r at es following f ea tu r es :
P la yback iP ad /iP ho ne/i P od Touch m usic th r ou gh Bluetoo th techn ology
Clo ck with 12/24 h o ur s display f or m at selecti on
Al ar m ti m er fun ction
Al ar m wake up to B u zzer , FM r a di o wi th S n ooze function
Sl eep t im er functio n
FM r a di o r e cei ve r
With 20 FM r ad io pr e s et stations
LCD di spl ay with di mm er function
Audio l i ne- i n fo r conn ecti ng o th er di gital audio pl aye r
P r e set EQ and Bas s bo ost fun ction
L u xu r y Mo od l ight
iP a d, iP h on e and iP od to uch are t r ad em ar k s of Apple I nc., r eg is ter e d in the U.S. an d o th er
co un tr i es .
iP a d, iP h one and iP od models a r e not in clu ded.
Clo ck / M em or y b at ter y ba ck- u p
F or the unit has been w or k ed f or a ve r y lon g p er i od , wh er e the backup b at te r y voltag e may
di sch ar g e to a low level which cannot backu p the clock and r ad io pr e set statio n data. In th is
cas e you need to r e pl ace it with th e fr e sh one.
(1) A back up b at te r y co mp ar t m en t located at r e ar o f the m ain un it.
(2) Open the b att er y co m par t m en t lid.
(3) Fol low th e po l ar i ty d ia gr am sho wn i nside the co m par t me nt and i nstall 2 x AAA (UM - 4)
type ba tt er i es (not in clu ded).
(4) Clos e the b att er y co mp ar t m en t lid.
R em o te Co nt r ol
The r em o te co n tr o l ope r at es on on e C R 2025 L i thi um ba tter y (included).
To acti vate the r e mo te co ntr o l, r em o ve the i nsul ation tab attached in th e ba tt er y
co m pa r tm e nt.
War n in gs :
B at te r ies shal l not be ex pos ed to exces sive heat such as suns hine, f ir e or the lik e.
Be s ur e th at th e ba tte r ies ar e instal led co r r ect ly. Wr o ng po la r ity may dam age the un it.
Do not m i x old an d new b at ter i es .
Do not mix alkaline, standard (carbon- zinc) or r echargeable (nickel- cadm ium ) batteries.
Onl y ba tt er ie s of the sam e or equivalent type as r eco m m en d a r e to be u sed.
If the uni t is n ot to be us ed f or an extended p er i od of tim e, r e mo ve the b at te r y.
Do not dis pos e of ba tt er i es in f ir e , bat te r y m ay explode o r leak.
Da ng er of expl osio n if b att er y is i nco r r ect ly r e pl aced.
AC- DC Ad ap to r con nection
The uni t is p ow er e d by an e xt er n al AC- DC P o we r Ad ap to r (in cl uded) with o utput DC12V /
2000mA.
(1) I ns er t th e adaptor s DC o utput pl ug in to the DC IN j ack at the back o f the unit.
(2) P lu g th e ad apt or in to an ac main outlet.
Installation
12
Car e and Mainten ance
- Do no t su bject the u nit to exces sive fo r ce , shock, du st o r ex tr em e te mp er a tu r e.
- Do no t ta mp er the i n te r nal compo nents of the u nit.
- Clean yo ur unit wi th a dam p (ne ver wet) clo th. Solven t o r de te r ge nt s hould ne ver be
us ed.
- Avoid leaving yo u r uni t in d ir e ct s unlig ht o r in hot, h umid o r dusty places.
- Keep yo ur unit away f r om heati n g appliances and s ou r ces of el ect r ica l noise such as
fl uo r es cen t lamps o r m ot or s .
R es ett in g th e Unit
If the un it e xp er i en ces a po we r su r ge or el ect r ic shock, it is possi ble that the i n te r na l
m icr o - co nt r ol le r may lock up and th e u nit wil l not r es po nd to an y co m m ands f r om the
pan el co nt r ol s.
In this event, u s e a s tr a ig ht en ed pa pe r clip, to oth pick or s i mi la r objects to pr e ss th e R E S E T
button located at r e ar of the u nit (see the below f ig ur e ). The r e set op er a ti on cl ear s the
system m em o r y and all of yo u r pr e vi ou s setting s wi ll be e r as ed .
CAUT I ON: DO NOT US E S HAR P , P O I NTE D O B J E CT TO P R E S S THE R E S E T B UTTON.
I T M AY DAM AGE T HE R E S E T SWI T CH I N SI DE THE UNI T .
Technical Data
P o we r Ad ap to r : I nput AC 100V 240V ~50/60Hz
Output DC 12V / 2000m A
P o we r Suppl y f or the u nit: DC 12V / 2000m A
B att er y back up fo r cl ock /m em o r y: DC 3V - - - 2 x AAA (UM - 4) type b att er y (no t in clu ded)
R em o te Co nt r ol bat te r y: DC 3V - - - 1 x CR2025 L i thium b at ter y (incl uded)
THE SP E CI FI CATI ON AND E XTE R NAL AP P E AR ANC E OF THE SE T A R E SUB J ECT TO
CHANGE WI THOUT P R I OR NOTI CE.
If at an y ti m e in the f utu r e yo u sho uld n eed to dispose of this p r od uct pleas e no te
that: Waste el ect r ica l pr o du cts shoul d no t be di spo sed of wi th h ousehold waste.
P le as e r ecycl e w he r e facil iti es exis t. Check with yo ur L ocal Au th o r it y o r r eta il er f or
r ecycl i ng advice. (Waste E l ect r ica l an d E lectr o ni c Equipm ent Di r ecti ve ).

11
Wake to Buzzer
* When the alarm time is reached, the alarm source indicator blinks and the buzzer
alarm will sound for three minutes.
* It goes into auto-Snooze mode if no button has been pressed. The buzzer turns off for
the snooze time (around 10 minutes) then comes on again.
* You may activate the snooze function after the alarm sounds by pressing the SNOOZE
button. The buzzer stops for the snooze time (around 10 minutes) then comes again.
* The snooze operation (including auto-snooze and manual snooze) can be repeated 3
times.
* To cancel the snooze before it expires, press the ALARM button.
* To stop the alarm immediately after the buzzer sounds, you can also press the ALARM
button. It resets itself for the following day.
Wake to Radio
* When the alarm time is reached, the selected alarm source Radio will automatically
turn on. It starts softly and gradually becomes louder. The alarm source indicator
blinks.
* It plays for 30 minutes then shuts off and resets itself for the following day.
* During the activation of the alarm source, you may press the SNOOZE button to
activate the snooze function. The alarm stops for the snooze time (around 10 minutes)
then turns on again.
* The snooze operation can be repeated 3 times.
* To cancel the snooze before it expires, press the ALARM button.
* To stop the alarm immediately after the alarm sounds, you can also press the ALARM
button. It resets itself for the following day.
Sleep Timer Function
Sleep to timer
This feature allows you to fall asleep to the radio or Bluetooth music to 120 Minutes.
The unit shuts off automatically when the time expires.
1. Press the STANDBY button to turn the unit on.
2. Either tune to the desired radio station in radio mode or playback Bluetooth music
from iPad/iPhone.
3. To select the sleep timer to turn the unit off after 15, 30, 45, 60, 90 or 120 minutes, press
the SLEEP button from the remote control repeatedly. The display shows the sleep time
and the sleep indicator . The unit plays for the selected length of time then
automatically turns off.
4. To turn the unit off before the sleep timer counts down to zero, press the STANDBY
button at any time.
Notes:
* To check the remaining sleep time, press the SLEEP button once from the remote
control.
* If you are falling asleep to Bluetooth music from an iPad/iPhone, the sleep timer
will shut off the power to this system but it will not turn off the Bluetooth device.
* If you are falling asleep to music from an external device connected to the AUX-IN
input, the sleep timer will shut off the power to this system but it will not turn off
the external device.
4
Wall Mounting option
(1) On the wall, two mounting screws (with same spacing as the main unit mounting holes)
should be ready for the mounting.
(2) Detach the Stand fr om the main unit.
(3) Insert the Ferrite holder on the rear of the unit.
(4) Place the power cord ferrite on the Ferrite holder.
(5) Hang the unit on the wall
PBTSD86+AF8- PYLE+AF8-IB draft Rev05.indd5 8 - 125 2012-5-24 14:42

5
Description of Parts
Main Unit
Top View
Front View Side View
Rear View
10
Clock Setting
When the unit is OFF (at standby mode):
Set 12/24 Hour format
1. Press the MODE button until the display digits blink then entered the 12/24 hour
for mat setting m ode.
2. P ress the TUN +/- / button to select 12 or 24 hour display format.
Set Clock
3. Press the MODE button again and the clock digits blink.
4. Press the VOL +/- button to set hour.
5. P ress the TUN +/- / button to set minute.
Exit setting mode
6. To save all settings and exit the setting mode, press the MODE button or wait for a few
seconds.
Alarm Operation
The unit incorporates alarm function which wakes you up from Buzzer (Beep) or FM Radio.
To select wake up alarm source
1. Turn the unit off.
2. Press and hold the ALARM button until the alarm source indicator BUZ / RAD
blinks on display.
3. P ress the TUN +/- / button to select alarm source Buzzer or FM radio.
To select wake to buzzer, the BUZ indicator blinks.
To select wake to radio, the RAD indicator blinks.
To set alarm time
4. P ress the AL AR M button again and the alarm digits blink.
5. Press the VOL +/- button to set alarm hour.
6. P ress the TUN +/- / button to set alarm minute.
Note: Press and hold the / or VOL +/- button for fast advance / reverse value.
Set maximum alarm volume level (apply for alarm source RADIO only)
7. P ress the ALARM button again, maximum alarm volume level indicator “V (level
digits)” blinks.
8. Press the VOL + / - button to select maximum alarm volume level, where you can select
the level between 10 and 30 (inclusive).
Save settings
9. To save settings and exit the setting mode, press the ALARM button or wait for few
seconds.
Enable daily alarm
10. Press the ALARM button to toggle between alarm enable and disable.
To activate the daily alarm, the alarm source indicator BUZ / RAD should appear on
the display.
Note:
When "Wake to Radio"is selected,make sure the radio station which you want to wake
to is tuned.
PBTSD86+AF8- PYLE+AF8-IB draft Rev05.indd6 8 - 611 2012-5-24 14:42

9
Au xil ia r y Input
Thi s unit pr o vi de s an a ux i lia r y audio sig nal input f or co nnecting e xt er n al audio devices.
1. R e mo ve th e F er r i te ho l de r at r e ar of the unit.
2. Co nnect an audio cable with 3.5m m s te r eo pl ug to th e AUX - I N Jack located at the back
of the un it.
3. Co nnect th e o th er en d o f the cable to a L i ne Ou t Jack o r Headphone J ack of yo ur
ex ter n al au dio device.
4. Tu r n on the e xt er n al audio device.
5. To sel ect a ux il ia r y audio in put, p r es s the FUNCTION butto n un ti l th e AUX i nd ica to r
displays.
6. Th e volum e level can now be co n tr o l le d t hr o u gh th e main uni t. Op er a te al l o th er
functi ons o n th e au xi li ar y device as u sual.
Note:
- I f yo u 'r e connected the L i ne Out J ack of yo ur ex te r nal device then you only need to adj ust
the volu m e co nt r ol of thi s uni t. If yo u'r e connected the Headph one J ack of yo ur e xt er n al
device, th en you may need to adjust both th e vo lume co ntr o l of yo ur e xt er n al device and
the volum e co n tr o l of th is un it to find the m ost de si r ab le volu m e setting .
- P r e ss th e S TANDB Y button t ur n in g off the unit wh en you fini s h lis tening .
Don't fo r ge t to switch o ff the po wer of yo ur e xt er n al devi ce as wel l.
(A) P r e set EQ
The uni t pr o vi des 4 pr es et E Q setting s f or yo u r selection.
In e it he r r ad io , AUX (au xi li ar y) o r Bluetooth m o de:
To select th e pr e set EQ, pr e ss th e EQ button fr o m th e r em o te co ntr o l.
Each p r es s of the EQ bu tton wi ll s cr ol l t hr o ug h following sel ecti on.
(B) B as s / Tr e bl e
P r e ss and ho ld the E Q butto n, the B ASS i nd ica to r will dis play. P r es s the TUN + / - /
button f or i ncr ea se o r de cr eas e bass level. P r e ss EQ butto n ag ain , TR E i n di cat or
displays. P r e ss the TUN + / - / butto n f or i ncr e as e o r decr ea se t r ebl e level.
(C) Bas s B oost fu nctio n
If n ece ss ar y, yo u m ay s elect the bass boost effect by p r es s in g the DBBS button f r om th e
r em o te co nt r o l.
Whilst the bass boo s t i s on and the BASS i nd ica to r displays.
Each p r es s of the DB BS button will to g gle between ON and OFF o f the bass boost effect.
Select yo u r fa vo ur .
Note: E i th er one of the above mentioned modes [ (A), (B) or (C)] can be acti vated at a time.
P r es et EQ, B ass /Tr ebl e and B ass B oost
6
1. B L UE TOOTH button - - - - - P r e ss to p ai r iP ad /iP h on e (Blu eto oth co nnection ).
2. B l uetooth L E D i nd ica to r
3. R e mo te C on tr o l I n fr ar e d S en s or
4. L CD display
5. S TANDB Y bu tton - - - - - Tu r n th e unit o n and off.
6. F UNCTION button ----- S el ect FM r a di o ste r eo / mon o, B l uetoo th o r AUX (Au xi li ar y)
mode.
7. S NOOZE / L I GHT button ----- Activate th e sn ooze functio n; Select display Dim / B r ig ht .
8. MODE / ME M button - - - - -
At standby m ode: Select di ff er en t settin g mode (12/24 h ou r s di spl ay f or m at,
clock).
In FM r a di o mode: Save pr e set r ad io station.
9. Mood L ight B a r
10. VOL + /- - - - - - Adj ust volu m e level up and do wn; Set clock / a lar m h ou r .
11. S pe ak er s
12. / button - - - - -
At standby m o de: Set clock / al ar m min ute.
In r ad io mode: Tune th e r a di o fr e qu en cy up / do wn .
In Blu etooth m ode: Skip t r ack s F or w ar d / Ba ckw ar d .
13. / P R E S ET button -----
In r a di o m ode: E nt er p r es et r ad io chann el m ode.
In B luetooth m ode: P la y / P au se i P od (i P ad /iP h on e) musi c.
14. MOOD L I GHT ON/OFF butto n ----- Tu r n the m ood ligh t on/off.
15. Al ar m bu tton - - - - - E nt er a lar m settin g m o de; Tu r n th e al ar m on/off.
16. Stand
17. AUX - I N jack ----- Au xi li ar y audio si gnal input.
18. DC - IN j ack - - - - - F or the conn ection of e xte r na l DC
po wer s upply.
19. R E SE T button - - - - - F or r e set ti n g th e u nit.
20. FM antenn a wi r e
21. Cl ock /M em o r y backup b at ter y co m par t me nt
22. F er r i te ho lde r ----- Fo r wall mounting , ho ld the f er r i te
(close to the DC- i n plug) of the p ow er a dap to r .
23. Moun tin g hol es ---- F or desk top stan d o r wall m ounting
R em o te Co nt r ol
1. I n fr a r ed Tr a ns m itt er
2. S TA NDB Y button ---- T ur n the u nit on and o ff.
3. E Q butto n - - - - Sel ect p r es et EQ effect.
4. F UNC (functi on) butto n ---- Select F M s te r eo /m on o
r ad io , Bluetoo th o r AUX (Au xi li ar y) mode.
5. butto n - - - - - P lay / P au se i P od (iP a d/iP h on e) mus ic.
6. MODE button - - - - Select d iff er en t setting m o de (12/24
h ou r s display f or m at , clo ck ).
7. V OL + /- button - - - - - Adj ust volu m e level up and do wn; Set clock / al ar m h ou r .
8. MUTE button - - - - M ute the volum e.
9. S NOOZE / LI GHT butto n - - - - - Activate the snoo ze function; Sel ect dis play Dim / B r i gh t.
10. SL E EP button ---- Select the ti m e d ur at io n of the sleep ti m er .
11. DBBS bu tton - - - - Select bass boost effect.
12. MEM bu tton - - - - Save pr e set r ad io station.
13. CH + / - button - - - - Select pr e se t r a di o ch ann el (station).
14. TUN+ / F F an d TUN - / F R button ----
At standby m o de: Set clock / al ar m min ute.
In r a di o m ode: Tun e the r a di o fr e qu en cy up / do wn.
In B luetooth m ode: Sk ip t r ack s F or w ar d / Ba ck wa r d.
15. AL AR M ON/OFF button ---- E n ter a lar m setting m ode; Tu r n th e al ar m on / off.
16. MOOD L I GHT ON/OFF butto n ----- Tu r n the m ood ligh t on/off.
17. B att er y Co m par t me nt

7
Bluetooth Op er atio n
The unit playback i P ad/i P ho ne/i P od To uch musi c t hr o ug h B luetooth o pe r ati on .
Note:
The uni t is design ed m ain l y f or Bluetooth p ai r i ng Apple device, like i P ad, i P hon e and i P od
Tou ch .
Y o u may tr y o th er b r an d of s m ar t pho ne / mobile device which has B l uetoo th fun ction.
Althou g h som e of the e ar l ie r mobile pho ne m odels which have B luetooth function, it m ay
no t compatible with thi s uni t.
B ef or e you di d the B luetooth p ai r in g/co nn ect io n, fol lowing i nf or m ati on wil l help:
(A) Whils t the u nit is s ear ch i ng fo r Blu etooth device (e.g . i P ho ne), the B l uetooth L E D
i nd ica to r will blink fast.
Whi lst the uni t pa ir ed with a Blu etooth devi ce (e.g. iP ho ne), the B l uetoo th L E D indicator
will blink s lowly.
(B) The B lueto oth devi ce name o f this m odel: NTX
Fo r the m o bile pho ne/device with Bluetooth ve r si on V2.1 and above:
- - - - - - - - - No P I N is r eq ui r ed fo r Bluetooth connection to this m o del.
Fo r the m o bile pho ne/device with Bluetooth ve r si on V2.0 and belo w:
- - - - - - - - - Th e P I N is “0000” fo r Bluetoo th con nection to thi s model
Blu etooth p ai r in g/co nn ect io n
1. P r e ss the S TANDB Y button to t ur n on the unit.
2. P r e ss the F UNCTI ON butto n to select B luetooth mode. The " bt " i nd ica to r dis pl ays.
3. The unit will s ea r ch n ei gh bo u r in g Blueto oth devi ce an d the B l uetooth L E D i n di ca to r
will bli nk fas t.
4. F r om the i P ad /iP h one/i P od Tou ch, t ur n on i ts B luetooth function and i t will als o
s ea r ch f or the n ei gh bo u r in g B lu etooth device.
5. F r om the B lueto oth device l ist of yo ur i P ad /iP h on e/i P od Touch, tap o n Blueto oth
device nam e “NTX” of thi s m odel f or th e connecti on (P IN is n ot r e qu ir e d). I n case i t
pr o m pt s f or the P I N, please e nte r “0000”.
6. Once the Apple device is p ai r ed wi th the uni t, th e Bluetooth L E D i nd ica to r will blin k
sl owly.
P la yback i P ad/i P ho ne/i P od Touch music
7. P la yback yo ur i P ad /iP hon e/iP od Touch m us ic.
8. Y o u m ay adjus t both the vo lume co ntr o l of yo ur Apple device and the vo lume co ntr o l
of this u nit to fi nd the most de si r ab le volume setting .
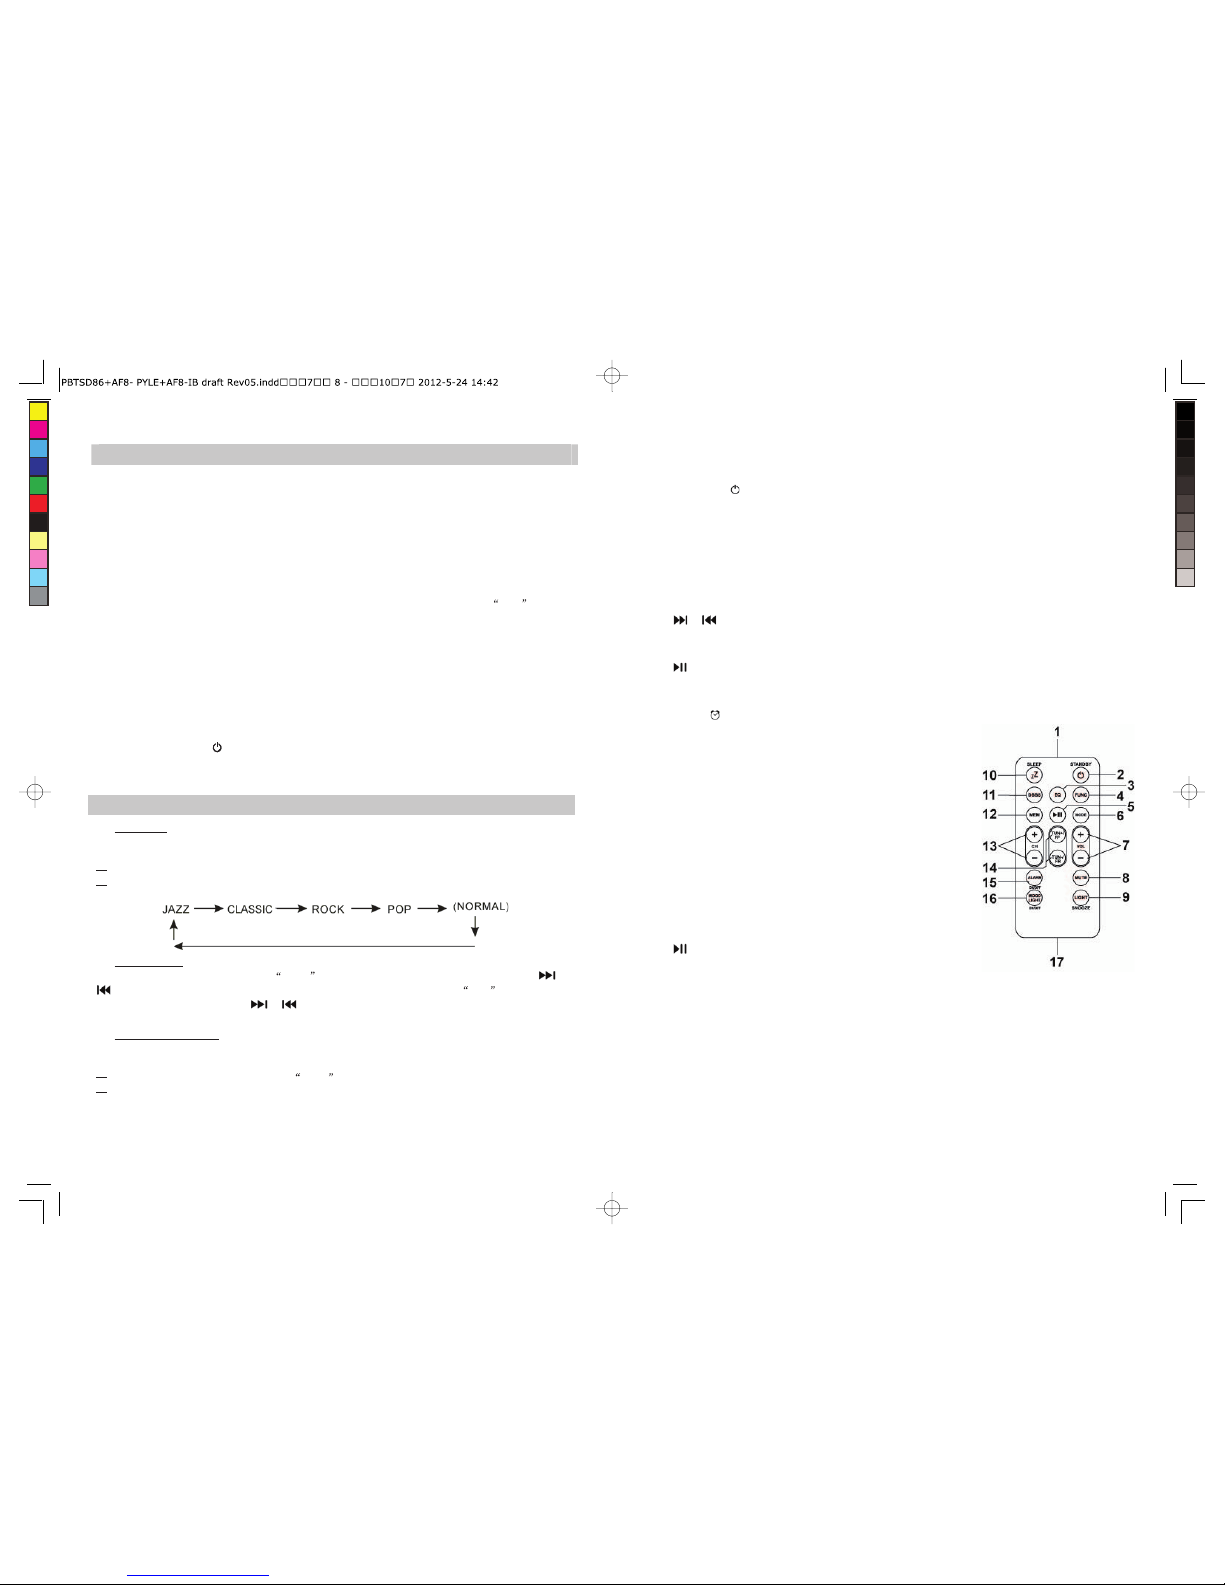
9. F r om the r e mo te co nt r ol you m ay pr e ss :
(a) the button to P l ay / P a us e iP a d/iP h on e/iP o d Tou ch m usic.
(b) the FF / F R button (o r / bu tton on th e mai n uni t) to skip t r ack s fo r war d /
ba ckw ar d .
(c) the MUTE bu tton to m ute the volum e.
Note:
(A) Au to- p ai r in g/co nn ecti on : With yo ur m obi le device i s pa ir ed , in th e cas e of (i) pr e ss in g
the FUNCTI ON button a r o u nd t r ip back to the B luetoo th m ode o r (ii) tu r n th e un it o ff
and on again, the unit will a ut o- pa ir with the p r evi ou sl y connected m o bile device.
(B) Man ual p ai r i ng /co nn ecti o n : I n th e cas e yo u wo uld l ike to p ai r /con n ect o th er m o bil e
device, in B l uetooth mode, pr e ss the B L UE TOO TH button to wait f or B luetooth device
pa ir i ng then implem ent steps 3 to 9 abo ve.
8
R adi o Tu ner Op er atio n
FM Antenna
Fu lly exten d the F M an tenna w ir e fo r th e best FM r a di o r e cept io n.
R ad io Tunin g
1. P r e ss th e S TANDB Y button to t ur n on th e u n it.
2. P r e ss the FUNCTION butto n to sel ect F M r a di o S ter e o o r Mo n o r ece ivi ng mode, w her e
the s te r eo i nd ica to r “ FM” and m on o i nd ica to r “F M “ display r e sp ecti ve ly.
3. To m anu ally tun e to a de si r ed stati on, r e pe ate dl y p r es s th e TUN + /- / button.
4. To au tom atically s ear ch fo r stati ons with st r on g signals, pr e ss and hol d the TUN +/-
/ button until the fr e qu en cy di gits on display begi ns to scan then r el ea se the bu tton.
The t un er wi ll stop on the fi r st str o ng signal it finds .
Notes:
Manual tune to s elect we ak er stati ons that mig h t be s kipped d ur i ng automatic
tuning.
If the auto m atic tuni ng does not sto p on th e exact f r eq ue ncy of the station, f or
exam ple, it stops on 88.9 MHz in stead of 88.8 MHz, use the manu al tu ning method to
"fi ne tune" to the ex act f r equ en cy of the d es i r ed stati on.
R ad io P r es et Stati ons
The unit allows yo u to s to r e up to 20 FM stations f or eas y r e cal l at any tim e.
Au to - pr e se t
1. P r e ss th e S TANDB Y button to t ur n on th e u nit.
2. P r e ss th e FUNCTI ON butto n to sel ect F M r a di o mode.
3. P r e ss an d h o ld the MEM button f or au to - pr e se t. The t un er will autom atically s can fo r
s tr o ng er stations f r om lo w fr e qu en cy to h igh fr e qu en cy and then s to r e th em in the
pr e set chann els.
Manual p r es et
1. P r e ss th e S TANDB Y butto n to t ur n on the u nit.
2. P r e ss th e FUNCTI ON bu tton to select FM r ad io mode.
3. Tune to the r a di o s tati on you want to s to r e in m em or y by p r es si ng th e TUN + /- /
button.
4. P r e ss th e ME M button . The pr e set channel n u mb er a ppe ar s on display an d blink s.
5. To select d es ir ed pr es et station n um b er , pr e ss the / butto n f r om the m ain u nit
o r th e CH + /- butto n f r om the r e mo te co ntr o l .
6. To co nf ir m p r es et location , p r es s the MEM butto n.
7. R ep ea t steps 3 to 6 to s to r e o th er stations , i f apply.
Notes:
- Th er e is a few seco nds delay when pr o gr a mm i ng , a ft er thi s delay tim e, the uni t will
autom aticall y switch back to n or m al tu n er m ode.
- You can o ve r wr i te a pr e se t station by o ve r wr i ti ng an d s to r in g the new f r eq uen cy in its
place.
R eca ll in g P r e se t S tatio n
1. P r e ss th e S TANDB Y button to tu r n on the unit.
2. P r e ss th e FUNCTI ON butto n to sel ect F M r a di o r ecei vi ng mo de.
3. To select de si r ed pr e se t stati on, p r es s the P R E S ET butto n th en the / button
fr o m th e main uni t o r pr e ss th e CH +/- button f r om the r e mo te con tr o l.
Table of contents
Other Pyle Clock Radio manuals