QAT MS6i User manual

Copyright (C) 2013-2014 QAT Audio Technology Ltd
All Rights Reserved
1
QAT Music Server MS6i USER’S MANUAL
Catalogue
1. General Introduction……………………………………….……2
1.1 Product Features…………………………………………....2
1.2 MS6i Overview……………………………………………....2
2. Start up & Shut down MS6i………………………………..…...4
3. Connect iPad and the Music Server…………………………...5
3.1 Use the USB wireless adapter (AP Mode)……………………….……5
3.2 Use a wireless router (connect by Ethernet cable)………………...…5
3.3 Use a wireless adapter (“Wireless Mode”connect wirelessly)…..…..5
4. Hard Disk Installation..............................................................6
5. Packing List ………………………………………..…..…….…7
6. After-Sale Service…………………………………………….…..8
Thanks for choosing QAT!
Copyright (C) 2013-2014 QAT Audio Technology Ltd
All Rights Reserved
2
1. General Introduction
1.1 Product Features
Changeable 2.5 inch Hard Disk
Digital output: TOSLINK, COAX, BNC, AES/EBU
Network Port: RJ-45 LAN
Control Port: RS232
Testing Port: TEST-SOCKE
4 USB Port for data transportation
Sample Ratio: 24Bit/192Hz
Support various audio formats: PCM、WAV、APE、FLAC、AIFF、WMA、M4A、MP3、
AAC、Ogg Vorbis etc.
Customized remote control software forAndroid and iOS
Self-owned intellectual property rights , Unique operation user interface
Fanless design, super cooling function
Various colors can be chosen
Support remote maintenance
Dimensions(W/W/H): 326×266×102(mm)
Net Weight:6 kg
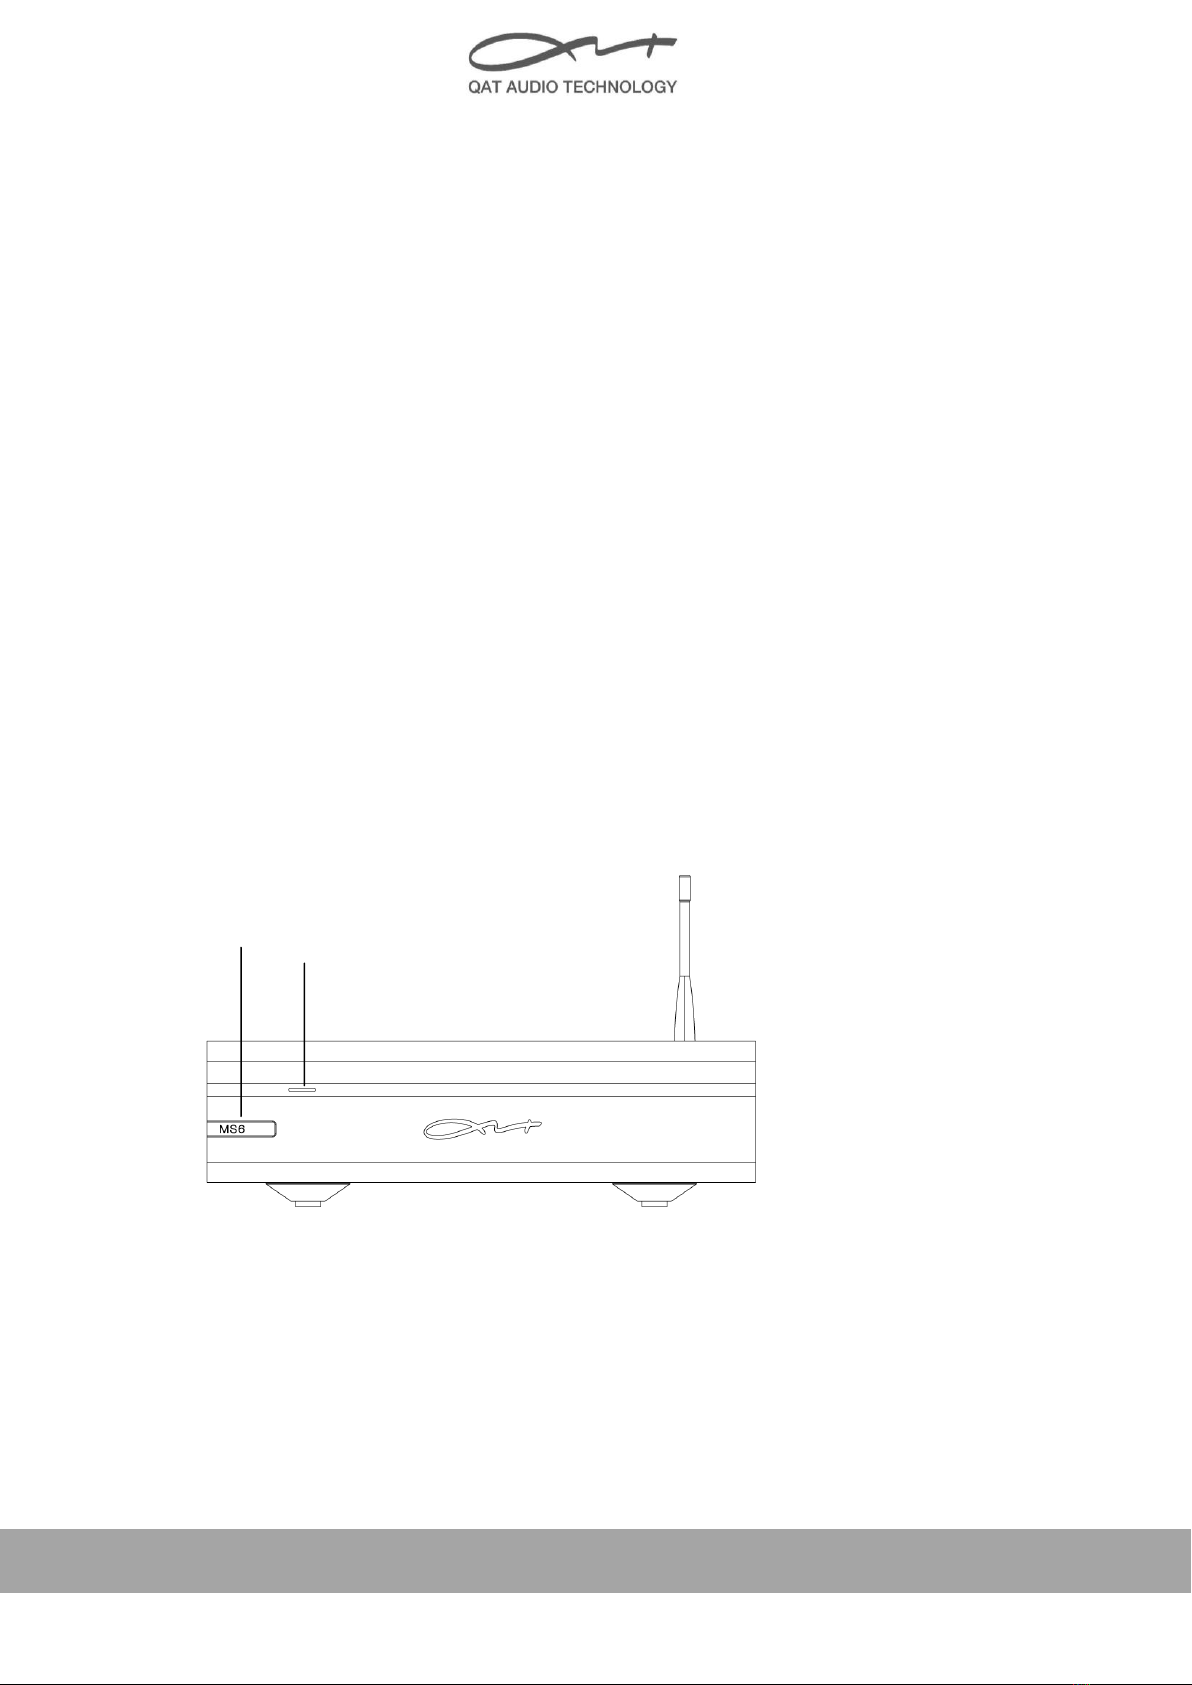
1.2 MS6i Overview
Front of MS6i
LED Light indicates current work status of MS6i:
LED Blue: MS6i Power on
LED Green: Starting
LED White: Working Status
USB Port
LED Light
i
Copyright (C) 2013-2014 QAT Audio Technology Ltd
All Rights Reserved
3
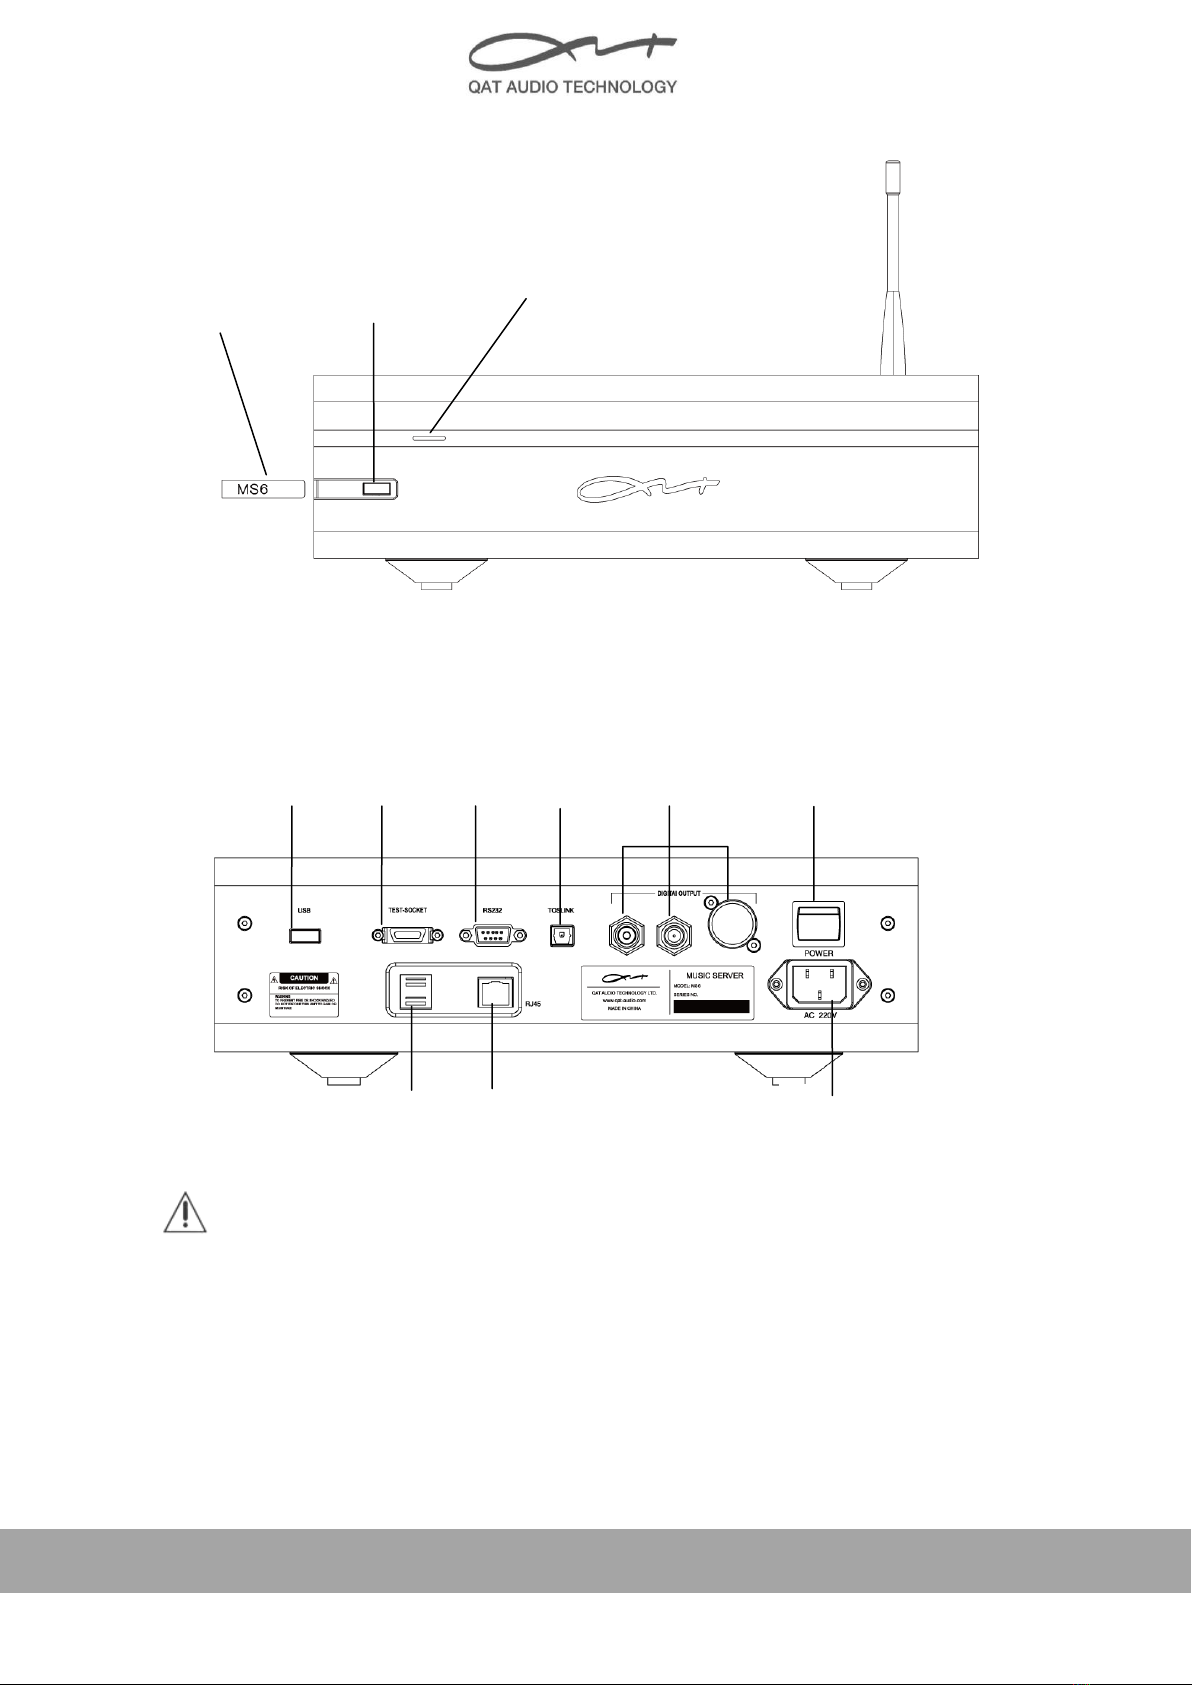
Back of MS6i
The Service port is only for servicing, this is a non-user-accessible
feature.
IEC Socket
OUTLEINTERINTE
RFACE
RJ45
INTE
RINT
ERFA
CE
USB
INTE
RINT
ERFA
CE
Power SWITCH
DIGITAI OUTPUT
Pre USB Port LED Indictor
USB Cover Lable
USB
INTE
RINT
ERFA
CE
TEST-SOCKE
T
RS232
TOSLINK
i

Copyright (C) 2013-2014 QAT Audio Technology Ltd
All Rights Reserved
4
2. Start up & Shut down MS6i Music Server
2.1 Start up MS6i Music Server
2.2.1 Connect Music Server to USB Wireless Adapter
2.2.2 Connect Power line
2.2.3 Turn on Power Switch on back panel
Indicator blue: Power on
Indictor green: Starting
Indicator White: Ready to work
2.3.4 Connect app “QAT ”Control Client
Starts up MS6I only by Power Switch in back panel, there is no standby switch.
2.2 Shut down MS6i Music Server
2.2.1 Shut down MS6i through app “QAT”, it only can turn off the machine, but not turn on
it.
2.2.2 After turning off MS6i through “QAT”, please shut down Power Switch on back panel.
●Power indicator green & flash: Shutting down
●Power Indicator blue:Already shut down.
APP DOWNLOAD
MS6i supports shut down from the iPad / iPhone / Android Devices but not turn on it.
iOS Device :
Please download “QAT”from Apple Store
Android Device:
Please download “QAT”from www.qat-audio.com
Or Search “QAT”from Google Play

Copyright (C) 2013-2014 QAT Audio Technology Ltd
All Rights Reserved
5
3. Connect iPad and the Music Server
There are three ways to connect iPad and the Music Server:
3.1 Use the USB wireless adapter (AP Mode)
You can use the USB wireless adapter, which is included in the original package, to connect iPad
and the host MS6I:
1) Connect the USB wireless adapter and the host through the USB port on the rear panel.
2) Tap “Settings” on the iPad screen, and find “WLAN”. Choose the correct network SSID(“QAT-
your S/N”), and type in code “qatqatqat”, if it is required. Then iPad and the host will be
connected.
3) Tap “QAT Remote”on your iPad to operate the host.
Note: When the host is connected to the Internet, the metadata of the CD album will be
downloaded and saved in iPad during the CD importing process. To connect to the Internet, the
user needs to insert one end of the Ethernet cable into the RJ45 interface on the rear panel and
the other end into an Internet access.
3.2 Use a wireless router (connect by Ethernet cable)
If you have a wireless router at home, you can connect the host to the route (DHCP function of
the router must be enabled). Insert one end of the Ethernet cable in the LAN interface of the
wireless router, and the other end into the RJ45 interface on the rear panel of the host. Then
follow the steps below:
1) Tap “Settings” on the iPad screen, and find “WLAN”. Choose the correct network (your home
Wi-Fi) and tap to connect (enter the password if it is required). Then iPad and the host will
be connected.
2) Back to iPad main screen, and tap app “QAT” to operate the host.
Note:
To acquire the metadata of the CD album during importing, the wireless router must have
Internet access.
When your iPad is too far away from the wireless router or when there are too many
obstacles such as walls in between, the connection may be unstable.
3.3 Use a wireless adapter (“Wireless Mode”connect wirelessly)
In this way, the host doesn’t need an Ethernet cable. You can use the USB wireless adapter, which
is included in the original package, to connect the host and the wireless router (DHCP function of
the router must be enabled):
1)Connect the USB wireless adapter and the host through the USB port on the rear panel.
2)Tap app“QAT” on your iPad to enter the main screen, and then tap “Settings”on the left
upper corner. In the network options, See the item of “WLAN Mode”, press “change”and then
select “wireless mode”, and type in the SSID of the wireless network and the code.
3)Tap OK and quit app ”QAT ”.
4)Tap iOS “Settings” on your iPad, and find “WLAN”. Choose the correct network (your home
Wi-Fi) and tap to connect (enter the password if it is required). Then iPad and the host will be
connected.
5)Back to iPad main screen, and tap app “QAT” to operate the host.

Copyright (C) 2013-2014 QAT Audio Technology Ltd
All Rights Reserved
6
Note:
To acquire the metadata of the CD album during importing, the wireless router must have
Internet access.
When your iPad is too far away from the wireless router or when there are too many
obstacles such as walls in between, the connection may be unstable.
The connecting approach in 3.3 will be available only for app QAT V2.0 and later versions.
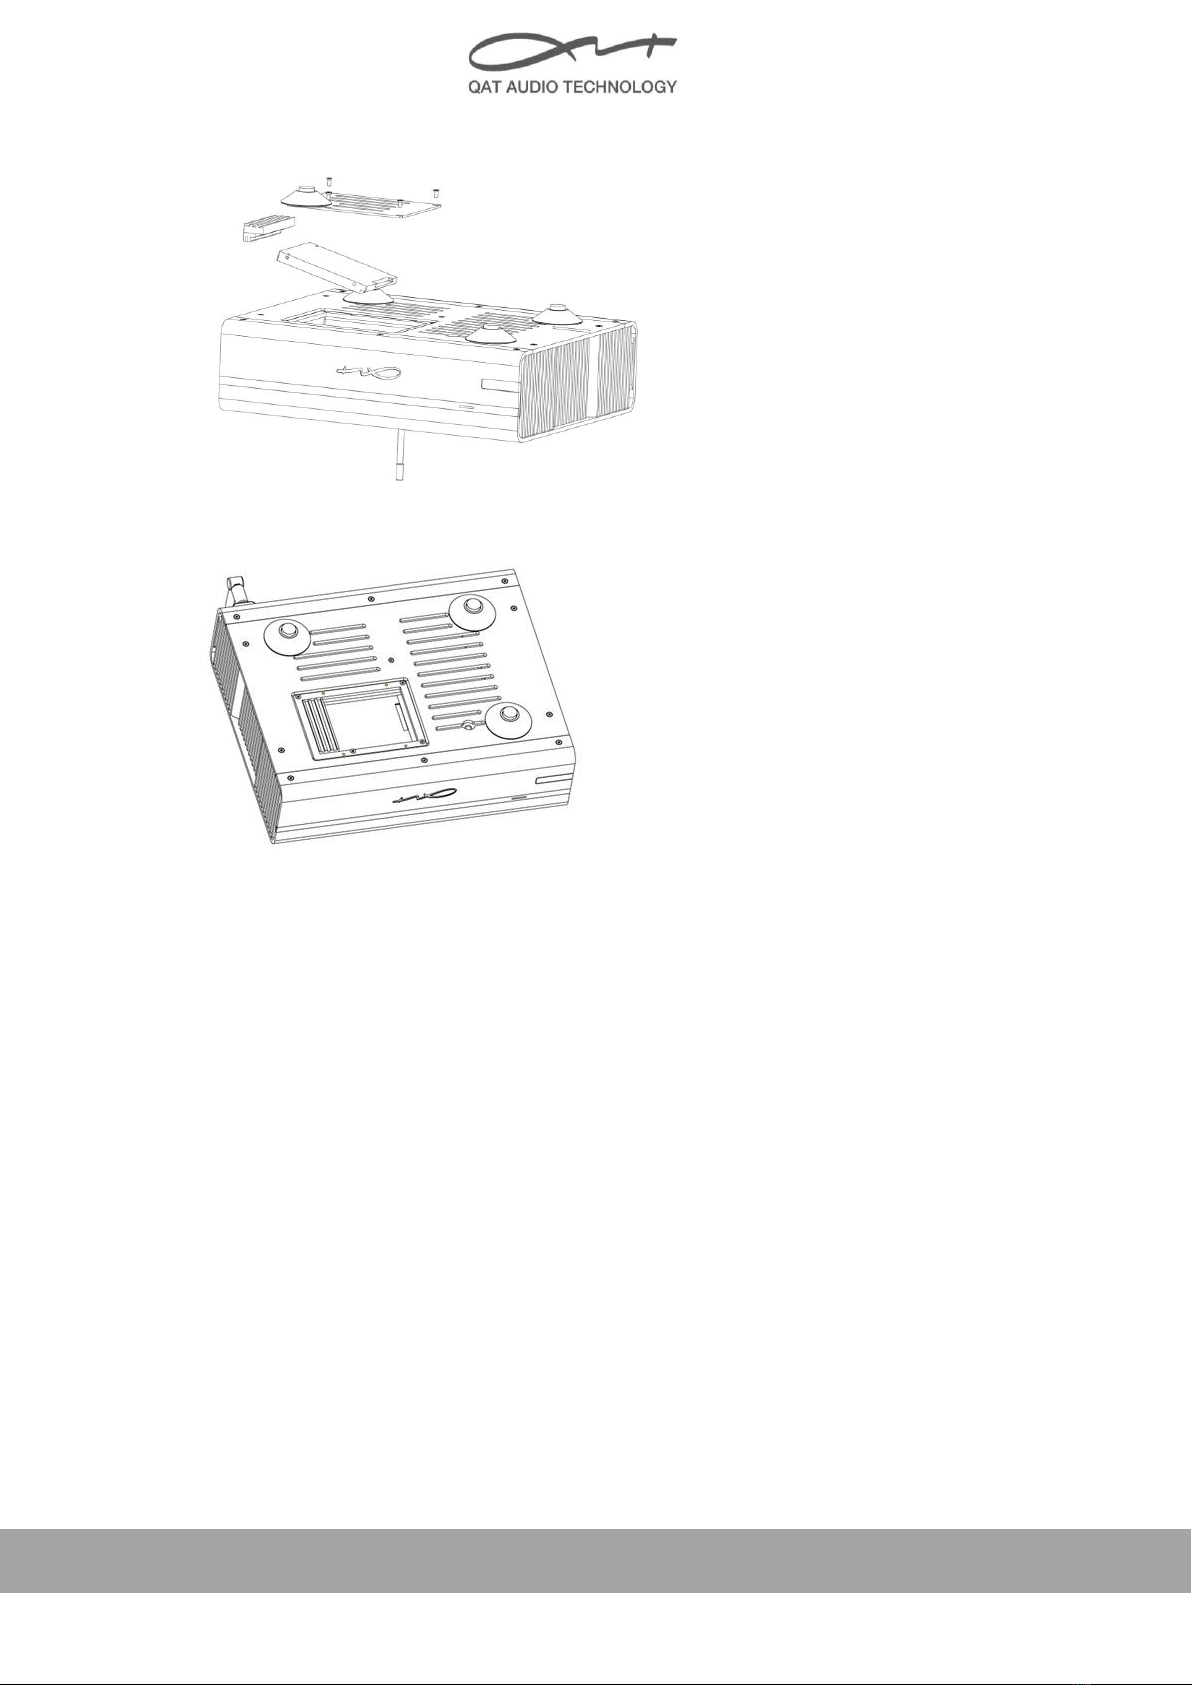
4. Hard Disk Installation
Step 1:Remove Screws of Hard Disk cover
Step 2: Remove HD cover
Step 3: Install Hard Disk
Copyright (C) 2013-2014 QAT Audio Technology Ltd
All Rights Reserved
7
Step 4: Fix Coverage
◆Please don’t extract Hard Disk when the unit is ON.
5. Packing List:
Please check that the following items are in the box:
● MS6i Music Server
● NW 338 USB Wireless Adapter
● Power Cord
● Quick Start Guide Book
● Hexagonal Screw Driver
◆Carefully unpack each part, if there is any damage, or missing parts, please inform
your dealer immediately.
◆Please retain the original shipping carton and all packing materials as they are
specially designed to protect the unit during transportation and shipping

Copyright (C) 2013-2014 QAT Audio Technology Ltd
All Rights Reserved
8
6. After-sale Service
QAT Audio offer –days of warranty from date of purchase that can be extended to a
2-Year Limited warranty.
QAT products are identified by a unique serial n°(S/N) located at the back of the
unit. This number is required to register your product and validate your warranty.
Please quote your serial number when service is required.
Warranty coverage doesn’t include:
●Damages due to operator’s misuse including water damage, physical damage and
modifications are not covered by this Warranty Policy.
●Normal wear of the housing or other consumable parts are not covered by this
Warranty Policy.
●Damages due to any unauthorized disassembling or repairing are not covered by
this Warranty Policy.
昆河宝珍音响科技有限公司
QAT Audio Technology Ltd.
北京市朝阳区望京利泽西街北小河公园北门园内东侧红楼二层
2 F, Red Tower, North Creek Park, Lize West Street, Wangjing, Chaoyang District, Beijing, China
Tel: +86-10-84294566 Fax: +86-10-84294966 W: www.qat-audio.com
Table of contents
Other QAT Server manuals


