Introduction
Setting Guide
Basic Operation
For explanations of basic functions, refer to "Basic Manual".
[ (Chrome)] Chrome icon
Use Google Chrome to view Web pages.
Navigation bar
C(BACK): Return to the previous screen. When " " appears in the character entry
screen, tap this button to hide the keyboard or menu.
H(HOME): Display the home screen. Long-touching this button activates Google.
N(RECENTS): Show recently-used apps. Long-touching this button activates the multi-
window during apps activation. When the multi-window activates, this
button is changed to " ". Long-touching this button deactivates the multi-
window.
FPower button
■The power button is on the front
Turning the Power On
Press and hold F(Power button)
until the incoming light turns on.
Displaying Home
screen
From the Start screen,
slide the screen. 《Start screen》
《Home screen (au Basic Home)》
Display
Touch directly with your finger to operate.
Tap/Double-tap
Lightly touch a screen and
then immediately release your
finger. Tapping a screen twice
in the same position is called
double-tap.
Long-touch
Keep touching a screen.
Slide
While lightly touching the
screen, trace to the desired
direction.
Flick
Touch the screen and flick up/
down/left/right.
Drag
While lightly touching the
screen, trace to the desired
position.
Zoom-in/Zoom-out
While touching the screen with
two fingers, move the fingers
away and closer to each other.
■Character entry
For character entry, there are flick input and input by tapping a key repeatedly.
Flick input
Tap a key to display characters like the right screen that can be input by flick input.
Flick to the direction of the character to enter.
《Character entry screen
(10-key keyboard)》
Character entry
mode switch key
Tap to switch
character type.
Entering with 10-key keyboard
This is a keyboard on which characters are arranged in the same order as the common cell phone. The character is switched every time you
tap the keyboard.
• To enter "No"
Tap " " two times →" " →" " three times.
■Setting Silent mode
• Press and hold l(Volume down button) for at least one second to set the Silent mode to ON/OFF.
• To change the Silent mode type, press l(Volume down button) / r(Volume up button) →[Vibrate] / [Mute] / [Drive] when the Silent
mode is set
.
• Alternatively, from the home screen →[ 基本機能 (Basic Function)] →[Settings] →[Sound] →[Silent mode] →[Silent mode type] →
Change the Silent mode type.
■Setting the App Permissions
The first time you launch an app/function that accesses the functions or information of the product, a confirmation screen for requesting
access permission appears. If the confirmation screen appears, confirm the content and tap "DENY"/"ALLOW".
• If you do not permit, apps/function may not be activated or use of function may be restricted.
• For some apps/functions, an explanation screen for the permission appears. A confirmation screen may appear in several times and its
content may vary. Confirm the content and follow the on-screen instructions.
• In this manual, description of such confirmation screen may be omitted.
■Auto Assist
It controls the functions automatically according to your actions or lifestyles such as the Silent mode is set when your getting on the train is
detected, the snooze is canceled when your walking is detected, it notifies you with vibration when there are unread notifications and you
pick up the phone, etc. Set in the following steps.
• From the home screen →[ 基本機能 (Basic Function)] →[Settings] →[Auto assist] →Set each item
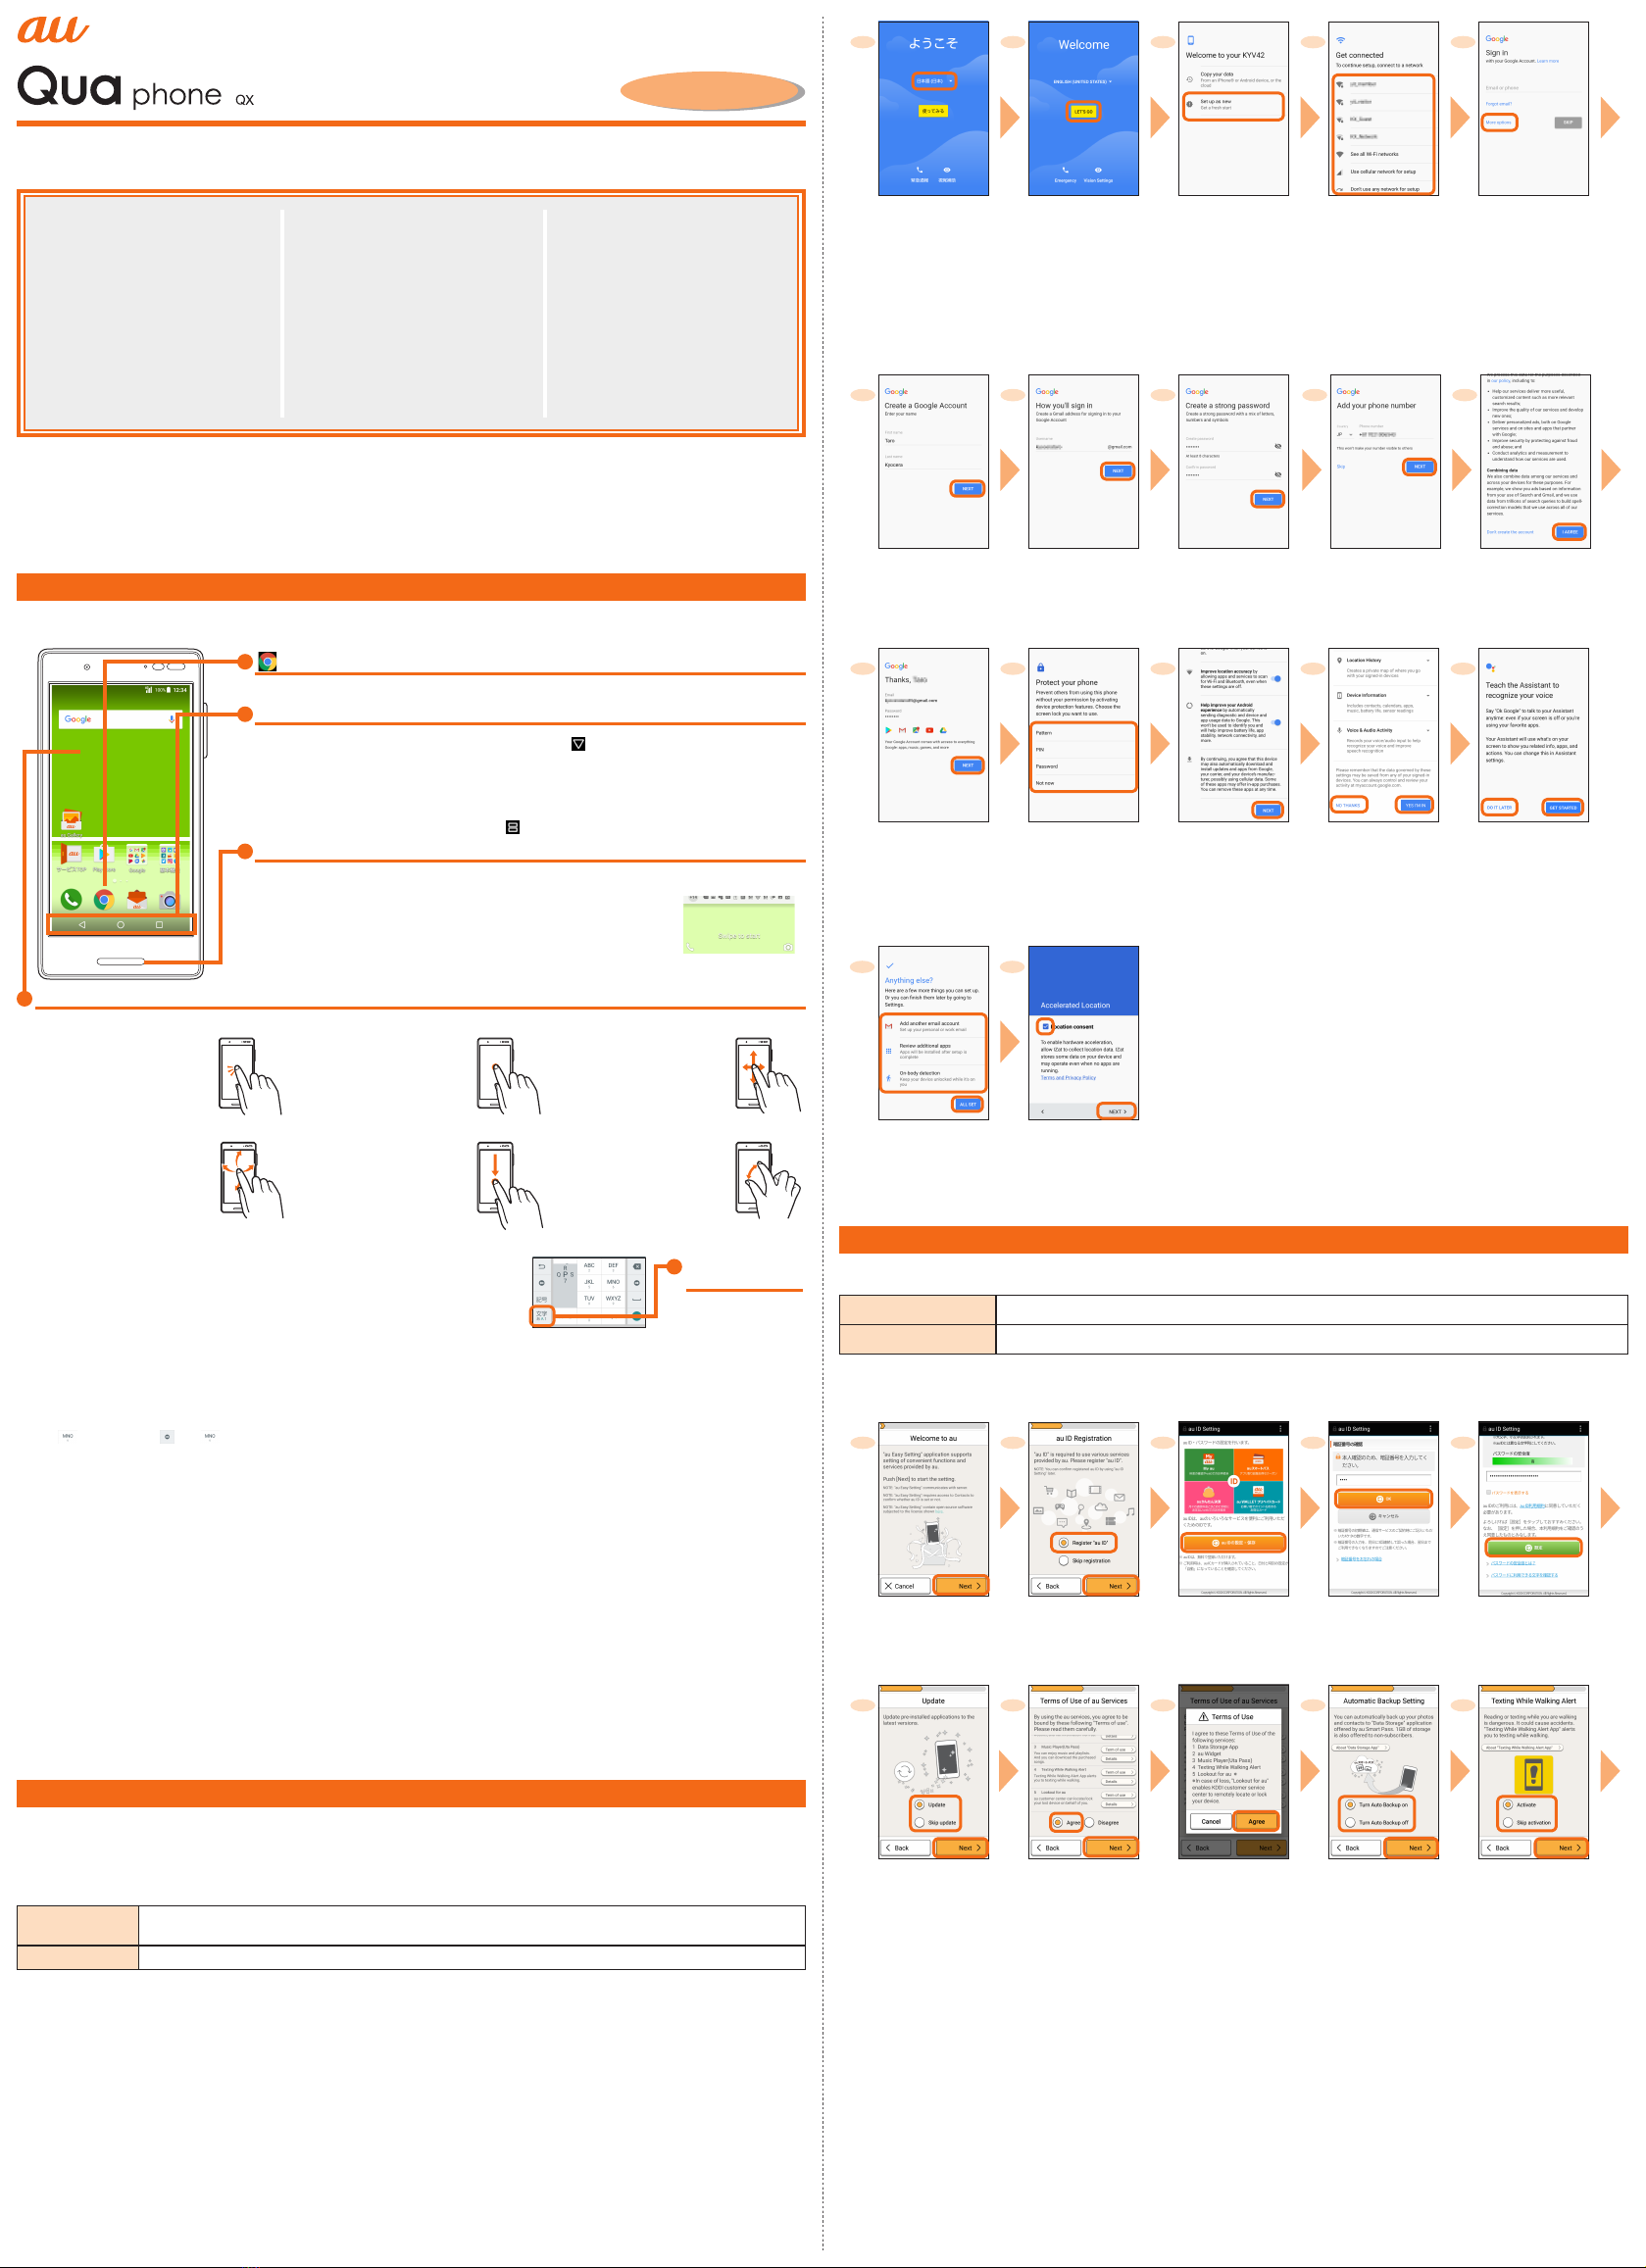
Initial Settings
When you turn on the product for the first time after purchasing the product, follow the on-screen instructions to set language, functions and
services.
■Setting up Google account
Set up Google account to use Google apps such as "Gmail", "Play Store", "Duo".
Setting items are as below (besides the items below, register "First name" and "Last name").
User name Register your Google account (user ID) and a character string for mail address. You can register a desired name,
but a name already registered by another user cannot be set.
Password Register password for the Google account.
12345
Tap " 日本語(日本)"
to select "English" →
"United States"
Tap [LET’S GO] [Set up as new]
* If you restore a backup
or copy from a device,
select [Copy your data]
and follow the on-screen
instructions.
Set up the Wi-Fi ®
network to connect as
required
* If you do not set up, tap
[Use cellular network for
setup] →[CONTINUE].
* If you select [Don't use
any network for setup] →
[CONTINUE], the name
input screen is displayed
and enter your name, and
then proceed to step 11.
And follow the on-screen
instructions.
[More options] →
[Create account]
* If you have a Google
account, enter a mail
address or phone number
→[NEXT]
.
6 7 8 9
10
Enter "First name" and
"Last name"
→[NEXT] →
Enter the date of birth and
gender →[NEXT]
Enter a user name
→[NEXT]
Checking registration of
user name starts.
Enter a password
and reenter the
password for
confirmation →
[NEXT]
Confirm/Change
the country name
and phone number
→[NEXT]*1 →
[VERIFY]
* If you do not set up,
tap "SKIP".
Check the contents,
then [I AGREE]
11 12 13 14 15
Check the contents,
then [NEXT]
Select protection
features →Follow the
on-screen instructions
to set security and
notification
* If you do not set up, tap
[Not now] →
[SKIP ANYWAY].
Confirm the Google
service settings,
then [NEXT] →
[CONTINUE]
Set up other settings
as required →
[NO THANKS]
/[YES I'M IN]
Set up the Assistant
as required →[GET
STARTED] →Follow the
on-screen instructions
* If you do not set up, tap
[DO IT LATER]
→
[DONE].
16 17
Set up other settings as
required →[ALL SET]
Check the contents
and mark the check
box, then [NEXT]
* If you do not set up,
tap “NEXT”.
*1 Text message for Google verification code will be sent to the set phone number.
au Easy Setting
By setting au ID, you can use various services provided by au such as "au Kantan Kessai" which allows you to purchase apps from the au ス
マ ート パ ス (au Smart Pass) or Google Play. Main setting items are as follows.
au ID*Register your au phone number or a character string for au ID (user ID).
au ID password Register password for using au ID.
* "au ID" which is already used by another user cannot be set.
• If you skip the operation of "au Easy Setting" at that time, you can set au ID later. In that case, operate from the home screen →[au
Supports] →[au ID Setting].
12345
Welcome to au screen →
[Next]
[Register "au ID"] →
[Next]
[au ID の設定・保存 (Set
and save au ID)]
Enter the security code
→[OK]
* Default value is a four-
digit number written at
subscription.
Enter a security
password →
[設定 (Settings)] →
[終了 (Exit)]
6 7 8 9
10
[Update]/[Skip update] →
[Next] →[ 次へ (Next)]
Check the terms and
conditions (reading
requires), [Agree] →
[Next]
[Agree] Check the contents,
then [Turn Auto Backup
on] / [Turn Auto Backup
off] →[Next]
* To back up photos and
contacts to au server
automatically using "Data
Storage App", tap "Turn
Auto Backup on"
.
[Activate] / [Skip
activation] →[Next]
Thank you for buying the "Qua phone QX" (simply called the "product" from here on).
In this guide, settings and precautions for using the product are described.
For explanations of basic functions, refer to "Basic Manual".
■Basic Operation
Describes the basic operations.
■Initial Settings
Make initial settings when you turn the
power on for the first time.
■au Easy Setting
Set au ID.
■E-mail
Make initial settings for E-mail (@ezweb.
ne.jp) etc.
■Basic Manual app
Describes how to download/use “Basic
Manual app”.
■Making a Call
Describes how to make a call.
■Receiving a Call
Describes how to receive a call.
■Setting Display
Set the screen brightness and back-
light time of the screen.
■Setting Wi-Fi®
Describes how to connect Wi-Fi®net-
work.
■Viewing/Playing Data
Describes how to view/play still images
or video data.
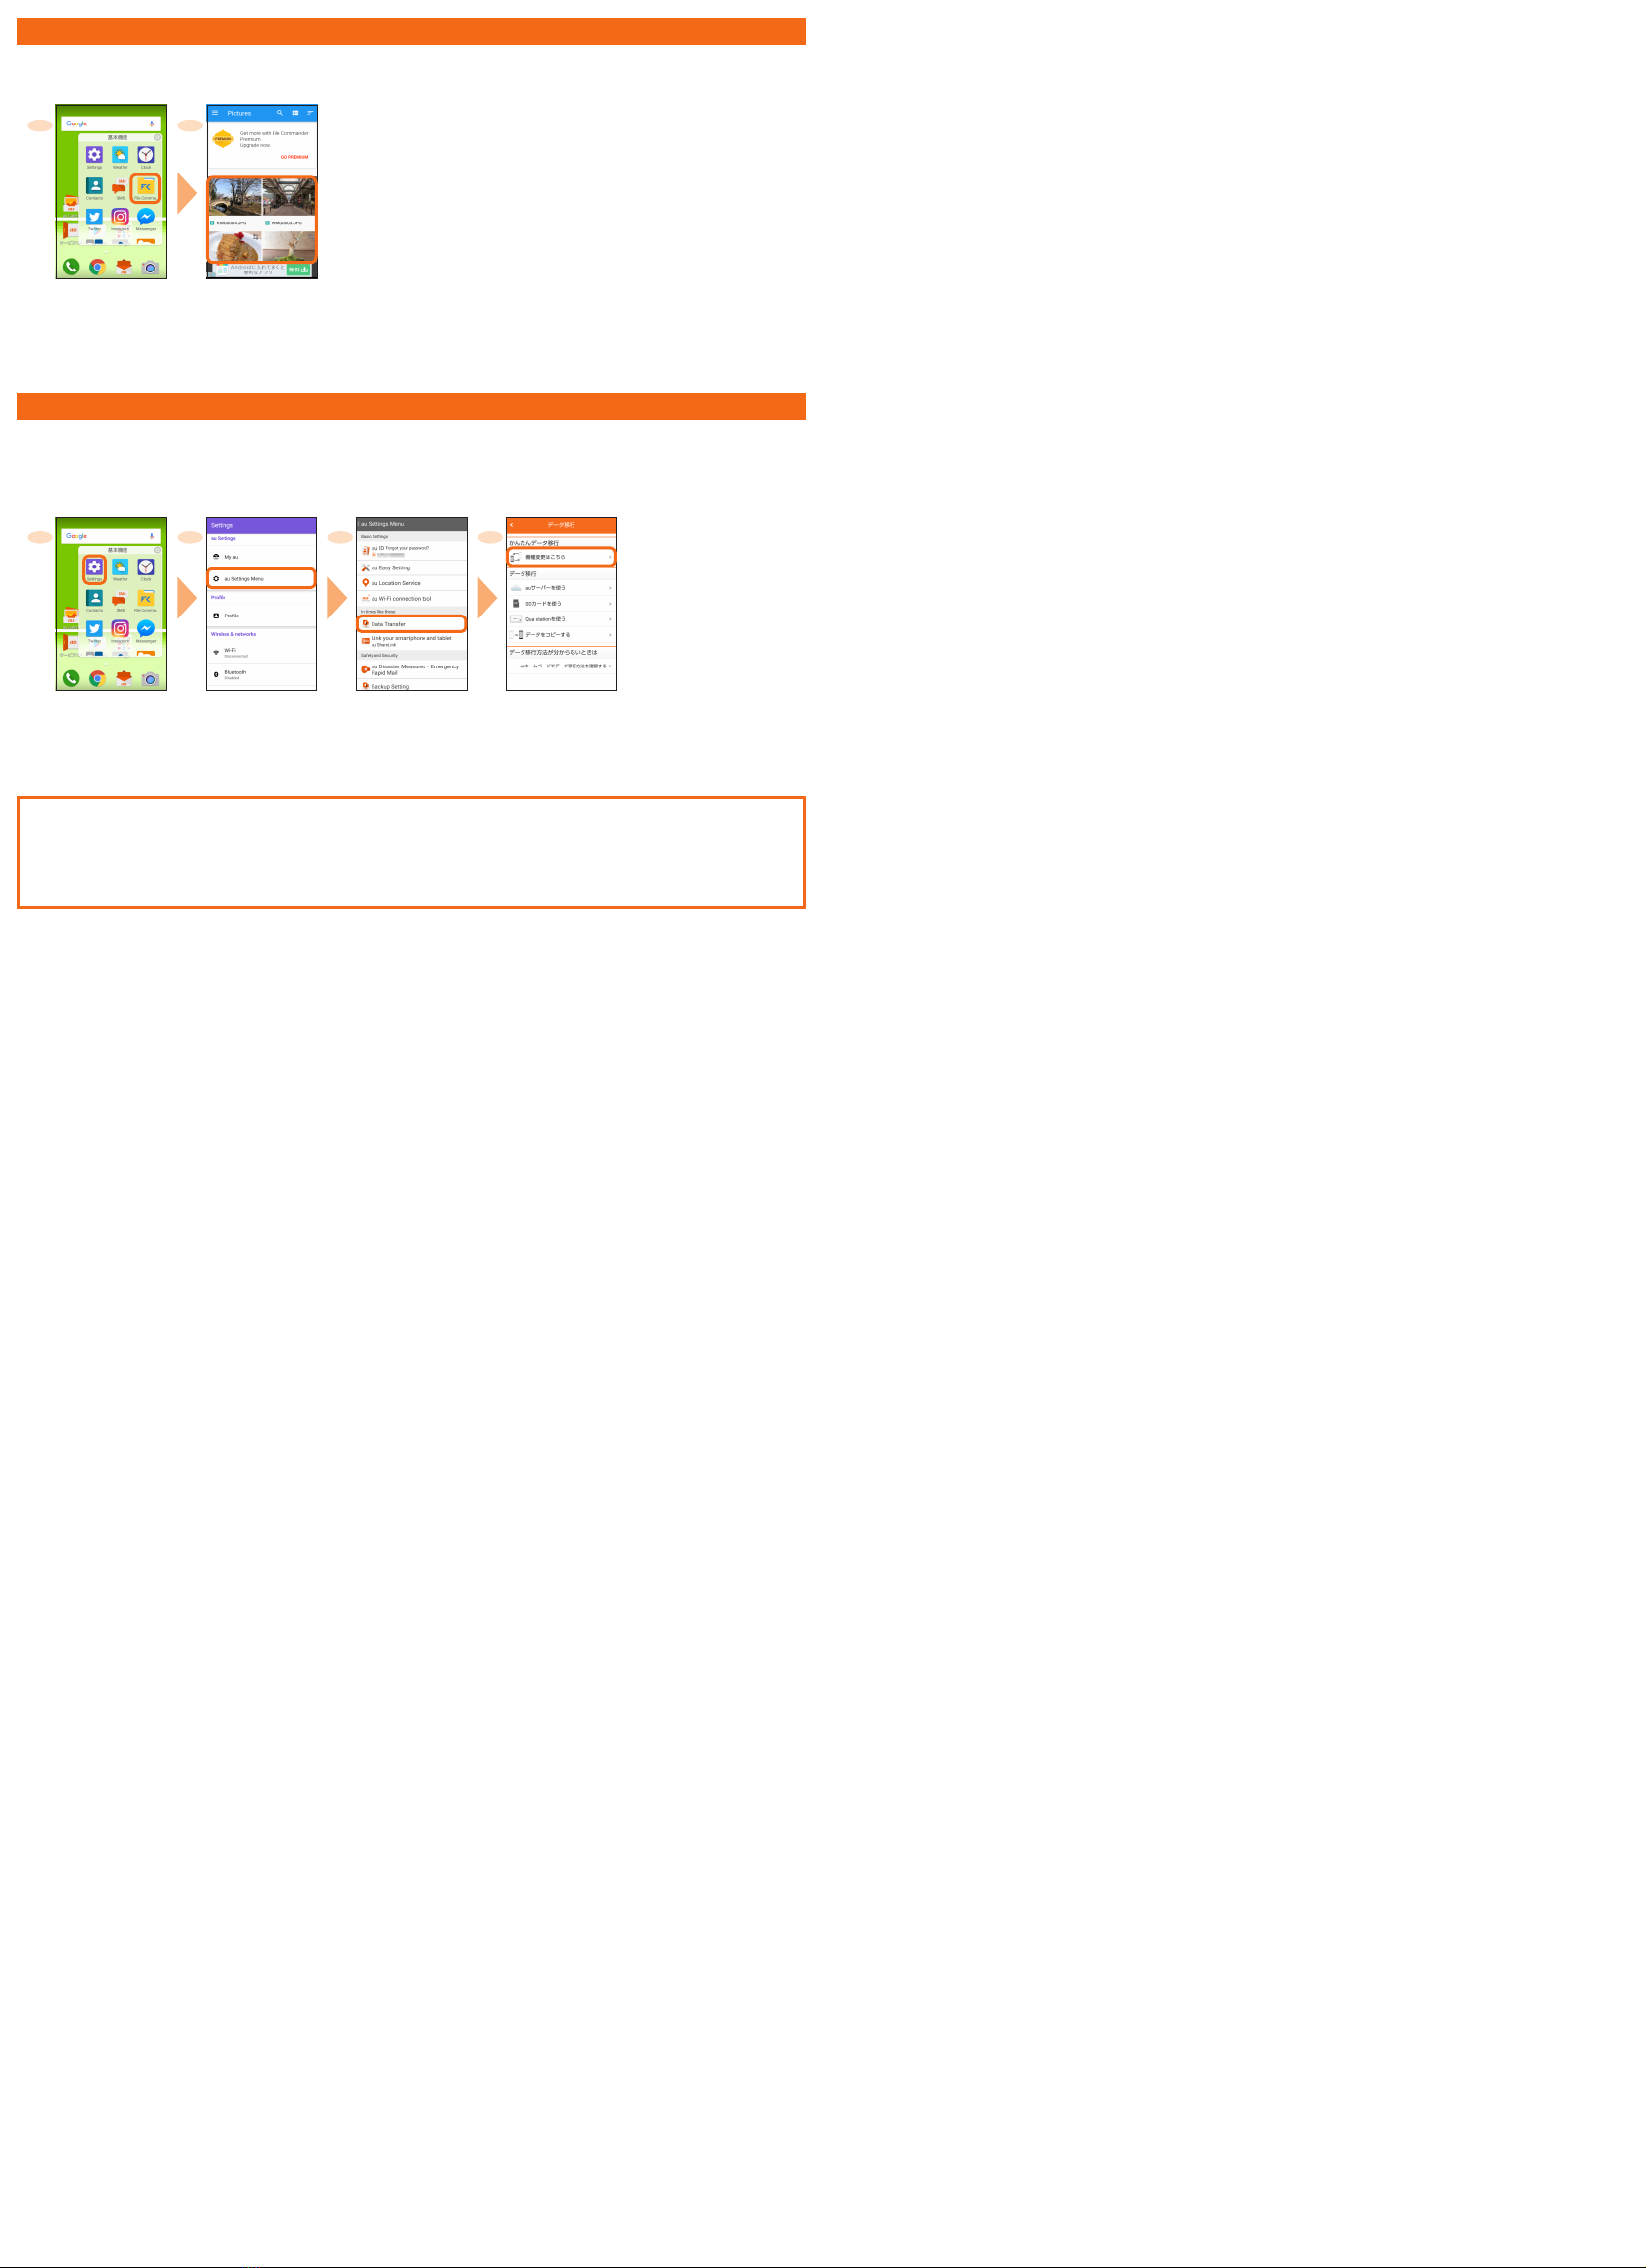
■Transferring data from au Settings
Menu
Describes how to restore/back up data
from/to your previously used phone to/
from this product using microSD card
or the au server.
Company names and product names referred to in this manual are trademarks or
registered trademarks of respective companies.
The TM, ® marks may be omitted in this manual.
Illustrations and screens shown in this manual may look different from
the actual illustrations and screens.
In some cases, minor details or a part of a screen may be omitted.
July 2017, 1st Edition
Sold by: KDDI CORPORATION
OKINAWA CELLULAR TELEPHONE COMPANY
Manufactured by: KYOCERA Corporation