Quik Swim Pool QS-1648 User manual

IMPORTANT
Read this guide and follow all instructions carefully before assembling or using
this product.
To purchase replacement parts and accessories, or to obtain
technical assistance, visit:
www.splasharoundpools.com

Index 2
Warnings………………………………………………………………….. 3
Before you begin…………………………………………………………. 4
Parts list and specifications……………………………………..…..… 5
Preparing the ground…………………………………………….…….... 6
Assembly instructions / frame layout…………………………….……. 7
Assembly instructions / liner layout……………………………………. 8
Assembly instructions / completion………………………………. 9
Skimmer and return fitting assembly…………..………………………. 9
Pump and filter assembly…………………………..………..................10
Disassembly………………………………………………………………10
Warranty……………………………………………………………….11-12
Getting started:
Congratulations on the purchase of your new pool! Please read this owner’s manual before
beginning assembly. The information contained within this booklet will help ease the installation
process and extend the life of your pool. We suggest using 2-3 people during the assembly of
your pool to speed things up. Don’t forget to save this manual for future reference.

Warning 3
WARNING:
Never jump or dive into pool.
Horseplay of any kind in pool
may result in spinal or fatal injury.
Adult supervision is required at all times.
Important - Please read
Make sure you do not install your pool under electrical lines.
Always use a GFCI outdoor protected receptacle to plug your pool equipment into.
Always make sure that the pool area is supervised by a competent individual.
Do not allow any diving, jumping or headfirst entry into the pool.
Never swim alone.
Never use the pool under the influence of alcohol or drugs.
Never allow children to use the pool unsupervised.
Never leave your pool assembled without water.
Never assemble the pool when the ground is off level.
Never assemble the pool on soft or unstable ground.
Never try to make one end deeper on the pool floor; the liner does not stretch.
Do not over fill the pool.
Never allow the pool to go unfiltered for a time period longer than 24 hours.
Do not attempt assembly on any day with winds in excess of 20 MPH.
Never assemble your pool on nut grass.
Never assemble the pool without proper concrete or pressure treated support base as shown in this
assembly guide.
Never drag the pool liner across abrasive surfaces like asphalt or concrete.
Always remember, safety is the key to fun in your new pool.

Before you begin 4
PLEASE NOTE:
It is normal for the pool to show some deflection of the top rails inward while the pool is filling. Once
the pool has filled completely, the deflection of the top rail may be slightly outward. This is common
and will not effect the structural integrity of your pool.
In some rare cases, due to different climate conditions and local water quality, your new pool may
“sweat” or “weep” slightly after being filled for the first time. This may appear around the bottom
perimeter of your pool, most often noticeable when installed on cement. This “sweating” or
“weeping” will most often stop once the outside air temperature and inside water temperature
equalize in a few weeks time or less. This is similar to condensation which occurs on the outside of
a can of cold soda on a hot day. If after several weeks, your pool continues to “sweat” or “weep”,
please contact your dealer or Splash-A-Round pools directly for further assistance.
In some rare cases, due to the advanced design of the PVC poly-fabric reinforced heavy duty liner,
small microscopic pinholes may occur in the material due to the curing process when manufactured.
These microscopic pinholes may appear as a small “weep” in the material which can be easily
omitted by dabbing a small amount of transparent glue which is provided with your pool. Once
applied, wipe off with a dry cloth. The “weep” will immediately stop and the transparent glue will be
invisible. If you do not wish to apply a small amount of transparent glue, you may simply wait a few
weeks as most often the “weep” will stop on it’s own. This is in no way a defect which will affect or
compromise the integrity of your new pool.

Parts list & specs 5
Frame Assembly List / Model QS –1648
Ref. Description Qty Diagram
A Horizontal straight tube 1 1/2” 12
B Vertical straight tube 1 1/4” 12
C T connector 12
D Plastic foot 12
Skimmer parts
(4) (2)

Preparing the ground 6
A. POOL SIZE / SPACE REQUIRED.
It is recommended to allow an additional 18” of space around the perimeter of your portable pool. For
example: a 16’ round pool should have an area of 17’ 6” in diameter. The larger dimension (17’ 6”) is
referred to as the “foot print”.
B. HOW DO I FIND LEVEL?
It is important that your pool be placed on level ground. Though your pool can tolerate being slightly out
of level, it is best for proper filtration, as well as visual concern, to have your pool as level as possible.
Here is a simple way to how to find level ground:
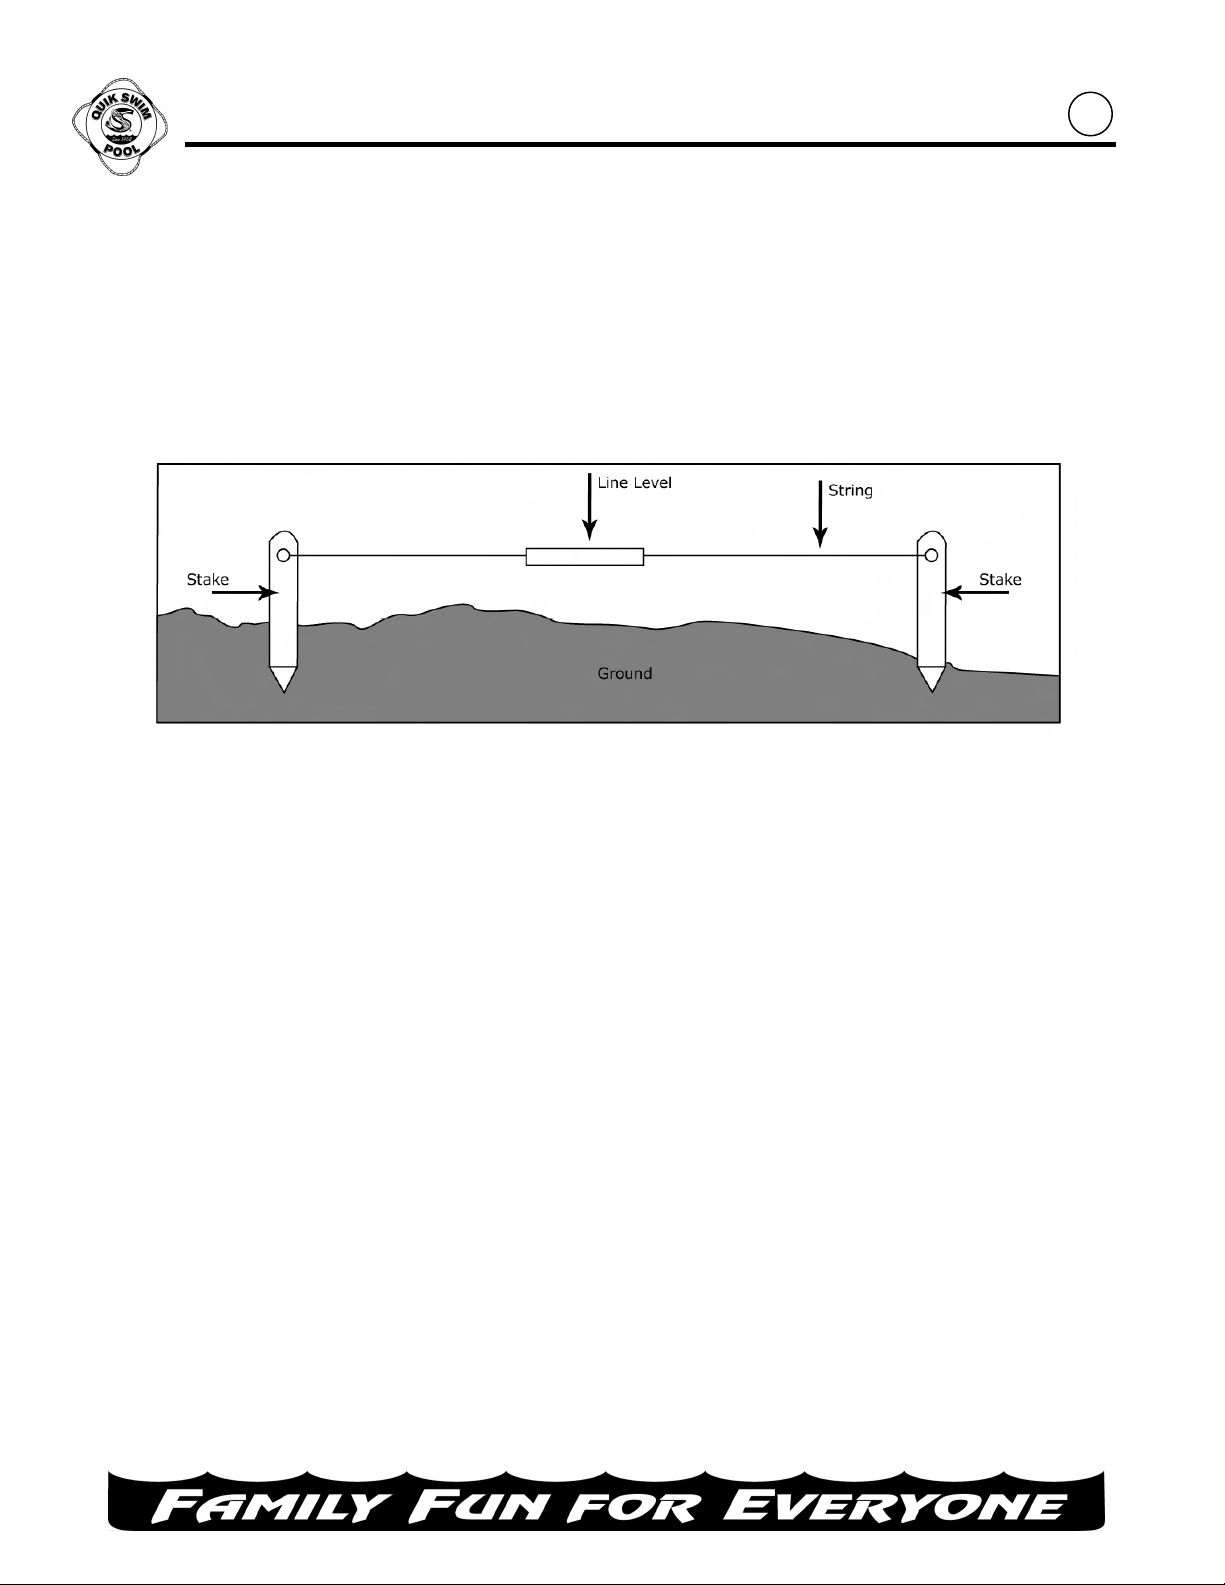
You will need:
Two small wooden stakes
Length of string, two feet longer than the longest dimension of the pool
One “Line level” (can be purchased from any hardware store for about $2.00)
1. Simply set one stake into the ground at one end of where the pool will be, and the other stake at the
other end.
2. Tie the string stretched between both stakes, making sure it is stretched tight.
3. Now set the line level in approximately the center of the string.
4. Tap either stake further into the ground to level the string at both ends.
5. Now measure the distance from the ground to the string at both ends. If one measurement is 5” at
one stake, and 7” at the other stake, then you’re only 2” off level.
C. SURFACE PREPARATION:
If there is grass in this area, we recommend removing grass and any foliage prior to assembly of the
pool. In addition to removing grass, it is recommended to add 2 to 3 inches of washed plaster sand or
Happy Bottom ® pad for additional protection of the pool liner prior to assembly. (Happy Bottom ® can
be purchased from your local dealer)
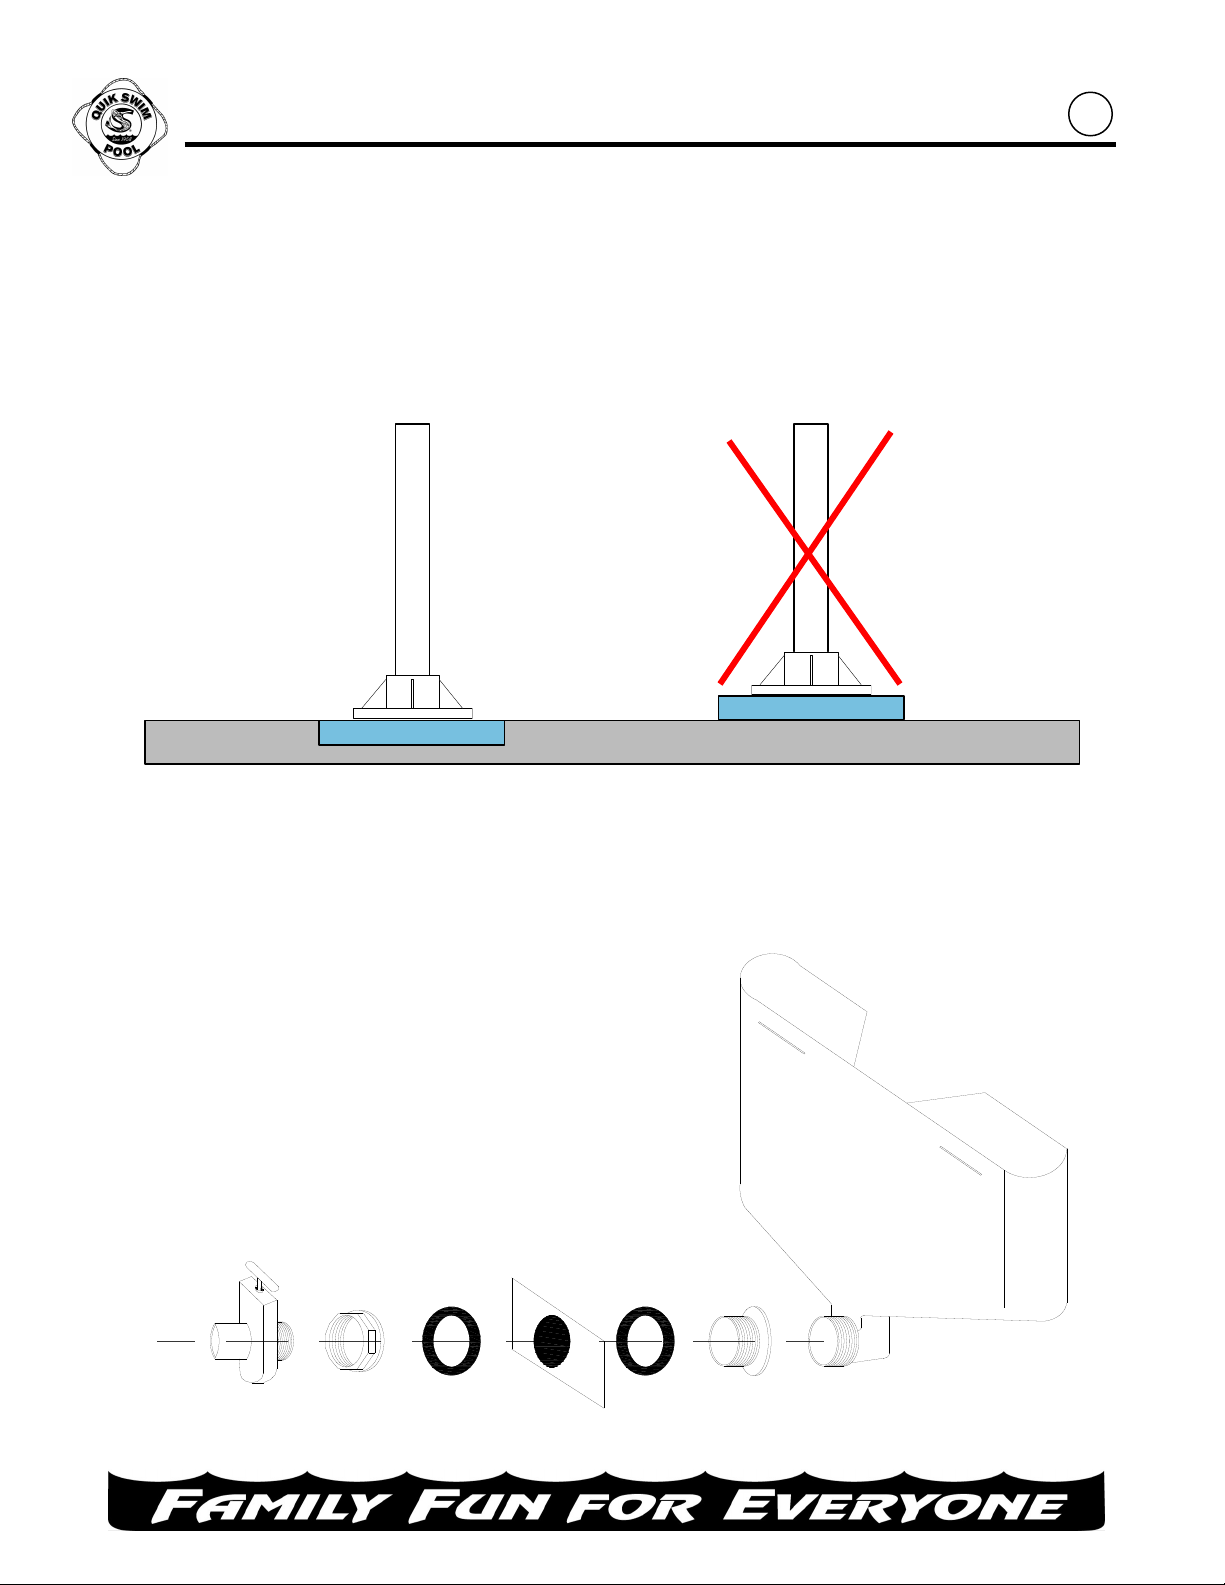
D. Base support:
We always recommend supporting the vertical uprights with concrete or pressure treated wood base.
Failure to use support base may result in structural failure which is not covered by the warranty.

Pool assembly / frame layout 7
Step 1:
Locate the area most suited for setting up the pool. Clear it of any sharp objects or debris and level it to
zero as explained on the “Preparing the ground” page. If the pool is assembled on unleveled ground, it
may suffer permanent structural warping or damage the liner.
Step 2:
Remove the liner from the box marked “liner” and place it at the center of the area where you plan to
assemble the pool. Take care not to damage the liner when opening the box. DO NOT USE SHARP
OBJECTS TO OPEN THE BOX THAT CONTAINS THE LINER.
Step 3:
Unfold the liner. Locate the place where the pump and filter system will be connected and position the 2
circular openings on the side where you intend on placing the pump and filter.
Step 4:
Remove the frame (parts a, b, c and d) from the box marked “frame”. Lay all of the upper frame out in
the order indicated below. Each frame piece will be clearly marked with the corresponding letter.
a
c

Pool assembly / Liner layout 8
Step 5:
Begin inserting the upper frame rails ( a ) into the sleeves located at the top of the liner. Center the
beam in the sleeve and attach a t connector ( c ) to the end of the frame rail in the open space between
each sleeve. Insert the smaller end of the top rail into the larger end of the t-connector lining up the
plastic pin making sure you hear a “click.” Repeat this step until all of the upper frame rails and t connec-
tors have been connected.
Step 6:
Once all of the upper frame rails have been connected it is time to attach the vertical legs. Begin by slid-
ing one vertical leg ( b ) through the retaining belt and attaching it to the t connector ( c ) pushing in on
the pins and aligning the holes until you hear a “click.” Double check that the vertical leg has been in-
serted in the restraining belt and proceed to the next leg repeating these steps until all of the vertical
legs are in place. Next go around the pool attaching the plastic feet ( d ) to each of the vertical legs ( b ).

Pool assembly / Fitting assembly 9
Step 7:
Special note: Once you finish, make sure the liner fits comfortably on the structure. Go around the pool
to check that the framework is assembled correctly. Once you start filling the pool with water, you will not
be able to make any changes.
IMPORTANT: Make sure to place a support base of concrete or treated wood under each vertical
upright as correctly shown below.
Step 8:
Now that you’ve completed the pool assembly, its time to install the skimmer and return fittings. Follow
the diagram below. Once the skimmer has been properly assembled, insert the 2 skimmer straps
through the openings on the skimmer and buckle them securely to the loops on the pool liner.
Gate Valve
(optional)
Compression
Nut Gasket Liner Compression
Face
Skimmer
Gasket
BAS E
BAS E
GROUND

Equipment assembly / Pool disassembly
Disassembling the pool:
Step 1:
Drain pool completely and dry all moisture off of the liner. This will prevent mildew or algae growth while
in storage:
Step 2:
Remove all top rails, T–connectors, vertical tubes, and bottom feet and store.
Step 3:
Make sure that all of your pool items are stored in a cool dry place without sun exposure.
From
Skimmer
To
Return
10
Step 8:
With the skimmer and return fittings now in place, assemble the pump and filter package and connect
the hoses according to the diagram below. (Equipment may vary by dealer)
Step 10:
Fill pool to middle of skimmer and enjoy your new pool! You have now completed the installation proc-
ess and are ready to start enjoying the benefits of pool ownership. Be sure to retain this manual for fu-
ture reference.
Rev. 11/13
Step 9:
Before you start filling the pool with water, assemble and secure the ladder with the ladder straps
included. Refer to the ladder instructions for assembly procedures.
(Hair & Lint Trap Optional)


Place first
class
postage
here
Table of contents
Other Quik Swim Pool Swimming Pool manuals