Wilbar Mediterranean V35041 User manual

POOL MODEL
INSTALLATION MANUAL - ROUND POOLS
11.13
V35041
Mediterranean


ABOVE GROUND POOL SAFETY
warning
FAILURE TO HEED THESE WARNINGS CAN RESULT IN PERMANENT INJURY,
PARALYSIS FROM A BROKEN NECK, ELECTROCUTION OR DROWNING.
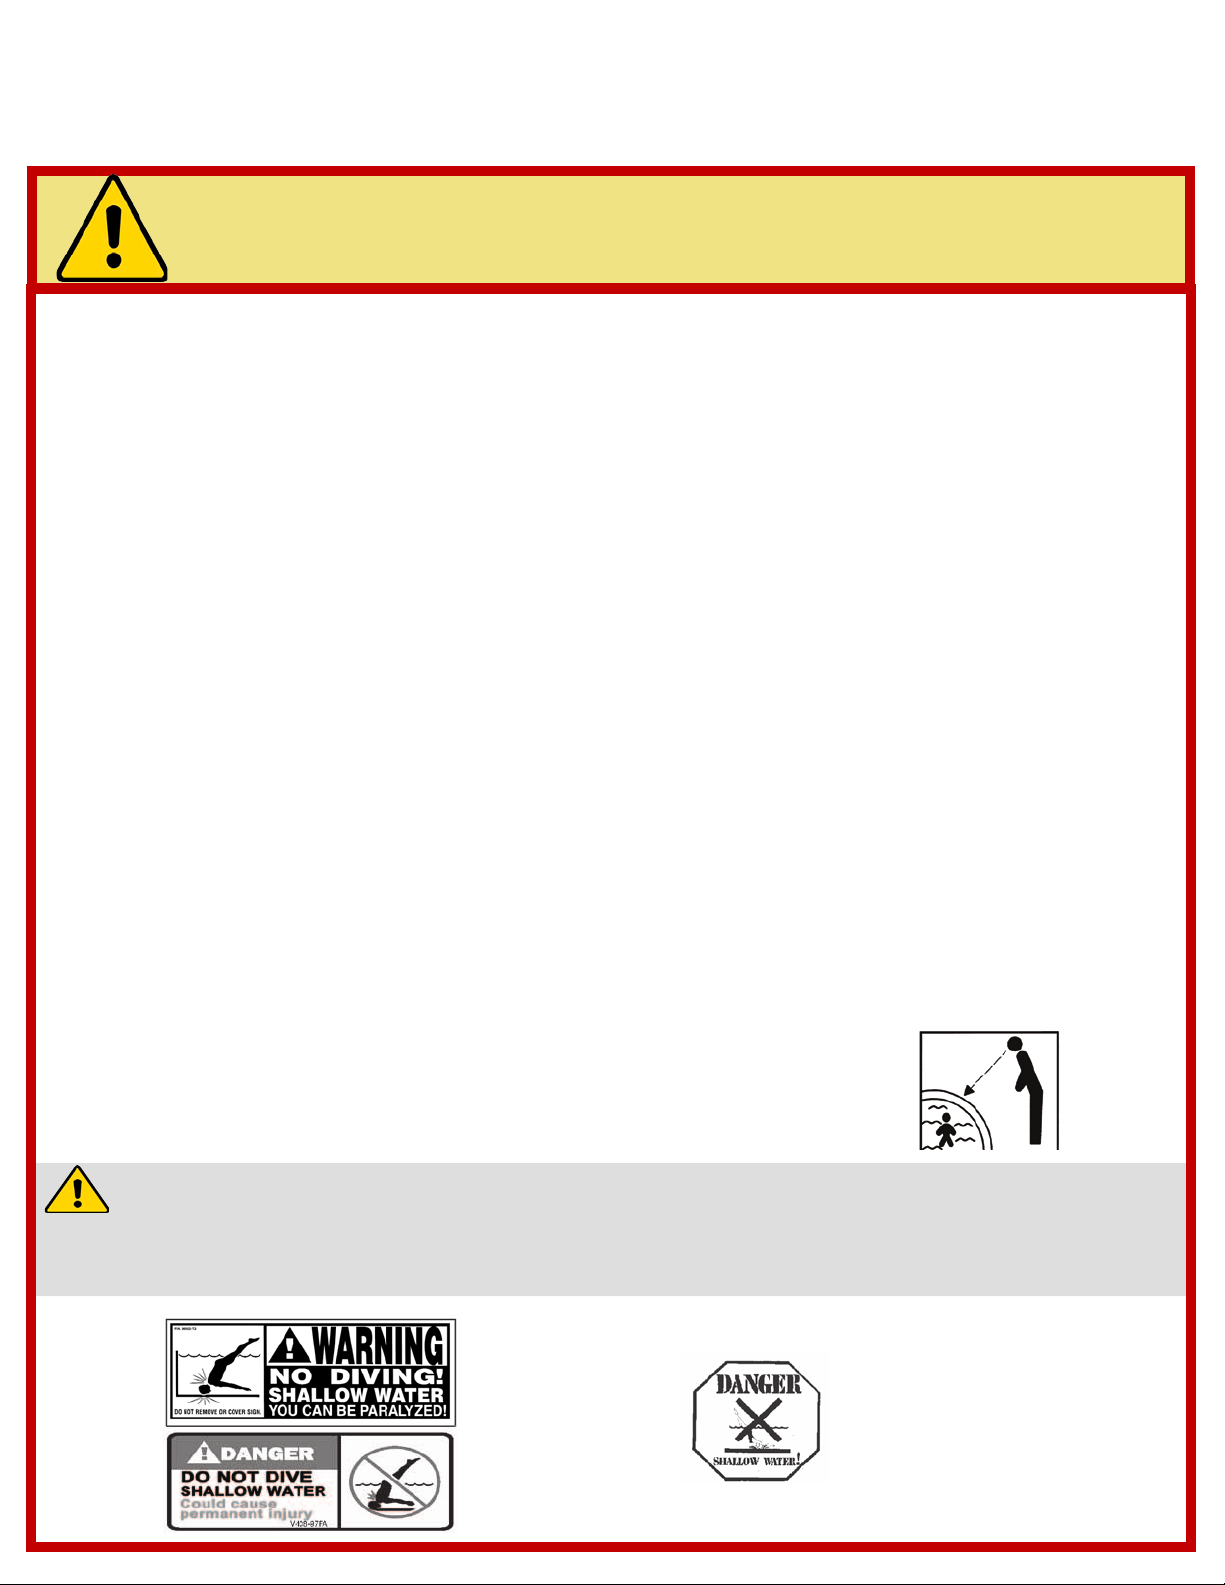
THIS POOL IS NOT DESIGNED FOR DIVING OR JUMPING!
DANGEROUS INJURY CAN RESULT, SHALLOW WATER!
Your pool contains a large quantity of water, and is deep enough to present inherent dangers to life and health unless the follow-
ing safety rules are strictly observed. First-time users run the highest risk of injury. Make sure everyone understands. To insure
your pool is used safely you must observe the following safety precautions:
1. NO JUMPING OR DIVING
The top rail of your pool is not a walkway and must not be used for jumping or diving. Do not
permit jumping or diving into the pool from a deck or the top rail of the pool. Diving or jumping
into the pool can result in serious injury.
2. NEVER USE THE POOL ALONE
Never permit the pool to be used unless it is attended by at least one person other than the
bather. Someone should always be available to lend assistance in an emergency.
3. NEVER LEAVE CHILDREN UNATTENDED
Never leave a child alone and unsupervised in or near the pool—not even for a second. There
is no substitute for constant adult supervision.
4. NO ROUGH PLAY
Do not permit “rough-playin” in and around your pool. Surfaces can become slippery and
hazardous when wet.
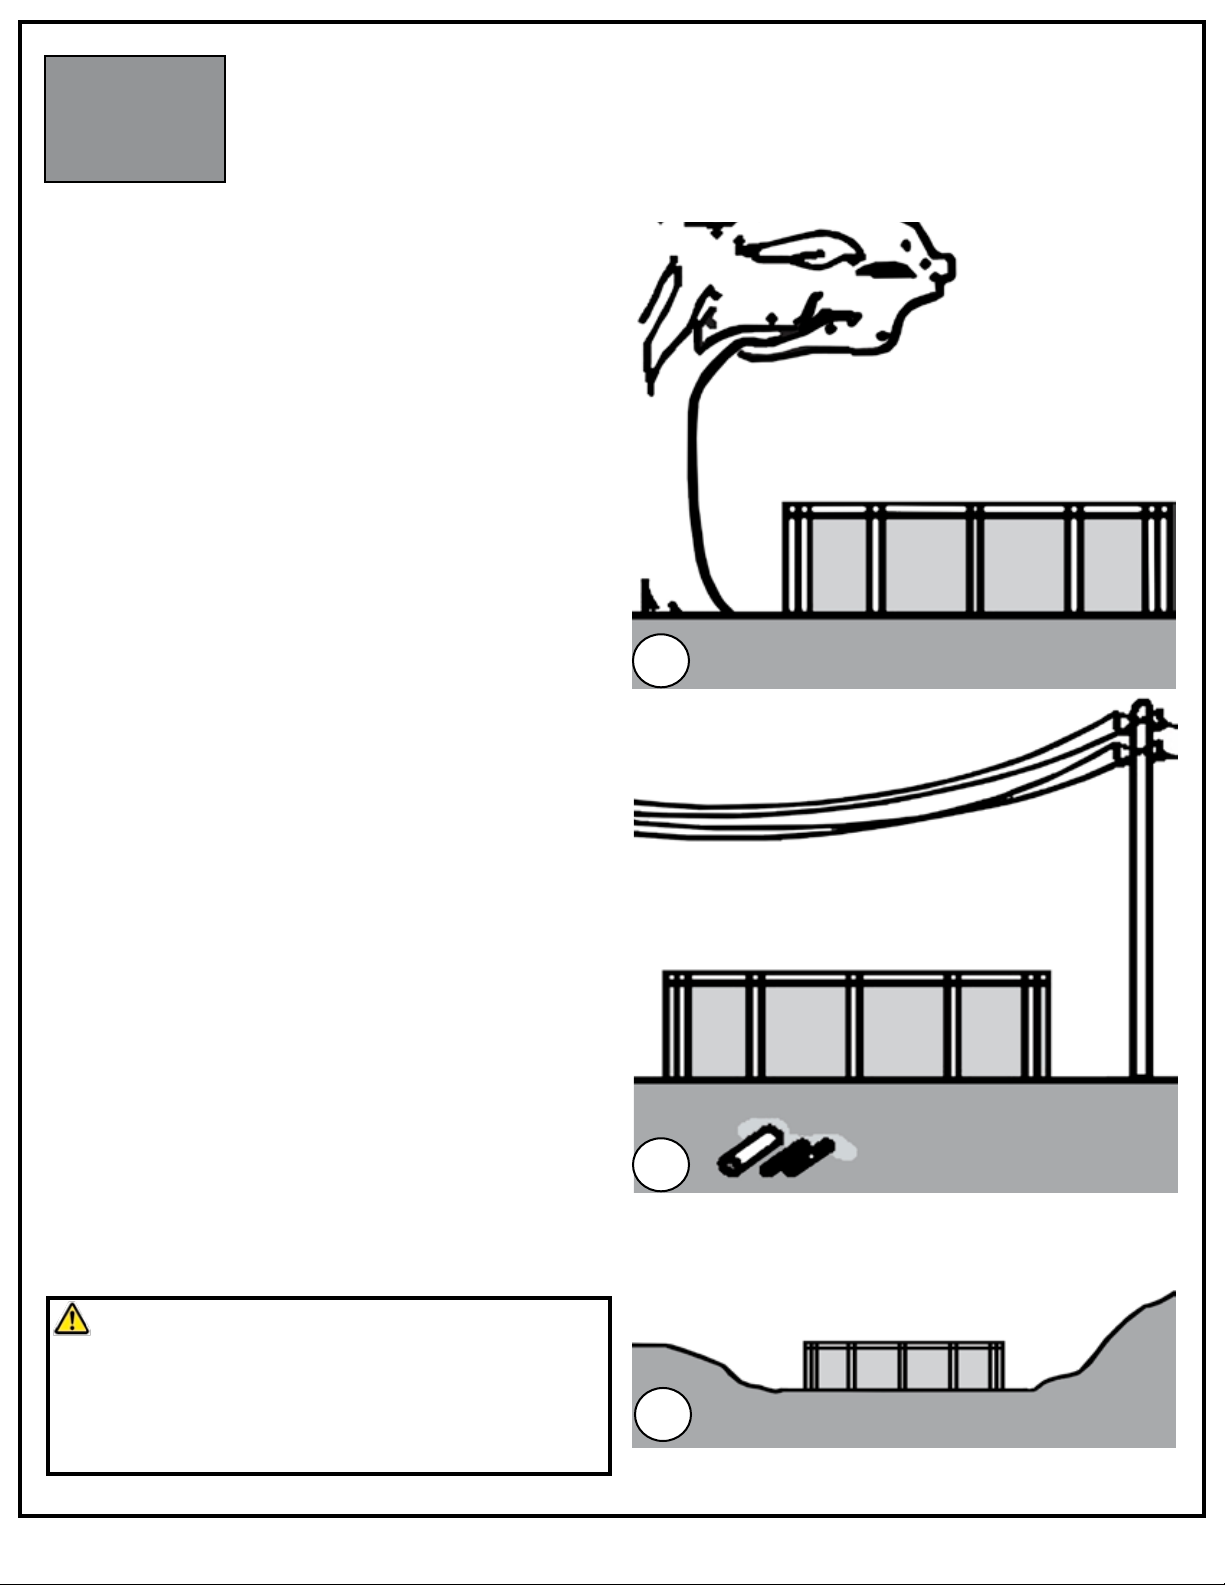
5. LIGHT THE POOL AT NIGHT
If the pool is used after dusk, adequate lighting must be provided. Illumination in the pool area
must be sufcient to clearly judge pool depth and all features in and around the pool. For light-
ing recommendations, consult your local licensed electrical contractor
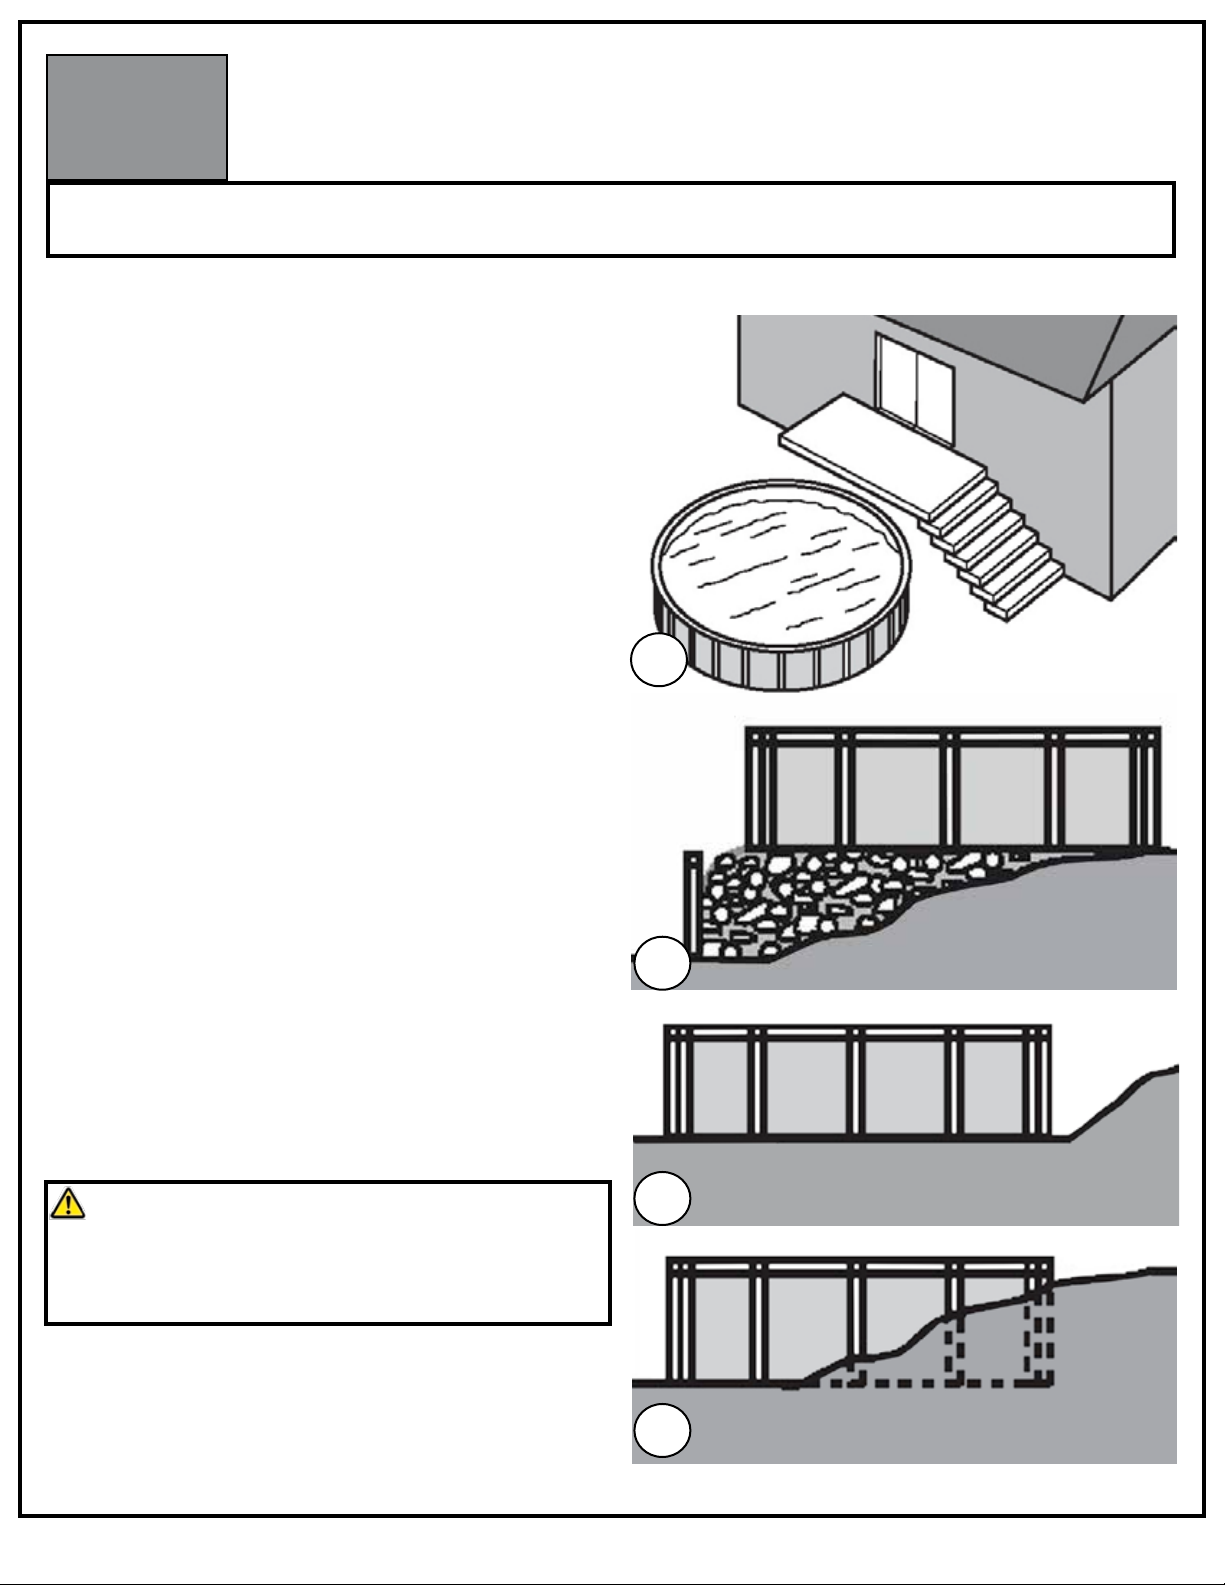
6. RESTRICT ACCESS TO THE POOL
Do not leave chairs or other furniture beside the pool that could be used by a child to climb
up into the pool. Ladders must be removed whenever the pool is unattended. A fence with a
lockable gate around the pool or yard is strongly recommended and may be required by law in
some jurisdictions.
7. NO ALCOHOL OR DRUGS
Never drink alcoholic beverages or use any intoxicants which could hinder your judgment and
reexes.
8. KEEP YOUR POOL CLEAN AND SANITARY
Your lter system will remove suspended particles from the water and the surface skimmer
will remove insects, leaves and other debris from the water surface. Use the correct pool
chemicals as directed to destroy harmful bacteria and prevent formation of algae. Remember,
unsanitary water is a serious health hazard.
The safety stickers must be installed as per following instructions. Failure to properly install warning labels will void warranty.
Failure to mount these safety labels may subject you to substantial liability in case of injury. These warning are not to be removed
under any circumstances! If they become discolored or fall off please request replacements which will be sent at no charge.
FOLLOW ALL SAFETY INSTRUCTIONS
Read and follow all safety instructions packaged with pool, ladder, deck or any other accessory.
Additional pool safety publications can be obtained by contacting: The Association of Pool &
Spa Professionals (www.apsp.org)
important notice read before installation!
9. KEEP OFF TOP LEDGES
Do not walk on top ledges. They can be slippery and they are not a walkway.
10.POOL COVER SAFETY
The cover must have a tamperproof locking retainer cable that positions the cover around the
pool wall and keeps it securely in place. Never allow anyone, especially small children on the
cover. Asphyxiation or drowning could result. When purchasing any pool cover, please consult a
swimming pool professional.
11.ELECTRICAL HAZARD
Never touch or attempt to service electrical equipment, including the lter when your body and/
or the ground is wet. Electrocution or permanent injury due to high voltage (120V AC) could
result. The pool should be bonded in accordance with Section 680-26 of the National Electical
Code. For further assistance contact your dealer or a local licensed electrician. Do not use pool
during electrical or rain storms.
12.SAFETY ROPE & POLE
Keep a safety rope 1/4" by 50" with a otation buoy with an outside diamter of 15". Have ac-
cessible in a prominent area by your pool. Keep a pole not less that 16 feet (4,88m) long with a
blunt or hook end available at pool side in case of emergencies.
13. POOL CHEMICALS
Do not place chlorine, chlorine tablets or sticks directly into skimmer, or winterize your pool with
liquid chlorine. Damage to the skimmer, pool liner and lter will result. Failure to obey this in-
struction will void all component warranties. Always follow Chemical Manufacturer’s instructions
when storing, handling and dispensing pool chemicals.
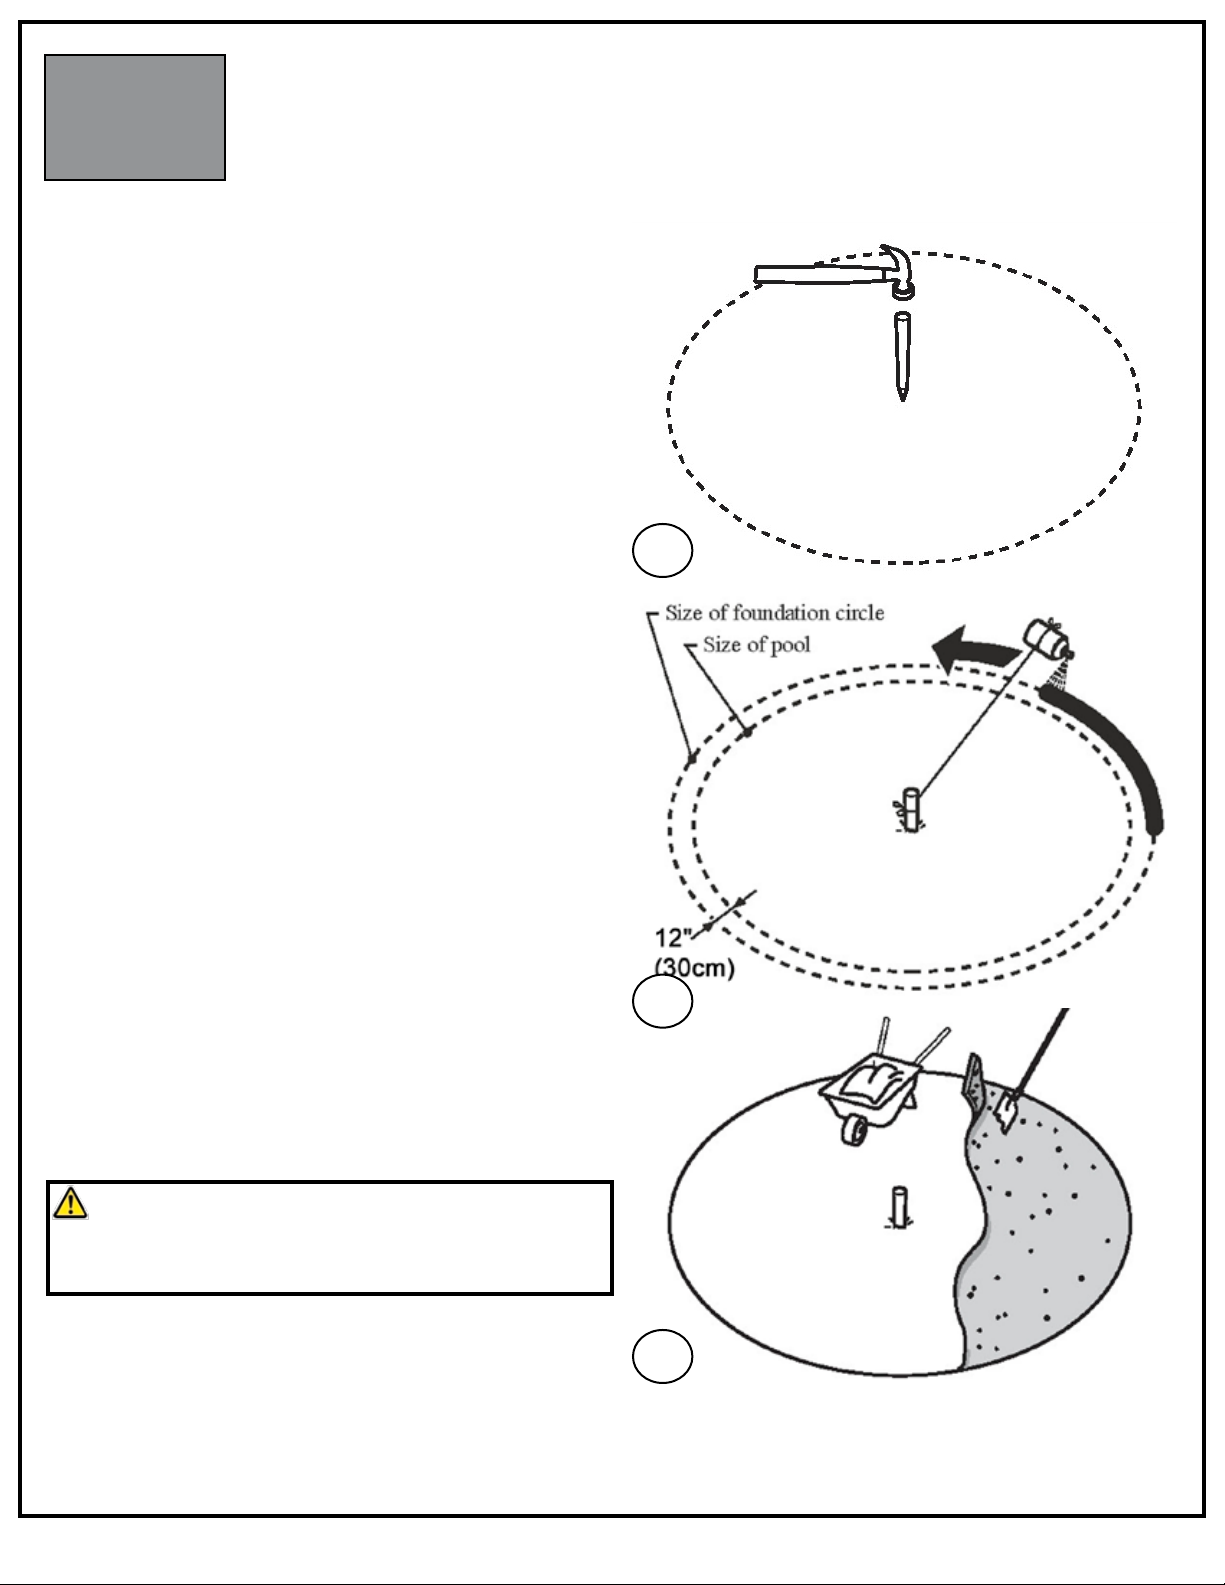
14.CHECK FOR DAMAGE
Periodically check your pool and ladder components for damage and wear. Be sure all screws
are in place. Replace all damaged or worn components and tighten all screws before you use
the pool, deck or ladders. At rst sign remove rust and touch up immediately.
15. POOL PARTS
Never modify the pool or accessories, or remove or drill holes in the pool, deck or ladder com-
ponents unless instructed. Your pool wall is made of thin metal, there is an inherent cut hazard
with metal so use gloves during installation. Always use Original Equipment Manufactured parts
for your replacement parts.
remember
watch
children
place sign on
liner above water
line, opposite en-
try to pool
place sign on
wall next to
pool entry
R.10/12
PLEASE READ BEFORE INSTALLATION


1-1
No Diving or Jumping. Observe all Safety Rules
Read all instrucons completely before you begin.
A. DETERMINE THE LOCATION OF YOUR POOL
1. The Terrain
Pay special attention to choosing the right location for
your pool:
• Choose a large area, as flat and level as possible and
well drained. (Image 1)
• Choose a spot on dry, firm earth (stabilizer or
other)—do not install the pool on asphalt, tar or oil
based surfaces, gravel, peat moss, wood or chemically
treated soil.
• Check with your pool dealer to see if Nut Grass grows
in your area. This type of grass may grow up through
your pool liner. Your dealer will be able to advise how
best to treat the site.
• Sloped areas will need to be made level by digging
away high spots, not by filling low spots—be prepared
to hire earth-moving equipment if necessary.
(Images 2 & 3)
• Ensure the earth is well compacted and a wall is
placed to prevent the earth from seeping out.
(Image 2)
• If you need to install partly in the ground, you
must contact your dealer to see if this is an option
for you and that you meet law requirements in your
jurisdiction. (Image 4)
1
Important Note:
Ground preparation is one of the most important steps in
the installation process. A proper foundation will ensure
the rest of the pool assembly goes smoothly and that no
problems will occur when the pool is filled with water.
GENERAL INSTRUCTIONS - ROUND POOLS
GROUND PREPARATION
Secon
1
2
3
4

1-2 No Diving or Jumping. Observe all Safety Rules
A. CONT. DETERMINE THE LOCATION OF YOUR POOL
2. Things to Avoid
Do not locate your pool near or on any of the following
(Images 5-7):
• Overhanging tree branches.
• Overhead wires and clotheslines.
• Buried pipes and wires. Contact your gas, electric
and telephone utilities to find buried pipes and wires
before you dig.
• Areas with poor drainage.
• Grass, stones and roots. Grass will rot underneath the
pool liner, and stones and roots will damage the pool
liner.
• Areas recently treated with oil-based weed killers,
chemicals or fertilizers.
3. Plan Ahead
• Will you be adding an adjacent deck later?
Be sure to leave room.
• Will you be using pool accessories or other
appliances that need electricity or gas? Locate your
pool near these services or plan to have them installed
later by a licensed contractor.
Important Note:
When locating the centre of the pool, be sure to take
into consideration any structures (deck, patio, house)
or relevant items (change rooms, gazebo, etc.) that the
pool may need to line up with and ensure that the pool
is in the most visual pleasing location for your property.
GENERAL INSTRUCTIONS - ROUND POOLS
GROUND PREPARATION
Secon
1
5
6
7

1-3
No Diving or Jumping. Observe all Safety Rules
A. CONT. DETERMINE THE LOCATION OF YOUR POOL
4. Tools Needed
List of required materials
• Straight wood plank
• Material that provides a permanent base (ex. Crushed stone)
• Fine sand (void of debris)
• Cement blocks (5cm x 20cm x 40cm / 2”x 8”x16”) (optional)
• 2x Plywood (60cm x 120cm /2ft x 4ft)
• Wood board (30cm x 20cm / 1ft x 1ft)
• Vinyl covered hooks (to hold wall steady)
• String and stakes & wooden pegs
• Prefabricated cove sections (optional)
• Pool carpeting (optional)
• Rope
• Polyethlyne Plastic Sheeting
• Optical Level
Can be useful for precise
measurements
GENERAL INSTRUCTIONS - ROUND POOLS
GROUND PREPARATION
Secon
1

1-4 No Diving or Jumping. Observe all Safety Rules
PARTS LISTING - EXPLODED VIEW
GENERAL INSTRUCTIONS - ROUND POOLS
GROUND PREPARATION
Secon
1
PMAG-54RSRSRSB10
Round
v
Mediterranean / Magnus RTR

1-5
No Diving or Jumping. Observe all Safety Rules
PARTS LISTING - CONTENT
GENERAL INSTRUCTIONS - ROUND POOLS
GROUND PREPARATION
Secon
1
Product Description : Magnus Round
Revised Sept 2013
Product Code : PMAG-54RSRSRSB10
Quantity required for installation (by pool size)
Index# Description Parts # Length 12 15 18 21 24 27 30
ATop ledge AR744-001-R 810 12 14 16 18 20
BUpright ART811-R12954M 53,750'' 810 12 14 16 18 20
C1 Top plate 21120A 810
12 14 16 18 20
C2 Bottom plate CG21120B 810 12 14 16 18 20
D1 Stabilizer 12D 1255612 55,750'' 8
D1 Stabilizer 15D 1255615 55,875'' 10
D1 Stabilizer 18D 1255618 55,875'' 12
D1 Stabilizer 21D 1255621 55,750'' 14
D1 Stabilizer 24D 1255624 56,125'' 16
D1 Stabilizer 27D 1255627 55,688'' 18
D1 Stabilizerl 30D 1255630 56,000'' 20
D2 Bottom rail 1525515 55,250'' 810 12
D2 Bottom rail 1525524 55,250'' 14 16 18
D2 Bottom rail 1525530 55,250'' 20
F1/F2 Ledge cover AR211-23120ABC 810 12 14 16 18 20
HSteel bars 11825 54,000'' 2222222
IWall 11
11111
Hardware bag for pool SACV12X34-102 #12 screw 3/4 11
Hardware bag for pool SACV12X34-124 #12 screw 3/4 1
Hardware bag for pool SACV12X34-147 #12 screw 3/4 1
Hardware bag for pool SACV12X34-164 #12 screw 3/4 1
Hardware bag for pool SACV12X34-184 #12 screw 3/4 1
Hardware bag for pool SACV12X34-204 #12 screw 3/4 1
Hardware for wall 1050000054 1111111
Instruction DVD
SACWBI36876 1111111
Addendum B40010FA 1111111

1-6 No Diving or Jumping. Observe all Safety Rules
1. Mark out the Area
a. Drive a peg into the ground at the centre of the
area where you want your pool. (Image 1)
b. Use a length of string tied between the peg and a
can of spray paint, and mark a circle on the ground
(a tape measure can also be used). The circle will
be 12” (30 cm) bigger all round than the pool.
(Image 2)
2. Remove the sod
a. Remove all sod and plants from the circle. (Image 3)
b. Remove any sticks, stones and roots from the circle
using a rake.
c. To make sure your pool is stable, compact the
ground well, use the compactor, before adding the
sand.
B. PREPARE THE FOUNDATION OF YOUR POOL
GENERAL INSTRUCTIONS - ROUND POOLS
GROUND PREPARATION
Secon
1
1
2
3
Important Note:
Your pool must be perfectly level. Take the time you
need to be sure your foundation is perfecty level.

1-7
No Diving or Jumping. Observe all Safety Rules
3. Make the are flat and level
a. Replace the centre peg with a flat-topped stake, at
least 1” (25 mm) square and 6” (15 cm) long. Drive
it down flush with the ground surface.
b. Nail one end of a straight 2-by-4 (5cm x 10cm)
wood plank to the top of the stake. Use a nail long
enough to hold the end of the 2-by-4 (5cm x 10cm)
wood plank to the stake while you rotate it in a
circle. (Image 4)
c. Put a carpenter’s level on the wood plank and
swing the board in a circle to find the high and low
spots. (Image 5)
d. Remove all the high spots with a shovel, hoe or
rake. (Image 6)
B. CONT. PREPARE THE FOUNDATION OF YOUR POOL
GENERAL INSTRUCTIONS - ROUND POOLS
GROUND PREPARATION
Secon
1
4
5
6
Important Note:
Use the optical level to ensure that the ground is
perfectly flat and level.

1-8 No Diving or Jumping. Observe all Safety Rules
e. Be prepared to hire earth moving equipment if you
need to level a large area. Remember, your pool
must be level across the diameter of the pool.
(Image 7)
f. Small dips and hollows may be filled in, but the soil
must be hard-packed and well compacted with a
tamping tool.
g. Take material such as rock dust or fine mortar
that can conform a solid, permanent base and
deposit this material around the rim of the basin.
The material used should be spread around the
perimeter of the pool to a width of 24” (60cm) and
a thickness of 2” (5cm). (Image 8)
Note: Bottom rails will be placed in the center of the
perimeter of the pool see the dashed line. (Image 8)
h. Recheck the outer perimeter of the circle, where
the pool wall will be. Compact the ground and
make sure there are no high or low spots. The
bottom edge of the pool wall must rest flat on the
ground and have no gaps under it. (Image 9)
B. CONT. PREPARE THE FOUNDATION OF YOUR POOL
GENERAL INSTRUCTIONS - ROUND POOLS
GROUND PREPARATION
Secon
1
7
8
9
Important Note:
The outer 24” (60cm) of the circle must be perfectly
flat. The bottom edge of the pool must rest flat on the
ground and have no gaps under it. Take the time you
need to be sure this area is perfectly flat and level.

1-9
No Diving or Jumping. Observe all Safety Rules
i. Go over the entire perimeter of the pool to ensure
that at every 3“ the surface is completely level.
j. Lay out the bottom rails and bottom plates around
the circle.
k. Check the roundness of your circle, by measuring
the diameter across in several locations. Since the
bottom rails do not automatically form a true circle,
DO NOT SKIP THIS STEP! Otherwise you might end
up with a slightly oval shape, which can cause
problems later on. (Image 10)
l. Verify the height of each bottom plate with an
optical level. They have to be at the same height.
Adjust height if necessary.
B. CONT. PREPARE THE FOUNDATION OF YOUR POOL
GENERAL INSTRUCTIONS - ROUND POOLS
GROUND PREPARATION
Secon
1
10
11

1-10 No Diving or Jumping. Observe all Safety Rules
4. Patio Stones (Optional)
a. Concrete patio stones may be placed at the base
of each upright of your pool.
b. Each bottom plate will show the location for a patio
stone. Make a mark in the ground at each base
plate. (Image 12)
c. Remove the bottom rails and bottom plates and lay
out the patio stones around the circle where the
bottom plates were.
d. The patio stones must be sunk into the ground so
the tops are flush with the soil around them. Use
the carpenter’s level to make sure the patio stones
are perfectly level and flush with the ground. Use
either the carpenter’s level and a 2-by-4 (5cm x
10cm) wood plank, or the optical level between
patio stones to make sure the stones are level with
each other.
e. Do not install blocks or rails on loose sifted soil or
sand. There must be no space between the ground
and the bottom of the rails. All patio blocks must
be flush with the ground, solid and level with each
other in all directions.
NOTE: Installing patio blocks is optional and the
blocks may shift due to temperature changes.
5. Proceed to Section 2 -
Assembling the Pool Base
B. CONT. PREPARE THE FOUNDATION OF YOUR POOL
GENERAL INSTRUCTIONS - ROUND POOLS
GROUND PREPARATION
Secon
1
Please contact your dealer for more information
about using patio stones.
12
13
14
Important Note:
Make sure the patio stones are perfectly level and flush
with the ground. All patio blocks must be flush with the
ground, solid and level with each other in all directions.

1-11
No Diving or Jumping. Observe all Safety Rules
ROUND FOOTPRINT - For - PZEN-52/54 SSPSPSB10/11/19
GENERAL INSTRUCTIONS - ROUND POOLS
GROUND PREPARATION
Secon
1
Bottom tracks length: 8'=30", 12'=49.75", 15'= 50.974",
18'=51.721", 21'-52.25", 24'=52.6875", 27'=53",
30'=53.375"
Actual PSize
566 793 11321019680
12'
1018
7.5'
565 905 1131
15'
906
454 679 792
15'
1244
Notes:
1. All dimensions are in inches unless otherwise specified.
2. All dimensions are referenced from the wall location.
3. Manufacturers tolerances and field condition may result
in dimensional variations.
15' 33'
21' 24' 30'
27'
18'
12'
Radius of Rails
Uprights
Pool Name 8'
10
4'
302
303
6' 9' 10.5' 13.5'
455 1245
9/16" 9/16"
Gap between
Rails
Wall Perimeter
Wall Length
9 11 13 15 17 19 21 23
ZENITH ROUND STEEL POOL CHART
3/4"1/2"
3/16" 3/8" 1/2" 9/16"
11/16"
Gap between Bottom Wall Channels
Upright

1-12 No Diving or Jumping. Observe all Safety Rules
ROUND FOOTPRINT - For - PZEN-52/54RSPSPSB10
GENERAL INSTRUCTIONS - ROUND POOLS
GROUND PREPARATION
Secon
1
Bottom tracks length: 12'=55.75", 15'= 55.875",
18'=55.875", 21'=55.75", 24'=56.125",
27'=55.688", 30'=56"
Actual PSize
15'
906
9/16"
793 1019
7/8"
11/16" 13/16" 7/16"
12 14 16 18
30'
1132
20
1018
12'
680
905565
7.5'
455
1131
566
24'
792
454 679
12' 18' 27'
21'
15'
10.5'9'6' 13.5'
8 10
1" 5/8"
Pool Name
Uprights
Radius of Rails
Notes:
1. All dimensions are in inches unless otherwise specified.
2. All dimensions are referenced from the wall location.
3. Manufacturers tolerances and field condition may result
in dimensional variations.
Gap between Bottom Wall Channels
Upright
Gap betweenRails Simbio
Wall PerimeterSimbio
Wall LengthSimbio 1245
9/16"
15'
SIMBIO ROUND STEEL POOL CHART
33'
22
1244

1-13
No Diving or Jumping. Observe all Safety Rules
ROUND FOOTPRINT - For - PZEN-52RSRARSB11
GENERAL INSTRUCTIONS - ROUND POOLS
GROUND PREPARATION
Secon
1
Bottom tracks length: 15'= 55.187", 24'=55.312", 30'=55.25"
Actual PSize
Gap between
Rails
Exceptions
Gap between
Rails
20
Pool Name
ROUND RESIN POOL CHART
12
814
Uprights 10 1816
12' 18' 30'
24'21' 33'
15'
22
Upright
Gap between Bottom Wall Channels
Notes:
1. All dimensions are in inches unless otherwise specified.
2. All dimensions are referenced from the wall location.
3. Manufacturers tolerances and field condition may result
in dimensional variations.
1-
5/8"
Impact
Atrium
Discov
1-5/16"
1-5/16"1-1/4"1-1/4"
27'
1-1/4"
1-1/4"
1-5/16"
1-9/16"
569
1245455
1244
568
Wall Length
Exceptions
792
12'
679
Wall Length
Wall Perimeter 454
906
15'
Radius of Rails
1131905565
7.5'7.5' 12'
1018
12'
680
12'
1019 1132793566
Wall Perimeter
Exceptions
15'


2-1
No Diving or Jumping. Observe all Safety Rules
1. Lay out bottom plates
a. Place the bottom plates equally spaced around the
perimeter of your foundation. If you are using the
optional patio stones, depending on your model
place one bottom plate on each stone. (Image 1)
2. Assemble bottom plates and bottom rails
NOTE: Depending on your pool model you may have
steel or resin bottom plates.
a. Insert the end of each bottom rail into a bottom
plate. Leave a gap between the ends of the bottom
rails.
Steel: Image 2
Resin: Image 3
b. Measure the diameter of your pool all around the
circle and make sure it is correct.
Note: this measurement should be taken from cen-
tre to centre of the bottom plate. When the circum-
ference is perfectly round, hammer nails into the
ground to keep the bottom rails into place.
These nails are to be removed only at the last step-
when filling up the pool.
A. LAY OUT THE BOTTOM PLATES AND BOTTOM RAILS
GENERAL INSTRUCTIONS - ROUND POOLS
ASSEMBLING THE POOL BASE
Secon
2
1
Important Note:
Use a soft measuring tape to measure around the
perimeter of the pool. Measure from the inside of the
bottom rail, the measurement should equal the wall
length.
2
See Diagram:
Please refer to your pool’s footprint (Section 1, last page)
for gap measurement,
3
STEEL
RESIN

Table of contents
Other Wilbar Swimming Pool manuals
Popular Swimming Pool manuals by other brands

Swim'n Play
Swim'n Play Above Ground Swimming Pool Assembly instructions

Coleman
Coleman 90479E owner's manual

Trigano PISCINES
Trigano PISCINES SAPHIR Assembly instructions and user guide

GRE
GRE Tulip manual

Intex
Intex ULTRA XTR 126364GN owner's manual

Outsunny
Outsunny 848-014V01 Assembly & instruction manual