Ideal Air Circulation Obstructed
Air Circulation
For 20GC, 30GC, and 40GC models: These models come equipped with a dual-range "quick-set" knob dial. This feature
makes it easier to hit a target temperature range from a cold start, whether using the Fahrenheit or Centigrade scale.Turn
the thermostat knob to the desired temperature indicated on the knob (Fahrenheit), or the dial (Centigrade).
HEAT CYCLE
Model 30GC Lab Oven
ON
POWER OFF
HEAT CYCLE
Model 30GC Lab Oven
ON
POWER OFF
The unit is ready for your immediate use and no adjustments are necessary. For normal operation and temperature setting
follow the steps below.
1. Turn the power switch to the ON (UP) position by pressing on the rocker switch.
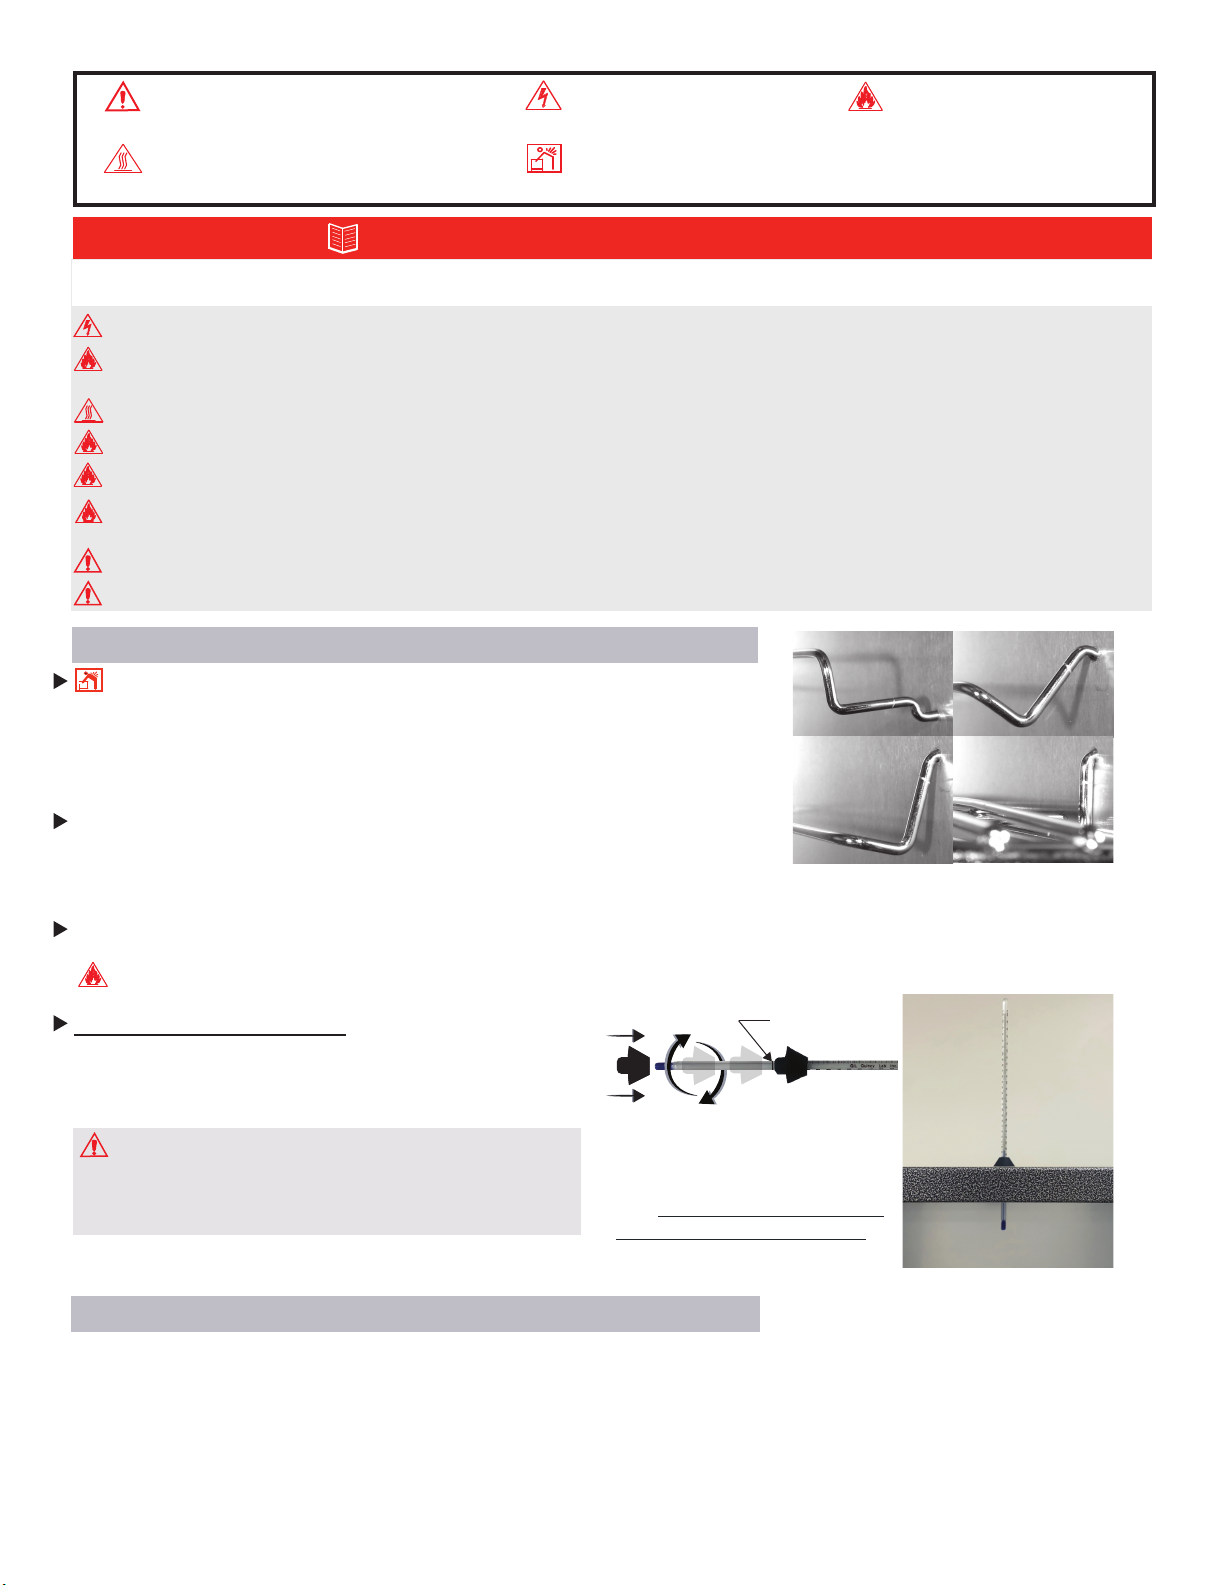
2. Insert the grommet/thermometer assembly into the top center port hole of the oven with the narrow part of the grommet
facing down. The thermometer will extend about 2 inches into the oven’s chamber when it’s placed at the reference line.
3. Rotate the oven’s dial clockwise to a number setting (10GC series) or temperature setting to start the heating process.
PAGE 3
Chamber Loading
Understanding the unit's thermal convection and "load-effect" are necessary to optimize oven’s performance. Article or
media processing times and/or uniformity are largely dependent on load density and positioning.
Process the smallest possible load the application or workload will permit. For best processing of small multiples or a
single item, adjust one shelf so that the article(s) is centered in the Lab Oven.
Avoid large solid trays or foil on lower shelves, this can drastically limit heat to shelves and articles placed above. (FIG. 5)
Important guidelines to chamber loading and processing:
Load the oven so that heated air circulation within the chamber is not impaired.
Avoid extremely large (in quantity or size), or high-density loads ( FIG. 6 ).This will show by non-uniform processing and
long or impossible "heat-through" times. To help determine a large load's suitability, use the set-point recovery time (the
time it takes for the temperature to recover to the original set temperature once load is placed), as a guide.
Leave a space between articles on the shelf.
To reduce recovery time after inserting a load, reduce load proportionally. Also, large loads may require an elevated set
temperature for the solution to reach and maintain a lower target temperature. When possible, measure large loads or
solution temperatures directly with an ancillary thermometer or probe. Probes can be inserted at the top port.
Stagger articles from those on lower shelves in a "V" formation for best performance. (FIG. 4 )
General Operation (continued)
For 10GC models: Rotate the dial clockwise to around the number '8'. The “heat/cycle” light will come on indicating
heater activity. Monitor the reading on the thermometer until it reaches the desired temperature. Next, rotate the
control knob very slowly counter-clockwise until the heat-cycle light goes out. The thermostat will then cycle automatically
maintaining the set temperature.
Rotate the dial to the desired temperature. The heat-cycle light will illuminate until the set temperature is reached. Once
reached, the heat-cycle light will cycle on and off with the heaters maintaining set temperature. Typically, the oven will
need to cycle at a set temperature for a minimum of 20 minutes before it will achieve equilibrium and become stable.
The temperatures printed on the "quick-set" dial are designed to help quickly set a temperature to within a close
proximity of the indicated dial temperature. Small rotational adjustments will likely be required to set a more precise
temperature setting as measured against a reading from the glass thermometer (supplied), or another measuring
device.
Any degree of offset observed for a given temperature setting may be different for other temperature settings on
the dial. The control dial is calibrated at the factory in the middle of the model's temperature range and is therefore
most accurate in these middle-range temperatures. Over time, continuous use at a single temperature setting may
require periodic re-adjustment as the contacts wear or as ambient temperatures change seasonally, or from air
conditioning or heating. See also: "Temperature Range Adjustment insert for more information".
Avoid placing articles or media against or within an inch of the walls especially on the lower shelf. Heated air from the
lower heat-shield, is designed to travel up the sidewalls and can have a slightly elevated temperature from the setpoint
and the rest of the chamber.
High Density
load
HEAT CYCLE
Model 30GC Lab Oven
ON
POWER OFF
FIG. 4 FIG. 5 FIG. 6
To set a temperature in degrees Centigrade, turn the knob in a clockwise direction until the white triangle with the "°C"
marking is pointing toward the desired temperature printed on the face of the control panel.
To set a temperature in degrees Fahrenheit, turn the knob in a clockwise direction until the desired number on the knob is
directly under the white triangle with the "°F" marking.