Quooker CUBE User manual

Installation guide CUBE
Suitable for all Quooker taps and boiling water tanks.


Safe operation 4
Practical background information 5
Installation requirements 6
Declaration of conformity 7
Contents of the package 8
Installing the lter bracket 9
The entire installation at a glance 10
Start-up process 30
CUBE Settings 31
Uninstalling the CUBE 32
Technical specications 34
Welcome to the Quooker family. Read this manual
before installing your CUBE. We assume that the user of
this manual has some basic technical knowledge. If you
still have any questions after reading this manual, please
contact Quooker Service. Our address and telephone
number are displayed on the back of this manual.
Youcanalsondthismanualonourwebsite:quooker.hk.

4
The Quooker tap may be used by
children above the age of eight and
people with diminished physical, sensory
or intellectual abilities provided they
are supervised or have been instructed
on how to use the appliance safely.
Inform people who are unfamiliar with
the Quooker system about safe use
and the possible dangers associated
with the use of the boiling-water tap.
Attention: incorrect use can lead to injury
or damage to health. Prevent children
from using the tap as a toy and do not
allow children to clean or maintain the
product unsupervised. Keep the plug out
of the reach of small children. The Quooker
system is only suitable for domestic use.
The Quooker system is suitable for
household use and use in similar
situations such as in sta kitchens at
shops, oces, farms and other business
premises and at hotels, motels, bed
& breakfasts and other residential
accommodation. If the appliance, cables
or hose set are defective, they may only
be replaced by a qualied technician.
Warning
– When installing the appliance, make
sure that the power cable has not
been crimped or damaged.
- Keep ventilation openings – in the
appliance housing or in the built-
in structure – clear of obstacles.
- Do not place an extension cord
with power strips or power adapters
near the back of the appliance.
Attention: re hazard.
The compressor uses
ammable refrigerant.
Do not connect the CUBE if it is
damaged. This can lead to dangerous
situations or can be harmful to the
environment. When disposing of the
equipment, the compressor and the
refrigerant in the compressor system
must be disposed of correctly and in
an environmentally-friendly way.
You can also nd this manual
on our website quooker.hk.
Please read the following information
before starting the installation.
Safe operation

5
How the Quooker CUBE works
This manual is based on a Quooker system that has
already been installed. For instructions on how to install the
Quooker tank and the tap, see the manual that is included
with the Quooker tank.
With the Quooker CUBE, besides cold, warm and boiling
water, you can now also dispense chilled sparkling
and ltered water from the Quooker tap. The Quooker
CUBE can only be used with Quooker taps and tanks
manufactured after October 2017. You can recognise
them by the serial number. Only tanks with a serial number
with a W in it or starting with an R and taps with a serial
number with a W in it or starting with a T can be used in
combination with a CUBE.
The light ring emits a constant red light when boiling water
is being dispensed or when the tank is warming up. The ring
lights up blue when chilled ltered water is being dispensed
and ashes blue when sparkling water is being dispensed.
There is a lter connected to the Quooker CUBE. This
Quooker lter contains a Hollow Fibre lter and an Active
Carbon lter that together ensure even better water quality.
The Quooker CUBE has a Quooker CO₂cylinder that is
lled with enough carbon dioxide to provide approximately
60 litres of sparkling water. The CUBE keeps 0.6 litres of
sparkling water and 1.6 litres of chilled water in stock. After
dispensing the sparkling water, the CUBE is topped up with
cold tap water.
Note: To ensure good water quality, the water stored in the
CUBE should be completely refreshed when no sparkling
or chilled water has been dispensed for fourteen days or
more. Quooker then recommends that you ush both the
sparkling and chilled water for ve minutes. This rells the
CUBE tank with fresh water and guarantees optimum water
quality. The temperature of the sparkling and chilled water
cannot be set.
Only Quooker CO₂cylinders can be used, as they have
been specially developed for the Quooker CUBE. This
enables us to guarantee the quality of the sparkling water
and the safety of the product. When all the water has
been drained from the CUBE's water supply, it will take
approximately 30 minutes before the sparkling and chilled
water has chilled down completely.
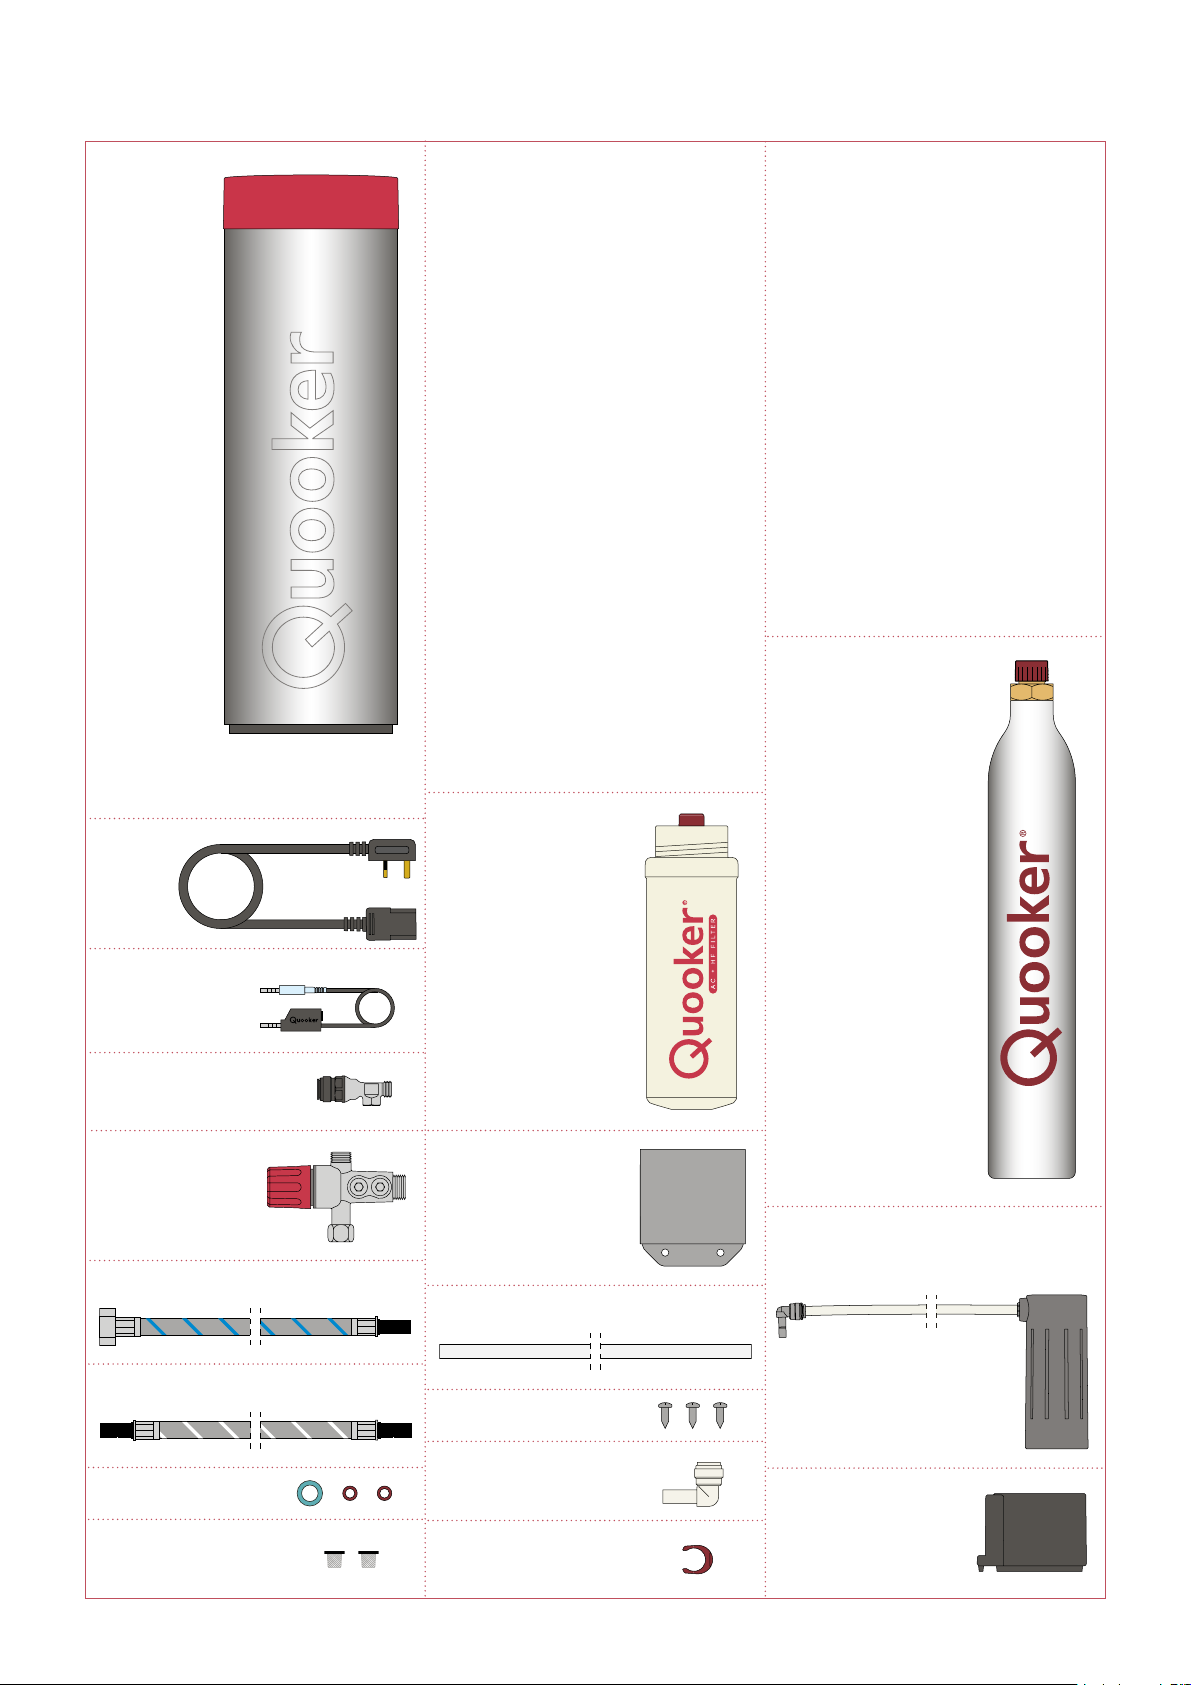
Installation, maintenance and warranty
To install the CUBE, it must be possible to connect to the
water mains and you need a free 13 amp power socket.
The CUBE is supplied with a connection set, including the
CO₂pressure reducing valve and the CO₂cylinder. It is not
permitted to connect the CUBE and the Quooker tank to a
reverse osmosis installation or a water softener with a pH-
lowering eect. Quooker recommends that you clean the
fan every year with a brush or vacuum cleaner.
The warranty period for the CUBE and the Quooker system
is two years and the warranty only covers the supply of
parts. It does not cover labour costs or mechanical failures
due to limescale. Only original Quooker parts may be used
with a Quooker system and the use of third party parts of
any kind will invalidate the warranty. Register your Quooker
system at quooker.hk/register to obtain this warranty.
Do you have any questions?
If the answer to your question is not on our website,
please contact us using the service contact form at
quooker.hk/register or call +852 2386 6326.
Practical background information

6
Installation requirements
Positioning the CUBE
Make sure the CUBE has enough space. When installing
the CUBE, remember that it must be easy to access for
service and maintenance. In addition, at least 10 cm must
be kept free at the back of the CUBE to allow warm air to
ventilate. We recommend that you leave at least 2 cm extra
space on both sides. The CUBE must be positioned within
70 cm of the Quooker tank.
Ventilation in the kitchen cupboard
For optimal operation of the CUBE, it must be possible to
properly ventilate the kitchen cabinet in which it is installed.
An opening of approximately 20 × 20 cm (400 cm²) must
therefore be made in the rear panel or an equivalent
opening in the base plate starting at 5 cm from the bottom
of the cabinet (at the height of the fan).
Extra socket
A 13 amp power socket is required to install the CUBE.
The CUBE requires 100W of power. Only use the supplied
detachable power cable. If the power cable is damaged, it
must be replaced with an identical power cable. Contact
Quooker for a replacement cable.

7
Quooker Nederland B.V., Staalstraat 13, 2984 AJ Ridderkerk (Netherlands)
hereby declares at its own risk that the Quooker CUBE is manufactured in
accordance with the rules in the following directives:
- 2014/35/EU Low Voltage Directive (LVD)
- 2011/65/EU Restriction of Hazardous Substances (RoHS) Directive
- 2014/30/EU Electromagnetic Compatibility Directive (EMCD)
- 2014/68/EU Pressure Equipment Directive (PED)
and complies with the following standards:
General product safety household and similar electrical appliances
IEC 60335-1:2010 + A1:2013 + A2:2016
IEC 60335-2-24:2010 + A1:2012 + A2:2017
EN 60335-1:2012 +A11:2014 + A13:2017 + A14:2019 + A1:2019 + A2:2019
EN 60335-2-24:2010 + A1:2019 + A2:2019
Public exposure to electromagnetic elds (EMF)
EN 62233:2008 + AC:2008
Electromagnetic compatibility (EMC)
EN 55014-1:2017 + EN 55014-1:2006 + A1:2009 + A2:2011
EN 55014-2:2015 + EN 55014-2:1997 + AC:1997 + A1:2001 +A2:2008
EN 61000-3-2:2014
EN 61000-3-3:2013
Restriction of hazardous substances
EN IEC 63000:2018
The Netherlands, Ridderkerk, 01/02/2022
Niels Peteri, CEO
Declaration of conformity

8
bre washers
hose screens
T-joint
power
cable
CO₂cylinder
CO₂reducing valve
incl. transparent plastic hose
and elbow connector
communication
cable
magnetic cylinder
holder
Contents of the package
elbow connector
safety clamp
CUBE
screws
lter
white striped hose
blue striped hose
lter bracket
white plastic hose
shut-o valve

9
1
3
2
If necessary
Make a sharp bend. Use the
elbow connector if a sharp
bend is desired.
1 Position the lter bracket
Position the bracket at least 5 cm below the sink or counter
top with at least 25 cm space between the bottom of the
bracket and the base of the cabinet.
2 Mount the lter bracket
Place a screw in the selected location and attach the lter
bracket. Secure the bracket with the two remaining screws.
3 Attach the lter
Remove the red cap from the new lter. Then screw on the
lter by turning it anticlockwise until it stops. Do not screw
it too tightly.
Installing the lter bracket
Min. 50 mm
Min. 250 mm

10
The entire installation at a glance
Select your Quooker system on the next page to go
directly to the correct CUBE installation instructions.
CUBE

11
Twintaps or Nordic single tap
with PRO3 & CUBE (page 12)
Twintaps or Nordic single tap
with PRO7 & CUBE (page 14)
Twintaps or Nordic single tap
with COMBI+ & CUBE (page 16)
Fusion with PRO3
& CUBE (page 18)
Fusion with PRO7
& CUBE (page 20)
Fusion with COMBI+
& CUBE (page 22)
Flex with PRO3
& CUBE (page 24)
Flex with PRO7
& CUBE (page 26)
Flex with COMBI+
& CUBE (page 28)
PRO3
Flex
PRO7
Fusion
COMBI+
Twintaps or Nordic single tap

12
PRO3
Twintaps or Nordic single tap
Extra materials required: spanners 12, 14, 19 and 22.
- Attach the lter bracket (p. 9).
- Switch o the Quooker system using the Q button.
Leave the plug in the socket.
- Run the boiling and cold water together until the water
runs cold.
- Close the main stopcock or isolation valve.
- Check if the Quooker system is depressurized by
opening the boiling-water tap. No more water should
now come out of the tap.
- Remove the plug from the socket.
- Disconnect the cold water hose and remove the old
hose screen.
1. Connect the shut-o valve to the cold water pipe with a
hose screen.
2. Place another hose screen in the shut-o valve and
mount the cold water hose from the tap onto it.
3. Connect the blue striped hose onto the shut-o valve
using the supplied bre washer.
4. Connect the other end of the blue striped hose into the
push-t connection of the lter head (‘IN’).
5. Push the white hose into the push-t connection of the
lter head (‘OUT’).
6. Push the other end of the white hose into the push-t
connection of the CUBE (‘IN’).
7. Push the white striped metal hose into the push-t
connection of the CUBE (‘OUT’).
- Ensure the hoses are not bent or crimped during the
installation process.
- Remove the boiling water hose from the top of the tank
using spanners 12 and 14.
8. Place a new bre washer on the tank connection and
install the T-joint with spanner 12 and 14.
9. Replace the old bre washer of the boiling water hose
with a new one. Attach the hose to the T-joint.
10. Push the white striped hose into the push-t connection
of the T-joint.
Attention: Make sure that the hoses are fully inserted into
the push-t connectors and pull them gently to make sure
they are securely in place.
11. Remove the plastic protective cap from the second
jack plug port on the back of the Quooker tank cover.
Firmly connect the black jack plug of the supplied
communication cable into the jack plug port until the
copper is no longer visible.
12. Connect the blue jack plug (on the other end of the
cable) into the back of the CUBE cover.
Attention: the CO₂cylinder is under pressure and must be
placed in the holder on the side of the CUBE.
The CO₂cylinder must never be positioned horizontally.
13. Firmly push the elbow connector on the transparent
hose into the CO₂ inlet on the back of the CUBE (‘CO₂’).
14. Keep the CO₂pressure reducing valve upright. Remove
the protective cap from the CO₂cylinder and screw
the cylinder into the CO₂pressure reducing valve until
it stops. A little gas may escape, this makes a hissing
sound; it is normal when this happens. Screw-in tightly,
the hissing should stop.
15. Place the CO₂cylinder in the holder and click the
magnet onto the bottom of the CUBE.
- Open the main stopcock or isolation valve.
- Open the shut-o valve.
- Check for leaks.
16. Connect the power cable to the CUBE.
17. Plug the CUBE into a 13 amp power socket.
Installation ready? Then take the following steps:
- Plug the Quooker system into a 13 amp power socket.
- Switch the Quooker system on again with the Q button.
- Check that everything has been installed correctly and
that the water and CO₂are connected.
- Position the tap spout over the sink.
- Click on the screen and go through the start-up
process (p. 30). During this start-up process, some of
the installation steps will be displayed again in order to
verify that they have been completed.

hot
cold
OUT
CO2
IN
11
6
109
8
7
13
12
16
14
1
2
3
17
15
4 5
‘IN’ ‘OUT’
13

14
Twintaps or Nordic single tap
Extra materials required: spanners 12, 14, 19 and 22.
- Attach the lter bracket (p. 9).
- Switch o the Quooker system using the Q button.
Leave the plug in the socket.
- Run the boiling and cold water together until the water
runs cold.
- Close the main stopcock or isolation valve.
- Check if the Quooker system is depressurized by
opening the boiling-water tap. No more water should
now come out of the tap.
- Remove the plug from the socket.
- Disconnect the cold water hose and remove the old
hose screen.
1. Connect the shut-o valve to the cold water pipe with a
hose screen.
2. Place another hose screen in the shut-o valve and
mount the cold water hose from the tap onto it.
3. Connect the blue striped hose onto the shut-o valve
using the supplied bre washer.
4. Connect the other end of the blue striped hose into the
push-t connection of the lter head (‘IN’).
5. Push the white hose into the push-t connection of the
lter head (‘OUT’).
6. Push the other end of the white hose into the push-t
connection of the CUBE (‘IN’).
7. Push the white striped metal hose into the push-t
connection of the CUBE (‘OUT’).
- Ensure the hoses are not bent or crimped during the
installation process.
- Remove the boiling water hose from the top of the tank
using spanners 12 and 14.
PRO7
8. Place a new bre washer on the tank connection and
install the T-joint with spanner 12 and 14.
9. Replace the old bre washer of the boiling water hose
with a new one. Attach the hose to the T-joint.
10. Push the white striped hose into the push-t connection
of the T-joint.
Attention: Make sure that the hoses are fully inserted into
the push-t connectors and pull them gently to make sure
they are securely in place.
11. Remove the plastic protective cap from the second
jack plug port on the back of the Quooker tank cover.
Firmly connect the black jack plug of the supplied
communication cable into the jack plug port until the
copper is no longer visible.
12. Connect the blue jack plug (on the other end of the
cable) into the back of the CUBE cover.
Attention: the CO₂cylinder is under pressure and must be
placed in the holder on the side of the CUBE.
The CO₂cylinder must never be positioned horizontally.
13. Firmly push the elbow connector on the transparent
hose into the CO₂ inlet on the back of the CUBE (‘CO₂’).
14. Keep the CO₂pressure reducing valve upright. Remove
the protective cap from the CO₂cylinder and screw
the cylinder into the CO₂pressure reducing valve until
it stops. A little gas may escape, this makes a hissing
sound; it is normal when this happens. Screw-in tightly,
the hissing should stop.
15. Place the CO₂cylinder in the holder and click the
magnet onto the bottom of the CUBE.
- Open the main stopcock or isolation valve.
- Open the shut-o valve.
- Check for leaks.
16. Connect the power cable to the CUBE.
17. Plug the CUBE into a 13 amp power socket.
Installation ready? Then take the following steps:
- Plug the Quooker system into a 13 amp power socket.
- Switch the Quooker system on again with the Q button.
- Check that everything has been installed correctly and
that the water and CO₂are connected.
- Position the tap spout over the sink.
- Click on the screen and go through the start-up
process (p. 30). During this start-up process, some of
the installation steps will be displayed again in order to
verify that they have been completed.

hot
cold
4 5
‘IN’ ‘OUT’
OUT
CO2
IN
11
6
109
8
7
13
12
16
14
1
23
17
15
15

16
Twintaps or Nordic single tap
COMBI+
Extra materials required: spanners 12, 14, 19 and 22.
- Attach the lter bracket (p. 9).
- Switch o the Quooker system using the Q button.
Leave the plug in the socket.
- Run the boiling and cold water together until the water
runs cold.
- Close the main stopcock or isolation valve.
- Check if the Quooker system is depressurized by
opening the boiling-water tap. No more water should
now come out of the tap.
- Remove the plug from the socket.
- Disconnect the cold water hose and remove the old
hose screen.
1. Connect the shut-o valve to the cold water pipe with a
hose screen.
2. Place another hose screen in the shut-o valve and
mount the cold water hose from the tap onto it.
3. Connect the blue striped hose onto the shut-o valve
using the supplied bre washer.
4. Connect the other end of the blue striped hose into the
push-t connection of the lter head (‘IN’).
5. Push the white hose into the push-t connection of the
lter head (‘OUT’).
6. Push the other end of the white hose into the push-t
connection of the CUBE (‘IN’).
7. Push the white striped metal hose into the push-t
connection of the CUBE (‘OUT’).
- Ensure the hoses are not bent or crimped during the
installation process.
- Remove the boiling water hose from the top of the tank
using spanners 12 and 14.
8. Place a new bre washer on the tank connection and
install the T-joint with spanner 12 and 14.
9. Replace the old bre washer of the boiling water hose
with a new one. Attach the hose to the T-joint.
10. Push the white striped hose into the push-t connection
of the T-joint.
Attention: Make sure that the hoses are fully inserted into
the push-t connectors and pull them gently to make sure
they are securely in place.
11. Remove the plastic protective cap from the second
jack plug port on the back of the Quooker tank cover.
Firmly connect the black jack plug of the supplied
communication cable into the jack plug port until the
copper is no longer visible.
12. Connect the blue jack plug (on the other end of the
cable) into the back of the CUBE cover.
Attention: the CO₂cylinder is under pressure and must be
placed in the holder on the side of the CUBE.
The CO₂cylinder must never be positioned horizontally.
13. Firmly push the elbow connector on the transparent
hose into the CO₂ inlet on the back of the CUBE (‘CO₂’).
14. Keep the CO₂pressure reducing valve upright. Remove
the protective cap from the CO₂cylinder and screw
the cylinder into the CO₂pressure reducing valve until
it stops. A little gas may escape, this makes a hissing
sound; it is normal when this happens. Screw-in tightly,
the hissing should stop.
15. Place the CO₂cylinder in the holder and click the
magnet onto the bottom of the CUBE.
- Open the main stopcock or isolation valve.
- Open the shut-o valve.
- Check for leaks.
16. Connect the power cable to the CUBE.
17. Plug the CUBE into a 13 amp power socket.
Installation ready? Then take the following steps:
- Plug the Quooker system into a 13 amp power socket.
- Switch the Quooker system on again with the Q button.
- Check that everything has been installed correctly and
that the water and CO₂are connected.
- Position the tap spout over the sink.
- Click on the screen and go through the start-up
process (p. 30). During this start-up process, some of
the installation steps will be displayed again in order to
verify that they have been completed.

hot
cold
4 5
‘IN’ ‘OUT’
OUT
CO2
IN
11
6
10
98
7
13
12
16
14
15
1
23
17
17

18
Fusion
PRO3
Extra materials required: spanners 12, 14, 19 and 22.
- Attach the lter bracket (p. 9).
- Switch o the Quooker system using the Q button.
Leave the plug in the socket.
- Run the boiling and cold water together until the water
runs cold.
- Close the main stopcock or isolation valve.
- Check if the Quooker system is depressurized by
opening the boiling-water tap. No more water should
now come out of the tap.
- Remove the plug from the socket.
- Disconnect the cold water hose and remove the old
hose screen.
1. Connect the shut-o valve to the cold water pipe with a
hose screen.
2. Place another hose screen in the shut-o valve and
mount the cold water hose from the tap onto it.
3. Connect the blue striped hose onto the shut-o valve
using the supplied bre washer.
4. Connect the other end of the blue striped hose into the
push-t connection of the lter head (‘IN’).
5. Push the white hose into the push-t connection of the
lter head (‘OUT’).
6. Push the other end of the white hose into the push-t
connection of the CUBE (‘IN’).
7. Push the white striped metal hose into the push-t
connection of the CUBE (‘OUT’).
- Ensure the hoses are not bent or crimped during the
installation process.
- Remove the boiling water hose from the top of the tank
using spanners 12 and 14.
8. Place a new bre washer on the tank connection and
install the T-joint with spanner 12 and 14.
9. Replace the old bre washer of the boiling water hose
with a new one. Attach the hose to the T-joint.
10. Push the white striped hose into the push-t connection
of the T-joint.
Attention: Make sure that the hoses are fully inserted into
the push-t connectors and pull them gently to make sure
they are securely in place.
11. Remove the plastic protective cap from the second
jack plug port on the back of the Quooker tank cover.
Firmly connect the black jack plug of the supplied
communication cable into the jack plug port until the
copper is no longer visible.
12. Connect the blue jack plug (on the other end of the
cable) into the back of the CUBE cover.
Attention: the CO₂cylinder is under pressure and must be
placed in the holder on the side of the CUBE.
The CO₂cylinder must never be positioned horizontally.
13. Firmly push the elbow connector on the transparent
hose into the CO₂ inlet on the back of the CUBE (‘CO₂’).
14. Keep the CO₂pressure reducing valve upright. Remove
the protective cap from the CO₂cylinder and screw
the cylinder into the CO₂pressure reducing valve until
it stops. A little gas may escape, this makes a hissing
sound; it is normal when this happens. Screw-in tightly,
the hissing should stop.
15. Place the CO₂cylinder in the holder and click the
magnet onto the bottom of the CUBE.
- Open the main stopcock or isolation valve.
- Open the shut-o valve.
- Check for leaks.
16. Connect the power cable to the CUBE.
17. Plug the CUBE into a 13 amp power socket.
Installation ready? Then take the following steps:
- Plug the Quooker system into a 13 amp power socket.
- Switch the Quooker system on again with the Q button.
- Check that everything has been installed correctly and
that the water and CO₂are connected.
- Position the tap spout over the sink.
- Click on the screen and go through the start-up
process (p. 30). During this start-up process, some of
the installation steps will be displayed again in order to
verify that they have been completed.

hot
cold
OUT
CO2
IN
11
6
109
8
7
13
12
16
14
1
2
3
17
15
4 5
‘IN’ ‘OUT’
19

20
PRO7
Fusion
- Attach the lter bracket (p. 9).
- Switch o the Quooker system using the Q button.
Leave the plug in the socket.
- Run the boiling and cold water together until the water
runs cold.
- Close the main stopcock or isolation valve.
- Check if the Quooker system is depressurized by
opening the boiling-water tap. No more water should
now come out of the tap.
- Remove the plug from the socket.
- Disconnect the cold water hose and remove the old
hose screen.
1. Connect the shut-o valve to the cold water pipe with a
hose screen.
2. Place another hose screen in the shut-o valve and
mount the cold water hose from the tap onto it.
3. Connect the blue striped hose onto the shut-o valve
using the supplied bre washer.
4. Connect the other end of the blue striped hose into the
push-t connection of the lter head (‘IN’).
5. Push the white hose into the push-t connection of the
lter head (‘OUT’).
6. Push the other end of the white hose into the push-t
connection of the CUBE (‘IN’).
7. Push the white striped metal hose into the push-t
connection of the CUBE (‘OUT’).
- Ensure the hoses are not bent or crimped during the
installation process.
- Remove the boiling water hose from the top of the tank
using spanners 12 and 14.
8. Place a new bre washer on the tank connection and
install the T-joint with spanner 12 and 14.
9. Replace the old bre washer of the boiling water hose
with a new one. Attach the hose to the T-joint.
10. Push the white striped hose into the push-t connection
of the T-joint.
Attention: Make sure that the hoses are fully inserted into
the push-t connectors and pull them gently to make sure
they are securely in place.
11. Remove the plastic protective cap from the second
jack plug port on the back of the Quooker tank cover.
Firmly connect the black jack plug of the supplied
communication cable into the jack plug port until the
copper is no longer visible.
12. Connect the blue jack plug (on the other end of the
cable) into the back of the CUBE cover.
Attention: the CO₂cylinder is under pressure and must be
placed in the holder on the side of the CUBE.
The CO₂cylinder must never be positioned horizontally.
13. Firmly push the elbow connector on the transparent
hose into the CO₂ inlet on the back of the CUBE (‘CO₂’).
14. Keep the CO₂pressure reducing valve upright. Remove
the protective cap from the CO₂cylinder and screw
the cylinder into the CO₂pressure reducing valve until
it stops. A little gas may escape, this makes a hissing
sound; it is normal when this happens. Screw-in tightly,
the hissing should stop.
15. Place the CO₂cylinder in the holder and click the
magnet onto the bottom of the CUBE.
- Open the main stopcock or isolation valve.
- Open the shut-o valve.
- Check for leaks.
16. Connect the power cable to the CUBE.
17. Plug the CUBE into a 13 amp power socket.
Installation ready? Then take the following steps:
- Plug the Quooker system into a 13 amp power socket.
- Switch the Quooker system on again with the Q button.
- Check that everything has been installed correctly and
that the water and CO₂are connected.
- Position the tap spout over the sink.
- Click on the screen and go through the start-up
process (p. 30). During this start-up process, some of
the installation steps will be displayed again in order to
verify that they have been completed.
Extra materials required: spanners 12, 14, 19 and 22.
Other manuals for CUBE
2
Table of contents
Other Quooker Water Heater manuals
Popular Water Heater manuals by other brands

Rheem
Rheem Induro 6N3315M7 Owner's guide and installation instructions

Kärcher
Kärcher HWE 860 Original instructions

Siemens
Siemens DH 18100 Installation and operating instructions

Noritz
Noritz NR71-SV installation manual

Bradford White
Bradford White EFT-18000-2-T-10 Installation guide and owner's manual

FF Europe
FF Europe ELKESS-A-100L Original instruction manual