Racing RACST264T User manual

1
ORIGINAL INSTRUCTIONS>EN
4-STROKE PETROL BLOWER
RACST264T
USER GUIDE
CAUTION: Read the instructions before using the machine.

SOMMAIRE
1. SAFETY INSTRUCTIONS .............................................................................. 3
2. EXPLANATION OF SYMBOLS...................................................................... 6
3.INTENDED USE............................................................................................... 7
4. KNOW YOUR PRODUCT............................................................................... 8
5. ASSEMBLY .................................................................................................. 31
6. OPERATION................................................................................................. 36
7. MAINTENANCE............................................................................................ 37
8. CLEANING AND STORAGE........................................................................ 41
9 TROUBLESHOOTING................................................................................... 42
10. DECLARATION OF CONFORMITY ........................................................... 43
11. WARRANTY ............................................................................................... 44
12. PRODUCT FAILURE.................................................................................. 45
13. WARRANTY EXCLUSIONS ....................................................................... 46

3
1. SAFETY INSTRUCTIONS
1.2 GENERAL WARNINGS
WARNING: For your own safety, please read this manual before attempting to operate your new unit.
Failure to follow instructions can result in serious personal injury. Spend a few moments to familiarize
yourself with your blower before each use. If you give this tool to another person, also hand over this
manual.
Use this tool as described in this manual. Any mishandling and any use contrary to the instructions
will not in any way engage the liability of the manufacturer.
Non-compliance with safety instructions and use can cause a risk of electric shock, fire and /or injury
to persons.
READ YOUR USER MANUAL THOROUGHLY BEFORE OPERATING YOUR UNIT.
⚫Never allow children, handicapped or inexperienced people to use the machine. Local regulations may
restrict the age of the user.
⚫Keep children, bystanders and animals away from the machine when using it (at least 15 meters).
⚫Remember that the user is responsible for accidents or damage to people or their property.
⚫Never dismantle the machine by yourself. Any disassembly or repair must be carried out by qualified
personnel.
⚫Always wear personal protective equipment (PPE)
⚫Wear long, thick pants, boots, eye protection and safety gloves. Do not wear loose clothing, shorts or
jewellery, and never work barefoot.
⚫To reduce the risk of injury, never wear loose clothing, scarf, collar, chain, etc. as they could get caught in
moving parts. If you have long hair, be sure to tie it above shoulder level to prevent it from getting caught
in the moving parts.
⚫The machine is extremely noisy and requires the use of good quality hearing protection every time you
use it.
⚫Carry the machine only by its handle. Never try to wear it in other places.
⚫Refuel only in safe places. Open the tank slowly to release any pressure that may have built up in the tank.
Clean any gasoline or spills from the machine before using it. To prevent any risk of fire, move at least 10
meters away from the refuelling area before starting the machine.
⚫Switch off the machine before any preparation, installation or maintenance.
⚫All machine screws should be properly seated and tightened securely. The machine must be in good
working order. Never use this machine if it is not assembled correctly.
⚫Keep handles clean and dry and free from gasoline or oil.
⚫Always store the machine in a clean and dry place away from all electrical equipment.
⚫Never start the engine in a closed or poorly ventilated room as the exhaust gases can be fatal.
⚫Only operate the machine at reasonable times - not too early in the morning or late at night, when people
may be disturbed.
⚫Never use the machine in bad weather or if there is a risk of lightning or thunderstorms. Do not use in the
rain or in wet areas.
⚫Do not use this machine if you are tired, sick, under the influence of alcohol or drugs, or if you are taking
medication.
⚫Do not use this machine in a poorly lit area.
⚫Keep a safe distance from moving parts and never touch surfaces that become hot during use.
⚫Wear a mask that filters out microscopic particles if your work generates dust, to avoid the risks associated
with inhaling harmful dust.

⚫Before starting the machine, clear the area where you are going to use it. Remove stones, broken glass,
nails, wire ropes, ropes or other objects that could be thrown or get caught in the machine.
⚫Always keep a good balance. Support yourself well on your legs and do not extend your arm too far.
Otherwise, you could fall, slip or injure yourself.
⚫Let your machine cool down before putting it away.
⚫Before transporting this machine in a vehicle, empty the fuel tank and secure the machine so that it cannot
move during transport.
⚫To reduce the risk of fire and burns, handle fuel with care. It is an extremely flammable substance.
⚫Do not smoke when handling fuel.
⚫Mix and store fuel in a container designed to hold gasoline.
⚫Mix the fuel in the open air, away from any sparks or flames.
⚫Choose a clean, bare surface, stop the engine, and allow it to cool before filling it.
⚫Slowly unscrew the fuel cap to relieve pressure and prevent fuel from spilling around the cap.
⚫Screw on the tank cap firmly after filling.
⚫Wipe down the machine if you have spilled fuel.
⚫Move at least 10m away from where you filled the fuel tank before starting the engine.
⚫Never attempt to burn spilled fuel.
⚫When replacing, use only replacement parts and accessories recommended by the manufacturer. Failure
to do so could reduce the efficiency of your machine and put you at risk of injury.
⚫Maintain your machine with care, according to the instructions in the "Maintenance" section of this manual.
⚫Check the condition of your machine before each use. Make sure that the fasteners are tight, that there
are no fuel leaks and that no parts are damaged.
⚫Replace any damaged part.
⚫To reduce the risk of injury from contact with moving parts, stop the engine before installing or removing
accessories.
⚫Do not use your machine if the protective elements are not installed. Always remove the spark plug before
carrying out any maintenance or working on any moving part.
⚫Do not point the blower nozzle at people or pets.
⚫Never start this machine if the required accessories are not installed.
⚫Do not operate the machine near open windows,
⚫Use a rake and broom to loosen debris before blowing.
⚫Lightly dampen surfaces in dusty conditions before working.
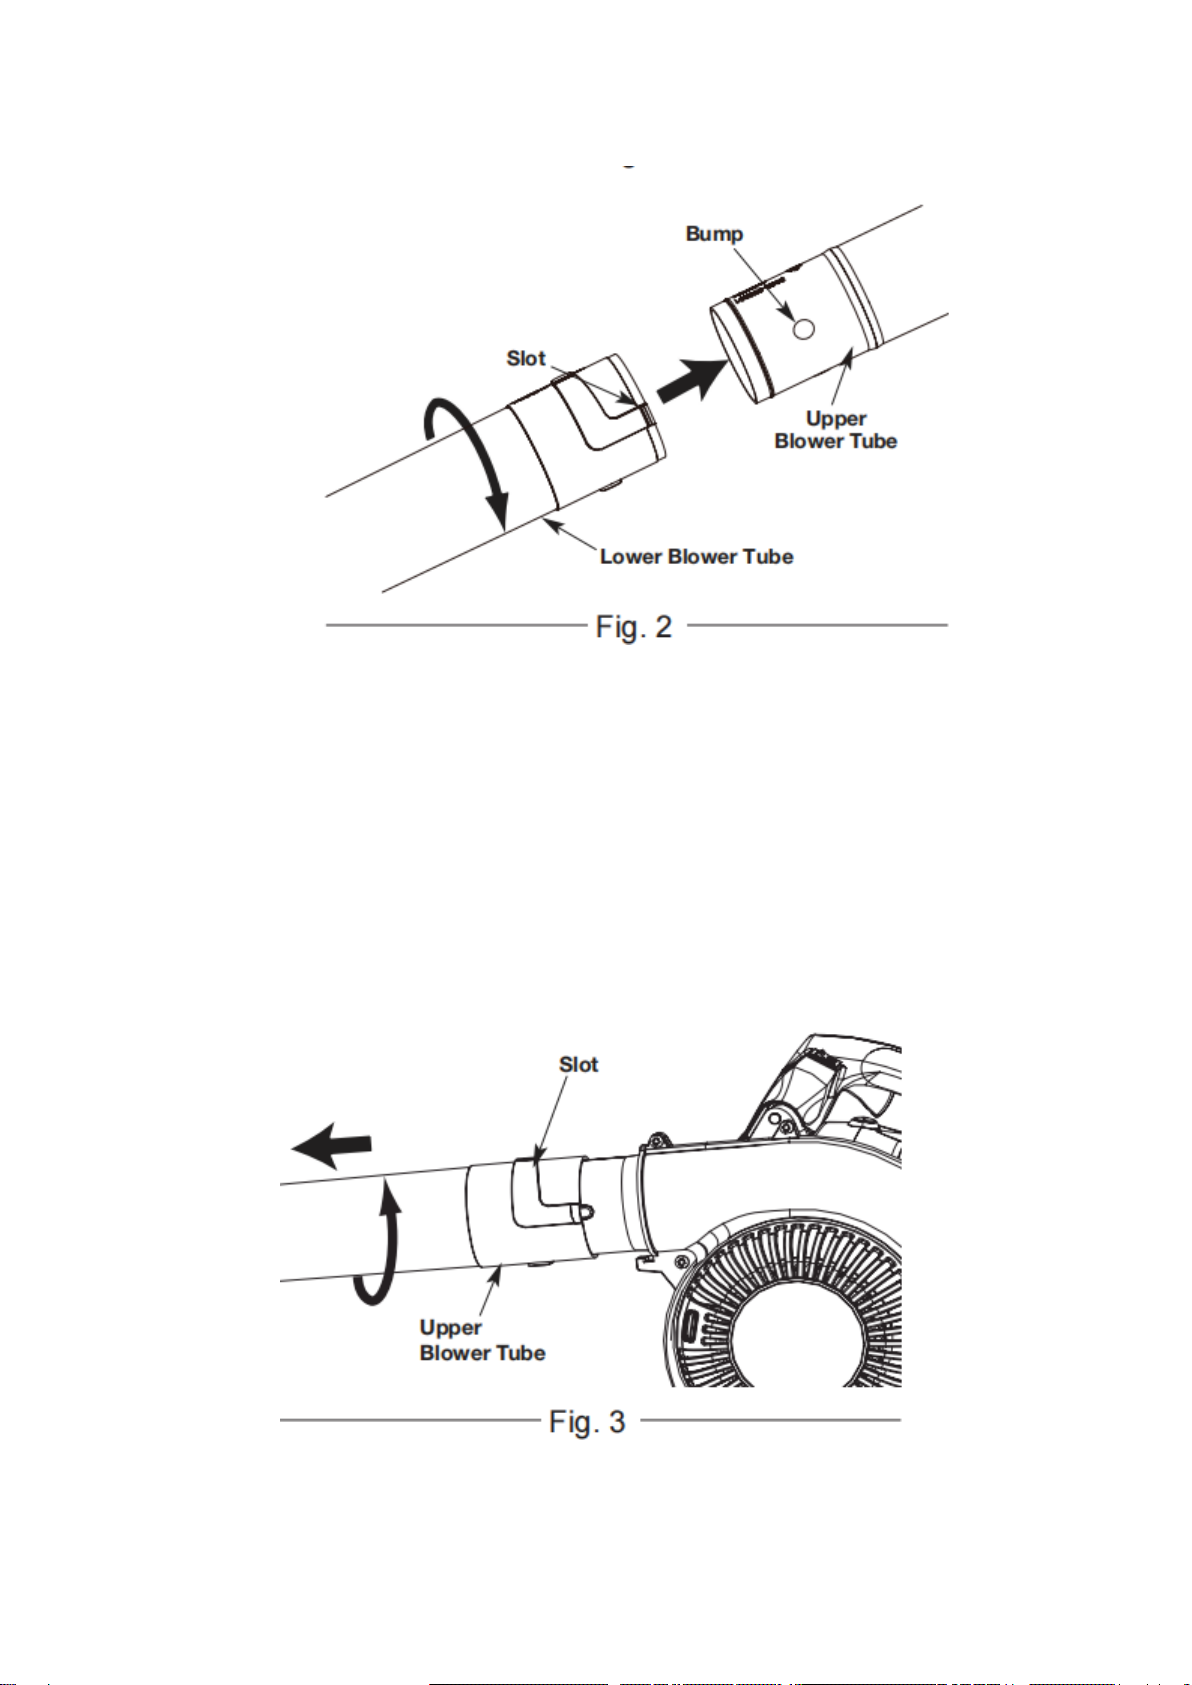
⚫Use the pipes fully assembled so that the air flow can reach the floor.
⚫Caution: there is a risk of danger from rotating parts. Avoid coming into contact with them.
⚫In case of blockage or breakdown, stop using the machine immediately. Inspect it and remove the
blockage securely (see chapter “Maintenance”). In the event of a fault, please take your machine to a
qualified service for inspection.
Fuel handling
⚫Be very careful when handling fuels. They are flammable and the vapors are explosive.
⚫Use only an approved container.
⚫Never remove the fuel cap or add fuel while the machine is on. Turn off the unit and allow the engine and
exhaust components to cool before refuelling.
⚫Do not smoke.

5
⚫Never refuel inside a room
⚫Never store the tool and the fuel tray indoors where there is a naked flame, such as near a water heater.
⚫If fuel has spilled, do not attempt to start the machine, but rather move it away from the spill before starting
to use it. Clean any spills.
⚫Replace and tighten the fuel tank cap after refuelling.
⚫Follow the instructions in this manual for filling the tool with fuel.
Maintenance and storage
When the machine is stopped for servicing, inspection, or storage, or to change an accessory, shut off the
power source and make sure that all moving parts have come to a complete stop. Allow the machine to cool
before making any inspections, adjustments, etc. Maintain the machine with care and keep it clean.
⚫Store the machine in a dry place out of the reach of children.
⚫Always allow the machine to cool before storing.
⚫Replace worn or damaged parts for safety. Use only genuine replacement parts and accessories.
⚫Never attempt to override the interlocked feature of the guard.
Residuals risks
Even if you use this product in compliance with all safety requirements, potential risks of injury and damage
remain. The following hazards may arise from the structure and design of this product. Always be vigilant
when using this product, so you can recognize and manage the risks early. Rapid intervention can prevent
serious injury and property damage. Turn off the tool if there are any malfunctions. Have it checked by a
qualified professional and have repairs carried out, if necessary, before using it again.
⚫There are harmful health consequences resulting from the emission of vibrations if the product is used for
long periods of time or not properly managed and properly maintained.
⚫There is risk of injury and property damage due to attachments or broken the sudden impact of hidden
objects.
⚫Risk of injury to persons and property caused by flying objects
⚫Inhalation of gasoline particles or toxic gases.
⚫Contact with moving parts. (Ex: Danger related to the starter handle (Risk of kickback))
⚫Hearing loss if hearing protection is not worn.

2. EXPLANATION OF SYMBOLS
This operator’s manual describes safety and international symbols and pictographs that may appear on this
product. Read the operator’s manual for complete safety, assembly, operating and maintenance and repair
information.
To reduce the risk of injury, user must read and understand operator’s manual
before using this product.
Keep all bystanders at least 15 m away.
Wear protective goggles.
Wear hearing protection.
Wear safety shoes.
Wear protective gloves.
Rotating impeller blades can cause severe injury
Failure to keep loose clothing from being drawn into air intake could result in
personal injury.
Failure to keep hair into air intake could result in personal injury.
Conforms to relevant safety standards
Guaranteed sound power lever:105dB (A).

7
1. • RUN choke position
2. • PARTIAL choke position
3. • FULL choke position
OFF or STOP
ON / START / RUN
Hot surface
Primer bulb
Warning symbol
3.INTENDED USE
This engine gasoline powered blower is intended for Cleaning yards, garages, driveways, porches, patios,
around walls, fences, etc.
This product is intended for blower use only and is not designed for vacuum use.
Do not attempt to open air inlet cover that covers the impeller. Opening the air inlet cover may result in contact
with the impeller blades and cause serious personal injuries.

4. KNOW YOUR PRODUCT
4.1 PRODUCT DESCRIPTION
1 Air Filter Cover
2 Choke Lever
3 Primer Bulb
4 Fuel Cap
5 Starter Rope Grip
6 Oil Fill Plug
7 Muffler
8 Spark Plug Cover
9 On/Off Switch
10 Handle
11 Throttle Control
12 Upper Blower Tube
13 Lower Blower Tube

31
4.2 TECHNICAL DATA
Engine Type
Air-Cooled, 4-STROKE
Engine displacement
26.5 cm³
Maximum engine capacity
0.65 kW
Engine rating speed
7000min-1
Engine max speed
11000min-1
Engine min speed
3500+/-300 min-1
Air speed
198 km/h
Air volume
690 m3/h
Fuel tank capacity
280 cm³/ 0.28 L
Lubricating tank capacity
60 cm³/ 0.06L
Net weight (without fuel)
4.0 kg
Sound pressure level LpA
87.9 dB(A), K=3dB(A)
Guaranteed sound power level LwA
105 dB(A)
Measured sound power level LwA
100.3 dB(A), K=3dB(A)
Main handle ah
13.2 m/s2
Aux. handle: ah
10.4 m/s2
Uncertainty K
1.5 m/s²
5. ASSEMBLY
WARNING!
To avoid serious personal injury and damage to the unit, shut the unit off before removing or installing blower
tubes or nozzles.
WARNING!
To prevent serious personal injury, never operate the unit without the upper blower tube firmly installed.
5.1 INSTALLING THE BLOWER TUBE(S)
Always install the upper blower tube. The lower blower tube is optional.
1) Installing the Upper Blower Tube
•Align the slots on the upper end of the upper blower tube with the bumps on the blower outlet (Fig. 1).
•Insert the upper blower tube into the blower outlet (Fig. 1).
•While holding the handle, twist the upper blower tube clockwise until it locks into place (Fig. 1).

2) Installing the Lower Blower Tube
•Align the slots on the lower blower tube with the bumps on the lower end of the upper blower tube (Fig. 2).
•Install the lower blower tube onto the upper blower tube (Fig. 2).
•While holding the upper blower tube, twist the lower blower tube clockwise until it locks into place (Fig. 2).
3) REMOVING THE BLOWER TUBE(S)
•Removing the Upper Blower Tube
➢Twist the upper blower tube counterclockwise until it unlocks from the blower outlet (Fig. 3).
➢Remove the upper blower tube from the blower outlet.
•Removing the Lower Blower Tube
➢While holding the upper blower tube, twist the lower blower tube counterclockwise until it unlocks
from the blower tube.
➢Remove the lower blower tube from the upper blower tube.
4) USING THE RIGHT OIL
Use a high-quality SAE 30 weight oil. DO NOT use dirty oil. Failure to use clean oil of the correct type can
cause premature engine wear and failure.

33
5) ADDING OIL: INITIAL USE
WARNING !
OVERFILLING THE CRANKCASE MAY CAUSE SERIOUS PERSONAL INJURY. Check the oil level
before each use. The importance of maintaining the proper oil level cannot be overemphasized. Change the
oil according to the Maintenance Schedule.
Note: This unit was shipped without oil in the crankcase. Oil must be added before starting the unit.
Note: This unit comes with a 60 ml container of oil.
a) Set the unit on a flat, level surface.
b) Unscrew the oil fill plug (Fig. 4).
c) Pour the entire container of oil into the oil fill hole (Fig. 4).
DO NOT overfill. Refer to Checking the Oil Level
Note: Never add oil to the fuel tank. This unit has a four-cycle engine. DO NOT mix oil with gasoline.
d) Wipe up any oil that may have spilled.
e) Reinstall the oil fill plug.
Note: Make sure the O-ring is in place on the oil fill plug (Fig. 4).
6) USING THE RIGHT FUEL
The use of old fuel is the most common cause of performance problems. Use only fresh, clean unleaded
gasoline.
Note: This unit has a four-cycle engine. DO NOT mix oil with gasoline.
7) FUELING THE UNIT
WARNING !
Gasoline is extremely flammable. Ignited vapors may explode. Always stop the engine and allow it to cool
before filling the fuel tank. Do not smoke while filling the tank. Keep sparks and open flames at a distance
from the area.
WARNING!
Remove the fuel cap slowly to avoid injury from fuel spray. Never operate the unit without the fuel cap
securely in place.
WARNING!
Add fuel in a clean, well ventilated outdoor area. Wipe up any spilled fuel immediately. Avoid creating a source
of ignition for spilled fuel. Do not start the engine until fuel vapors dissipate.
a) Position the unit with the fuel cap facing up.
b) Slowly remove the fuel cap.

c) Place the fuel container spout into the fuel tank fill hole and fill the tank.
Note: Do not overfill the tank.
d) Wipe up any fuel that may have spilled.
e) Reinstall the fuel cap.
f) Move the unit at least 30 ft. (9.1 m) from the fuel container and the fueling site before starting the
engine.
5.2 STARTING AND STOPPING
WARNING!
Operate this unit only in a well-ventilated outdoor area.
Carbon monoxide exhaust fumes can be lethal in a confined area.
WARNING!
Avoid accidentally starting the unit. To avoid serious injury, the operator and the unit must be in a stable
position when pulling the starter rope (Fig. 7).
WARNING!
When starting the unit, make sure it is not directed toward people, animals, windows, automobiles or loose
debris.
WARNING!
Be sure to read the fuel information in the safety rules before you begin. If you do not understand the safety
rules, do not attempt to fuel your unit.
1) STARTING INSTRUCTIONS
a) Check the oil level. Refer to Checking the Oil Level.
b) Fill the fuel tank. Refer to Fueling the Unit.
c) Push the ON/OFF switch on the ON (I) position. (Fig. 5).
d) Slowly press the primer bulb 10 times (Fig. 6).
e) Move the choke lever to the Full Choke position (Fig. 6).

35
f) DO NOT squeeze the throttle control. Crouch in the starting position (Fig. 7).
g) DO NOT squeeze the throttle control. Pull the starter rope with a controlled and steady motion 3 to 5
times to start the engine (Fig. 7).
h) Allow the engine to warm up less than 10 seconds, then squeeze the throttle control to return the choke to
the Choke OFF position and operate the blower.
If the engine does not start, begin the starting procedure with step 3.
If the engine fails to start after a few attempts, squeeze the throttle control to return move the choke to the
Choke Off position. Pull the starter rope with a controlled and steady motion 3 to 8 times. The engine should
start. If it does not, repeat this instruction.
IF THE UNIT WAS RUN FOR 10-15 MINUTES AND THE ENGINE IS HOT... perform steps 3, 5, 6, 7 to
restart the engine. Squeeze and hold the throttle control. Run the unit for 2-5 minutes, or as needed. The unit
may be used during this time.
If the engine speed fluctuates, move the choke lever to the Full Choke position and run the unit for 2-5
minutes, or as needed. The unit may be used during this time. Then squeeze and hold the throttle control to
operate the blower.
2) STOPPING INSTRUCTIONS
a) Release the throttle control and allow the engine to idle.
b) Press and hold the ON/OFF switch in the OFF (STOP) position until the engine comes to a complete stop
(Fig. 5).

6. OPERATION
WARNING!
Clear the area of children bystanders, and pets. At a minimum, keep all children, bystanders, and pets outside
a 15 m (50 ft) radius; outside the 15 m (50 ft) zone, there is still a risk of injury from thrown objects.
Bystanders should be encouraged to wear eye protection. If you are approached, stop the engine.
WARNING!
To prevent serious personal injury, never operate the unit without the upper blower tube firmly installed.
WARNING!
Always wear eye, hearing, hand, foot and body protection to reduce the risk of injury when operating
this unit. Wear a face mask or dust mask if the operation is dusty.
WARNING!
To reduce the risk of injury associated with contacting rotating parts, stop the engine before installing or
removing attachments. Do not operate without guards in place. Always disconnect the spark plug before
performing maintenance or accessing movable parts.
6.1 OPERATING TIPS
•While vacuuming or blowing debris, hold the unit with the muffler side facing away from your body and
clothes.
•To reduce the risk of hearing loss associated with sound level(s), hearing protection is required.
•To reduce the risk of injury associated with contacting rotating parts, stop the engine before installing or
removing attachments. Do not operate without guard(s) in place.
•Operate power equipment only at reasonable hours not early in the morning or late at night when people
might be disturbed. Comply with times listed in local ordinances. Usual recommendations are 9:00 a.m. to
5:00 p.m., Monday through Saturday.
•To reduce noise levels, limit the number of pieces of equipment used at any one time.
•To reduce noise levels, operate power blowers at the lowest possible throttle speed to do the job.
•Use rakes and brooms to loosen debris before blowing.
•In dusty conditions, slightly dampen surfaces when water is available.
•Conserve water by using power blowers instead of hoses for many lawn and garden applications,
including areas such as gutters, screens, patios, grills, porches, and gardens.
•Watch out for children, pets, open windows, or freshly washed cars. Blow debris away safely.
•Use the full blower nozzle extension so the air stream can work close to the ground.
•After using blowers and other equipment, CLEAN UP! Dispose of debris in trash receptacles.

37
6.2 HOLDING THE UNIT
•Stand in the operating position (Fig. 8). Stand up straight. Do not bend over.
•Keep feet apart and firmly planted.
•Hold the unit in front of, and away from, your body (Fig. 8).
WARNING!
To prevent serious personal injury or damage to the unit, DO NOT hold the unit at your side (Fig. 8). The
engine may be extremely hot. DO NOT block the air intake.
7. MAINTENANCE
7.1 GENERAL RECOMMENDATIONS
The warranty on this unit does not cover items that have been subjected to operator abuse or negligence.
To receive full value from the warranty, the operator must maintain unit as instructed in this manual. Various
adjustments will need to be made periodically to properly maintain your unit.
Note: Use only original equipment manufacturer replacement parts and accessories for this unit. These are
available from an authorized service dealer. The use of any unauthorized parts or accessories could lead to
serious injury to the user, or damage to the unit, and void the warranty.
WARNING!
To avoid serious personal injury, always stop the engine and allow it to cool before cleaning or maintaining the
unit. Never perform cleaning or maintenance while the unit is running. Disconnect the spark plug wire to
prevent the unit from starting accidentally.
Wear protective clothing and observe all safety instructions to prevent serious personal injury.
7.2 CHECKING THE OIL LEVEL
WARNING!
OVERFILLING THE CRANKCASE MAY CAUSE SERIOUS PERSONAL INJURY. Check the oil level before
each use. The importance of maintaining the proper oil level cannot be overemphasized.
1) Stop the engine and allow it to cool.
2) Set the unit on a flat, level surface, such as a workbench or table.
Note: Failure to keep the engine level may result in oil overfill.
3) Clean the area around the oil fill plug (Fig. 9) to prevent debris from entering the oil fill hole.

4) Unscrew the oil fill plug.
5) Look into the oil fill hole; use a flashlight if necessary. Add oil to the oil fill hole until the oil level is
visible on the first thread of the oil reservoir (Fig.10). If the oil level is too low, add oil to the oil fill hole
until the oil level touches the bottom thread of the oil fill hole.
Note: DO NOT overfill the crankcase.
6) Wipe up any oil that may have spilled.
7) Reinstall the oil fill plug.
Note: Make sure the O-ring is in place on the oil fill plug (Fig. 9).
7.3 MAINTENANCE SCHEDULE
Perform these required maintenance procedures at the frequency stated in the table. These procedures
should also be a part of any seasonal tune-up. Some maintenance procedures may require special tools or
skills. If unsure about these procedures, take the unit to a Sears or other qualified service dealer.
Note: Maintenance, replacement, or repair of the emission control devices and system may be performed by
a qualified service dealer.
FREQUENCY
MAINTENANCE REQUIRED
Every 10 hours
Clean and re-oil the air filter. Refer to
Maintaining the Air Filter.
After the first 10 hours and at 38 hours
•Change the oil. Refer to Changing the Oil.
•Have the rocker arm clearance checked by a
Sears or other qualified service dealer.
•Check the spark plug condition and gap.
Refer to Maintaining the Spark Plug.

39
7.4 CHANGING THE OIL
Change the oil while the engine is still warm. The oil will flow freely and carry away more impurities.
1) Clean the area around the oil fill plug (Fig. 9) to prevent debris from entering the oil fill hole.
2) Unscrew the oil fill plug.
3) Tip the unit vertically to pour the oil out of the oil fill hole and into a container (Fig. 11). Allow ample
time for complete drainage.
4)
Note: Dispose of the old oil according to federal, state and local regulations.
5) Wipe up any oil that may have spilled.
6) Pour 60 ml of SAE 30 oil into the oil fill hole.
Note: DO NOT overfill. Refer to Checking the Oil Level.
7) Wipe up any oil that may have spilled.
8) Reinstall the oil fill plug.
Note: Make sure the O-ring is in place on the oil fill plug (Fig. 9).
7.5 MAINTAINING THE AIR FILTER
Failure to maintain the air filter can result in poor performance or can cause permanent damage to the engine.
Engine failure due to improper air filter maintenance is not covered by the product warranty
1) Cleaning the Air Filter
2) Open the air filter cover: press in the lock tab and swing the air filter cover to the right (Fig. 12).
3) Remove the air filter (Fig. 12).
4) Wash the air filter in detergent and water. Rinse the air filter thoroughly and allow it to dry.
5) Lightly coat the air filter with clean SAE 30 oil.
6) Squeeze the air filter to spread and remove excess oil.
7) Reinstall the air filter (Fig. 12).
Note: Operating the unit without the air filter and air filter cover will VOID the warranty.
8) Close the air filter cover: insert the tabs on the air filter cover into the slots on the backplate. Swing the air
filter cover to the left and press it closed until the lock tab snaps into place.

7.6 ADJUSTING THE IDLE SPEED
If the engine will not idle properly:
1) Start the engine. Refer to Starting and Stopping.
2) Let the engine idle. If the engine stops, increase the idle speed. Use a small Phillips screwdriver to
turn the idle speed screw clockwise, 1/8 of a turn at a time, until the engine idles smoothly (Fig. 13).
7.7 MAINTAINING THE SPARK PLUG
If the engine will not idle properly:
1) Stop the engine and allow it to cool.
2) Grasp the spark plug boot firmly and pull it from the spark plug (Fig. 14).
3) Clean around the spark plug. Remove the spark plug from the cylinder head with a 5/8-inch socket,
turning counterclockwise.
WARNING! do not sand blast, scrape or clean spark plug electrodes. Grit in the engine could damage
the cylinder
4) Inspect the spark plug. If the spark plug is cracked, fouled or dirty, replace it with replacement part
Newstar AM5C, or NGK CMR5H, or an equivalent spark plug.
5) Use a feeler gauge to set the air gap at 0.025 - 0.31 in. (0.6 mm - 0.8 mm) (Fig. 15).
6) Install the spark plug in the cylinder head. Tighten the spark plug with a 5/8-inch socket, turning it
clockwise until snug.
Note: If using a torque wrench, torque to 18 Nm. Do not over tighten.
7) Reattach the spark plug boot.

41
8. CLEANING AND STORAGE
8.1 CLEANING
WARNING! to avoid serious personal injury, always stop the engine and allow it to cool before
cleaning or maintaining the unit.
Use a small brush to clean the outside of the unit. Do not use strong detergents. Household cleaners that
contain aromatic oils such as pine and lemon, and solvents such as kerosene, can damage plastic. Wipe off
any moisture with a soft cloth.
8.2 STORAGE
•Never store a fueled unit where fumes may reach an open flame or spark.
•Allow the engine to cool before storing.
•Lock up the unit to prevent unauthorized use or damage.
•Store the unit in a dry, well-ventilated area.
•Store the unit out of the reach of children.
8.3 LONG-TERM STORAGE
•Remove the fuel cap, tip the unit and drain the fuel into an approved container. Reinstall the fuel cap.
•Start the engine and allow it to run until it stalls. This ensures that all fuel has been drained from the
carburetor.
•Allow the engine to cool. Remove the spark plug and put 5 drops of any high-quality motor oil into the
cylinder. Pull the starter rope slowly to distribute the oil. Reinstall the spark plug.
•Thoroughly clean the unit and inspect it for any loose or damaged parts. Repair or replace damaged parts
and tighten loose screws, nuts or bolts.
8.4 PREPARING THE UNIT FOR USE AFTER LONG-TERM STORAGE
•Remove the spark plug. Tip the unit and drain all of the oil from the cylinder into an approved container.
Reinstall the spark plug.
•Change the oil. Refer to Changing the Oil.
Note: Do not use fuel that has been stored for more than 30 days. Dispose of old fuel and oil according to
federal, state and local regulations.

8.5 FUEL SYSTEM
Empty the fuel system before storage for 30 days or longer. Drain the gas tank, start the engine and let it run
until the fuel lines and carburetor are empty. Use fresh fuel next season. Under OIL AND FUEL section of this
manual, see message labeled IMPORTANT regarding the use of blended and E85 fuel in your engine. Fuel
stabilizer is an acceptable alternative in minimizing the formation of fuel gum deposits during storage.
Add stabilizer to gasoline in fuel tank or fuel storage container. Follow the mix instructions found on stabilizer
container. Run engine at least 3 minutes after adding stabilizer.
8.6 ENGINE & OTHER
1) ENGINE
•Remove spark plug and pour 1 teaspoon of engine oil through the spark plug opening. Slowly pull the
starter rope 8 to 10 times to distribute oil.
•Replace spark plug with new one of recommended type and heat range.
•Clean air filter.
•Check entire unit for loose screws, nuts, and bolts. Replace any damaged, broken, or worn parts.
•At the beginning of the next season, use only fresh fuel.
2) OTHER
•Do not store gasoline from one season to another.
•Replace your gasoline can if it starts to rust.
9 TROUBLESHOOTING
PROBLEM
CAUSES
SOLUTION
THE ENGINE
WILL NOT
START
The fuel tank is empty
Fill the fuel tank with fresh fuel
The primer bulb was not pressed
enough
Press the primer bulb 10 times
The fuel is old (over 30 days)
Drain the fuel tank and add fresh fuel
The spark plug is fouled
Replace the spark plug
The engine is hot
Refer to the IF... THE ENGINE IS HOT instructions in
the
Starting and Stopping section
THE ENGINE
WILL NOT IDLE
The air filter is dirty
Clean or replace the air filter
The fuel is old (over 30 days)
Drain the fuel tank and add fresh fuel
The idle speed is incorrect
Adjust the idle speed
THE ENGINE
WILL NOT
ACCELERATE
The fuel is old (over 30 days)
Drain the fuel tank and add fresh fuel
The air filter is dirty
Clean or replace the air filter
THE ENGINE
LACKS
POWER OR
STALLS
The fuel is old (over 30 days)
Drain the fuel tank and add fresh fuel
The air filter is dirty
Clean or replace the air filter
The spark plug is fouled
Replace the spark plug
If further assistance is required, take the unit to a qualified service dealer.
WARNING!
If the unit strikes or becomes entangled with a foreign object, stop the unit immediately. Check for damage. If
damaged, do not restart or operate the unit until it is repaired. Do not operate the unit with loose or damaged.
If a blockage is likely to occur, switch off the engine and wait until it has stopped completely. Check that the
machine is not damaged. Repair any damage.
Table of contents
Other Racing Blower manuals