RADEMACHER RolloTron Comfort 1623 45 19 User manual

VBD 567-2-1 (12.20)
Item No.:
1623 45 19
1623 60 19 (Comfort Plus)
1615 45 19 (Small belt)
Electronic Roller Shutter Belt Winder RolloTron Comfort
Translation of the Original Operating and Assembly Manual
EN

2
EN
With your purchase of RolloTron Comfort, you have cho-
sen a quality product manufactured by RADEMACHER.
Thank you for the trust you have placed in us.
This roller shutter belt winder has been designed both in
order to provide optimal convenience and operability as
well as to ensure solidity and durability. Having applied
uncompromising quality standards, and carried out
thorough testing, we are proud to be able to present you
this innovative product.
It’s brought to you by all the
highly-qualified personnel here at
RADEMACHER.
Dear Customer,
These instructions...
...describe how to install the equipment, connect the elec-
trical system and operate your roller shutter belt winder.
Before you begin, please read these instructions through
completely and follow all the safety instructions.
This manual is a component of the product. Please store it
in an easily accessible place. When passing the RolloTron
Comfort on to a third party, this manual must be passed
on as well.
Damage resulting from non-compliance with these in-
structions and safety instructions will void the guarantee.
We assume no liability for any consequential damage.
i

3
EN
Table of Contents
i
i Dear Customer, ........................................................................2
1. Hazard symbols .......................................................................5
1.1 Levels of danger and signal words....................5
1.2 Symbols and depictions used .............................5
2. Safety instructions..................................................................6
2.1 Proper use...................................................................7
2.2 Improper use.............................................................8
2.3 Required expert knowledge of the installer ..8
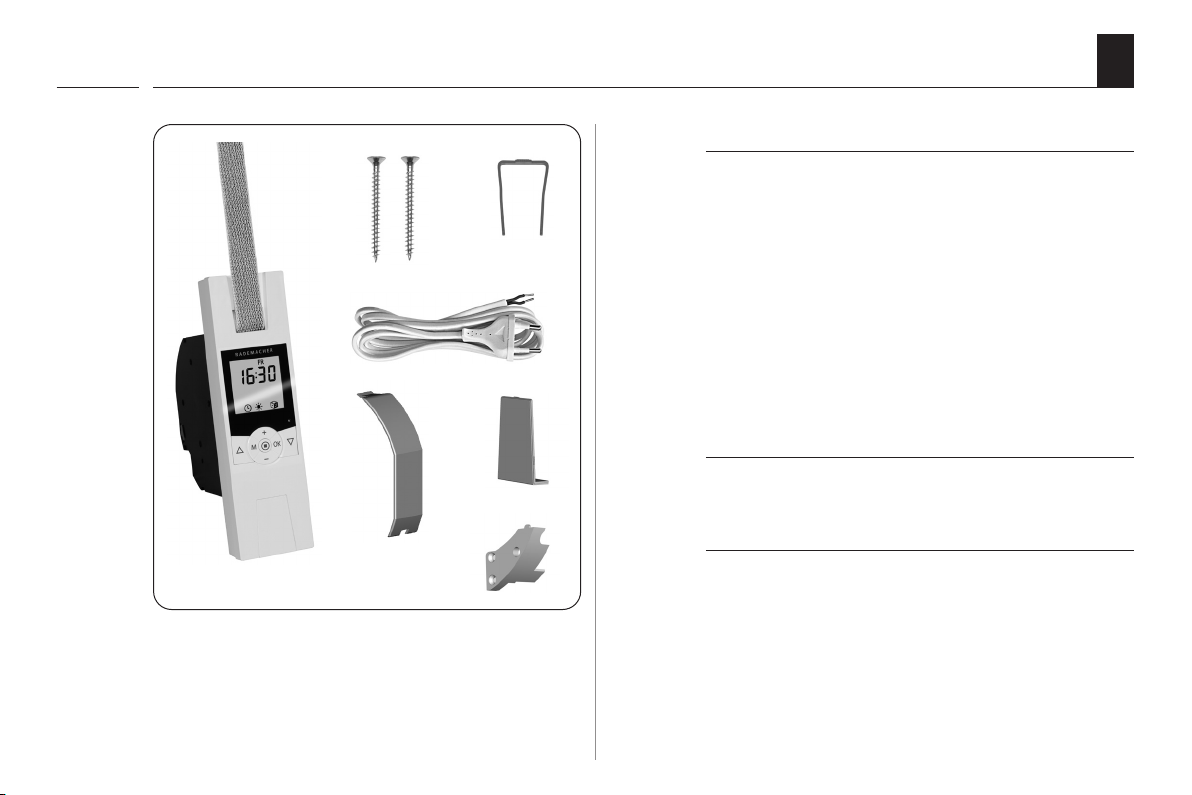
3. Scowpe of delivery (item no. 1623 45 19) *...................9
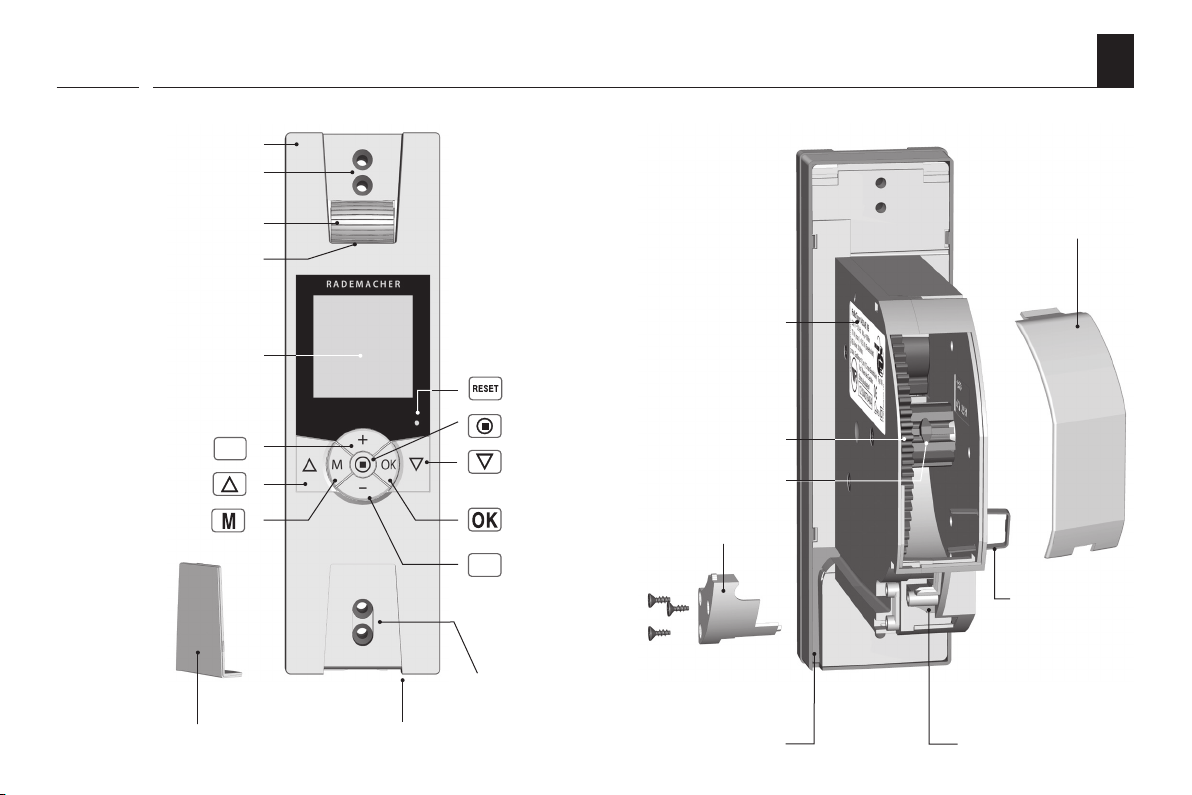
4. General view (item no. 1623 45 19) *............................ 10
5. Display overall view............................................................. 11
6. Permissible roller shutter belts........................................ 12
7. Functional description ....................................................... 13
7.1 Description of the safety functions................ 13
7.2 Overview of features ........................................... 15
8. General assembly instructions........................................ 16
8.1 You will require the following tools ............... 16
8.2 Preparation for installation................................ 17
9. Safety instructions for electrical connection ............. 19
9.1 Electrical connection........................................... 20
10. Drawing in and fastening the belt................................. 21
11. Mounting the RolloTron Comfort................................... 23
12. Brief description of the button functions .................. 25
12.1 Brief description of the standard display
and main menu ..................................................... 26
12.2 Introduction to opening and closing the
menus ....................................................................... 27
13. Initial commissioning with the help of the
installation wizard................................................................ 28
14. Manual operation ................................................................ 32
14.1 Moving to a target position .............................. 33
15. Menu overview / main menu .......................................... 34
15.1 [ AUTO ] Automatic mode; brief
description .............................................................. 35
15.1.1 Menu 1- Automatic mode on / off.. 36
15.2 Switching times (opening and closing
times) [ / ]; brief description........................ 37
15.2.1 Menu 2 - Configuration of opening
and closing times [ / ] .................... 40
15.3 Automatic dusk function; brief
description .............................................................. 44
15.3.1 Menu 3 - Customising the auto-
matic dusk function [ ] ................... 45
15.4 Automatic solar function; brief
description .............................................................. 47
15.4.1 Menu 4 - Configuring the auto-
matic solar function [ ]................... 49
15.5 Automatic dawn function; brief
description .............................................................. 50
15.5.1 Menu 5 - Customising the auto-
matic dawn time [ ] ......................... 51
15.6 Random function; brief description............... 52
15.6.1 Menu 6 - Configuring the random
function [ ] ......................................... 52

4
EN
Table of Contents
i
15.7 Menu 9 - System settings [ ]; brief
description .............................................................. 53
15.7.1 Menu 9.1 - Set time / date [ ]
and Postcode [ PLZ ] ............................ 54
15.7.2 Menu 9.2 - End point configura-
tion [ ] .................................................. 55
15.7.3 Menu 9.3 - Configure ventilation
position [ ] ...................................... 56
15.7.4 Menu 9.4 - Configure continuous
display lighting...................................... 57
15.7.5 Menu 9.5 - Weekly programme [ ]
configuration.......................................... 58
15.7.6 Menu 9.6 - Configure motor
speed......................................................... 59
15.7.7 Menu 9.7 - Switch button lock
on/off......................................................... 60
15.7.8 Erase all settings, software reset....... 61
16. Carry out hardware reset................................................... 61
17. Removing the RolloTron Comfort (e.g. in the
event of a move)................................................................... 62
18. Removing the belt in the event of unit failure.......... 64
19. What to do if... ? .................................................................... 65
20. Information about maintenance and care of
your equipment.................................................................... 68
21. Technical Specifications..................................................... 69
22. Tractive force diagrams...................................................... 70
23. Factory settings .................................................................... 71
24. Time zone table.................................................................... 72
25. Simplified EU Declaration of Conformity .................... 73
26. Accessories ....................................................................... 73
27. Warranty conditions............................................................ 74

5
EN
i
i
i
i
1. Hazard symbols
Danger of fatal electric shock Danger area / dangerous situation
1.1 Levels of danger and signal words
DANGER!
This hazard will result in serious injury or death if not
avoided.
WARNING!WARNING!
This hazard may result in serious injury or death if not
avoided.
CAUTION!
This hazard may result in minor or moderate injury if not
avoided.
ATTENTION!
This hazard may lead to property damage.
1.2 Symbols and depictions used
1. Steps to be taken
2.
◆Itemisation
1. List
Please read the
respective manual
further useful information

6
EN
i
2. Safety instructions
The use of defective equipment can lead to personal
injury and damage to property (electric shocks, short
circuiting).
◆Never use defective or damaged equipment.
◆Check the device and mains cable beforehand for
damage.
◆Should you discover damage to the equipment,
please consult our customer service department
(see page 76).
Incorrect use leads to an
increased risk of injury.
◆Train all personnel to use the RolloTron Comfort
safely.
◆This device may be used by children from 8 years of age
upwards as well as by persons with reduced physical,
sensory or mental capacities or with lack of experience
and knowledge if they are supervised or have been
instructed on how to use the device safely and if they
understand what dangers may resulted from this.
◆Children must not play with the device.
◆Cleaning and user maintenance may not be carried out
by children without supervision.
◆Watch the moving roller shutters whilst carrying out
the settings and during normal operation, and keep
other people away from the area to avoid injury in the
event the shutters suddenly slip.
◆Carry out all cleaning work on the roller shutters whilst
the device is disconnected from the mains power.
The mains socket and plug must be easily accessible
at all times.
Exceedingthemaximum permissible runningtime(KB)
can overload and damage the RolloTron Comfort.
◆The maximum permissible running time for a cycle may
not be exceeded when the equipment is in operation.
For this reason, the RolloTron Comfort has an automatic
running time limit (KB) of four minutes.
◆If the running time limit is triggered, then the RolloTron
Comfort must be left for at least 12 minutes to cool
down. Full operational availability is re-established
after approx. one hour.

7
EN
i
i
i
2. Safety instructions
According DIN EN 13659, it is necessary to determine that
the movement conditions for the shutters are maintained
in accordance with EN 12045.
◆The displacement must amount to at least 40 mm on
the lower edge in the rolled-out position with a force
of 150 N in the upwards direction.
◆In doing so, it must be ensured that the extending
speed of the shutters for the final 0.4 m is less than
0.15 m/s.
2.1 Proper use
Only use the RolloTron Comfort for opening and closing
roller shutters with a permissible belt.
Mechanical locks of any kind are not suitable for auto-
mated operation with this device.
Only use original spare parts
from RADEMACHER.
◆By doing so, you avoid the risk of malfunctions and
damage to your RolloTron Comfort.
◆As the manufacturer, we provide no guarantee for the
use of third-party components and accept no liability
for consequential damage resulting from such.
◆All repairs to the RolloTron Comfort must be under-
taken by authorised customer service personnel.
Operating conditions
◆Only operate the RolloTron Comfort in dry rooms.
◆A 230 V / 50 Hz power supply, together with a site-
provided isolating device (fuse, MCB), must be perma-
nently available at the installation location.
◆An easily accessible 230V / 50 Hz socket must be avail-
able at the installation site if the enclosed connecting
cable with Euro plug is being used.
◆The roller shutters must run up and down smoothly
and should not stick.
◆The mounting surface for the RolloTron Comfort
must be flat.

8
EN
i
i
2.2 Improper use
2.3 Required expert knowledge of the installer
Using the RolloTron Comfort for purposes other than
previously mentioned is impermissible and is
regarded as improper use.
There is a risk to life caused through short circuiting
and electric shocks if the RolloTron Comfort is used
outside.
◆Never install or operate the RolloTron Comfort
outside.
The electrical connection, installation and commissioning of the RolloTron Comfort must only be carried out by a qualified electrician
in accordance with the instructions in this manual.

9
EN
1.
2.
5.
3.
4.
6.
7.
3. Scowpe of delivery (item no. 1623 45 19) *
Legend
1. Belt winder RolloTron Comfort or Comfort Plus
2. 2 x assembly screws (4 x 55 mm)
3. Disengaging bracket (in housing)
4. Connection cable with Euro-plug
5. Reel compartment cover
6. Cover plate
7. Traction relief mechanism incl. assembly screws
i
* also applies to item numbers 1623 60 19 / 1615 45 19
After unpacking please check and compare ...
the contents of the package with the above specified.
Check the details on the type plate
Check that the voltage / frequency on the type plate cor-
responds to the local mains conditions.

10
EN
Up button
Front cover
Fastening holes
Cover plate
Plus button
Menu button
Deflection roller
Down button
OK button
+
Reel
Fastening
hook
Traction relief
Cable ductConnection socket for the light sensor Connecting terminals
Reset button
Minus button
Fastening holes
4. General view (item no. 1623 45 19) *
Reel compartment
cover
Belt inlet
Display
-
Type plate
* also applies to item numbers 1623 60 19 / 1615 45 19
Disengaging
bracket
SET/Stop button
i

11
EN
5. Display overall view
i
Display symbol legend
(MON...SUN) Week days
Time / setting parameters
Button lock
ACTUAL value
Direction of travel - up / down
End point setting
Postcode
OFFSET (for Astro time)
Weekly programme
Switching modes
[ OFFSET ]
[ NORMAL ]
[ ASTRO ]
[ SENSOR ]
AUTO - automatic mode
Automatic mode off
Timer periods
Automatic dusk function
Automated solar function
Automatic dawn function
Random function
System settings
Dimension (percent)
SET - value
[ AUTO ]
[ SOLL ]
[ IST ]
[ % ]
[ MO ... SO ]
[ PLZ ]

12
EN
6. Permissible roller shutter belts
ATTENTION!
The RolloTron Comfort may be damaged if exces-
sively long belts are used.
Only use belts of the permissible lengths.
Table 1: Permissible roller shutter belts
RolloTron:
Item No:
Comfort (Small belt)
1615 45 19
Comfort
1623 45 19
Comfort Plus
1623 60 19
Belt width: Belt thickness: Maximum belt length
15 mm (Small-belt) 1.0 mm 7.6 m - - - - - -
23 mm (Standard belt)
1.0 mm - - - 7.6 m 15 m
1.3 mm - - - 6.2 m 12 m
1.5 mm - - - 5.2 m 11 m
Table 2: Permissible shutter surface area (m2)
Roller shutter type: Weight/m2Permissible shutter surface area (m2)
Plastic roller shutters (4.5 kg/m2) Approx. 6 m2Approx. 6 m2Approx. 10 m2
Aluminium and wooden roller shutters (10.0 kg/m2) Approx. 3 m2Approx. 3 m2Approx. 6 m2
The specifications are intended for guidance only and
apply to an ideal installation situation. The actual values
may vary due to local conditions.
i
i

13
EN
7. Functional description
The RolloTron Comfort is a roller shutter drive designed for
use inside. The unit is installed as a flush-mounted device.
The power supply is provided via the enclosed connecting
cable with plug or a fixed installed lead.
i
7.1 Description of the safety functions
Soft-start / Soft-stop
The RolloTron Comfort is equipped with a Soft-start /
Soft-stop function. Gentle starting and stopping serves
to protect the belt winder mechanics and the belt.
Obstacle detection
The movement of the belt is monitored. If the roller shut-
ters hit an obstacle in the DOWN ( t t ) direction, the belt
will stop moving and the belt winder is switched off.
Once the system has switched off, it is no longer
possible to directly operate the drive in the same
direction.
◆Run the belt winder back in the opposite direction
and remove any possible obstacle.
◆Subsequently it is possible to operate the drive in the
original direction again.
i

14
EN
i
There is a risk of injury if the obstacle detection is not
working.
◆The belt must be wound on as evenly as possible to
ensure safe and correct functioning of the obstacle
detection function.
◆Please ensure that the belt winds as straight and evenly
as possible into the device during its subsequent cycle
after the obstacle detection system has triggered.
7.1 Description of the safety functions
Overload cut-off
The RolloTron Comfort is equipped with an overload
cut-off system.
If the drive jams in the UP ( ▲ ▲ ) cycle (for example, due to
ice), the belt winder will also switch off.
◆Once the cause for the overload has been rectified,
the drive will be fully operational in both directions.

15
EN
7.2 Overview of features
◆Display background illumination
◆Operational demonstrator
◆Manual operation
◆Direct configuration and movement to a target posi-
tion
◆AUTO/MANU - switchover
◆Easy configuration with menu-driven operation
◆Weekly programme:
●Weekly switching times (2 x)
– 1 x []and 1 x [ ]for (MON...SUN) [MO...SO ]
●Weekday and weekend switching times (4 x)
– 1 x [ ]and 1 x [ ]for (MON...FRI) [ MO...FR ]
– 1 x [ ] and 1 x [ ]for (SAT+SUN) [ SA+SO]
●Individual day switching times (14 x)
– 1 x [ ]and 1 x [ ]for (MON / TUES / WED /...
SUN) [ MO / DI / MI /... SO ]
●Activate a second switching time block,
(dual switching times, see page 38).
◆Automatic dusk function
●Automatic darkness function with the Astro
programme
●Automatic darkness function with connected
light sensor
◆Automatic solar function (with light sensor)
◆Automatic dawn function with the Astro programme
◆Random function
◆Ventilating position
◆End point setting
◆Button lock
◆System settings
◆Permanent storage of the settings
◆Automatic summer / winter changeover
◆Obstacle detection
◆Overload cut-off
◆Soft-start and Soft-stop
i
Description and configuration of the individual local
functions
A precise description of the individual local functions
and settings is included starting on page 25.
System settings
The individual device configuration is described begin-
ning on page 53.

16
EN
1
2
3
4
5
8. General assembly instructions
Poor routing of the belt can cause the belt to fail and
leads to unnecessary loads on the RolloTron Comfort.
Install the belt winder so that the belt runs as straight as
possible into the device, in order to avoid unnecessary
friction and wear.
8.1 You will require the following tools
◆Screwdriver
◆Scissors
◆Carpenter's gauge or measuring tape
◆Pen
i
i
Incorrect installation can lead to
property damage.
Strong forces are exerted during operation of the system
which require secure installation on a firm base.

17
EN
+
-
-
+
8.2 Preparation for installation
1. Take measurements.
Check that the belt box has suf-
ficient space to house the RolloTron
Comfort.
All dimensions in mm
RolloTron Comfort
Item no.:
1615 45 19 (small belt)
1623 45 19 (standard belt)
RolloTron Comfort Plus
Item no.:
1623 60 19 (standard belt)
All dimensions in mm
i

18
EN
20 cm
CAUTION!
There is a risk of injury from the pre-tensioned
springs on the old belt winder.
◆The spring unit of the old belt winder may suddenly
recoil when it is removed.
◆Hold the spring unit firmly when loosening the belt
and allow it to recoil slowly until the spring unit has
completely unwound.
8.2 Preparation for installation
2. Remove the old belt winder, if you are carrying out a con-
version to an existing roller shutter system.
2.1 Let the roller shutter move fully down, until the slats are
completely closed.
2.2 Remove the old belt winder and unreel the belt.
3. Prepare the belt.
3.1 Cut the belt off approx. 20 cm under the belt box.
3.2 Fold the end of the belt over by approx. 2 cm and cut a
short slit in the centre. This enables you to subsequently
hook the belt onto the reel.
Recommendation
The belt must run as straight and freely as possible. For
stiff roller shutters, mount a deflection roller on the belt
box. This helps to prevent unnecessary friction and wear
to the belt.
i
Accessories, see page 73

19
EN
9. Safety instructions for electrical connection
DANGER!
Danger due to electric shock when working on all
electrical systems.
◆Carry out all installation and connection work only in
an isolated, zero-volts state.
◆Disconnect all phases of the mains power supply cable
and secure it to prevent any reconnection.
◆Check the system for a zero-voltage status.
The electrical connection for the RolloTron Comfort
can be made either with the supplied connecting
cable or via a fixed laid cable.
i
i

20
EN
9.1 Electrical connection
1. Connect the provided connecting cable to the connecting
terminals of the RolloTron Comfort.
The colour coding is irrelevant for the installation.
2. Lay the connecting cable in the cable duct of the RolloTron
Comfort.
3. Finally, screw on the traction relief mechanism with the
screws provided.
RolloTron Comfort RolloTron Comfort Plus
Cable duct
Traction relief
Traction
relief
i
WARNING!WARNING!
A damaged connecting cable may cause a short
circuit.
◆Pay attention that cables are laid safely.
◆The connecting cable may not be pinched when screw-
ing on the belt winder as this could lead to damage.
Other manuals for RolloTron Comfort 1623 45 19
1
This manual suits for next models
2
Table of contents