Radialight AER Pro N User manual

AER Pro N
IT Leggere il manuale d'uso. Conservare con cura le istruzioni per ogni futura consultazione.
EN Please retain these instructions in a safe place for further reference.

2
4 2 1 .5 H
A
B
C
D
E
F
G
1
2
3

3
4

4
ITALIANO
MANUALE DI INSTALLAZIONE E D’USO
Si prega di leggere attentamente queste istruzioni, prima di utilizzare il prodotto, in modo da evitare danneg-
giamenti o comunque il vericarsi di situazioni di pericolo. Qualsiasi utilizzo del prodotto diverso da quanto
indicato nel presente manuale può causare incendi, pericoli elettrici o ferite e rende nulla qualsiasi garanzia.
La garanzia non si applica ad alcun difetto, deterioramento, perdita, ferimento o danneggiamento riconducibili ad un
uso non corretto del prodotto. Rimangono garantiti tutti i diritti di legge in materia. Nessuna condizione di garanzia può
escludere o modicare le condizioni di garanzia regolamentate da leggi dello Stato che non possono essere a nessun
titolo escluse o modicate.
Prima di ogni operazione, rimuovere con cura l’imballo e controllare la perfetta integrità del prodotto. Nel caso si
evidenziassero dei difetti o danni, non installare né cercare di riparare l’apparecchiatura, ma rivolgersi al rivenditore.
Non lasciare l’imballo alla portata dei bambini e smaltirne le parti in conformità con le disposizioni vigenti.
Per la vostra sicurezza
• Questo prodotto non è adatto per l’utilizzo su veicoli, imbarcazioni
o aeromobili.
• L’apparecchio può essere utilizzato da bambini di età non inferio-
re a 8 anni e da persone con ridotte capacità siche, sensoriali
o mentali, o prive di esperienza o della necessaria conoscenza,
purché sotto sorveglianza oppure dopo che le stesse abbiano
ricevuto istruzioni relative all’uso sicuro dell’apparecchio e alla
comprensione dei pericoli ad esso inerenti. I bambini non devono
giocare con l’apparecchio. La pulizia e la manutenzione destinata
ad essere effettuata dall’utilizzatore non deve essere effettuata da
bambini senza sorveglianza.
• I bambini di età inferiore a 3 anni non devono avvicinarsi al pro-
dotto se non costantemente supervisionati.
• I bambini di età compresa fra 3 e 8 anni possono solamente ac-
cendere e spegnere l’apparecchio purchè esso sia stato installato
e posizionato secondo le normali condizioni d’uso e loro siano
supervisionati o adeguatamente istruiti riguardo al corretto e si-
curo utilizzo del prodotto e ne abbiano compresa la pericolosità.
I bambini di età compresa fra 3 e 8 anni non possono collegare il
prodotto, regolarlo, pulirlo o effettuare manutenzione.
• Se il cavo è danneggiato e dovete sostituirlo non eseguite questa
operazione da soli, riportate il termoventilatore ad un centro di
riparazioni autorizzato perché è richiesto l’intervento di personale
specializzato al ne di evitare qualunque rischio di danneggia-
mento.
• Il prodotto deve essere spento e scollegato dall'alimentazione pri-

5
ma di svolgere operazioni di riempimento, svuotamento, pulizia
del serbatoio o prima di effettuare qualsiasi altra operazione di
manutenzione.
• Assicuratevi che l’alimentazione di rete corrisponda ai dati di tar-
ga: 230V~, 50Hz. Tensioni inferiori ai 220V possono causare mal-
funzionamenti.
• Non utilizzare il prodotto in ambienti con gas esplosivi o durante
l'utilizzo di solventi inammabili o vernici o colle.
• L'apparecchio deve essere posizionato in modo tale che la spina
sia sempre accessibile.
• Questo prodotto deve essere installato correttamente in conformi-
tà con le normative in vigore nel paese di installazione.
• Non utilizzare questo prodotto nelle immediate vicinanze di un
bagno, una doccia o una piscina.
• Non utilizzare se sono visibili segni di danni all'apparecchio.
• Non utilizzare questo prodotto se è stato fatto cadere.
• Non mettere oggetti nel prodotto quando è in funzione.
• Non ingerire la batteria. In caso di ingestione involontaria delle
batterie, consultare immediatamente un medico.
• Questo apparecchio deve essere utilizzato su un pavimento liscio
e piatto.
• Assicuratevi che le ruote siano bloccate mentre il prodotto è in
funzione.
• Non aprire il pannello laterale o quello posteriore mentre il prodot-
to è in funzione.
• In caso di installazione all'aperto, assicuratevi di spegnere e ripa-
rare il prodotto in caso di pioggia o temporali.
• Raccomandiamo di sostituire l'acqua ed eseguire la pulizia del
serbatoio ogni giorno.
• Nei periodi di non utilizzo conservate il prodotto con il serbatoio
dell'acqua vuoto.
• Questo prodotto è in classe I e necessita di un collegamento di
terra con una sezione minima di 1,5mm2..
• Non collegare il prodotto a prese di alimentazione multiple.

6
Caratteristiche
• Principio di funzionamento:
Il raffrescatore evaporativo raffredda l'aria attraverso l'evaporazione dell'acqua. Una pompa fa circolare l'acqua
presente nel serbatoio attraverso un pannello nel quale l'aria viene fatta passare grazie ad un potente ventilatore.
L'aria cede così energia per far evaporare una parte dell'acqua con cui viene a contatto e in questo processo si
raffredda.
• Controllo manuale con pannello comandi di semplice utilizzo – Controllo remoto con telecomando in dotazione.
• Ventilazione normale – Ventilazione raffrescata.
• Tre diverse intensità di ventilazione: BASSA, MEDIA, ALTA.
• Ventilazione oscillante di 90° per direzionare l’aria in senso orizzontale su un fronte più ampio.
• Possibilità di orientare l’aria in senso verticale muovendo manualmente la griglia di uscita.
• Ruote girevoli per un facile spostamento del prodotto.
• Sistema di svuotamento del serbatoio.
• Capienza serbatoio: 40lt.
• Blocco automatico del funzionamento della pompa e della funzione ventilazione raffrescata qualora l’acqua nel
serbatoio non sia sufciente.
• Funzionamento temporizzato da 30min a 7h e 30min.
• Display a icone che mostra lo stato di funzionamento del prodotto.
Pannello di controllo eaccessori
• Sulla parte frontale del prodotto si trovano 6 pulsanti e un display multifunzione per il controllo di tutte le funzioni
(gura 1).
• I 6 pulsanti presenti sul prodotto (gura 1) e anche sul telecomando (gura 2) hanno le seguenti funzioni:
Prodotto Telecomando Funzione
ON/OFF Accende il prodotto o lo imposta in Stand-by.
COOL Attiva la funzione di raffrescamento.
VENT Attiva la funzione di ventilazione.
SPEED Imposta la velocità della ventola.
SWING Attiva l'oscillazione per una migliore diffusione dell'aria.
TIMER Avvia il funzionamento temporizzato.

7
accensione euso delle funzioni
ATTENZIONE: La griglia di uscita dell'aria deve essere aperta manualmente prima
di accendere il prodotto.
ACCENSIONE E SPEGNIMENTO
• Dopo aver inserito la spina nella presa il prodotto si trova in modalità Stand-by. La relativa spia si illumina e viene
emesso un "beep" di conferma.
Nota bene: La spia luminosa si accende a prescindere dal fatto che il raffrescatore sia in funzione oppure
no.
• Dallo stato di Stand-by premere il tasto ON/OFF (oppure il pulsante A di gura 2 sul telecomando) per accendere
il prodotto. L'apparecchio si mette in funzione nella modalità in uso al momento del precedente spegnimento. Se
si è al primo utilizzo il prodotto si mette in funzione in modalità di raffrescamento con velocità bassa.
• Premendo il tasto ON/OFF (oppure il pulsante A di gura 2 sul telecomando) durante il funzionamento il prodotto
torna in modalità Stand-by. Se al momento dello spegnimento il prodotto si trova in modalità di raffrescamento la
ventilazione continua per 10 secondi alla velocità minima prima di andare in Stand-by.
FUNZIONI
• Il prodotto è dotato delle seguenti funzioni:
- Ventilazione;
- Raffrescamento;
- Controllo della velocità;
- Oscillazione;
- Funzionamento temporizzato;
- Protezione per mancanza d'acqua.
• VENTILAZIONE
Premere il tasto VENT (oppure il pulsante D di gura 2 sul telecomando) per attivare la modalità di ventilazione:
la rispettiva icona si illumina. Il sistema di raffrescamento è disattivato.
• RAFFRESCAMENTO
Premere il tasto COOL (oppure il pulsante C di gura 2 sul telecomando) per attivare la modalità di raffrescamen-
to: la rispettiva icona si illumina. Il sistema di raffrescamento è attivato.
• CONTROLLO DELLA VELOCITÀ
Premere il tasto SPEED (oppure i pulsanti F e G di gura 2 sul telecomando) per regolare la velocità dell'aria.
La velocità può essere impostata su un valore a scelta fra bassa, media e alta. Una indicazione luminosa sul
prodotto indica la velocità selezionata:
BASSA MEDIA ALTA
• OSCILLAZIONE
Premere SWING (oppure il pulsante B di gura 2 sul telecomando) per attivare l'oscillazione delle alette verticali
interne alla griglia che permettono di orientare automaticamente il usso d'aria in molteplici direzioni.

8
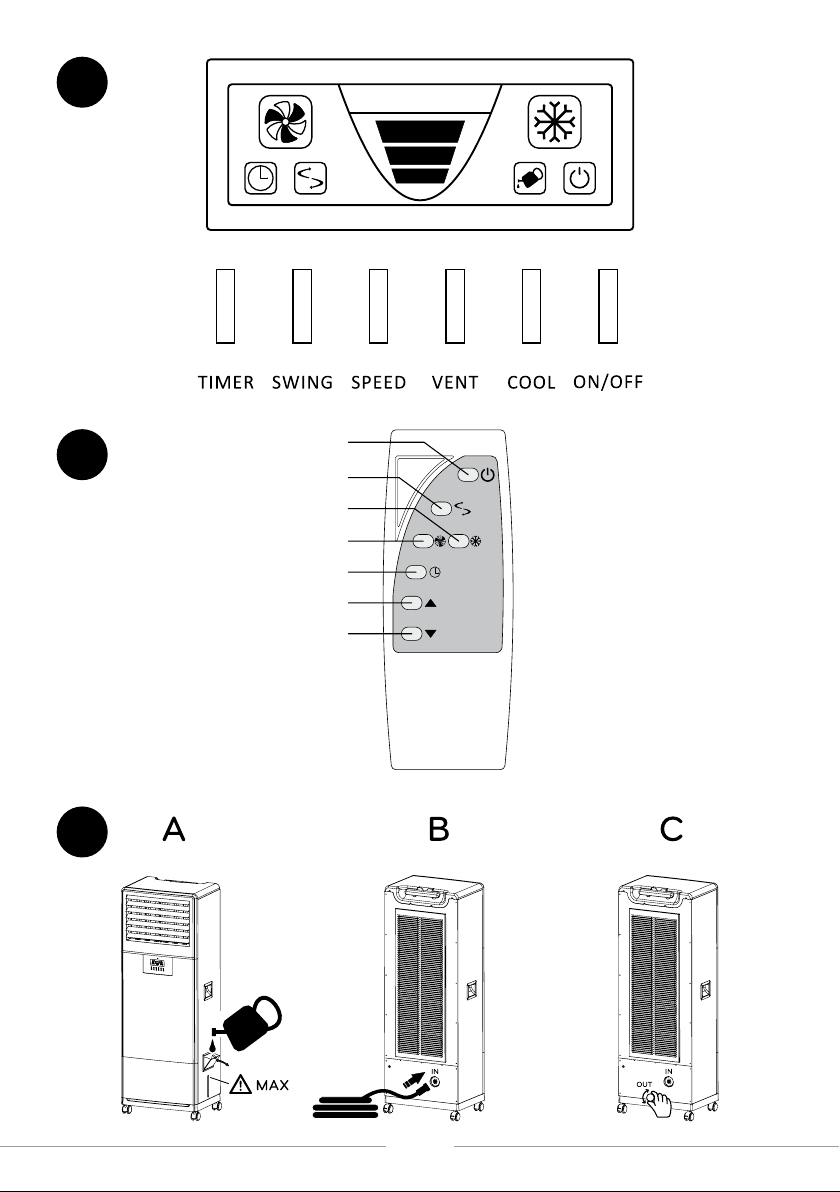
• FUNZIONAMENTO TEMPORIZZATO
Normalmente il prodotto funziona in continuo ma è possibile temporizzarne l’uso in modo che funzioni per un
periodo limitato e poi si spenga automaticamente. Premere il tasto TIMER (oppure il pulsante E di gura 2 sul
telecomando) per impostare la temporizzazione da 0,5h a 7,5h con incrementi di 0,5h ad ogni pressione. Dopo
5 secondi dalla selezione del tempo la funzione si attiverà automaticamente.
Per disattivare la funzione impostare un tempo di funzionameto pari a 0h (tutti numeri sulla parte alta del display
sonoi spenti).
• PROTEZIONE MANCANZA ACQUA
Qualora si attivi la funzione di raffrescamento ma non vi sia sufciente acqua nel serbatoio la spia luminosa inizia
a lampeggiare e 5 "beep" vengono emessi per richiamare l'attenzione dell'utente.
Non appena viene ripristinato il livello di acqua nel serbatoio la spia luminosa si spegne e il prodotto ricomincia
a funzionare.
riemPire/svuotare il serbatoio dell'acqua
• E' possibile aggiungere acqua nel serbatoio sia utilizzando un recipiente (gura 3-A) che utilizzando un tubo
(gura 3-B). In entrambi i casi:
- Disconnettere il prodotto dalla presa di alimentazione elettrica;
- Aprire lo sportellino di riempimento o connettere il tubo come indicato in gura 3 (A e B);
- Riempire con acqua potabile controllando il livello grazie l'apposito indicatore.
Attenzione:
Non spruzzare l'acqua sul motore o su altri parti elettriche;
Non superare il livello massimo indicato;
Utilizzare solo acqua potabile;
Non lasciare il tubo dell'acqua permanentemente collegato al prodotto.
• Per svuotare il serbatoio è necessario svitare il tappo di drenaggio indicato in gura 3-C:
- Disconnettere il prodotto dalla presa di alimentazione elettrica;
- Aprire il tappo di denaggio posto sul lato posteriore;
- Richiudere il tappo di drenaggio al termine dell'operazione.
schema elettrico
• Lo schema elettrico del prodotto è rappresentato in gura 4.
Pulizia emanutenzione
• Questo prodotto non richiede manutenzione speciale.
• Prima di procedere con la pulizia, vericate che il prodotto sia spento e che il cavo di alimentazione sia scolle-
gato.
• Non usate benzina o solventi per la pulizia poiché le varie superci potrebbero facilmente rovinarsi.
• Se prevedete di non utilizzare il prodotto per lungo tempo svuotate il serbatoio rimuovendo il tappo che si trova
nella parte posteriore del prodotto (gura 3-C) . Successivamente riavvitate il tappo del serbatoio.
• In caso di sostituzione del cavo di alimentazione utilizzare un tipo 3x0,50mm2H03VV-F <HAR>. Tale sostituzione
deve essere effettuata da personale tecnico qualicato e mai dall’utente nale per evitare un danneggiamento
del prodotto e ogni rischio per la persona.
informazioni legali
Tutela dell'ambiente e riciclaggio
Afnché il vostro apparecchio non subisca danni durante il trasporto, esso è stato imballato con cura. Per
contribuire alla tutela del nostro ambiente, vi chiediamo di smaltire in modo appropriato il materiale utiliz-
zato per l'imballaggio dell'apparecchio.
Smaltimento degli apparecchi usati
Gli apparecchi che recano il contrassegno riportato a anco non devono essere smaltiti insieme ai riuti
urbani, ma vanno raccolti e smaltiti separatamente. Lo smaltimento degli apparecchi usati va eseguito a
regola d'arte, in conformità con le prescrizioni e leggi vigenti localmente in materia.

9
ENGLISH
OPERATING INSTRUCTIONS
Before operating the appliance, please read these instructions thoroughly to avoid damage and hazardous
situations. Any use of this product other than that stipulated in this instruction manual may cause re, elec-
tric shock or injury, and voids all warranties.
Warranty does not apply to any defect, deterioration, loss, injury or damage caused by, or as a result of, the misuse
or abuse of this heater. The rights dictated by State law are not prejudiced. None of the terms of this warranty are to
be taken as excluding any conditions or warranties implied by State law, which cannot be excluded or modied.
Before any operation remove the packaging and check product integrity. In case of defects or damages do not try to
repair it yourself but contact your dealer.
Do not let children play with the packaging and protect the environment by disposing of the packaging in accordance
with the national regulations for waste processing.
for your safety
• This appliance is not intended for use in vehicles or on board
ships or aircrafts.
• This appliance can be used by children aged from 8 years and
above and persons with reduced physical, sensory or mental ca-
pabilities or lack of experience and knowledge if they have been
given supervision or instruction concerning use of the appliance
in a safe way and understand the hazards involved. Children shall
not play with the appliance. Cleaning and user maintenance shall
not be made by children without supervision.
• Children of less than 3 years should be kept away unless conti-
nuously supervised.
• Children aged from 3 years and less than 8 years shall only switch
on/off the appliance provided that it has been placed or installed
in its intended normal operating position and they have been gi-
ven supervision or instruction concerning use of the appliance in
a safe way and understand the hazards involved. Children aged
from 3 years and less than 8 years shall not plug in, regulate and
clean the appliance or perform user maintenance.
• If the cable is damaged and you need to replace it, do not carry
out this operation yourself, return the product to an authorized
repair center because specialized personnel are required to avoid
any risk of damage.
• The product must be switched off and disconnected from the po-
wer supply before lling or emptying operations, cleaning the tank
or carrying out any other maintenance operation.
• Make sure that the mains power supply corresponds to the name-

10
plate data: 230V ~, 50Hz. Voltages lower than 220V can cause
malfunctions.
• Do not use the product in rooms with explosive gas or while using
inammable solvents or varnish or glues.
• The appliance must be positioned so that the plug is always ac-
cessible.
• This product must be correctly installed in compliance with the
regulations in force in the country of installation.
• Do not use this product in the immediate surroundings of a bath,
a shower or a swimming pool.
• Do not use if there are visible signs of damage to the appliance.
• Do not use this product if it has been dropped.
• Do not put objects into the product when it is in operation.
• Do not ingest battery. In case of involuntary ingestion of the batte-
ries, seek immediate medical attention.
• This appliance is to be used on a smooth and at oor.
• Make sure that the wheels are locked while the product is running.
• Do not open the side or rear panel while the product is running.
• In case of outdoor installation, be sure to turn off and protect the
product in case of rain or thunderstorm.
• We recommend to replace the water and to clean the tank every
day.
• When not in use, keep the product with the water tank empty.
• This product is in class I and requires an earth connection with a
minimum section of 1,5mm2.
• Do not connect the product to multiple power outlets.
features
• Principle of operation:
The evaporative cooler cools the air by evaporating the water. A pump circulates the water present in the tank
through a panel in which the air is passed through a powerful fan. The air thus releases energy to evaporate part
of the water and cools in this process.
• Manual control with easy-to-use control panel - Remote control with the supplied remote control.
• Normal ventilation - Cooled ventilation.
• Three different ventilation speeds: LOW, MEDIUM, HIGH.
• 90° oscillating ventilation to direct the air horizontally on a wider front.
• Possibility of directing the air vertically by manually moving the outlet grill.
• Swivel wheels for easy product movement.
• Tank draining system.
• Tank capacity: 40lt.
• Automatic blocking of pump operation and cooling ventilation function in case the water in the tank is not suf-
cient.
• Timed operation from 30min to 7h and 30min.
• Icon display showing the operating status of the product.

11
contol Panel and accessories
• On the front of the product there are 6 buttons and a multifunction display to control all the functions (gure 1).
• The 6 buttons on the product (gure 1) and also on the remote control (gure 2) have the following functions:
Product Remote Function
ON/OFF Turns on the product or sets it to standby.
COOL Activates the cooling function.
VENT Activates the ventilation function.
SPEED Sets the fan speed.
SWING Activates the swing for better air diffusion.
TIMER Starts timed operation.
switching on and using the functions
WARNING: The air outlet grill must be opened manually before turning on the product.
SWITCHING ON AND OFF
• After inserting the plug into the socket, the product is in Stand-by mode. The relative indicator lights up and a
conrmation "beep" is emitted.
Note: The indicator light comes on regardless of whether the cooler is running or not.
• From Stand-by status, press the ON/OFF button (or the button A in gure 2 on the remote control) to switch on
the product. The appliance starts operating in the mode in use at the time of the previous shutdown. If you are
using it for the rst time, the product starts up in low speed cooling mode.
• By pressing the ON/OFF button (or the button A in gure 2 on the remote control) during operation the product
returns to Stand-by mode. If at the time of switching off the product is in cooling mode, ventilation continues for
10 seconds at minimum speed before going into Stand-by.
FUNCTIONS
• The product has the following functions:
- Ventilation;
- Cooling;
- Speed control;
- Swinging;
- Timed operation;
- Protection for lack of water.
• VENTILATION
Press the VENT button (or the D button in gure 2 on the remote control) to activate the ventilation mode: the
respective icon lights up. The cooling system is deactivated.

12
• COOLING
Press the COOL button (or the C button in gure 2 on the remote control) to activate the cooling mode: the re-
spective icon lights up. The cooling system is activated.
• SPEED CONTROL
Press the SPEED button (or the F and G buttons in gure 2 on the remote control) to adjust the air speed. The
speed can be set to a value chosen from low, medium or high. A luminous indication on the product indicates
the selected speed:
LOW MEDIUM HIGH
• SWINGING
Press SWING (or the button B in gure 2 on the remote control) to activate the oscillation of the vertical aps
inside the grille which allows to automatically direct the air ow in multiple directions.
• TIMED OPERATION
Normally the product works continuously but it is possible to set it in order to work for a limited period and then
switch off automatically. Press the TIMER button (or the button E in gure 2 on the remote control) to set the
timing from 0.5h to 7.5h in 0.5h increments with each press. 5 seconds after selecting the time, the function will
activate automatically.
To deactivate the function, set an operating time of 0h (all numbers on the upper part of the display are off).
• PROTECTION FOR LACK OF WATER
If the cooling function is activated but there is not enough water in the tank, the indicator light starts to ash and
5 "beeps" are emitted to draw the user's attention.
As soon as the water level in the tank is restored, the indicator light goes off and the product starts again.
refill/drain the water tank
• It is possible to add water to the tank either using a container (gure 3-A) or using a tube (gure 3-B). In both
cases:
- Disconnect the product from the power supply;
- Open the ller ap or connect the tube as shown in gure 3 (A and B);
- Fill with drinking water checking the level thanks to the appropriate indicator.
Warning:
Do not spray water on the engine or other electrical parts;
Do not exceed the maximum level indicated;
Use only drinking water;
Do not leave the water hose permanently connected to the product.
• To empty the tank it is necessary to unscrew the drain plug indicated in gure 3-C:
- Disconnect the product from the power supply;
- Open the drain plug located on the rear side;
- Close the drain plug at the end of the operation.
wiring diagram
• The wiring diagram of the product is shown in gure 4.

13
cleaning and maintenance
• This product doesn't require any special maintenance.
• Before cleaning, check that the product is turned off and that the power cable is unplugged.
• Do not use gasoline or solvents for cleaning as the various surfaces could easily be damaged.
• If you do not intend to use the product for a long time, empty the tank by removing the drain plug located on the
rear of the product (gure 3-C). Then screw the tank cap back on.
• If the power supply cable must be replaced, use type 3x0,50mm2H03VV-F <HAR>. This replacement must be
carried out by qualied technical personnel and never by the end user to avoid damage to the product and any
risk to the person.
legal notice
Environment and recycling
To prevent the product from being damaged during transport, it has been carefully packed. To contribute to
environmental protection, we ask you to dispose of the packaging material properly.
Recycling of obsolete appliances
Appliances with this label must not be disposed off with the general waste. They must be
collected separately and disposed off according to local regulations. Used appliances disposal must be
carried out carefully and in accordance with local waste disposal regulations.

14

15

ISPRN001_R1
This manual suits for next models
1
Table of contents
Languages: