Radio Shack 273-1827 User manual

©2002 RadioShack Corporation.
All Rights Reserved.
RadioShack and RadioShack.com are trademarks
used by RadioShack Corporation.
OWNER’S MANUAL
Please read before using this equipment.
82/9CVV"7PKXGTUCN"0QVGDQQM"&%"
#FCRVGT
273-1827
Thank you for purchasing a RadioShack 60W Universal Notebook
DC Adapter. Your adapter powers notebook computers and other
electronic devices by converting a nominal 12-volt input voltage to
a regulated output voltage from 12 to 27 volts at up to 3.75A/60
watts of continuous power. It is reverse-voltage, over-current, and
short-circuit protected.The compact, lightweight adapter fits inside
most computer carrying cases, and can recharge your computer's
internal battery. The adapter comes with a deluxe, padded vinyl
case.
#"+/2146#06"#
If an icon appears at the end of a paragraph, go to the box on that page with the
corresponding icon for pertinent information.
Rý— Warning #— Important .
..
.— Caution °
°°
°— Hint ±— Note

Safety Instructions
2
5#('6;"
+05647%6+105
This manual contains important safety
and operating instructions for your
adapter. Before you use the adapter,
read all the instructions and cautionary
markings in this manual, on the
adapter, and on the product that you
will connect to the adapter.
RýTo reduce the risk of injury:
• Do not disassemble the adapter;
take it to a qualified service
technician when service or repair
is required. Improper reassembly
may result in the risk of fire.
• Do not use an attachment not
recommended or sold by
RadioShack. Doing so could result
in a risk offire, injury to persons, or
damage to personal property.
• Never push any object into the air
ventilation slots and openings in
the adapter. It could short out parts
resulting in a fire.
• Slots and openings on the bottom
of the adapter are for ventilation.
To ensure reliable operation and
protect the adapter from
overheating, be sure these
%106'065
Safety Instructions ...... 2
Preparation ................. 4
Adjusting Output
Voltage ..................... 4
Selecting an
Adaptaplug .............. 5
Installing an
Adaptaplug .............. 7
Operation .................... 9
Troubleshooting ........ 11
Case
Temperature .......... 12
Care .......................... 12
Replacing
the Fuse ................. 13
Service and Repair ... 13
Specifications ............ 14
Compatible
Computers ................ 15
The lightning symbol is intended to
alert you to the presence of uninsu-
lated dangerous voltage within this
product’s enclosure that might be of
sufficient magnitude to constitute a
risk of electric shock. Do not open
the product’s case.
The exclamation symbol is intended
to inform you that important operat-
ing and maintenance instructions
are included in the literature accom-
panying this product.
!
WARNING: To reduce the risk of fire or
shock hazard, do not expose this product to
rain or moisture.
CAUTION
CAUTION: TO REDUCE THE RISK OF
ELECTRIC SHOCK, DO NOT REMOVE COV-
ER OR BACK. NO USER-SERVICEABLE
PARTS INSIDE. REFER SERVICING TO
QUALIFIED PERSONNEL.
RISK OF ELECTRIC
SHOCK
DO NOT OPEN
!

Safety Instructions
3
openings are not blocked or
covered.
• Unplug the adapter from the DC
power source before attempting to
adjust voltage, change the
Adaptaplug, or clean the adapter.
Do not use liquid aerosol cleaners.
Use a damp cloth for cleaning,
then wipe the adapter dry
immediately.
• Do not operate the adapter with
damaged input or output cords or
plugs.
• Make sure the cords are not
located where they will be stepped
on, tripped over or otherwise
subjected to damage or stress.
• Disconnect the plugs from the
socket by pulling on the plugs
rather than the cord.
• If your adapter does not operate
normally, particularly if unusual
sounds or smells come from it,
immediately unplug it and contact
your local RadioShack.
Limited Ninety-Day
Warranty
This product is warranted by Ra-
dioShack against manufacturing
defects in material and workman-
ship under normal use for ninety
(90) days from the date of pur-
chase from RadioShack company-
owned stores and authorized Ra-
dioShack franchisees and dealers.
EXCEPT AS PROVIDED HEREIN,
RadioShack MAKES NO EX-
PRESS WARRANTIES AND ANY
IMPLIED WARRANTIES, INCLUD-
ING THOSE OF MERCHANTABIL-
ITY AND FITNESS FOR A
PARTICULAR PURPOSE, ARE
LIMITED IN DURATION TO THE
DURATION OF THE WRITTEN
LIMITED WARRANTIES CON-
TAINED HEREIN. EXCEPT AS
PROVIDED HEREIN, RadioShack
SHALL HAVE NO LIABILITY OR
RESPONSIBILITY TO CUS-
TOMER OR ANY OTHER PER-
SON OR ENTITY WITH RESPECT
TO ANY LIABILITY, LOSS OR
DAMAGE CAUSED DIRECTLY
OR INDIRECTLY BY USE OR
PERFORMANCE OF THE PROD-
UCT OR ARISING OUT OF ANY
BREACH OF THIS WARRANTY,
INCLUDING, BUT NOT LIMITED
TO, ANY DAMAGES RESULTING
FROM INCONVENIENCE, LOSS
OF TIME, DATA, PROPERTY,
REVENUE, OR PROFIT OR ANY
INDIRECT, SPECIAL, INCIDEN-
TAL, OR CONSEQUENTIAL DAM-
AGES, EVEN IF RadioShack HAS
BEEN ADVISED OF THE POSSI-
BILITY OF SUCH DAMAGES.
Some states do not allow limita-
tions on how long an implied war-
ranty lasts or the exclusion or
limitation of incidental or conse-
quential damages, so the above
limitations or exclusions may not
apply to you.
(Continued on next page)

4
Preparation
24'2#4#6+10
This adapter is intended for mobile use
in automobiles, trucks and boats. This
adapter can also be used on
commercial aircraft or with 12V DC
portable power sources. It is safe for
outdoor use..
..
.
#&,756+0)"176276"
81.6#)'.
..
.
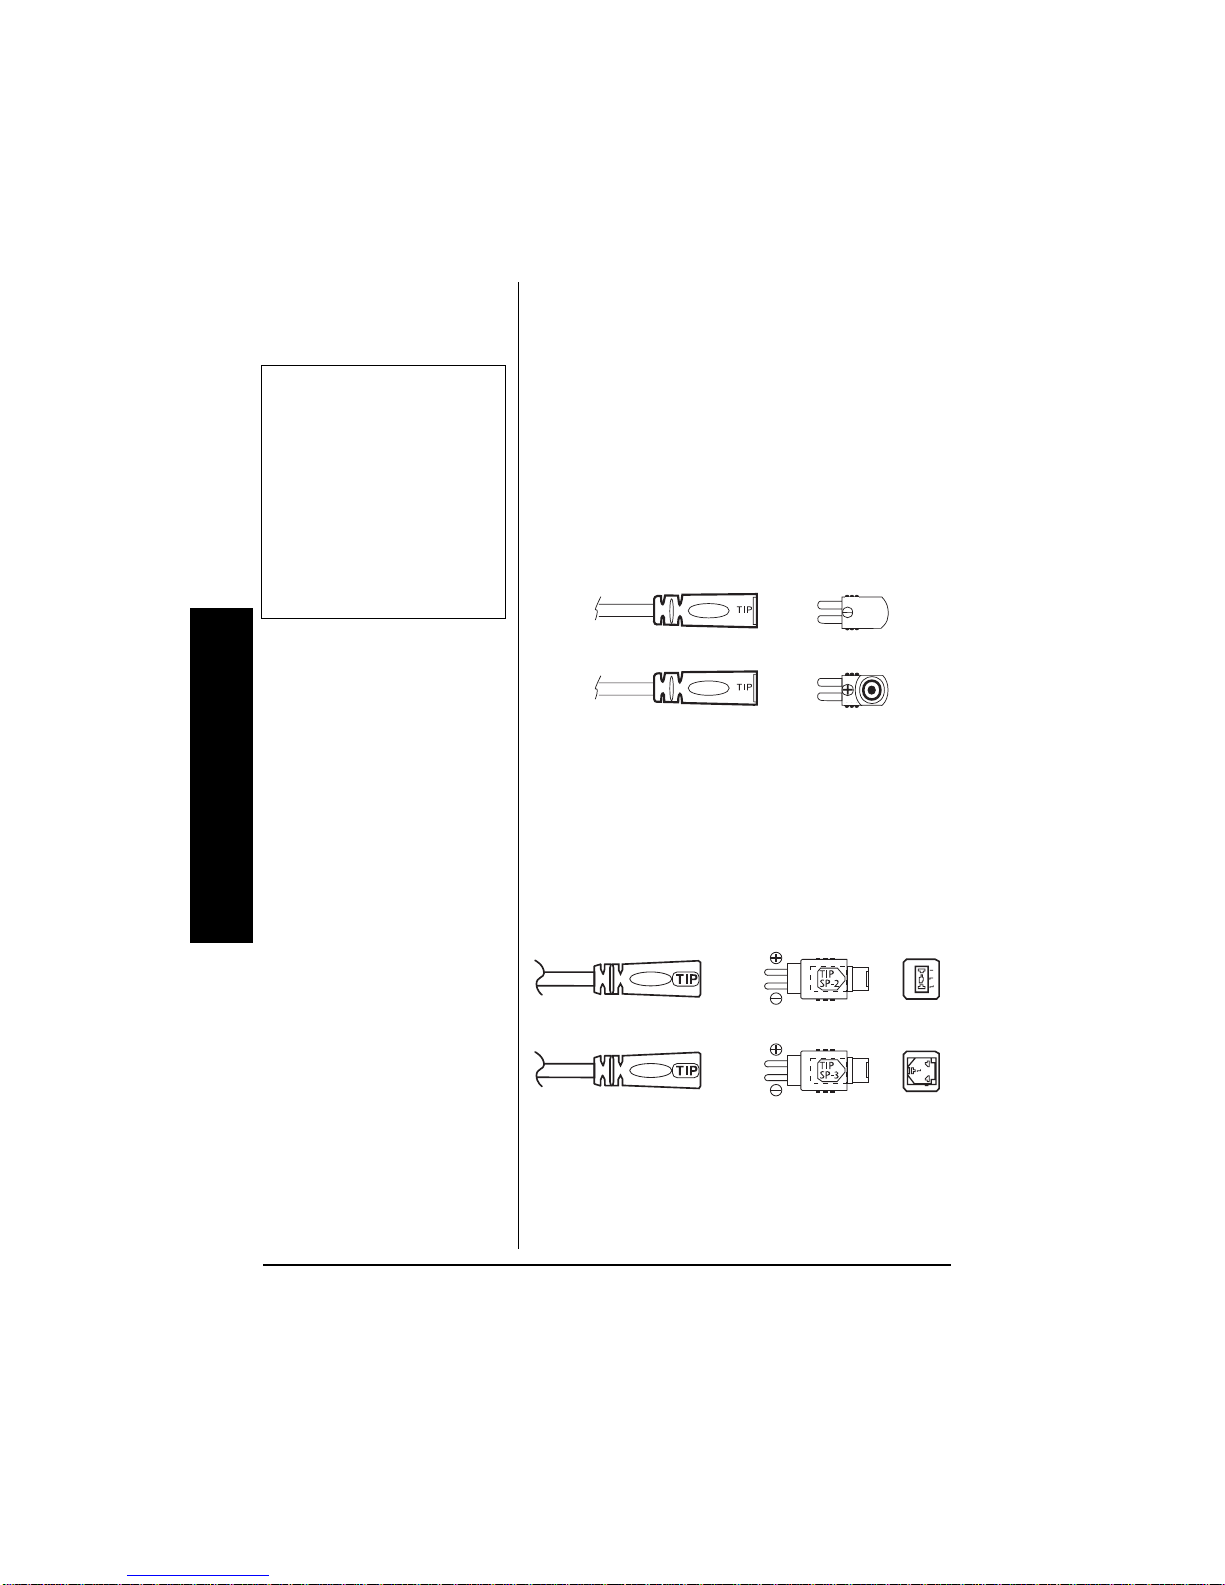
1. Determine the required output
voltage setting of the adapter by
one of the following four methods:
• Refer to “Compatible
Computers” on Page 15 for
voltage, tip size, and polarity
settings.Rý
• Note the voltage indication
marked next to the input jack on
the device to be powered.
Example:
Vin =
18VDC
or
18VDC
.
• Refer to the power or ID plate
on the device to be powered.
Look for the word
“INPUT”
followed by a number and
VDC
(for example,
INPUT: 18VDC)
.
Limited Ninety-Day
Warranty (continued)
In the event of a product defect during
the warranty period, take the product
and the RadioShack sales receipt as
proof of purchase date to any Ra-
dioShack store. RadioShack will, at its
option, unless otherwise provided by
law: (a) correct the defect by product
repair without charge for parts and la-
bor; (b) replace the product with one of
the same or similar design; or (c) re-
fund the purchase price. All replaced
parts and products, and products on
which a refund is made, become the
property of RadioShack. New or re-
conditioned parts and products may be
used in the performance of warranty
service. Repaired or replaced parts
and products are warranted for the re-
mainder of the original warranty pe-
riod. You will be charged for repair or
replacement of the product made after
the expiration of the warranty period.
This warranty does not cover: (a) dam-
age or failure caused by or attributable
to acts of God, abuse, accident, mis-
use, improper or abnormal usage, fail-
ure to follow instructions, improper
installation or maintenance, alteration,
lightning or other incidence of excess
voltage or current; (b) any repairs
other than those provided by a Ra-
dioShack Authorized Service Facility;
(c) consumables such as fuses or bat-
teries; (d) cosmetic damage; (e) trans-
portation, shipping or insurance costs;
or (f) costs of product removal, installa-
tion, set-up service adjustment or rein-
stallation.
This warranty gives you specific legal
rights, and you may also have other
rights which vary from state to state.
RadioShack Customer Relations, 200
Taylor Street, 6th Floor, Fort Worth, TX
76102
12/99

5
Preparation
• Refer to the power or ID plate
on the AC power adapter
usually used to power the
device. Look for the word
“OUTPUT”
followed by a
number and
VDC
(for example,
OUTPUT: 18VDC
).
• If the power adapter or
computer indicates a voltage
range (such as
OUTPUT: 10–
16VDC
), use the voltage closest
to the mid-range (in our
example, 13VDC).±
• In rare cases when the voltage
setting is between whole
numbers, such as 15.5VDC,
use the lower setting first
(15VDC). If the device does not
seem to operate properly,
readjust it to the higher value
(16VDC).
2. Use the supplied aluminum plate
to turn the voltage selector dial
untilthe arrow pointsto the desired
voltage.
5'.'%6+0)"#0"##2.7)
The adapter comes with seven
Adaptaplugs and two Dell custom
."%#76+10".
Preparation
Take care not to expose
the adapter to rain, snow,
or water, which could
damage the adapter’s.
Adjusting Output
Voltage
Make the proper voltage
setting before you connect
the adapter to an input
power source.
±"016'"±"
The specific
notation
“VDC” might
not be indicated. Instead,
the international symbol
shown to the right might
be used.
ýR"9#40+0)ýR"
Your adapter provides
direct current (DC)
voltage. Do not use it with
devices that are not
specifically identified as
requiring DC voltage. Do
not use it with devices that
require AC voltage.
Damage to the device
could result.

6
Preparation
plugs. The Adaptaplug colors and sizes
are:
• Blue (M) — 5.5 ×2.1 mm
• White (N) — 5.5 ×2.5 mm
• Yellow (D) 5.5 ×3.3 ×1.0 mm
• Yellow (C) 4.7 ×1.7 mm
• Green (Q) — 6.3 ×3 mm
• Yellow (T) — 6.5 ×4.3 ×1.4 mm
• Orange (H) – 3.4 ×1.3 mm (can
also be used for Dell LT series
notebook computers)
For Dell notebook computers:
• Dell SP-2 plug, match the SP-2
mark on the plug instead of
matching a color
• Dell SP-3 plug, match the SP-3
mark on plug instead of matching a
color
1. Disconnect the AC adapter you are
replacing from the AC outlet and
from the device to be powered.
2. Refer to “Compatible Computers”
on Page 15 or examine the output
connector of your computer’s AC
adapter and compare it with the
Adaptaplugs supplied with your
adapter.

7
Preparation
3. Select the Adaptaplug that most
resembles the original plug and
insert it into the device to be
powered. The inside and outside
diameter must be the correct size
to ensure proper electrical contact.
If none of the supplied plugs fit,
additional Adaptaplugs are
available at your local RadioShack
store.±
+056#..+0)"#0"##2.7)
To avoid damage to the device you are
using, make sure that the Adaptaplug is
installed correctly. If you have trouble
installing it, take the device to be
powered (with all its accessories) and
your adapter to your local RadioShack
store for assistance..
..
.
To use your adapter, your computer
must have a DC input jack and you
must determine the polarity of the jack.
This symbol means that
the inside contact, or TIP,
is negative (–).
This symbol means that
the insidecontact,or TIP,
is positive (+).
±"016'"±"
Some Dell models
require the special Dell
plug.
."%#76+10".
Install the Adaptaplug
before you connect the
adapter to an input
power source.

8
Preparation
The adapter's plug must match your
device's DC input jack with respect to
polarity (positive to positive and
negative to negative).±
According to the jack's polarity, insert
the Adaptaplug into the output cord by
aligning the correct polarity symbol
(+ or –) on the Adaptaplug with the
word TIP on the output cord.
For Dell computers which use SP-2 or
SP-3 plugs, see “Compatible
Computers” on Page 15 and refer to
the illustrations below to correctly
match the adapter plug and jack.
±"016'"±"
If the polarity symbol is
not displayed on the
device to be powered, it
might appear on an ID
plate on the computer’s
power supply or the
original adapter. For Tip Negative
For Tip Positive
For SP-2 Plug
For SP-3 Plug

9
Operation
12'4#6+10
You can use your adapter to power
your notebook computer from
automobile cigarette-lighter sockets
and 12-volt power ports, portable 12-
volt battery packs, airline seats with 11
to 16V DC capabilities and the
appropriate receptacles, and solar
panels with power capabilities of 11 to
16 volts at 80 watts (minimum)..
..
.
After you have properly adjusted the
output voltage and installed the
Adaptaplug, follow these steps to use
your adapter.
1. Insert the Adaptaplug's tip into the
DC input jack on the device to be
powered.
2. Insert the adapter's cigarette-
lighter plug into any DC outlet with
a power rating of 12 VDC.
The green indicator on the adapter
lights when the adapter is properly
connected and the device is receiving
power.
If the green indicator on the adapter
does not light, disconnect the adapter
from the device being powered, then
check the Adaptaplug's connection for
."%#76+10".
Do not connect any
peripheral powered by an
additional 12V DC adapter
to the laptop when
powering the laptop with
this RadioShack adapter.
Such a connection could
result in damage to the
peripheral or the laptop.

10
Operation
the correct polarity orientation. This
could also indicate a problem with your
computer or with the adapter. Take
your adapter and/or computer to your
local RadioShack store. Some
automobiles require the ignition to be
turned on, or to the ACC (accessory)
position, to provide power to the
cigarette-lighter socket. You may have
a blown fuse for your vehicle’s
cigarette-lighter socket or in the
adapter’s cigarette-lighter plug (see
“Replacing the Fuse” on Page 13).
If you operate your notebook computer
after removing its internal battery, an
interruption in power might result in an
immediate computer shutdown and
possible data loss..
..
.
Such a power interruption could be
caused by:
• Accidentally disconnecting either
end of the power adapter.
• Starting your vehicle.
."%#76+10".
• Save your data
frequently!

Troubleshooting
11
6417$.'5*116+0)
Some notebook computers have power
supplies in excess of this adapter’s
rating (over 60 watts). In most cases,
this higher rating is used toboth charge
a completely discharged battery and
power the computer at the same time.
This adapter can be used for such
applications, but it is recommended
that the computer’s battery be
recharged before using this adapter to
operate the computer..
..
.
In the unlikely event of insufficient
power, you may encounter slower
battery charging time or automatic
shutdown of the adapter. In case of
automatic shutdown, try one or more of
these steps to reset the adapter:
• Disconnect the adapter from the
device being powered for about 30
minutes or until the adapter case
returns to room temperature and
the green indicator comes on,
indicating the adapter is ready.
• Completely recharge the computer
battery before using the computer.
Use the adapter to charge the
battery, but do not operate the
computer during charging.
."%#76+10".
Except as noted for
notebook computers
(see “Compatible
Computers” on
Page 15), the power
adapter’s 60-watt rating
must be equal to or
greater than the
requirement of the
device to be powered.
Using an adapter that
provides less current can
damage the adapter or
the device being
powered.

12
Care
• If the computer battery is easily
removable, remove it from the
computer to eliminate the power
requirement for recharging.±
%#5'"6'/2'4#674'
This adapter is a high energy switching
regulated power supply and generates
a significant amount of heat when used
at peak power for extended periods. It
is not uncommon for the case to
become warm to the touch.
When using this adapter, care should
be taken to avoid blocking the air vents
in the case. When possible, it is
recommended that the case be
positioned to enable maximum air
circulation.
%#4'
Keep the adapter dry; if it gets wet,
wipe it dry immediately. Use and store
the adapter only in normal temperature
environments. Handle the adapter
carefully; do not drop it. Keep the
adapter away from dust and dirt, and
wipe it with a damp cloth occasionally
to keep it looking new.
±"016'"±"
You can use this
adapter to charge the
battery in your notebook
computer by connecting
it to the computer with
thebattery installed,and
leaving the computer
turned off.

13
Service and Repair
4'2.#%+0)"6*'"(75'
If the cigarette-lighter plug’s fuse is
broken or blown, replace it with a 12A
250V 1/4×11/4-inch fast-blow,
automotive glass type fuse. To remove
the fuse, turn the knurled knob
counterclockwise then remove the tip
cap..
..
.
To reassemble the cigarette-lighter
fuse holder, insert the components in
the following order: 1) fuse, 2) tip cap
with spring, 3) knob.
5'48+%'"#0&"4'2#+4
If your adapter is not performing as it
should, take it to your local RadioShack
store for assistance. Modifying or
tampering with the adapter’s internal
components can cause a malfunction
and might invalidate its warranty.
."%#76+10".
Do not use a fuse with
ratings other than those
specified. Doing so
might damage your
adapter.
d
ec

Specifications
14
52'%+(+%#6+105
Input
Voltage .................................................................................. 11–16V DC
Maximum Power .......................................................................... 8 Amps
In-rush Current......................................... 40 Amps, Maximum Cold Start
at Room Temperature (77° F, 25° C)
Typical Standby Current ........................................... <100 mA @ 11VDC
<100 mA @ 13.8 VDC
<100 mA @ 16 VDC
Protection Features ............................................................... Fused Input
Reverse Voltage
Over Current
Fuse .................................................. 12A/250V 1/4×11/4-inch Fast-blow
Automotive Glass Type
Cord ........................................ 3-Foot UL Coiled Cord, Extended Length
Connector ................................................. Cigarette-Lighter Plug, Fused
Output
Programmable Voltages ..................................................... 12 to 27V DC
Voltage Regulation .......................................................................... ±5%
Power ........................................................... 3.75A/60 Watts (Maximum)
Output Cord ......................... About 3.0 Feet with Receptacle (1.0 Meter)
Mechanical
Dimensions ....................... 313/16 ×23/4×19/32 Inches (97 ×70 ×33 mm)
Weight ............................................................. Less than 10.2 oz (290 g)
Enclosure ................................ Injection Molded Norly SE-100, UL94V-0
Indicator .................................................... Output Power-On LED (Case)
Environmental
Temperature:
Maximum Performance .................................... 32°to 122°F (0° to 50°C)

15
Compatible Computers
Operation ................................................... –22° to 140°F (–10° to 60°C)
Storage ...................................................... –22° to 185°F (–30° to 85°C)
Humidity:
Operation .................................................. 10–90% RH Non-condensing
Storage ....................................................... 5–95% RH Non-condensing
Altitude:
Operation ..................................... –1,000 to 10,000 ft. (–300 to 3,000 m)
Storage ...................................... –1,000 to 49,000 ft. (–300 to 15,000 m)
Specifications are typical; individual units might vary. Specifications are subject to
change and improvement without notice.
%1/2#6+$.'"%1/276'45
The Universal Notebook Computer Power Adapter is compatible
with all notebook computers listed in the following table. The
table is not necessarily comprehensive, though, so your
notebook computer could work with this adapter even though it is
not listed. Verify it against your computer’s original power supply,
as manufacturing changes are sometimes made in production.
As long as the voltage and power requirements of your computer
are satisfied by this universal adapter, you can use it to power
the computer. Many sizes of Adaptaplugs are available from your
local RadioShack store if the size you need is not supplied with
the adapter.
/CPWHCEVWTGT /QFGN"0Q08QNVU 6KR"
%QNQT
6KR"
2QNCTKV[
Acer 1100LX 18 White NEG
ALR Venture 16 21 White POS
ALR Venture 386SX 21 White POS
Altec Lansing Multimedia CD-ROM 12 Blue POS

16
Compatible Computers
AST Advantage 486sx/25 21 Blue NEG
AST Advantage Explorer 21 Blue NEG
AST Advantage Notebooks 21 Blue NEG
AST Ascentia 800 19 White POS
AST Ascentia 800N 19 White POS
AST Ascentia 810N 19 White POS
AST Ascentia 950N 18 Blue POS
AST Ascentia P Series 19 White POS
AST Bravo Notebooks 14 Green POS
AST BravoL/CDX2-66 21 Blue NEG
AST Explorer Notebooks 14 Green POS
Atari Stacy 17 Blue NEG
CAF 386SX 18 White POS
Canon 200LS 19 Blue POS
Canon BJ-30 13 Green POS
Canon BJC-70 13 Green POS
Canon Innova NoteJet 486 20 Green POS
Canon InnovaBook 1000 20 Green POS
Canon InnovaBook 350CD 20 White POS
Canon InnovaBook 350P 20 White POS
Canon InnovaBook 475 20 White POS
Coax Coax 386SX 21 White POS
Coax SmartBook V-Star 19 Blue POS
Coax Ultrathin 386SX/20 19 White POS
Compaq 5300 18 Blue POS
Compaq Concerto 4/25 18 Green POS
Compaq Concerto 4/33 18 Green POS
Compaq Contura 3/20 18 Green POS
/CPWHCEVWTGT /QFGN"0Q08QNVU 6KR"
%QNQT
6KR"
2QNCTKV[

17
Compatible Computers
Compaq Contura 3/25 18 Green POS
Compaq Contura 3/25C 18 Green POS
Compaq Contura 4/25 18 Green POS
Compaq Contura 4/25C 18 Green POS
Compaq Contura 4/25/CX 18 Green POS
Compaq Contura 430C 17 Blue POS
Compaq Presario 305 18.5 Yellow POS
Compaq Presario (all models
except 305 & 1900) 18 White POS
Compaq EVO N200 18.5 Yellow POS
Compaq EVO N400C 18.5 Yellow POS
Compaq EVO N600C 18.5 Yellow POS
Compaq Armada M300 Series 18.5 Yellow POS
Compaq Armada V300 Series 18.5 Yellow POS
Compaq Armada E500 Series 18.5 Yellow POS
Compaq Armada M700 Series 18.5 Yellow POS
Compaq Armada 110 18.5 Yellow POS
Compaq Prosignia 150 18.5 Yellow POS
Compaq Prosignia 170 18.5 Yellow POS
Compaq Prosignia 190 18.5 Yellow POS
Compaq Presario 300 Series 18.5 Yellow POS
Compaq 900 18.5 Yellow POS
Compaq 1500 Series 18.5 Yellow POS
Compaq Presario 1900 24 Special N/A
CompuAdd Companion 15 Green POS
CTX International EasyBook 18 White POS
Data Point 4808J 19 White POS
DEC PC425SE 21 Blue NEG
/CPWHCEVWTGT /QFGN"0Q08QNVU 6KR"
%QNQT
6KR"
2QNCTKV[

18
Compatible Computers
Decision Mate 486SLC 19 White POS
Decision Mate Decision Mate SX 19 White POS
Dell 325SLI 12 Blue POS
Dell Latitude 425 14 Green POS
Dell Latitude 433 14 Green POS
Dell Latitude 433C 14 Green POS
Dell NL320SLI 12 Blue POS
Dell (M Plug) 3200/3500/7000 series 19 Blue POS
Dell (T Plug) XP 450C, 475C, 4100T,
450X, 4100d, 100CX,
XP4000, 4100C
20 Yellow POS
Dell (SP-3 Plug) Latitude C/CS/CP/CPI/
CPX 20 None Match
TIP to
TIP
Dell (SP-3 Plug) Inspiron 2500/3700/
5000/7500/8000/8100 20 None Match
TIP to
TIP
Dell (SP-2 Plug) LS series 19 None Match
TIP to
TIP
Dell (H Plug) LT Series 20 Orange POS
EPS EPS Notebook 20 White POS
Epson ActionNote 4000 15 White POS
Epson ActionNote 700 15 White POS
Epson ActionNote 700C 15 White POS
Epson ActionNote 800 19 White POS
Epson ActionNote 866 19 White POS
Epson ActionNote 866C 19 White POS
Epson ActionNote 880C 19 White POS
/CPWHCEVWTGT /QFGN"0Q08QNVU 6KR"
%QNQT
6KR"
2QNCTKV[

19
Compatible Computers
Epson ActionNote 880CX 19 White POS
Epson ActionNote 888CX 19 White POS
Epson ActionNote 895CX 19 White POS
Everex DesigNote 20 White POS
Everex StepNote 486 20 White POS
Fora NBL386S 19 White POS
Goldstar GS520 18 White POS
Hewlett Packard OmniBook 300 12 Blue NEG
Hewlett Packard OmniBook 425 12 Blue NEG
Hewlett Packard OmniBook 430 12 Blue NEG
Hewlett Packard OmniBook 530 12 Blue NEG
Hewlett Packard OmniBook 600 12 Blue NEG
Hewlett Packard OmniBook 600C 12 Blue NEG
Hewlett Packard Vectra LS12 17 Blue NEG
Honeywell AP-L 17 Blue NEG
Hyundai Neuron 433SLC 15 White POS
IBM PS/2 L40SX 15 Green POS
IBM PS/2 N33SX 15 Green POS
IBM ThinkPad 350 15 Green POS
IBM ThinkPad 350C 15 Green POS
IBM ThinkPad 365ED 16 White POS
IBM ThinkPad 560 16 White POS
IBM ThinkPad 700 15 Green POS
IBM ThinkPad 700C 15 Green POS
IBM ThinkPad 701C 16 White POS
IBM ThinkPad 701CS 16 White POS
IBM ThinkPad 720 15 Green POS
IBM ThinkPad 720C 15 Green POS
/CPWHCEVWTGT /QFGN"0Q08QNVU 6KR"
%QNQT
6KR"
2QNCTKV[

20
Compatible Computers
Keynote Notebook (ADP-38AB) 19 Blue POS
Librex Adapter SCO2P 12 Blue POS
Librex Adapter SPCE813 15 Blue POS
Magitronic NoteBook w/ CD 20 White POS
Mitac 40235XT 17 Green POS
Mitsuba Ninja 12-1 17 Blue POS
MPC M700 18 White POS
NBCC 386SX Notebook 21 White POS
NBCC 386SX/20 Notebook 21 White POS
NBCC 386SXN Notebook 21 White POS
NEC UltraLite Versa 550D 19 White POS
Packard Bell PB286LP 17 Blue POS
Polaroid Hand Scanner 14 Blue POS
ProStar Pentium 20 White POS
Sharp PC3010 19 White POS
Sharp PC3020 19 White POS
Sharp PC3030 19 White POS
Sharp PC3050 19 White POS
Sharp PC3060 19 White POS
Sharp PC3070 19 White POS
Sharp PC5500 17 Green POS
Sharp PC5541 17 Green POS
Sharp PC5700 17 Green POS
Sharp PC5741 17 Green POS
Sharp PC6200 15 Green POS
Sharp PC6220 15 Green POS
Sharp PC6541 15 Green POS
Sharp PC6700 15 Green POS
/CPWHCEVWTGT /QFGN"0Q08QNVU 6KR"
%QNQT
6KR"
2QNCTKV[
Table of contents
Other Radio Shack Adapter manuals

Radio Shack
Radio Shack 273-1668 User manual

Radio Shack
Radio Shack Notebook Computer Universal 30W Power... User manual

Radio Shack
Radio Shack AUTOMATIC TWO-LINE ADAPTER User manual

Radio Shack
Radio Shack Enercell 273-317 User manual

Radio Shack
Radio Shack 2730887 User manual

Radio Shack
Radio Shack 273-1687 User manual

Radio Shack
Radio Shack 1500093 User manual

Radio Shack
Radio Shack 273-1675 User manual

Radio Shack
Radio Shack 2730885 User manual

Radio Shack
Radio Shack 33-331 User manual