63-5027
$TÕLWNC"&KIKVCN"EQP"4GNQL"FG"%NKR
La brújula digital con reloj de sujetador RadioShack le proporciona funciones de reloj,
cronómetro, temporizador, alarma y brújula, todo en un solo paquete resistente y fácil de usar.
±
±±
±"016#"±
±±
±"
• En el formato de 12
horas aparece 7ýQ7CS
o FýQFCS.
• En el modo de
alarma mantenga
apretado el botón
ADV./ST./SPL.
durante 3 segundos
aproximadamente
para encender o
apagar la alarma.
• En la moda
campaneo de
alarma, oprima
ADV./ST./SPL. por 3
segundos para
apagar y aprender el
campaneo de
alarma.
24'2#4#%+¦0
%#.+$4#%+¦0"&'".#"$4-,7.#
#,756'"&'".#"*14#";".#"('%*#
#,756'"&'".#"#.#4/#
Para fijar la declinación
correspondiente al área
en la que vive, escoja la
ciudad más cercana a
usted de la siguiente lista
y oprima repetidamente el
botón MODE [MODO]
para seleccionar los
dígitos y la dirección (este
[E] u oeste [W]) mostrada
para tal ciudad, después
oprima el botón ADV./ST./
SPL. para fijarla. Después
oprima el botón
SET.LIGHT/STP./RST.
Oprima el botón
BEARING. En
seguida cambian
los dígitos
indicadores de la
dirección según
sea la dirección de
la brújula.
Mantenga apretado el
botón SET.LIGHT/
STP./RST. durante 2
segundos
aproximadamente. En
seguida aparece la
abreviatura 97BýQ97B?8$S
Mantenga la brújula en
posición horizontal o
colóquela en dicha posición
sobre una mesa de madera;
después gírela lentamente
dos vueltas completas.
Oprima el botón
SET.LIGHT/STP./RST. En
seguida destella el primer
dígito.
II;
II;II;
II;
',&
',&',&
',&
°
97B
97B97B
97B
;
;;
;
&&
&&&&
&&
°
Oprima repetidamente el botón
MODE hasta que aparezca la
abreviatura JC;ýQ<;9>7ýOý>EH7S,
después de lo cualaparece la fecha
y la hora. Después mantenga
oprimido el botón SET.LIGHT/STP./
RST. durante 3 segundos
aproximadamente. En seguida
destellan los dígitos de los segundos.
Oprima repetidamente el
botón MODE para seleccionar
la hora, los minutos, el año, el
mes y la semana o los
segundos, así como el
formato de 12 o de 24 horas.
JK;
JK;JK;
JK;
)0)/
)0)/)0)/
)0)/
'(
JK;
JK;JK;
JK;
)0)/
)0)/)0)/
)0)/
&&
JK;
JK;JK;
JK;
(&&(
(&&((&&(
(&&(
Oprima repetidamente el botón MODE hasta que aparezca la
abreviatura 7BCýQ7B7HC7S yla hora fijada de la alarma. Después
mantenga apretado el botón SET.LIGHT/STP./RST. durante 3
segundos aproximadamente. En seguida destella el dígito de la hora.
Quando aparece el tiempo de alarma, oprima ADV./ST./SPL. para
cambiar entre las modas alarma y campaneo de alarma. Aparece
0&&ýquando la brújula esta en la moda campaneo de alarma.
Oprima o mantenga
apretado el botón ADV./
ST./SPL. para recorrer
progresivamente los
dígitos y después
oprima el botón MODE.
En seguida destellan
los dígitos de los
minutos.
Al terminar de ajustar
los minutos oprima el
botón SET/LIGHT/
STP./RST. como
confirmación.
7BC
7BC7BC
7BC
'0((
'0(('0((
'0((
'(
7BC
7BC7BC
7BC
+0((
+0((+0((
+0((
'(
7BC
7BC7BC
7BC
+0*.
+0*.+0*.
+0*.
'(
Si no coloca el
compascorrectamente
al calibrarlo, aparece
el mensaje abreviado
;hhýâ[hhehá. Si sucede tal
cosa comience de
nuevo.
;hh
;hh;hh
;hh
19°E- 27°E12°E
Al ajustar los segundos oprima el botón
ADV./ST./SPL. para iniciarlos a partir
de 00.
Oprima o mantenga apretado el botón
ADV./ST./SPL. para recorrer
progresivamente los dígitos o para
alternar entre el formato de 12 o de 24
horas y después oprima el botón SET/
LIGHT/STP./RST. como confirmación.
±
±±
±"016#"±
±±
±"
En la moda
desplegamiento de
tiempo, oprima ADV./
ST./SPL. para cambiar
de tiempo a fecha.
MANUAL DEL PROPIETARIO
Le suplicamos leer el manual antes de utilizar este equipo.
63-5027
08A02
Impreso en China
RadioShack Corporation
Fort Worth, Texas 76102
©2002 RadioShack Corporation.
Todos los derechos reservados.
RadioShack y RadioShack.com son marcas comerciales
empleadas por RadioShack Corporation.
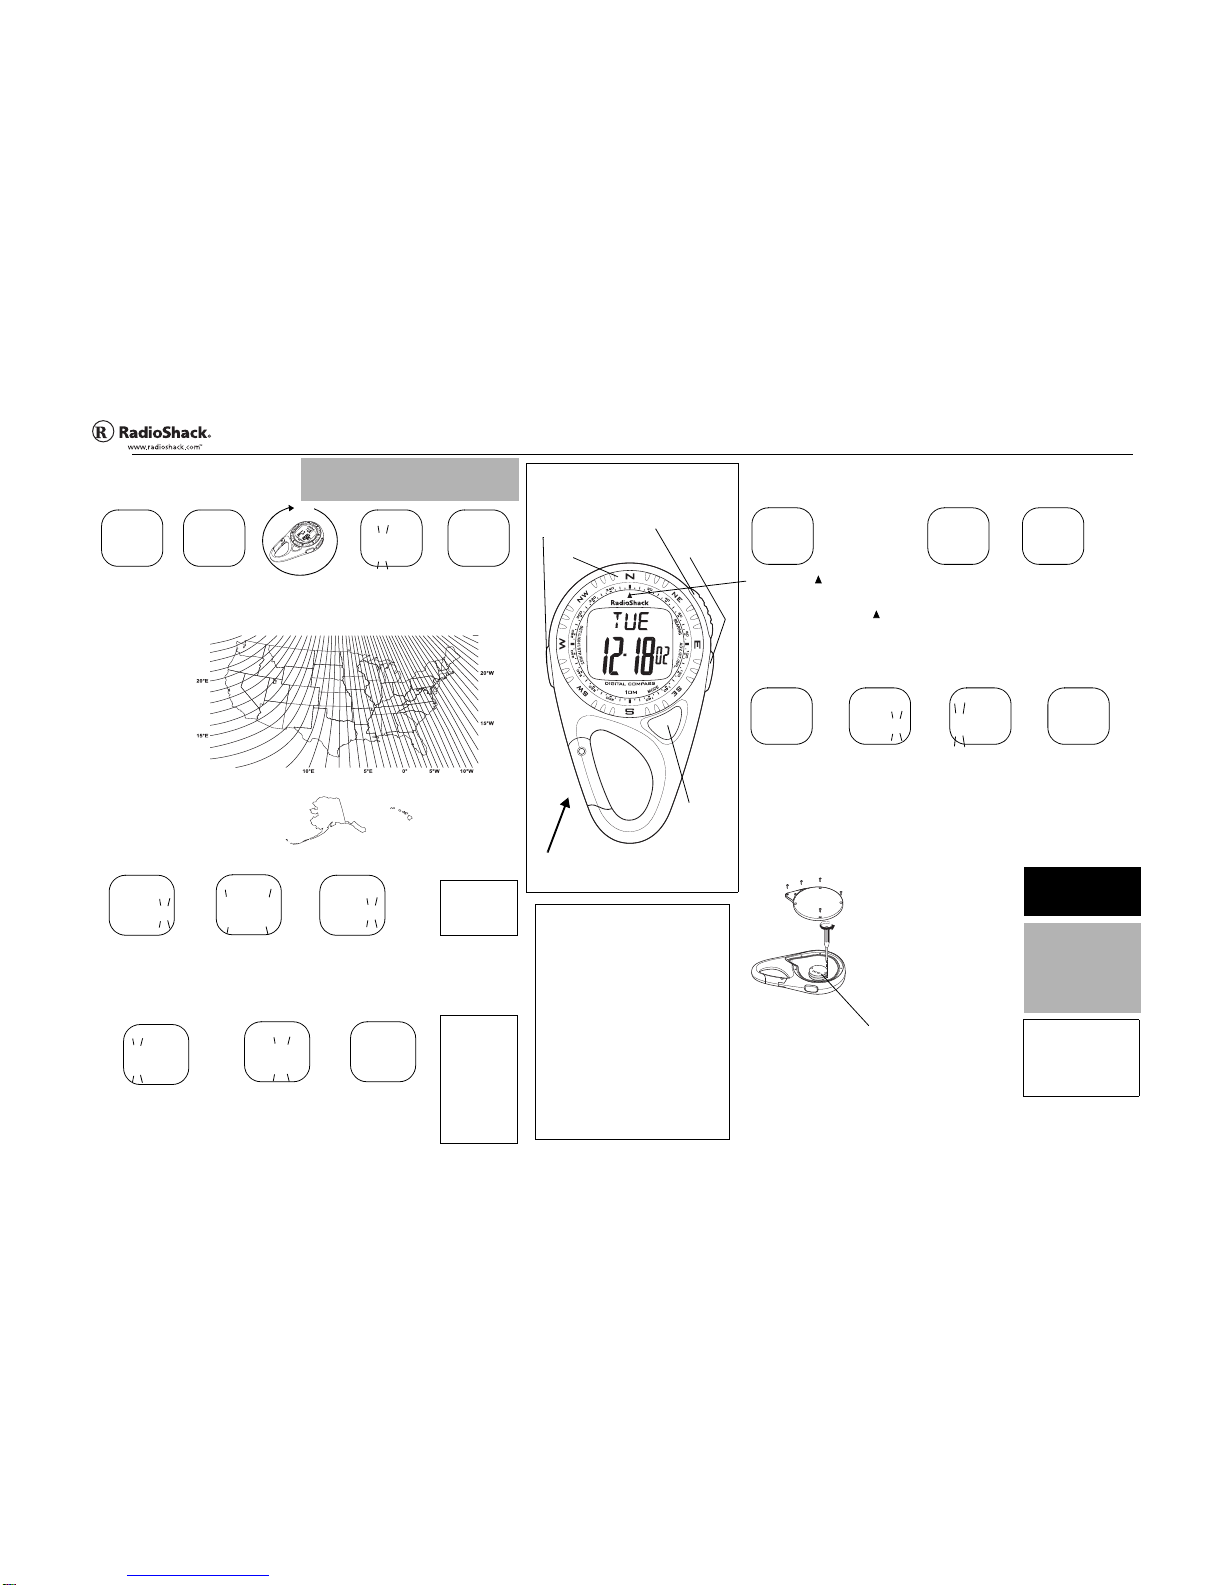
SET/LIGHT/STP./RST.
[FIJAR/LUZ/PARAR/REINIC.] —
Sirve para encender la luz
posterior, para calibrar y fijar la
declinación de la brújula, así como
para fijar y reinicializar el
cronómetro.
%10641.'5";"
%#4#%6'4 56+%#5
BEARING [ACIMUT]—
Sirve para desplegar
la brújula.
Aro tipo clip — Le permite sujetar con facilidad la
brújula a una mochila, a un llavero o a una correa. Para
abrirlo simplemente oprima aquí.
Garantía limitada de un año
Este producto está garantizado por RadioShack contra defectos de fabricación en el material y
mano de obra bajo condiciones normales de uso durante un año a partir de la fecha de compra en
tiendas propiedad de la empresa RadioShack, franquicias y distribuidores autorizados de
RadioShack. EXCEPTUANDO LO AQUÍ ESTABLECIDO, RadioShack NO OFRECE GARANTÍAS
EXPLÍCITAS Y LAS GARANTÍAS IMPLÍCITAS, INCLUYENDO LA GARANTÍA DE QUE EL
PRODUCTO PODRÁ SER COMERCIALIZADO Y QUE ES ADECUADO PARA UN FIN
ESPECÍFICO, TIENEN UNA DURACIÓN LIMITADA AL PERÍODO DE VIGENCIA DE LAS
GARANTÍAS LIMITADAS AQUÍ EXPUESTAS POR ESCRITO. EXCEPTUANDO LO AQUÍ
ESTABLECIDO, RadioShack NO TENDRÁ RESPONSABILIDAD NI OBLIGACIÓN ALGUNA HACIA
EL CLIENTE U OTRA PERSONA O ENTIDAD CON RESPECTO A LAS RESPONSABILIDADES,
PÉRDIDAS O DAÑOS CAUSADOS DIRECTA O INDIRECTAMENTE POR EL USO U OPERACIÓN
DEL PRODUCTO O RESULTANTES DE UNA VIOLACIÓN DE ESTA GARANTÍA, INCLUYENDO
PERO SIN LIMITARSE A, DAÑOS CAUSADOS POR INCONVENIENCIA, PÉRDIDA DE TIEMPO,
DATOS, BIENES, INGRESOS O GANANCIAS, O DAÑOS INDIRECTOS, ESPECIALES,
INCIDENTALES O CONSECUENCIALES, AÚN SI SE HA NOTIFICADO A RadioShack DE LA
POSIBILIDAD DE TALES DAÑOS.
Algunos estados no permiten limitantes a la duración de una garantía implícita ni la exclusión o
limitación de los daños incidentales o consecuenciales, por lo que es posible que las limitaciones o
exclusiones mencionadas más arriba puedan no ser de aplicación.
En caso de defecto del producto durante el período de garantía, lleve el producto y el recibo de
compra que sirve de comprobante de la fecha de compra a cualquier tienda RadioShack. Salvo sila
ley dispone lo contrario, RadioShack a su opción: (a) corregirá el defecto reparando el producto sin
cargo alguno por componentes y mano de obra; (b) reemplazará el producto por otro igual o de
características similares; o (c) reembolsará el precio de compra. Todos los productos y componentes
reemplazados, así como los productos cuyo costo es reembolsado, pasan a ser propiedad de
RadioShack. Pueden utilizarse componentes y productos nuevos o reacondicionados para llevar a
cabo el servicio de garantía. Los componentes y productos reparados o reemplazados están
garantizados por el período remanente de la garantía original. La reparación o sustitución del
producto no serán gratuitas después de la expiración del período de garantía.
Esta garantía no cubre: (a) daños o averías causadas por o atribuibles a causa fortuita, abuso,
accidente, mal uso, uso anormal o impropio, falta de atención a las instrucciones, instalación o
mantenimiento impropio, alteración, caída de rayos u otra incidencia de excesivo voltaje o corriente;
(b) reparaciones no efectuadas por un taller autorizado por RadioShack; (c) consumibles tales como
fusibles o pilas; (d) daños a la apariencia; (e) costos de transporte, envío o seguro; o (f) costos de
recogida, instalación, servicio de ajuste o reinstalación.
Esta garantía le otorga derechos legales específicos, si bien también puede tener otros derechos
que varían de un estado a otro. La traducción al español se provee solamente para su conveniencia.
En caso de discrepancias entre las versiones en inglés y en español, prevalecerá la versión en
inglés. RadioShack Customer Relations, 200 Taylor Street, 6th Floor, Fort Worth, TX 76102
12/99
ADV.//ST./SPL/.
[AVAN.//FIJAR/
FRACC.] —
Sirve para fijar
y reinicializar
funciones.
MODE [MODO] —
Sirve para fijar el
modo de desplegar
datos.
ESFERA
'/2.'1"&'."%410¦/'641
(70%+10#/+'061
'/2.'1"&'".#"$4-,7.#
%7+&#&1"&'".#"70+&#&
+0&+%#&14"&'"
2+.#5"$#,#5
Oprima repetidamente el
botón MODE hasta que
aparezca la abreviatura 9>Hý
Q9HEDÏC;JHES. En seguida
aparece la última medición
que haya tomado.
Oprima el botón SET/LIGHT/
STP./RST. para reinicializar el
cronómetro, después oprima
el botón ADV./ST./SPL. para
iniciar su funcionamiento.
Para tomar una fracción de
tiempo oprima el botón
ADV./ST./SPL. mientras
está funcionando el
cronómetro.
Con un destornillador
Phillips pequeño retire
los tornillos de la parte
posterior de la brújula y
después quite la tapa.
Con un destornillador
Phillips pequeño retire el
tornillo de la tapa del
compartimiento de las
pilas y después quite
dicha tapa.
Si está baja la carga de
la pila, se oscurece la
pantalla y se debilita el
sonido de la brújula.
Mantenga seca la brújula; si se moja, séquela de inmediato. Utilice la brújula y guárdela
solamente en entornos con temperatura normal. Maneje con cuidado la brújula; no la deje
caer. Mantenga la brújula alejada del polvo y la suciedad, y límpiela ocasionalmente con un
trozo limpio de tela para mantenerla con aspecto de nueva.
%#/$+1"&'".#5"2+.#5
Oprima el botón SET/LIGHT/
STP./RST. para detener el
cronómetro.
'/2.'1"&'."6'/214+<#&14
Oprima repetidamente el
botón MODE hasta que
aparezca la abreviatura JCHý
QJ;CFEH?P7:EHS. Aparece el
modo de cuenta regresiva
(9:I (paro de cuenta
regresiva), 9:H (repetición de
cuenta regresiva), o 9:K
(avance de cuenta regresiva))
así como la última medición
que usted haya tomado.
Mantenga oprimido el
botón SET/LIGHT/STP./
RST. durante 3 segundos
aproximadamente. En
seguida destellan los
dígitos de los segundos.
Oprima repetidamente el
botón ADV./ST./SPL. para
cambiar el parámetro
seleccionado; después
oprima repetidamente el
botón MODE para
seleccionar los segundos,
los minutos y la hora, así
como el modo de cuenta
regresiva.
Asegúrese de que el
lado positivo (+) de la
nueva pila quede
orientado hacia arriba.
Al terminar de ajustar el
temporizador oprima el botón
SET/LIGHT/STP./RST.
Para iniciar el funcionamiento
del temporizador oprima el
botón ADV./ST./SPL. Para
detener el temporizador y
volver a cargar el tiempo
prefijado oprima el botón
SET/LIGHT/STP./RST.
II;
II;II;
II;
',&
',&',&
',&
°
9>H
9>H9>H
9>H
(
((
(ýý
ýýýý
ýý(&
(&(&
(&
&&
‘9>H
9>H9>H
9>H
&
&&
&ýý
ýýýý
ýý&&
&&&&
&&
&&
‘
9:H
9:H9:H
9:H
'
''
'0
000&,
&,&,
&,
&)
9:H
9:H9:H
9:H
'
''
'0
000&,
&,&,
&,
&)
9:H
9:H9:H
9:H
'
''
'0
000&,
&,&,
&,
&&
9:H
9:H9:H
9:H
(
((
(0
000&&
&&&&
&&
&&
CR2032
Mantegna la brújula con el abajo del esfera
apuntando en eldirección que deseas leer, luego
oprima BEARING. Los digitos enseñando el
dirección actual aparesen.
Voltea la esfera que los digitos en la esfera mas
acercados con los digitos en el desplegamiento
estan aliñeados con el . El
N
en la esfrea
apunta para el norte.
Al terminar de usar la brújula oprima MODE o
simplemente espere 70 segundos aproximadamente.
4'(+,#%+10"&'"
.#"$4-,7.#
Si la brújula no funciona
bien, refijalo
presionando todos los
botones al mismo
tiempo.
R
RR
R"#&8'46'0%+#"R
RR
R"
Mantenga las pilas tipo botón
fuera del alcance de los niños. La
deglución de una pila tipo botón
puede causar la muerte.
.
..
.24'%#7%+¦0".
..
.
• Solamente utilice una pila
nueva del tamaño requerido y
del tipo recomendado.
• Si no tiene pensado utilizar la
brújula durante un mes o más,
retire las pilas. Las pilas
pueden despedir compuestos
químicos capaces de destruir
componentes electrónicos.
±
±±
±"016#"±
±±
±"
Su brújula esta diseñado trabajar
con una temperatura fluctuada
de 14° hasta 122°F (–10° hasta
50°C). Si la temperatura esta
mas alto o bajo de este alcance,
puede ser que su brújula no
tenga desplegamiento.
.
..
."24'%#7%+¦0".
..
.
La brújula es sumamente sensible a los campos magnéticos y eléctricos como
los emanados por las televisiones y los monitores de las computadoras. Para
calibrar la brújula busque un lugar alejado de esos tipos de dispositivos.