manuals.online logo
Brands
  1. Home
  2. •
  3. Brands
  4. •
  5. Radio Shack
  6. •
  7. Weather Station
  8. •
  9. Radio Shack 6301469 User manual

Radio Shack 6301469 User manual

TM
234567
We hope you enjoy your Wireless Weather
Station from RadioShack. This weather
station features a clock with alarm function,
and minimum and maximum indoor/outdoor
temperature display. It works with up to three
sensors (additional sensors not included). Please
read this user’s guide before using your new
weather station.
Package Contents
•Weather Station
•Thermo Sensor
•User’s Guide
Specifications
Indoor Temperature Range ... 32–122°F (0–50°C)
Outdoor Temperature Range ....................................
.................................................. -4 – 140°F (-20–60°C)
Sensor RF Frequency ..................................433 MHz
RF Operation Range...............................98 ft (30 m)
Channe l Numb er .........................................................3
Specications are subject to change and improvement
without notice. Actual product may vary from the
images found in this document.
Wireless Weather Station
6301469
User’s Guide
Set Weather Station and Sensor
1. Place the weather station and sensor close
together indoors to communicate.
2. Slide the sensor’s CH 1 2 3
switch to select a channel,
and press the weather
station’s CH + button to
select the same channel. If
you are using more than one
sensor (up to three), select
a dierent channel for each
sensor.
high enough where it is out of reach for
children. The sensor should be mounted
onto a vertical at surface. Avoid location
where rain and water falls directly onto the
sensor.
Install Batteries
1. Inser t two AA batteries (not included) into
the weather station and thermo sensor
respectively, matching the polarity symbols
(+and –) marked inside each battery
compartment.
2. Press RESET on both units.
Battery Note:
•Dispose of old batteries promptly and
properly. Do not burn or bury them.
•Use only a fresh battery of the required size
and type.
•Use alkaline batteries for longer usage, or
use lithium batteries in temperatures below
-4°F (-20°C).
•Do not mix old and new batteries, or
batteries of dierent types, capacities, or
chemistries.
Weather Station
Thermo Sensor
AA
AA
AA
AA
RESET
CH 1 2 3
SNOOZE / LI GHT
•Silence the alarm for
5 minutes when t he
alarm sounds .
•Turn the backlight on.
ALARM SET
•Enter and
conrm alarm
settings.
•View the set
alarm time.
• Activate the
alarm.
CH +
•Set t he hour
and minute.
•Select a se nsor.
MEM –
•Set t he hour
and minute.
•View maximum
(MAX), mini mum
(MIN) or current
indoor/outdoor
temperature.
DISPL AY SET
Enter and conrm
clock settings.
°C/°F
Change between
Celsius and Fahrenheit.
SENSOR
Scan sensor sig nal.
RESET
Clear all indo or/outdoor
temperature data,
and clo ck and alarm
settings.
Important Installation and
Location Notes
•During initial installation, the sensor may
take up to an hour or more to acclimate to
current conditions.
•Place the weather station indoors away from
vents, heating or cooling elements, and
direct sunlight.
•Stand the sensor on
a at surface indoors
or outdoors away
from direct sunlight
and moisture. Or use
a screw (not included)
to mount it on a wall.
Make sure the sensor is within 98 feet (30m)
of the weather station, without obstructions
between them. To avoid inter ference, place
the weather station and sensor away from
other electronic devices.
•If the sensor is placed outdoors, mount it
high enough o the ground where water,
snow, and rain cannot accumulate and also
•If you do not plan to use your weather
station for more than a month, remove the
batteries. Batteries can leak chemicals that
can damage electronic parts.
3.
Press the weather
station’s SENSOR
button to scan sensor
signal. Scanning may
take some time.
Note: If the weather
station does not connect
to the sensor, relocate
the sensor and/or the
weather station until
connection is established.
6301469_PM_EN_081115.indd 1-7 8/11/2015 3:57:34 PM
8 9 10 11 12 13 14
Set the Time
1. Press and hold DISPLAY SET until the digits
12 or 24 (time format) ash.
2. Press CH+ or MEM– to select a time
format. Press DISPLAY SET to conrm and
go to the next setting.
•The setting order is 12/24 hour format,
hour, minute, and second.
•When you select the 12-hour format,
AM or PM displays.
Set the Alarm
1. Press and hold ALARM SET until the alarm
hour digits ash.
2. Press CH+ and MEM – to set the hour.
Press ALARM SET to conrm and go to the
minute setting.
3. Press CH+ and MEM– to set the minute and
press ALARM SET to conrm.
Note: After setting the alarm, press ALARM SET
again to activate the alarm. Mdisplays.
Printed
in China
09A15
6301469
Limited Warranty
General Wireless Operations Inc., doing business as
RadioShack (hereafter “RadioShack”) warrants this
product against defects in materials and workmanship
under normal use by the original purchaser for ninety
(90) days after the date of purchase from a RadioShack-
owned store or an authorized RadioShack franchisee
or dealer. RADIOSHACK MAKES NO OTHER EXPRESS
WARRANTIES.
This warranty does not cover: (a) damage or failure
caused by or attributable to abuse, misuse, failure
to follow instructions, improper installation or
maintenance, alteration, accident, Acts of God (such
as oods or lightning), or excess voltage or current; (b)
improper or incorrectly performed repairs by persons
who are not a RadioShack-authorized service facility;
(c) consumables such as fuses or batteries; (d) ordinary
wear and tear or cosmetic damage; (e) transportation,
shipping or insurance costs; (f) costs of product removal,
installation, set-up service, adjustment or reinstallation;
and (g) claims by persons other than the original
purchaser.
Should a problem occur that is covered by this warranty,
take the product and the RadioShack sales receipt as
proof of purchase date to any RadioShack store in the
U.S. RadioShack will, at its option, unless otherwise
provided by law (a) replace the product with the same or
a comparable product, or (b) refund the purchase price.
All replaced products, and products on which a refund is
made, become the property of RadioShack.
RADIOSHACK EXPRESSLY DISCLAIMS ALL
WARRANTIES AND CONDITIONS NOT STATED IN
THIS LIMITED WARRANTY. ANY IMPLIED WARRANTIES
THAT MAY BE IMPOSED BY LAW, INCLUDING THE
IMPLIED WARRANTY OF MERCHANTABILITY AND, IF
APPLICABLE, THE IMPLIED WARRANTY OF FITNESS
FOR A PARTICULAR PURPOSE, SHALL EXPIRE ON THE
EXPIRATION OF THE STATED WARRANTY PERIOD.
EXCEPT AS DESCRIBED ABOVE, RADIOSHACK
SHALL HAVE NO LIABILITY OR RESPONSIBILITY
TO THE PURCHASER OF THE PRODUCT OR ANY
OTHER PERSON OR ENTITY WITH RESPECT TO ANY
LIABILITY, LOSS OR DAMAGE CAUSED DIRECTLY
OR INDIRECTLY BY USE OR PERFORMANCE OF THE
PRODUCT OR ARISING OUT OF ANY BREACH OF
THIS WARRANTY, INCLUDING, BUT NOT LIMITED TO,
ANY DAMAGES RESULTING FROM INCONVENIENCE
AND ANY LOSS OF TIME, DATA, PROPERTY,
REVENUE, OR PROFIT AND ANY INDIRECT, SPECIAL,
INCIDENTAL, OR CONSEQUENTIAL DAMAGES,
EVEN IF RADIOSHACK HAS BEEN ADVISED OF THE
POSSIBILITY OF SUCH DAMAGES.
Some states do not allow limitations on how long an
implied warranty lasts or the exclusion or limitation of
incidental or consequential damages, so the above
limitations or exclusions may not apply to you. This
warranty gives you specic legal rights, and you may also
have other rights which vary from state to state.
Contact General Wireless Operations Inc. at:
RadioShack Customer Relations
300 RadioShack Circle
Fort Worth, TX 76102 07/15
www.radioshack.com
FCC Information
This equipment has been tested and found to comply
with the limits for a Class B digital device, pursuant to
Part 15 of the FCC Rules. These limits are designed
to provide reasonable protection against harmful
interference in a residential installation. This equipment
generates, uses, and can radiate radio frequency energy
and, if not installed and used in accordance with the
instructions, may cause harmful interference to radio
communications. However, there is no guarantee that
interference will not occur in a particular installation.
If this equipment does cause harmful interference to
radio or television reception, which can be determined
by turning the equipment o and on, the user is
encouraged to try to correct the interference by one or
more of the following measures:
• Reorient or relocate the receiving antenna.
• Increase the separation between the equipment and
receiver.
Note:
•For temperatures from -2°C to 3°C
(28°F–37°F), the ice alert icon () appears
on the display.
•If the weather station malfunctions, reset
it by pressing the RESET button, change
the batteries or wait for more moderate
temperatures to resume.
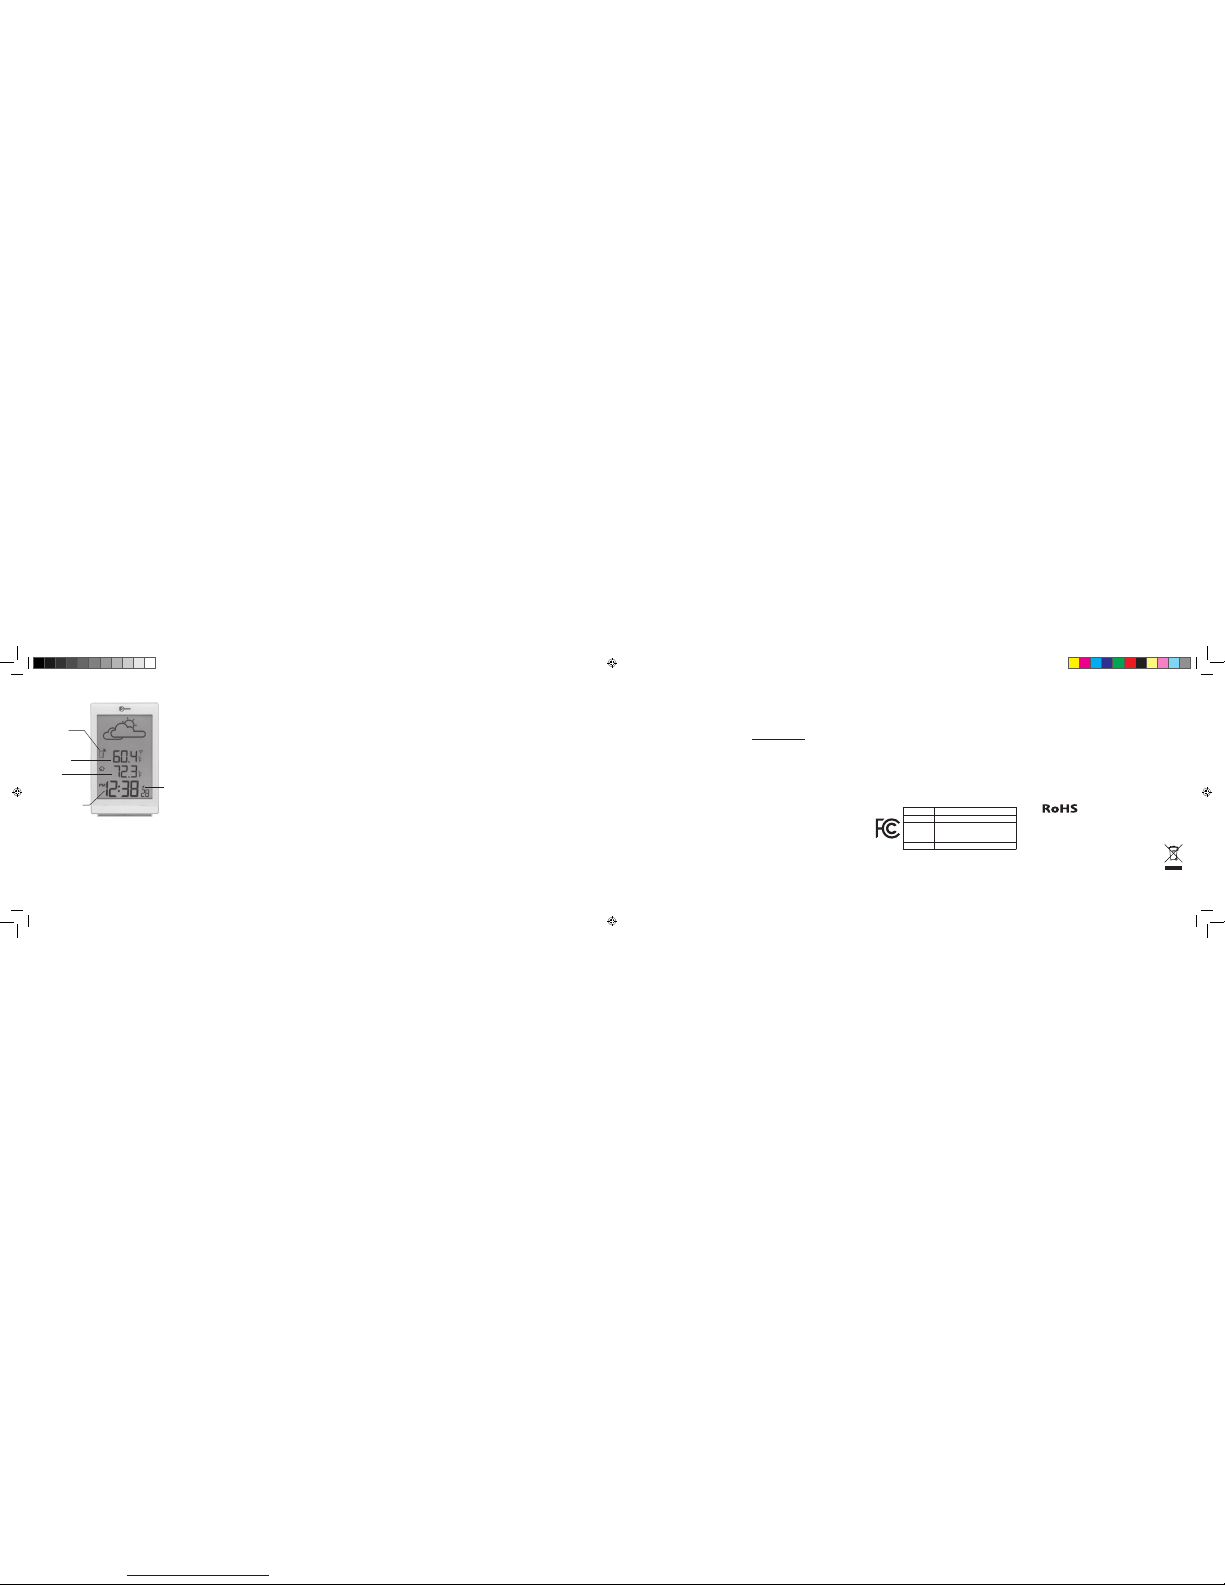
Outdoor
Temperature
(Current ,
MAX, MIN)
Sensor
Chann el
Indicator
Indoo r
Temperature
(Current , MAX,
and MIN)
Clock or Alarm
Alarm Icon
Weather Station Display • Connect the equipment into an outlet on a
circuit dierent from that to which the receiver is
connected.
• Consult the dealer or an experienced radio/TV
technician for help.
If you cannot eliminate the interference, the FCC
requires that you stop using your product. Changes
or modications not expressly approved by the party
responsible for compliance could void the user’s
authority to operate the equipment.
This device complies with Part 15 of the FCC Rules.
Operation is subject to the following two conditions:
(1) this device may not cause harmful interference, and
(2) this device must accept any interference received,
including interference that may cause undesired
operation.
Product Wireless Weather Station
Model 6301469
Responsible
Party
General Wireless Operations Inc.
300 RadioShack Circle, Fort
Worth, TX 76102
Phone 817-415-3200
Compl ies with the European Union’s
“Rest riction of Hazardous Substa nces
Directive,” which protec ts the
environment by restric ting specic
hazardous materials and produc ts.
© 2015 Genera l Wireless Operations Inc.
All rights reserved. RadioShack is a
registered trademar k used by
General Wireless Operations Inc.
6301469_PM_EN_081115.indd 8-14 8/11/2015 3:57:35 PM

Other manuals for 6301469

1

Other Radio Shack Weather Station manuals

Radio Shack 6300772 User manual

Radio Shack

Radio Shack 6300772 User manual

Radio Shack 6301469 User manual

Radio Shack

Radio Shack 6301469 User manual

Radio Shack 63-1016 Operation and maintenance manual

Radio Shack

Radio Shack 63-1016 Operation and maintenance manual

Radio Shack 6300333 User manual

Radio Shack

Radio Shack 6300333 User manual

Radio Shack 63-1029 User manual

Radio Shack

Radio Shack 63-1029 User manual

Radio Shack 63-1086 User manual

Radio Shack

Radio Shack 63-1086 User manual

Popular Weather Station manuals by other brands

Conrad 515474 operating instructions

Conrad

Conrad 515474 operating instructions

Bresser 7003100CM3000 instruction manual

Bresser

Bresser 7003100CM3000 instruction manual

Auriol Z32171B Operation and safety notes

Auriol

Auriol Z32171B Operation and safety notes

RS PRO RS 1111-UT operating manual

RS PRO

RS PRO RS 1111-UT operating manual

hager TXE530 manual

hager

hager TXE530 manual

Fourier MultiLogPRO user guide

Fourier

Fourier MultiLogPRO user guide

La Crosse Technology WS9090 instruction manual

La Crosse Technology

La Crosse Technology WS9090 instruction manual

Vitek WS330 manual

Vitek

Vitek WS330 manual

Hama EWS-880 operating instructions

Hama

Hama EWS-880 operating instructions

R&TTE WS-3500 Operation manual

R&TTE

R&TTE WS-3500 Operation manual

La Crosse Technology WS-2308AL Operation manual

La Crosse Technology

La Crosse Technology WS-2308AL Operation manual

Eurochron EPT-D1 operating instructions

Eurochron

Eurochron EPT-D1 operating instructions

ECG MS 007 instruction manual

ECG

ECG MS 007 instruction manual

Alecto WS-2300 user manual

Alecto

Alecto WS-2300 user manual

Trevi ME 3P20 RC manual

Trevi

Trevi ME 3P20 RC manual

Coastal WEATHERPAK EOC Operation & maintenance manual

Coastal

Coastal WEATHERPAK EOC Operation & maintenance manual

Hama EWS-1000 operating instructions

Hama

Hama EWS-1000 operating instructions

Honeywell TE242ELW user manual

Honeywell

Honeywell TE242ELW user manual

manuals.online logo
manuals.online logoBrands
  • About & Mission
  • Contact us
  • Privacy Policy
  • Terms and Conditions

Copyright 2025 Manuals.Online. All Rights Reserved.