manuals.online logo
Brands
  1. Home
  2. •
  3. Brands
  4. •
  5. Rainbow Pool Products
  6. •
  7. Swimming Pool Vacuum
  8. •
  9. Rainbow Pool Products Max3 User manual

Rainbow Pool Products Max3 User manual

BK 0011700
2
37
30
23
16
9
Rainbow Pool Products
PO Box 2388, Mansfield Qld 4122
Telephone STD 61-7-3849 5385
Facsimile STD 61-7-3849 5384
Email: [email protected]
Web: www.rainbowpoolproducts.com.au
IMPORTANT SAFETY INSTRUCTIONS
READ AND FOLLOW ALL THE INSTRUCTIONS
CAUTION: Do not plug the power supply into a grounded outlet or do not switch the
pool cleaner “ON” if it is not fully immersed in water. Operating the cleaner out of water
will cause severe damage immediately and will result in loss of warranty.
Allow the cleaner to remain in the pool for 15 to 20 minutes following the end of its
cleaning cycle. This will allow the motors to cool adequately. Do not leave the cleaner
in the pool all the time. Always remember to turn the power supply “OFF” and unplug it
from the power outlet before removing the cleaner from the pool.
WARNING: The cleaner must not be used when people are in the water. For use
with swimming pool only
Safety Note
- The unit must be supplied through a residual current device (RCD) having a rated
residual operating current not exceeding 30 mA
- The connection to the branch circuit should be consistent with the local and national
wiring rules (electrical code).
- Mishandling of the unit can result in leakage of lubricants.
- If the supply cord is damaged, it must be replaced by the manufacturer’s service
agent or a qualified and trained person in order to avoid hazards.
Dear Customer,
Thank you for choosing our product to clean your pool. We hope that you will enjoy
using your new robot to maintain your swimming pool for years to come.
Before you begin to use your robot, please take a few minutes to carefully read these
operating instructions.
Again, thank you for choosing our product.
ENGLISH
2
Components
Your new automatic pool cleaner contains:
- The robotic pool cleaner with its floating cable.
- The Power Supply (transformer).
Please read this manual completely before operating your pool cleaner.
While the appearance of your cleaner and some of its components may differ from those
shown here, the function of the cleaner, operating procedures and maintenance
practices are the same.
WARNING: A Ground Fault Current Interrupter (GFCI-USA) or a Residual Current
Device (RCD-EUROPE) must be installed to protect your electric outlet and prevent
any possible electric shock.
This appliance is not intended for use by persons (including children)
with reduced physical, sensory or mental capabilities, or lack of
experience and knowledge, unless they have been given supervision or
instruction concerning use of the appliance by a person responsible for
their safety. Children should be supervised to ensure that they do not
play with the appliance.
SAVE THESE INSTRUCTIONS
1) Handle
2) Cable
3) Outlet Top
4) Filter Access
5) Filter Lock Lever
6) Wheels
7) Unit Body
8) Intake Valves
9) Rolling Brush
1
3
5
4
6
2
7
8
9
12 cm
(4.7 inch)
3.6m/11.8ft
1
1a
1. Place the power supply (transformer) at least 3.6 meters / 11.8 feet from the pool and at
least 12 cm / 4 Inch above the surface (fig.1). The transformer will supply low voltage to
the cleaner.
2. Uncoil the cable.(fig.1a)
unit
Operating the pool cleaner - Quick start guide
4. Plug the cable into the power supply. Depending on your model (Type I or Type II),
make sure the key on the plug corresponds exactly with the key slot on the socket of
the power supply (fig.3a). (See details on the next page)
5. Plug the power supply into a grounded outlet. Ensure that the electric outlet has been
properly grounded (fig.3b).
6. Press the “ON” button on the power supply (fig 4). The light will glow indicating that the
system is “ ON “ and the pool cleaner will start the cleaning cycle. The unit keeps
record of the number of cleaning cycles. Only an authorized service center can
display the accumulated cleaning cycles.
3. Place the unit in the water.
Turn the unit side to side in
the water to allow air to
escape from the body and
then let the cleaner sink to the
bottom of the pool (fig.3).
Then, spread the cable over
the surface of the pool as
evenly as possible (fig.1).
3
3a
3
3b
Type I
Type II
4
Operating the pool cleaner - Plugging the cable
4
ABslot
key
CD
Plugs Type I
To plug the cable (Fig A) into the socket on the power supply (Fig. B), please do the
following:
1.Prepare the plug as seen in (Fig. C) with the key and 3 outside slots exactly as shown.
2.Fit exactly the key and the slots from cable plug with the corresponding key and slots
from the power supply socket. (Fig. D)
3.Push the plug into the socket of the power supply all the way in.
4.Once the plug is in, rotate the plug to the right to lock it into place (Fig. E).
5.To remove the plug, first rotate the plug to the left to unlock it, then pull it out (Fig. F).
Socket (B)
Cable plug (A)
slot
key
Push and rotate
right to lock
E
Rotate left and
pull to unlock
F
ABriser
key
cable
plug
CD
Plugs Type II
To plug the cable (Fig A) into the socket on the power supply (Fig. B), please do the
following:
1.Prepare the plug as seen in (Fig. C) with the key and the riser exactly as shown.
2.The riser should face up (Fig. E) in order to keep the socket cap open. The cap will lock
the cable in place.
3.Fit exactly the key with the corresponding key slot from the power supply socket.
Although the socket has 4 holes, only the top and the bottom one will be used (Fig. D)
4. Push the plug into the socket of the power supply all the way in.
power supply
socket
cable
plug
Socket (B)
Cable plug (A)
power supply
socket
key
E
cap
THIS
SIDE UP
cable
plug
power supply
socket
cable
plug power supply
socket
5
Maintenance and adjustment - Cleaning the filter
Operating the pool cleaner - Power button
a. Power LED
The blue LED flashes when the power supply is in standby mode and lights
continuously when the pool cleaner is operating.The power button switches
between ON and STANDBY
b. "POWER" button
The button switches between "ON" and "STANDBY".
IMPORTANT- After every cycle the pool cleaner will automatically go to "standby".
In case you want to turn the machine off during the working cycle, press the
"power" button once and the LED will start flashing, indicating that the machine
has stopped running.
6
4
3
12
8
7
5
Maintenance and adjustment - Changing the rolling brush
Maintenance and adjustment - Accessing and cleaning the propeller
6
1
10
5
6
4
12
CLICK
new brush
3
pump motor
4
3
2
78 9
Maintenance and adjustment - Replacing the wheel
b
c
a
6
4
3
12
8
7
5
9
7
new wheel
old wheel
8
PLEASE CHECK THE FOLLOWING BEFORE CALLING YOUR SERVICE CENTER
Before troubleshooting, the pool cleaner must be disconnected from the power supply and the power supply must be unplugged from the electrical outlet to prevent damage to the
unit and possible personal injury.
1. Unit does not pump water or move:
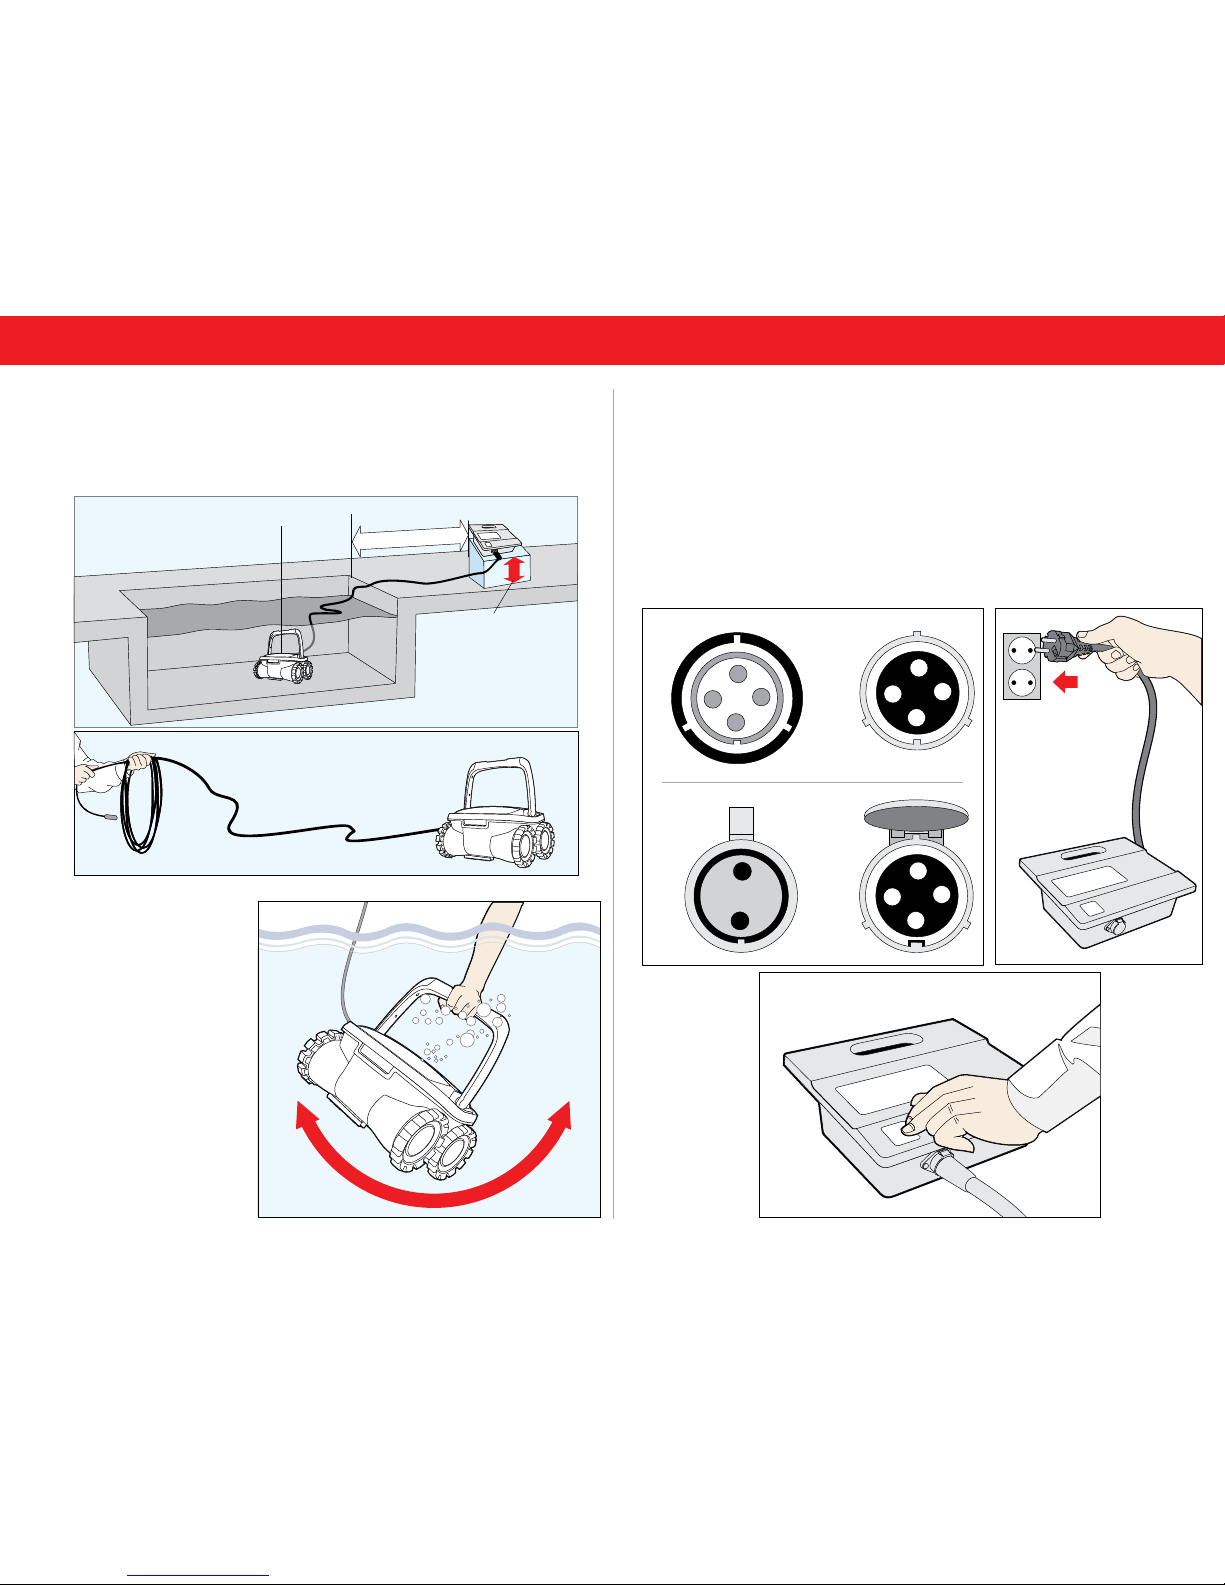
a) Check to see if electric outlet has power.
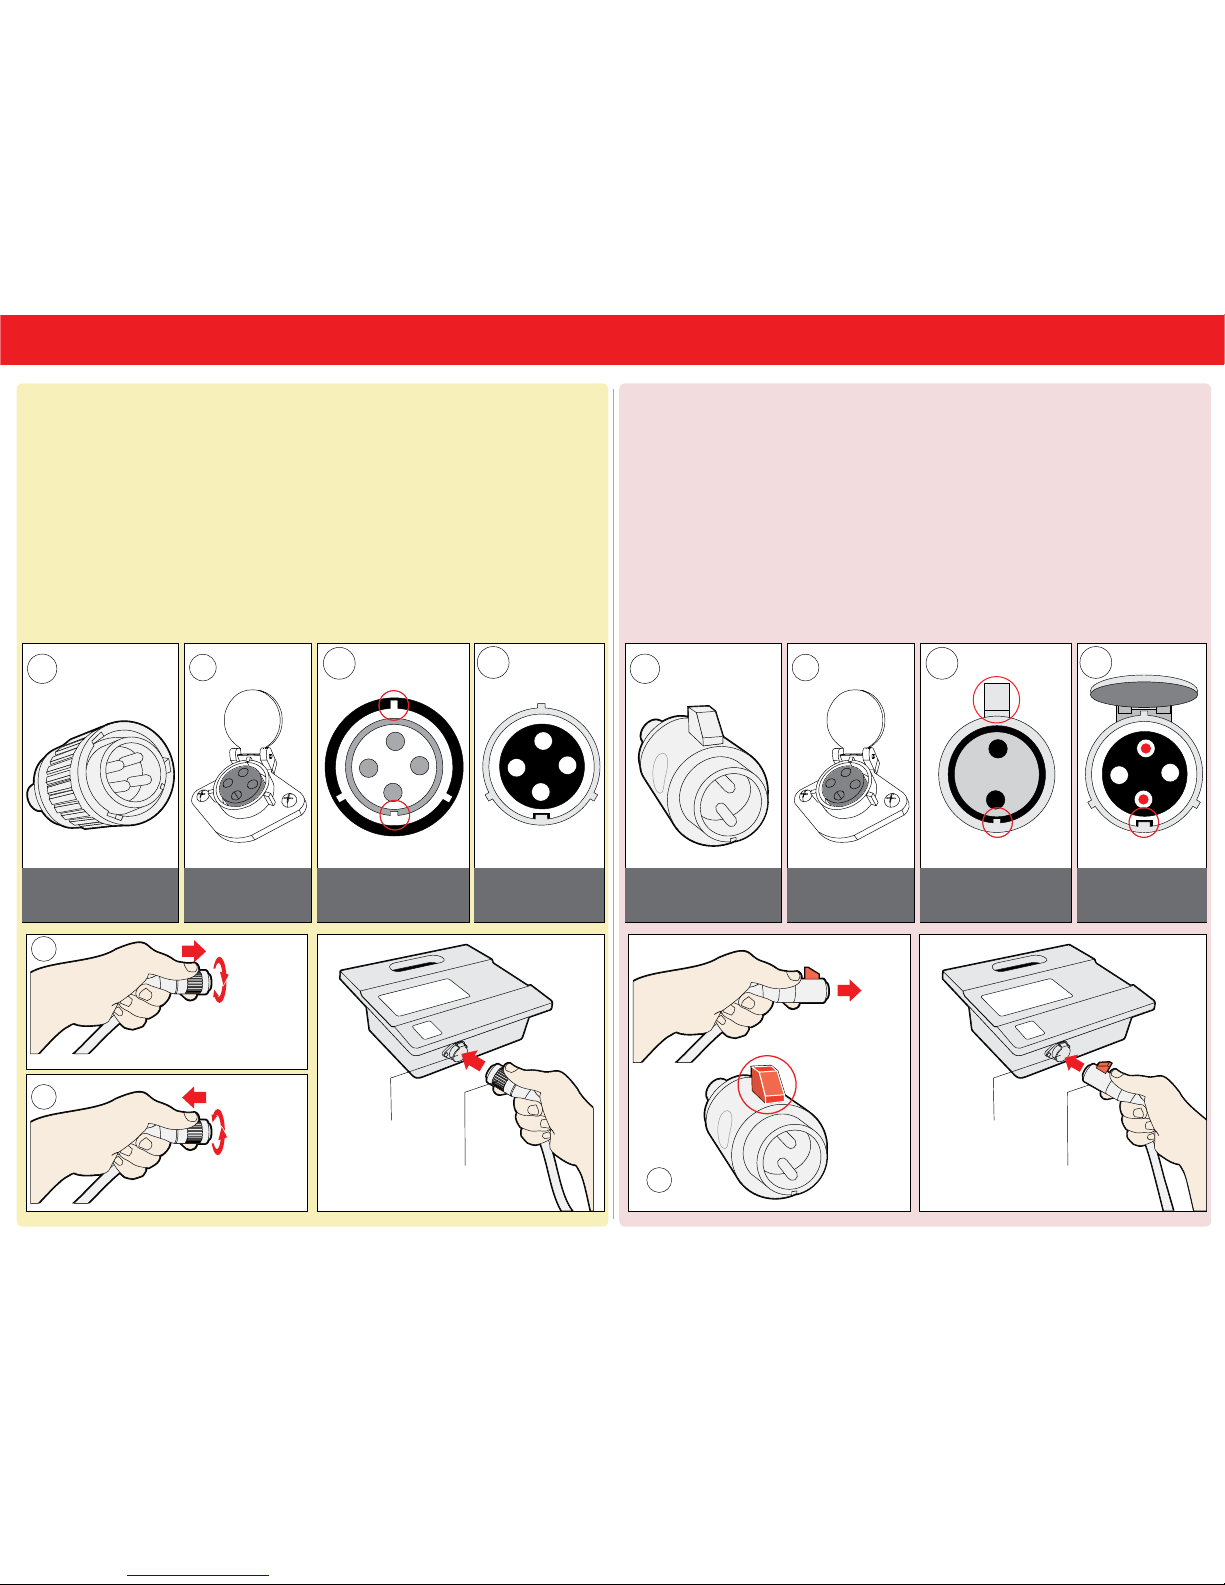
b) Check if transformer is plugged into a grounded outlet and the cable assembly
is plugged into the transformer.*
c) Switch the power supply “OFF” and “ON” a few times. Allow 45 seconds
between “ON” and “OFF”.
d) Check for and remove any debris such as hair, string, or leaves that may be
obstructing the free movement of the wheels.
2. Unit does not pump water at all, or pumps slowly but moves:
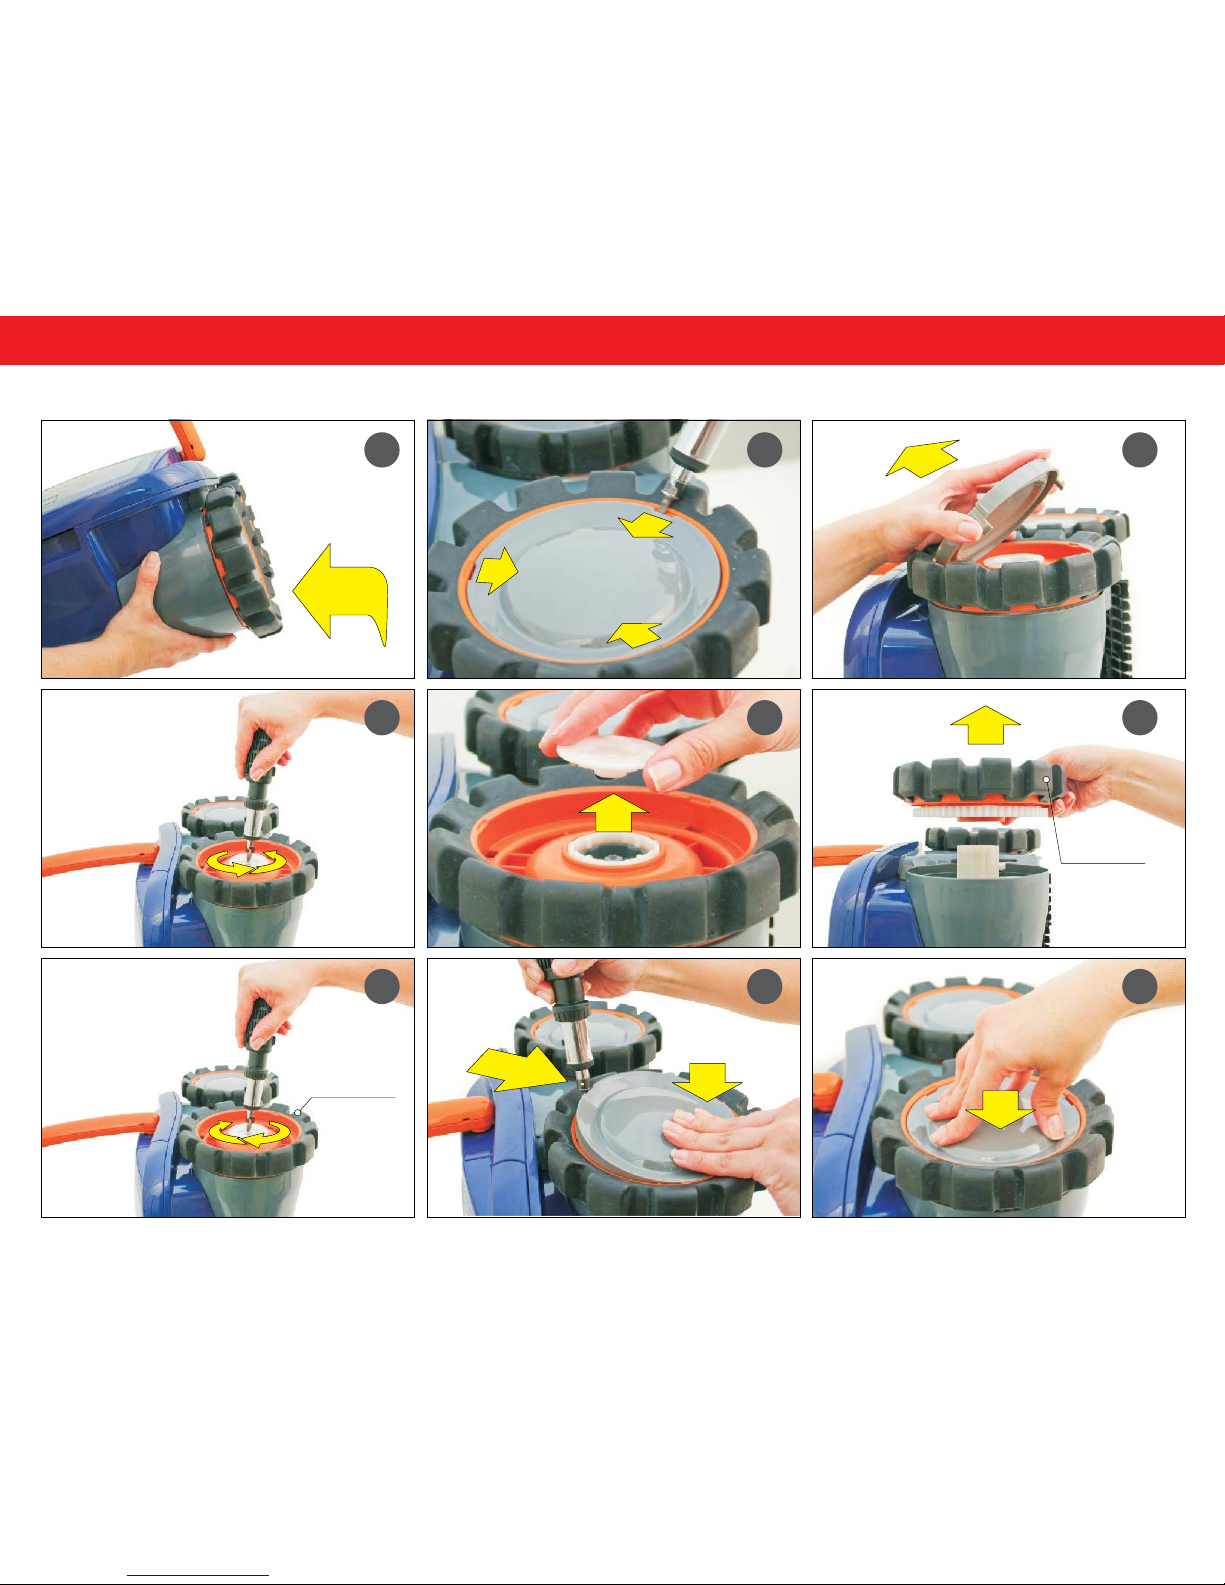
a) Check to see if propeller is seized due to accumulation of hair or debris on the
propellers. Remove the top screw on the outlet top and clean the propeller.
When reassembling the top cover, do not overtighten the screw.
b) Check to see if the filter bags are thoroughly clean. Clean as necessary.
c) If a and b are negative, check the pump motor. If they are not functioning send
the unit to your service center.
3. Unit does not move but does pump water:
a) Check to see if forward/reverse motion is obstructed by foreign matter; hair,
debris, etc. on wheels or there is an entanglement with the power cord.
b) Check the motor. If is not functioning, send the unit to your service center.
4. Unit does not pick up dirt and debris:
a) Check 2a and 2b of this guide.
b) Check the Filter Intake Valve Flaps on the underside of your unit (see image
bellow). The Flaps should move freely to open and close. Clean and free the
Valve Flaps if necessary.
5. Unit does not seem to cover the entire pool:
a) Most likely a thorough cleaning of the filter is needed.
b) Check to see that the floating cable is properly spread out and is untangled.
c) Allow the unit to run in the pool for the entire cleaning cycle.
e) Check that the Motor is operating. Please refer to the section 2 of this guide
f) After following all of the above, if there is still a problem, call your dealer for
specific additional assistance.
6. Debris Comes Out Of The Unit When Removing It From Pool
(Top Access Lid Does Not Close Properly)
a) Filter lock lever - Check that the Lock release mechanism is not damaged.
The lid edges should be aligned with the unit's body and the top filter is
properly locked.
b) Intake Valves - Check that the Filter Intake Valve Flaps (see image bellow)
move freely to open and close. Clean flaps if necessary.
IMPORTANT:
Please be sure to always keep your pool cleaner properly stored anywhere between 10
to 40 degrees Celsius (50 to 104 degrees Fahrenheit). This will keep the motors, plastics
and seals protected. Failure to comply will result in loss of warranty.
Robot can be used in water with temperatures ranging from 13°C to 35°C (55°F to
95°F). However, the recommended optimal temperature is between 22°C and 32°C
(72°F and 90°F)
Important Tips
Troubleshooting Guide
Filter Intake Valve Flaps
Shut off and unplug the power supply every time you remove the cleaner from the water.
Clean the filter bag after every cycle.
Periodically straighten out the floating cable.
Save your cleaner's packaging for off-season storage or for shipping the unit to your
dealer if service is required.
Do not leave your cleaner in direct sunlight when not in use.
Never leave the power supply in direct sunlight and avoid leaving it in the
rain.
Occasionally, you should rinse your cleaner in clean, fresh water. This will
lengthen the service life of your cleaner.

This manual suits for next models

1

Other Rainbow Pool Products Swimming Pool Vacuum manuals

Rainbow Pool Products GW7500 User manual

Rainbow Pool Products

Rainbow Pool Products GW7500 User manual

Rainbow Pool Products W5420005 User manual

Rainbow Pool Products

Rainbow Pool Products W5420005 User manual

Rainbow Pool Products RBX User manual

Rainbow Pool Products

Rainbow Pool Products RBX User manual

Popular Swimming Pool Vacuum manuals by other brands

Maytronics Dolphin S100 User instructions

Maytronics

Maytronics Dolphin S100 User instructions

Frog Pool Tender Cycler instruction manual

Frog

Frog Pool Tender Cycler instruction manual

Polaris Vac-Sweep 60 owner's guide

Polaris

Polaris Vac-Sweep 60 owner's guide

Hayward Aquabug owner's manual

Hayward

Hayward Aquabug owner's manual

Maytronics Dolphin Basic 4-UNI User instructions

Maytronics

Maytronics Dolphin Basic 4-UNI User instructions

Steinbach Poolrunner Battery Pro ORIGINAL OWNER'S MANUAL

Steinbach

Steinbach Poolrunner Battery Pro ORIGINAL OWNER'S MANUAL

Hayward Blu Important safety instructions

Hayward

Hayward Blu Important safety instructions

Hayward Navigator installation manual

Hayward

Hayward Navigator installation manual

Dolphin PROX 2 Gyro operating instructions

Dolphin

Dolphin PROX 2 Gyro operating instructions

Intex ZR200 owner's manual

Intex

Intex ZR200 owner's manual

Lincoln The PoolCleaner owner's manual

Lincoln

Lincoln The PoolCleaner owner's manual

Steinbach 061205 ORIGINAL OWNER'S MANUAL

Steinbach

Steinbach 061205 ORIGINAL OWNER'S MANUAL

Pool Blaster MAX LI CG quick start guide

Pool Blaster

Pool Blaster MAX LI CG quick start guide

Dolphin Blueline 2x2 operating instructions

Dolphin

Dolphin Blueline 2x2 operating instructions

Hozelock Vorton 11 Installation and operating instructions

Hozelock

Hozelock Vorton 11 Installation and operating instructions

Paxcess OPTIMUS HJ2052 manual

Paxcess

Paxcess OPTIMUS HJ2052 manual

WaterTech Pool Blaster PRO 900 user manual

WaterTech

WaterTech Pool Blaster PRO 900 user manual

Astral Pool QB800 owner's manual

Astral Pool

Astral Pool QB800 owner's manual

manuals.online logo
manuals.online logoBrands
  • About & Mission
  • Contact us
  • Privacy Policy
  • Terms and Conditions

Copyright 2025 Manuals.Online. All Rights Reserved.