Rainbow Pool Products GW7500 User manual

GW7500 POOL CLEANER
Code Description
GW7500 GW7500 Pool Cleaner
RAINBOW POOL PRODUCTS PTY LTD

RAINBOW POOL PRODUCTS PTY LTD
Please Read The Following Before Installing Your New Automatic Pool Cleaner!
About Safety:
This is the safety alert symbol. When you see this symbol on your system or in this
manual, look for one of the following signal words and be alert to the potential for personal
injury.
warns about hazards that will cause death, serious personal injury, or major
property damage if ignored.
warns about hazards that can cause death, serious personal injury, or major
property damage if ignored.
warns about hazards that will or can cause minor personal injury or property
damage if ignored.
Carefully read and follow all safety instructions in this manual and on equipment.
Keep safety labels in good condition; replace if missing or damaged.
Hazardous suction. Can trap and tear hair or body parts. Can cause drowning. Do not play
with cleaner or hose or apply to body. Do not let children use or play with pool cleaner. Stop
pump before attempting to clean unit. Do not allow swimmers in pool while pool cleaner is
operating.
Oscillator may injure hands or fingers. Stop pump before attempting to clean out
pool cleaner head.
Hose can trip or entangle swimmers. Do not allow swimmers in pool while pool
cleaner is operating.

RAINBOW POOL PRODUCTS PTY LTD
About Your Pool And Filter System:
Before installing your cleaner, review and understand all warnings and safety information on
the inside front cover of this manual.
PRE-INSTALLATION CHECK LIST
Before Installing The Cleaner In A Vinyl Liner Pool: Check liner closely for signs of
deterioration or damage from age, chemicals, pool wall damage, etc. If any damage is found,
have a qualified pool professional make all necessary repairs. Also, if there are stones, roots,
etc., under the liner, remove them before installing the cleaner.
Before Installing The Cleaner In A Gunite Pool Or A Pool That Is Partially Or Completely
Tiled: Repair loose tiles and tighten any loose light rings.
Before Installing The Cleaner, Clean Your Filter System: Make sure you have cleaned the
filter, including backwashing, rinsing, and emptying all baskets. A clean system is necessary
for proper cleaner operation and coverage.
Before Installing The Cleaner, Fill The Hose With Water:
Always make sure the cleaner head is submerged and the hose is full of water before
connecting the hose to the filtration system (whether through a skimmer or dedicated wall
fitting). Air in the system can damage the pump through dry running and overheating. Before
installing the cleaner, understand cleaner coverage: The cleaner is designed to rid your pool
of debris in approximately 4-6 hours. Less time could be needed, depending on the pool size.
The cleaner was not designed to automatically clean steps or swimouts or to work under a
solar cover. It was also not designed to do initial cleanup for a new pool or when opening your
pool for the season.
Suction entrapment, injury, and drowning hazard. If your pool has a dedicated
suction port (“vac port”) for vacuuming or for an automatic pool cleaner, it must be covered
when not in use. Purchase a spring loaded safety cover from your local pool store and install
it on the suction port to prevent entrapment and injury. The cover should conform to IAPMO
SPS4-99A.

ASSEMBLY
1. Remove the PoolShark® and all of its parts from the box and check to make sure that all
the parts and components were included (see Figure 1).
2. Dampen the female end of the short leader hose section with water and connect it to the
swivel of your PoolShark.
3. Connect together as many hose sections as are needed to reach from your selected
vacuum source (dedicated vacuum line or skimmer) to the far side of the pool, plus one
section (see Figure 2). Save any extra sections for future use as replacements.
4. Attach one end of the hose assembly to the short leader hose, which is already connected
to the PoolShark.
5. Attach one hose weight to the third cuff from the cleaner head. If your pool depth is over
six and onehalf feet it may be necessary to add a second hose weight to the fifth cuff from
the PoolShark.
Notice: Clean your filtration system and empty out all leaf baskets BEFORE you begin
installation.
RAINBOW POOL PRODUCTS PTY LTD

Hose must equal longest stretch — — plus one length.
Add one hose weight to the third cuff from the PoolShark
Measure hose against pool length.
INSTALLATION
The PoolShark is designed to work in a wide variety of swimming pools. Both standard
in-skimmer installations and dedicated vacuum line installations are covered in this manual.
Check to see which installation most closely fits your pool configuration and follow those
instructions. Standard Skimmer Installation (See Figure 3)
Notice: Do not use the Regulator Valve cover when installing the PoolShark in a skimmer. The
cover can clog with leaves and debris which may damage the pump.
1. Close the main drain and all suction lines except the line from the skimmer to which you
are connecting the PoolShark.
2. Turn off the main circulation pump.
3. Remove the skimmer basket.
4. Install the reducer cone in the skimmer.
5. Place the PoolShark (with the Hose Assembly attached) in the pool with the bumper facing
downward. Tilt it from front to back and from side to side to purge all the air from the
inside of the cleaner body.
6. Allow the PoolShark to sink to the pool floor. While holding the free end of the hose, feed
the hose down into the pool until it is completely filled with water and purged of air.
7. Attach Regulator Valve #1 (without the Regulator Valve Cover) to the hose end. Insert
Regulator Valve #1 (with hose attached) into the skimmer throat and push it into the
Reducer Cone.
Do not install protective cover when the Regulator Valve is connected to a Skimmer.
RAINBOW POOL PRODUCTS PTY LTD

Dedicated Vacuum Line Installation
Hose
End
Regulator
Valve
Protective
Basket
Shor t
Extension
Hose
Male-male
Adapter
Use Protective Basket to prevent entrapment when the Regulator Valve is connected to
a Dedicated Vacuum Port.
1. Close the main drain and all suction lines except the one to which you are connecting the
PoolShark.
2. Turn off the main circulation pump.
3. If necessary, insert the Reducer Cone into the dedicated vacuum line port.
4. Place the PoolShark (with the Hose Asembly attached) in the pool with the bumper facing
downward. Tilt it from front to back and from side to side to purge all the air from the
inside of the cleaner body.
5. Allow the PoolShark to sink to the pool floor. While holding the free end of the hose, feed
the hose down into the pool until it is completely filled with water and purged of air.
6. Attach Regulator Valve #1 (with the Regulator Valve Cover) to the hose end. Insert
Regulator Valve #1 (with hose attached) into the short extension hose. Insert the short
extension hose into the male-male adapter and the entire assembly into the dedicated
vacuum line port.
Initial Adjustments And Operational Checks
1. Purge remaining air:
After completing the installation turn the main circulation pump on. Allow it to run for a
couple of minutes to purge any remaining air from the system.
2. Check/Adjust Suction:
1. If you have not already done so, clean the filtration system (including backwashing, if
that is appropriate to your system).
2. If you have not already done so, close the valve controlling the flow through the main
drain in the floor of the pool.
3. Adjust the pool circulation system valves to provide a sufficient flow of water to your
Skimmer or Dedicated Vacuum Line (whichever you have decided to use).
4. To determine whether or not you have the suction correctly adjusted, look at the Regulator
Valve and make sure that the Yellow Band is half covered by the edge of the sleeve (See
Figure 5). Operation within the Yellow Band indicates the best suction adjustment for good
cleaner performance.
RAINBOW POOL PRODUCTS PTY LTD

Low or No
Suction
Correct
Suction
Suction too
High
Suction Regulator Sleeve positions.
NOTICE: If the skimmer does not allow you to see the Yellow Band on the Regulator, the
following TEMPORARY procedure will let you check the suction:
1. Turn off the Pump.
2. Detach the Regulator Valve from the skimmer’s suction inlet.
3. Insert the Regulator Valve in the joint between the last and the next to the last sections of
hose.
4. Reconnect the hose to the skimmer.
5. While a helper holds the regulator under water (so that it won’t suck air – see Figure 6),
Turn the pump on and make the valve adjustments described in Steps 2 and 3 (Page 4).
Hold regulator under water to observe sleeve position.
6. When you have finished the valve adjustments, stop the Pump, reconnect the hoses, and
replace the Regulator in the skimmer.
Do you have enough vacuum on the system for good operation?
1. If you have not already done so, clean the filtration system (including backwashing, if that
is appropriate to your system).
2. If your system is clean and the cleaner still performs sluggishly, try inserting Regulator
Valve #2, which is designed for use with weaker pumps, longer hose lengths, or low
suction situations. The installation of Regulator Valve #2 is the same as the installation of
Regulator Valve #1. See “Installation”, Page 3.
Notice: After you have installed Regulator Valve #2, adjust the circulation system valves as
described in Steps 3 and 4 (Page 4).
RAINBOW POOL PRODUCTS PTY LTD

Do you have too much vacuum?
You have too much vacuum if the PoolShark sucks air when it climbs up to the water line.
Check to be sure that you have installed Suction Regulator Valve #1. If not, install it now. If
the PoolShark still climbs out and sucks air, do the following:
1. If you are connecting the PoolShark to the Skimmer, slightly open the main drain valve.
2. If you are connecting the PoolShark to the Dedicated Vacuum Line, slightly open the
skimmer intake valve.
3. Check the hose length:
The main circulation pump must be running when you check the hose length. The hose
contracts when the pump is on and will look longer when the circulation pump is off or the
hose is disconnected from the system. Position the PoolShark at the furthest point of the pool
from the skimmer or dedicated suction port. The hose should be long enough to reach this
distance, with one hose section over. If your hose is more than one section longer than the
distance to the furthest point of the pool, remove the extra section(s) from the end of the hose
at the vacuum port or skimmer. Save these extra sections for future use as replacements.
4. To install the eyeball diverter:
The water flow from the return line can push the PoolShark’s hose, causing the PoolShark
to steer away from the return line or to remain in one area of the pool. To correct this, adjust
your existing return line diverters or install the eyeball diverters supplied with the PoolShark
as follows:
1. Turn off the main circulation pump.
2. Unscrew the lock rings from the pool’s return line fittings and remove the original eyeball
diverters.
3. Replace them with the PoolShark’s eyeball diverters.
4. Replace the lock rings and tighten them. Be sure that the openings of the eyeball diverters
point down or to the side (9:00 O’clock position), before fully tightening the rings. Usually,
directing the return line water flow against the side of the pool (as described above) works
best. However, you may want to try pointing the flow downward or in different positions to
see which works best in the pool. After installing the eyeball diverter, turn the circulation
pump on. The PoolShark should begin moving across the pool floor, vacuuming up the
debris in its path.
5. If the PoolShark’s eyeball diverters do not fit your existing return line fittings, adjust your
existing fittings as best you can as described above.
RAINBOW POOL PRODUCTS PTY LTD

Maintenance
Hazardous suction. Suction through the PoolShark can entrap bathers, causing
severe injuries or drowning. Do not operate the PoolShark cleaner while people are using the
swimming pool. Do not allow anyone to play with the PoolShark or its hoses.
Your PoolShark can stay in the pool at all times except during chemical shock treatments.
However, when people are using the pool, disconnect the PoolShark and pull it to one side of
the pool.
The PoolShark requires almost no maintenance. Manually open and close the regulator valve
from time to time to flush away accumulated dirt and debris and ensure smooth operation.
Also, from time to time, visually inspect the PoolShark to be sure that:
• The oscillator moves freely and is not obstructed by debris.
• The vacuum pad is not excessively worn. When the traction pads on the bottom have worn
down, it’s time for replacement.
Notice: When storing the PoolShark, do not coil the hose. Instead, lay it out straight and flat
in an area protected from direct sunlight. Use only a genuine PoolShark hose. The warranty is
void if the cleaner is operated with other than a genuine PoolShark hose.
Troubleshooting
Common Causes of Cleaner Problems:
• Dirty filter
Clean the filter
• Dirty basket in pump hair and lint strainer
Clean the basket
• Debris blocking the bottom of the PoolShark
Remove the Debris
• Leaks in the hose
Remove the leaky section
• Debris in the regulator valve
Clean the regulator valve
• Low vacuum through the cleaner
Close the main drain
Poolshark Doesn’t Move Or Pulsates Slowly:
• Make sure that the main drain and all other suction lines are closed except the suction line
to which the PoolShark is attached.
• Check for debris in the filter or the pump strainer basket.
• Check for debris in the PoolShark’s oscillator. Debris may prevent oscillator movement or
restrict the flow through the cleaner.
• Check the oscillator for: damage; lost seals (there should be 4 seals): obstructed seals
(seals should slide freely on the oscillator).
• Be sure that the short, soft leader hose section is the first section in the hose assembly
(next to the cleaner).
RAINBOW POOL PRODUCTS PTY LTD

If the PoolShark tracks in a repetitive pattern:
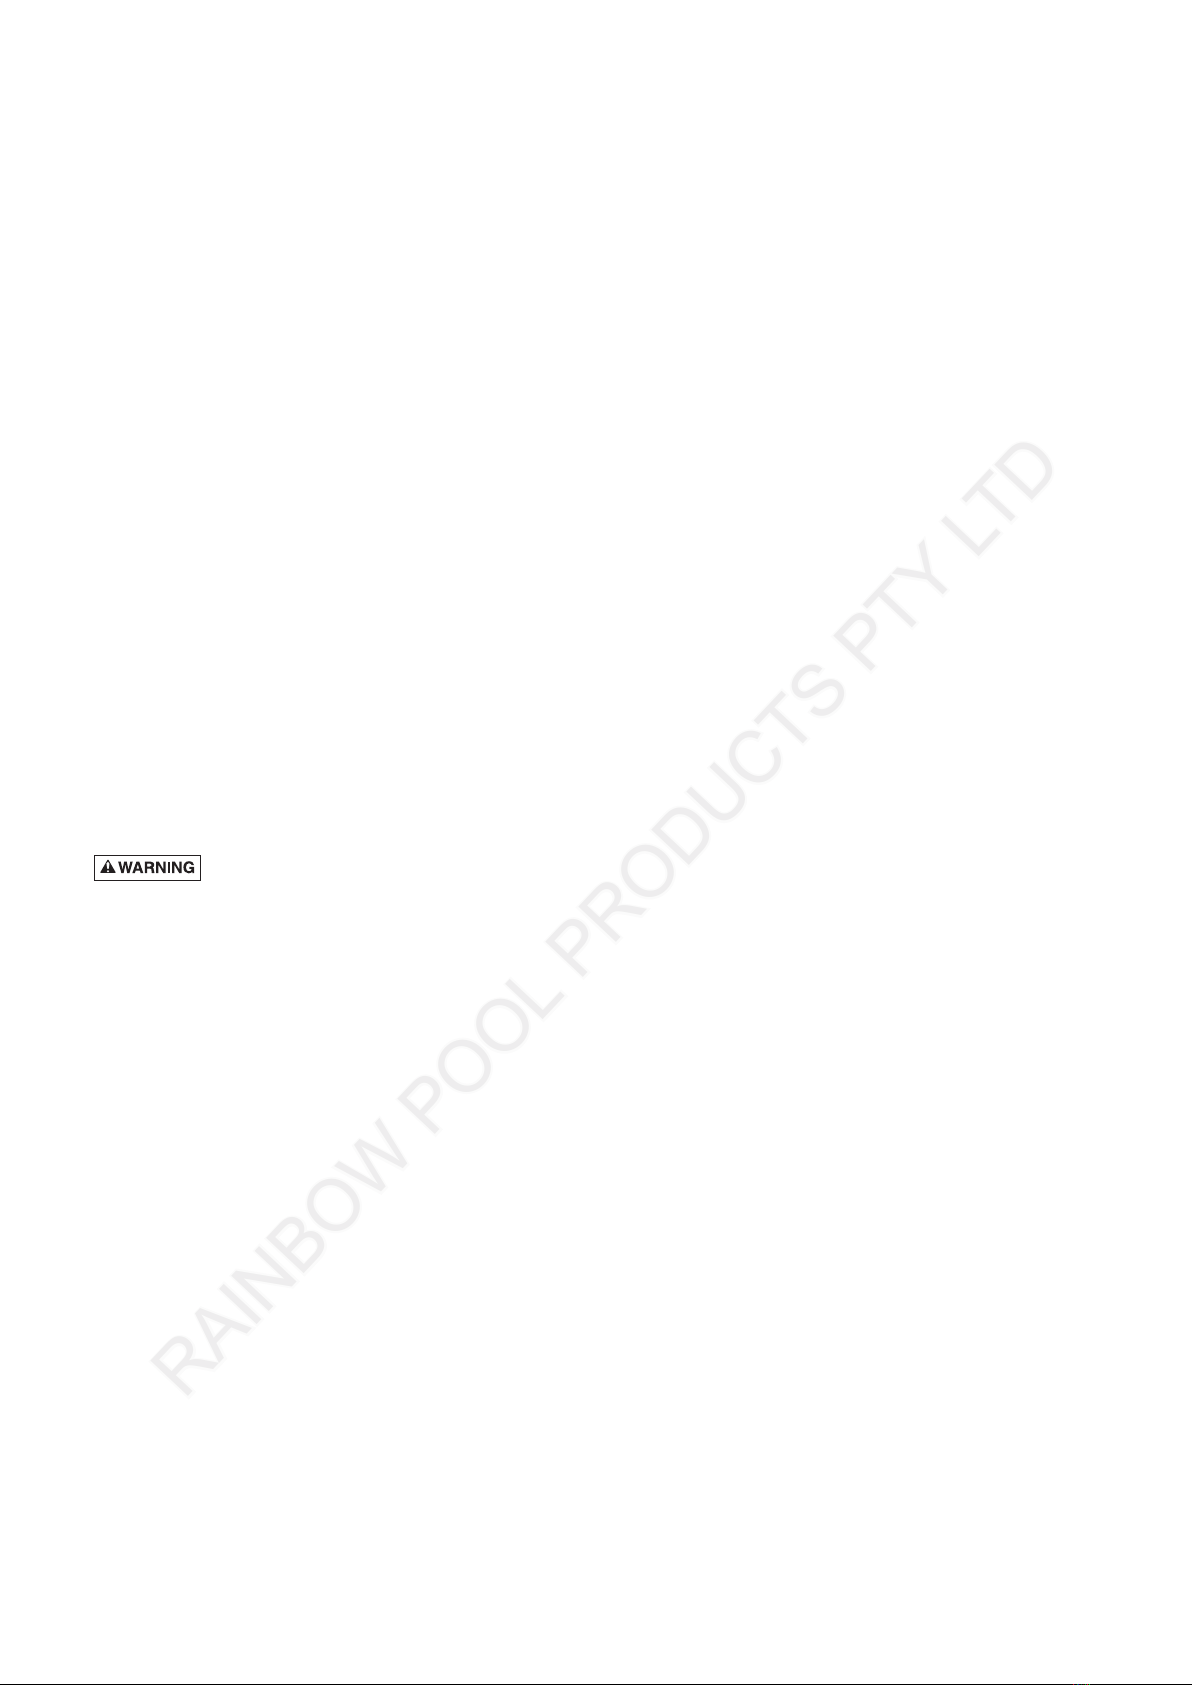
• Check the pool return line water flow and redirect it as necessary with a return line
eyeball diverter (see No. 4, “To install the eyeball diverter”, under Initial Adjustments and
Operational Checks, Pages 4 and 5).
• Check the PoolShark’s hose to be sure that it has not become bent or kinked. Do not coil
the hose, as it will retain the coiled shape and reduce the cleaning coverage. To check the
hose, lay each hose section flat on the pool deck (or another flat surface) and look down
the length of the hose. It should be perfectly flat and straight. Replace any sections which
are bent or kinked.
• Check the oscillator for: damage; lost seals (there should be 4 seals): obstructed seals
(seals should slide freely on the oscillator).
• Be sure that the short, soft leader hose section is the first section in the hose assembly
(next to the cleaner).
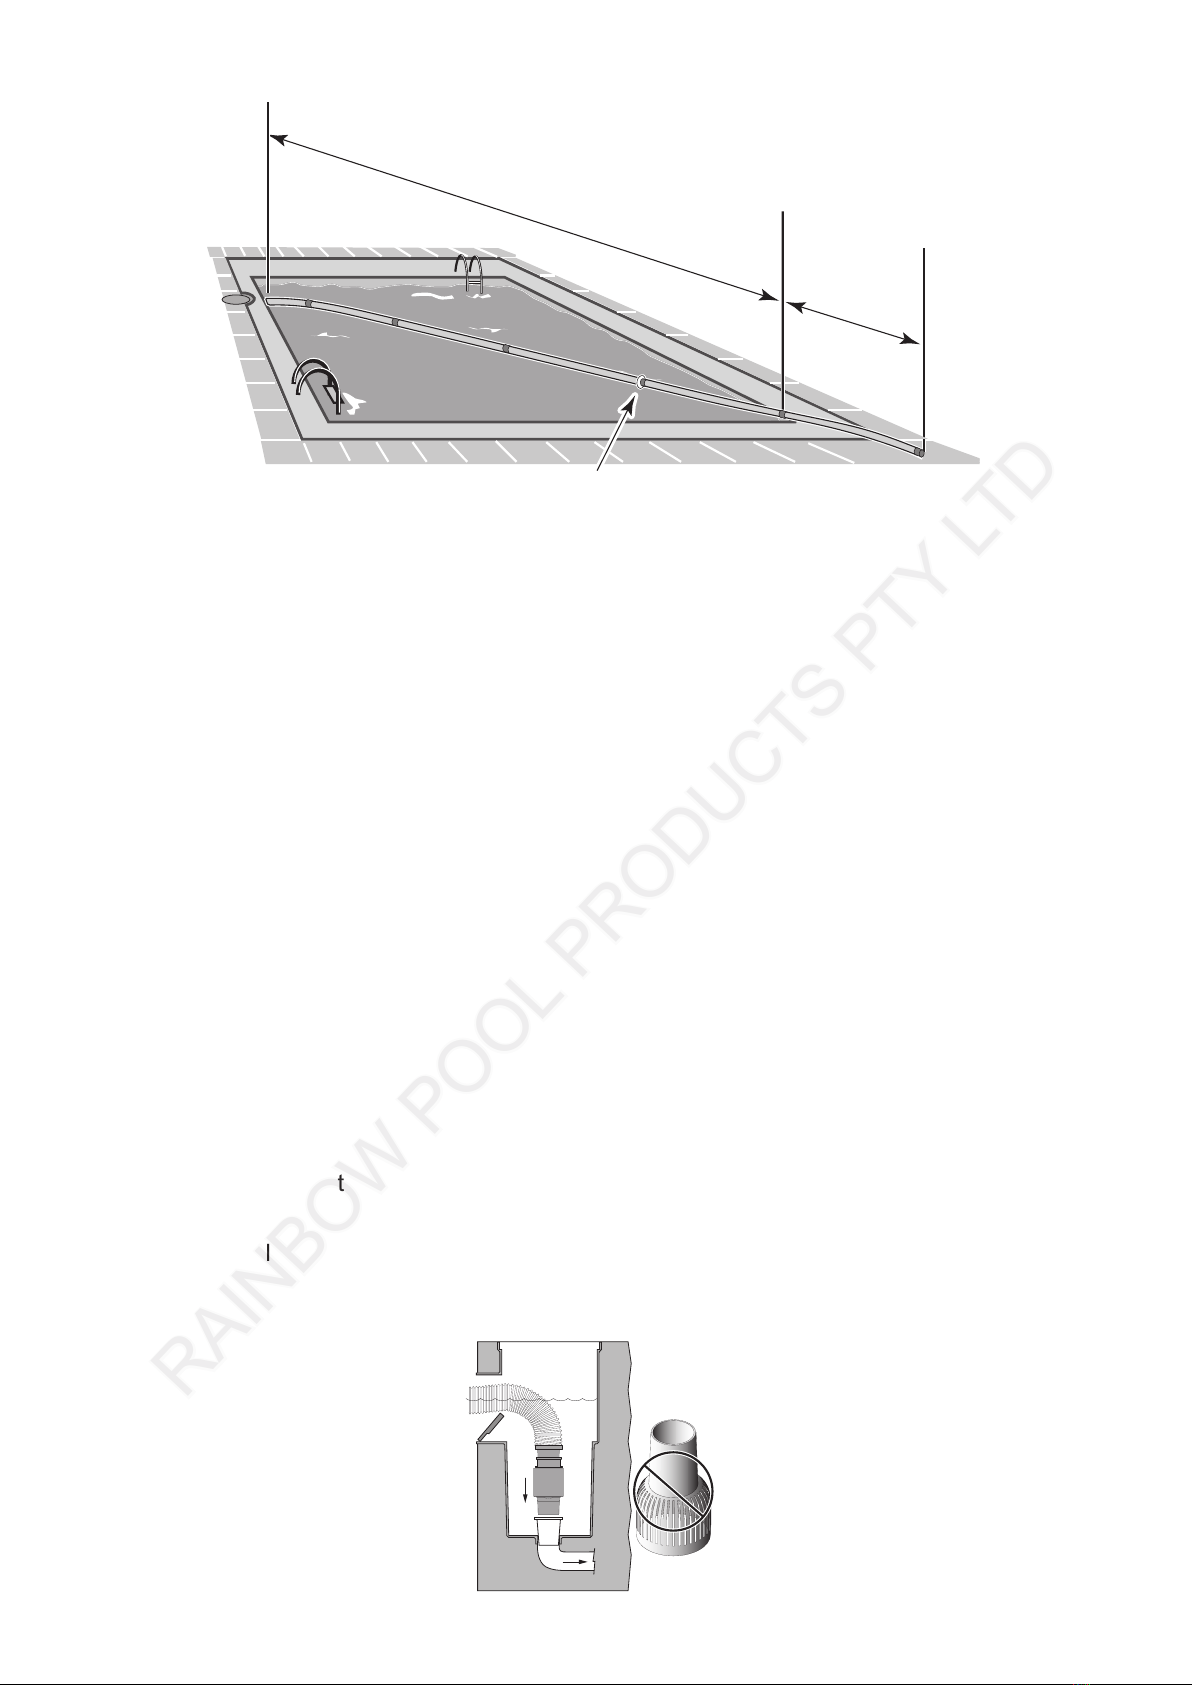
Square Bottom Pools Only: If the transition radius between your pool’s floor and wall is
small and the PoolShark will not climb the pool walls, then you have a square bottom pool. If
so, remove the cleaner from the pool and drill two holes in the indentations in the bumper (see
Figure 7). This will provide an outlet for air which would otherwise accumulate in the hollow
bumper. This air, from microscopic bubbles suspended in the pool water, is normally able to
escape when the PoolShark climbs the pool walls.
3899 0201
Drill Bumper if you have a square-bottom pool.
Notice: DO NOT drill the holes if your PoolShark CAN climb the pool walls!
Pool pump suction is hazardous and can cause entrapment with severe personal
injury or drowning. Use vacuum regulator (see instructions below) in pool cleaner system at all
times.
Notice: Each pool’s hydraulic system and vacuum connections are different. Be sure you
have installed the vacuum regulator valve before you “fine-tune” the system. This not only
regulates vacuum, but also acts as a safety device.
About “Fine-Tuning” Vacuum Adjustments And Connections
Suction entrapment, injury, and drowning hazard. If your pool has a dedicated
suction port (“vac port”) for vacuuming or for an automatic pool cleaner, it must be covered
when not in use. Purchase a spring loaded safety cover from your local pool store and
install it on the suction port to prevent entrapment and injury. For the “Novice Pool Owner”
where vacuuming is a new experience, please read all of the following points, the installation
instructions, and the trouble shooting guide carefully.
Please Note The Following:
“Vacuum” and “suction” are two words meaning the same thing.•
“Dedicated suction line”, “vac port”, and “vac fitting” are different terms for a hole in•
the side wall of pool; this hole is connected to the pump suction and is dedicated to
vacuuming.
RAINBOW POOL PRODUCTS PTY LTD

Some pools do not have a vac port. If your pool does have one, please read the “Suction•
Entrapment” warning, above. For the “SEASONED POOL OWNER”: The automatic pool
cleaner connection and vacuum adjustments can be similar to using your manual pool
vacuum. Please read on.
Valves (Pump, Skimmer, And Main Drain) And Vacuum Adjustments
You may need to spend some time adjusting the skimmer and main drain valves in order
to obtain the best vacuum setting for good cleaner operation. Once you have found the
correct valve settings for best operation, we suggest you mark the valves to ensure repeated
success.
In-Line Leaf Canisters
If your pool is exposed to large quantities of leaves, we suggest purchasing and installing an
in-line leaf canister. A leaf canister will provide more debris-loading capacity and also provides
a water by-pass when the canister is full. It is very important that the pump not starve for
water!
Dedicated Suction Line/Vac Port/Vac Fitting
Vac
Port
Typical Dedicated Vacuum Port.
Some pools have a dedicated wall fitting just for vacuuming. If the wall fitting connection is
used, you may notice that the clear pump lid shows signs of bubbles or what appears to be
the presence of air. To eliminate this, slightly open the main drain valve to supplement the
water intake. The cleaner may slow down a bit when you change the suction.
Skimmer vac plates
Some pool owners connect the hose to a skimmer vac plate, which allows the skimmer basket
to remain in the skimmer. If this method is used, empty the basket frequently. Also make sure
that the vacuum regulator provided is completely submerged so that it will not suck air and
damage the pump.
Skimmer vac plate vacuum control adjusters
Some pool owners use one of a variety of manufacturer’s skimmer vac plates. Some have
a vacuum control adjuster, and some do not. The adjuster could be a screw-type, a spring
loaded apparatus, or a dial design. For those vac plates with adjusters, it is important to adjust
them when fine tuning the vacuum for the cleaner.
RAINBOW POOL PRODUCTS PTY LTD

Step 1: With a screwdriver, carefully work the
rubber vacuum pad down over the lip of the
Outer Housing.
Step 4: Pull the Oscillator Straight out from the
bottom of the Outer Housing. Be careful not to
lose the Sliding Seals.
Step 2: Lift the Outer Housing straight up
off of the chassis. Squeeze the tabs on the
Bumper Clips (inside the housing) to remove
the Bumper. The Bumper, Bumper Boots, and
Bumper Clips pull apart.
Step 3: Squeeze and pull the Sprocket Clips
to release the Drive Shaft Assembly and
Center Sprocket.
Step 5: Squeeze the latching tabs and pull
up on the Swivel Housing and Swivel. The
assembly will come up, releasing the Swivel
Sprocket. Squeeze the latching tabs to remove
the Clutch Clip.
Step 6: Remove the Shaft Plug with the
stainless steel shaft and the Large Steering
Drive Assembly.
RAINBOW POOL PRODUCTS PTY LTD
3900 0201
Disassembly
Disassembly
3901 0201
3904 0201

Step 7: Remove the Oscillator Sleeve,
releasing the Oscillator Sleeve Bushing, the
Clutch assembly, and the Teflon Washer.
Reassembly: To reassemble the PoolShark,
reverse the steps above. NOTE: The notch
on the center disk of the Large Steering
Drive Assembly must be down (as shown) for
assembly.
RAINBOW POOL PRODUCTS PTY LTD
3906 0201
3907 0201
Table of contents
Other Rainbow Pool Products Swimming Pool Vacuum manuals
Popular Swimming Pool Vacuum manuals by other brands

Dolphin
Dolphin Explorer Top 9 User instructions

Zodiac
Zodiac Baracuda G3 owner's manual

WaterTech
WaterTech POOL BUSTER use and care manual

WaterTech
WaterTech Pool Blaster Leaf Demon Operator's manual

R/Evolution
R/Evolution Revolution l operating instructions

PondXpert
PondXpert PondMaster PXVACMASTER-NS instruction manual