Rainbow MPA 5.420 Service manual

1
Installation instruction for
IQ Line amplifier
MPA 5.420 4 x 70 watt + 1 x 140 watt art.no.: 271021
Please read carefully the installation instructions before you start installing the amplifier!
Audi Teile Team GmbH – P.O. Box 12 25 – 74899 Bad Rappenau
Phone +49-7264-9163-0 – Fax +49-7264-9163-50

2
Technical specifications MPA 5.420
• Power amplifier with integrated high current-MOSFET-switch-mode power supply.
• Amplifiers in antiphase for power doubling at mono-bridge connection.
• Symmetrical Preamplifier inputs dissymmetrical for optimal noise suppression.
• Operational mode controller from 2-channel-car radio to 5-channel-amplifier operation.
• Separated input level controls for front and rear, infinitely adjustable.
• Active high- and low pass, as well as Subsonic-filter and phase shifter.
• Parametrical equalizer for adaptation of the frequency response to the car specific vehicle
conditions.
• Reversible disconnection cut-off with thermal protection.
• Cut-off protection at direct current and short cut on the loudspeakers.
• Soft start Remote-Muting for suppression of the switch-on peaks.
• Conforming to standard ISO-DIN loudspeaker connections.
• High-Tec assembly in SMD-construction with low coupling bar function.
• Noise immune due to officially approved new „e“ standard and CE certificate.
Technical dates MPA 5.420
Total output 4 x 70 watt + 1 x 140 watt on 4 Ω
Front output 2 x 40 watt rms on 4 Ω
Rear output 2 x 40 watt rms on 4 Ω
Front and rear bridged output 2 x 80 watt rms on 4 Ω
Output Subwoofer 1 x 80 watt rms on 4 Ω
Total harmonic distortion 0,065 % (1kHz / 1 watt)
Signal-to-noise-ratio 97 dB / A-assessment
Transmission range – 3 dB 20 Hz – 30 kHz
Input sensitivity Line Input 300 mV – 5 V
Input sensitivity High Level in 4 V – 10 V
Connection impedance each channel 4 Ωand 8 Ωpossible
Rated voltage 11 V – 16 V DC
Power consumption max. 28 A (5 channels on 4 Ωeach)
Short-cut protection / Overload Immediate disconnection
Temperature monitoring heating 85°C disconnection (<60°C switch on)
Aerating start temperature 45°C – 50°C automatically switch-on
Soft start-Muting on/off 2s switch-on delay
Dimensions: b x h x d 174 x 160 x 46 mm
Weight 1,8 kg
Approval number e 13 020630 and CE
Active controls:
High-pass front and rear 60 Hz – 360 Hz adjustable, 12 dB/Okt.
Low-pass subwoofer 62 Hz – 143 Hz adjustable, 12dB/Okt.
Subsonic filter subwoofer 18 Hz – 3 dB stable, 24 dB/Okt.
Bass boost subwoofer 65 Hz – 100 Hz, infinitely adjustable up
to +12 dB
Phase shifter subwoofer 0°, 90°, 180° adjustable
Parametric equalizer front 480 Hz – 1.100 Hz adjustable, -/+ 12 dB
adjustable
Parametric equalizer rear 180 Hz – 420 Hz adjustable, -/+ 12 dB
adjustable.

3
Front- and rear view with operating elements MPA 5.420
Picture 1:
1= Operational check: LED green, amplifier is operating.
2= Fuse with 18 channels „Hi-Level In-Outputs“: High Level input, as well as loudspeaker outputs.
Cable connection:
Lilac= right rear
Grey= right front
White=left front
Green=left rear
3= Switch „2/4 channel“: Accommodation of the amplifier to the number on the car radio existing
outputs.
Switch not pressed: For connection of 4-channel-car radio (front/rear)
Switch pressed: For connection of 2-channel-car radio (only front)
4= jack „front“ and „rear“: Low Level input with chinch jacks.
Picture 2:
5= Fan: automatical start at 45°C – 50°C. Attention: Don’t uncover the fan protection.
6= 8-channel jack: Power- and Remote connection.
Cable connection:
Red = positive pole (+)
Black = mass (-)
Blue = remote

4
Installation MPA 5.420
Fix the amplifier on a suitable, well-aerated place in the vehicle with the included scotch tape. The
heating of the amplifier can reach a very high temperature; enough space to high temperature
sensible elements is absolutely necessary.
Attention: Disconnect the negative pole of the battery before you start with the installation work.
Our products are only suitable for users with the necessary professional installation knowledge and
can only be carried out very carefully according to the relevant safety regulations.
Power supply and remote MPA 5.420
Put the reverse pole protection plug in the included 8-channel connection cable of plug (6) and press
strongly until it will plug in.
• Connect the red cable (cross section of 4 mm²) directly to the positive pole (+) of the battery
or to the central positive point of the Hifi system. Please pay absolutely attention that the
power cable is protected with a 25 A fuse.
Should the cable length of 2 m not be enough, then you have to lengthen the cable with a
cable of the same cross section. Isolate the connecting point very well.
• Connect the black cable with (cross section of 4 mm²) directly to the car body, on a blank
point without colour and protection lacquer, or on the central mass point of the car hifi
system.
The connection of the cable directly to the negative pole of the battery is due to possible
interferences not advisable.
• Connect the blue cable to the remote clamp of the car radio.
When switching on or off the car radio, the amplifier will be switched on/off through a Soft-
muting-switcher with a time delay of 2 seconds.
Switch-on- / function control through LED MPA 5.420
The switch-on of the amplifier will be signalised by a LED (1). The amplifier will operate with a
time delay of 2 seconds. Due to this soft start, an uncontrolled excursion of the loudspeakers will be
oppressed when switching on the loudspeaker.
In case of a critical under impedance (< 4Ω) or complex burden, short cut on the loudspeaker
outputs, direct current on the loudspeaker voice coils, as well as overheating with too high heating
temperatures, the surveying electronic will switch off the amplifier immediately.
After the interference has been removed, the amplifier can be activated again with repeated on/off
switching.
Has the amplifier been switched off due to overload and too high heating temperature (85°C), then
the amplifier will operate again after having cooled down to 65°C.
The frequent disconnection due to thermal reasons will be the result of a wrong chosen installation
place, which can be replaced by a well-aerated place.

5
Connection of the amplifier MPA 5.420
Plug the reverse pole protection plug (white) of the included 18-channel cable into the jack (2) and
press down, until it will plug in.
Connection of the car radio to the amplifier MPA 5.420
The „MPA 5.420“ amplifier offers two connection possibilities for the car radio:
1. Connection with chinch cable on „Low Level“ input.
2. Connection with ISO-plug on „High Level“ input.
The first possibility should be preferred due to the much better signal quality.
Attention: Choose only 1 connection possibility. Don’t accumulate two inputs at the same time!
Connection „Low Level In“ MPA 5.420
• Car radio with 4-channel output (4 chinch plugs):
Feed the output signal of the car radio with chinch cables on the chinch jacks „Rear“ and
„Font“ (red=right, white=left). The plug must be pressed in this operational mode (3).
• Car radio with 2-channel output (2 chinch plugs):
Is no 4-channel-output available on the car radio then you have to feed the signal only on the
„front“ chinch plugs (red=right, white=left). The plug (3) must be pressed in this operational
mode.
The input level will be controlled with the potentiometers „Front Level“ and „Rear Level“ on the
bottom side of the amplifier from 300 m V (max.) to 5 V (min.). The inputs need the lowest input
voltage of 300 m V at right side striking (max.) of the potentiometer. The potentiometer will also
keep its function if the switch is pressed.
Attention: When using different chinch cable lengths, then a potential loss may result. Due to this
difference in length, a mass loop will be built to zero potential, which may cause uncomfortable
generator interferences.
Don’t lay the chinch cables parallel to the power supply cable in order to avoid interference
capacitance.
Connection „High Level In“ MPA 5.420
• Car radio with 4-channel-output (ISO):
Connect the reverse pole protection ISO-plug of the included 18-channel connection cable
with the loudspeaker-ISO-jack of the car radio. The switch (3) must not be pressed in this
case!
• Car radio with 2-channel-output (ISO):
Connect the reverse pole protection ISO-plug of the included 18-channel connection cable
with the loudspeaker-ISO-jack of the car radio. The switch (3) must be pressed in this
operational mode.

6
The input level will be controlled with the potentiometers „Front Level“ and „Rear Level“ on the
amplifier bottom side from 4 V (max.) to 10 V (min.). The inputs need the lowest input voltage of
4 V at right side striking (max.) of the potentiometer. The potentiometer „Rear Level“ will keep its
function also at pressed switch (3).
Attention: The High Level Signal of the car radios is compressed in the frequency response. The
sound reproduction is deeper and is covered with noise. Excellent high pitch reproduction is missing.
In order to achieve an optimal and noise free adaptation, the potentiometer „Front Level“ and „Rear
Level“ should be adjusted in order that at 1/3 of the loudness level on the car radio the maximum
loudness will be achieved. This adjustment allows a distortion free reproduction through the car
radio amplifiers, since they can still work in the distortion free area.
Loudspeaker connection: Front and Rear MPA 5.420
The loudspeaker systems will be connected with the ISO-cable form in the vehicle onto the ISO-jack
of the included 18-channel connecting cable.
Should no cable form be available in the vehicle, then a corresponding adapter cable with ISO-plug
must be prepared. The connection of the ISO-jack will be shown in picture 3. In addition all
conductors of the 18-channel connection cable are marked clearly, in order that there should occur no
problems in the production.
Picture 3: Connection of the ISO-jack
1 = loudspeaker behind right +
2 = loudspeaker behind right -
3 = loudspeaker front right +
4 = loudspeaker front right -
5 = loudspeaker front left +
6 = loudspeaker front left -
7 = loudspeaker behind left +
8 = loudspeaker behind left –
Loudspeaker connection: Subwoofer MPA 5.420
The subwoofer will be connected with the included 2-channel adapter cable (blue/green) on the black
2-channel jack of the included 18-channel connection cable.
Please take in consideration, that the blue conductor of the 2-channel adapter cable must be
connected with the positive connection (+) and the green line with the negative (-) connection of the
subwoofer.
Adjustment of the Subwoofer MPA 5.420
The loudspeaker level of the subwoofer will be adjusted with the potentiometer „Sub Level“ on the
amplifier bottom side.
Vehicles, with a strong absorbing bass reproduction can boost the bass with the level “Bass Boost”
on the bottom side of the amplifier. Adjust the bass boost according to the loudspeaker insertion and
listening impression. The correct adjustment is achieved, as soon as the bass reproduction is full and
dry. A too strong bass boost will lead to the overstressing of the amplifier in case of too big
loudspeakers. + 6 dB is the quadruplex amplifier performance and leads to a bass trim, unnatural
acoustic reproduction.

7
For the selection of the subwoofer, the power of the amplifier must be according to the power
requirement of the subwoofer size. According to this measure, a premature distortion in the woofer
as well as the thermal overstressing of the amplifier will be prevented. Recommendation: A 4 Ωor 8
Ωsubwoofer with maximum diameter of 300 mm enables a good pulse ratio and an unbiased
damping factor, at strong bass reproduction. This combination can be operated interruption free from
the amplifier, also if there is a high claim to the woofer level of the subwoofer.
Attention: Pay attention for all adjustment works that the fader (Front-Rear) of the car radio is on
it’s neutral norm (mostly „0“), as after a later adjustment all levels on the amplifier will be shifted.
The subwoofer-signal will be generated from the front-channels; this will also change the level of the
subwoofer, if the fader adjustment has been changed too.
Loudspeaker connection: Front bridged MPA 5.420
Should a 3-channel-operation be necessary, then the loudspeaker channels left front and rear as well
as right front and rear can be bridged. The bridge connection will be effected with a special adapter
(art.no.: 273001). With the bridging of the channels, the power of the front channels can be doubled,
but the rear channels can then not be used anymore.
Optional accessories MPA 5.420
For the installation of the amplifier in the rear area, a longer cable set will be necessary, which can
be ordered with the following art.no: 273002.
Fundamental adjustment of the active controls MPA 5.420
The 5-channel-amplifier has been adjusted from the factory accordingly:
Front-channel left and right side: High pass 60 Hz-3 dB
Parametric Equalizer 1.100 Hz
Parametric Eq. Level 0 dB
Rear-channel left and right side: High pass 60 Hz – 3 dB
Parametric Equalizer 180 Hz
Parametric Eq. Level 0 dB
Subwoofer-channel Mono: Low pass 95 Hz – 3 dB
Bass Boost 65 Hz
Bass Boost Level 0 dB
Phase Shifter 180°
Attention: The change of the fundamental adjustment can only be made by the authorised specialist
dealer, as special measurement means are necessary.

8
Change of the fuse MPA 5.420
For the protection of the amplifier electronics, there is a changeable DIN flat blade fuse of 25 A
under the bottom plate next to the fan. The exchange from outside is not possible. Should there be a
defect, than this fuse should only be changed by the specialist dealer with an equivalent one.
Picture 4: Connection scheme of the amplifier, car radio and loudspeaker

9
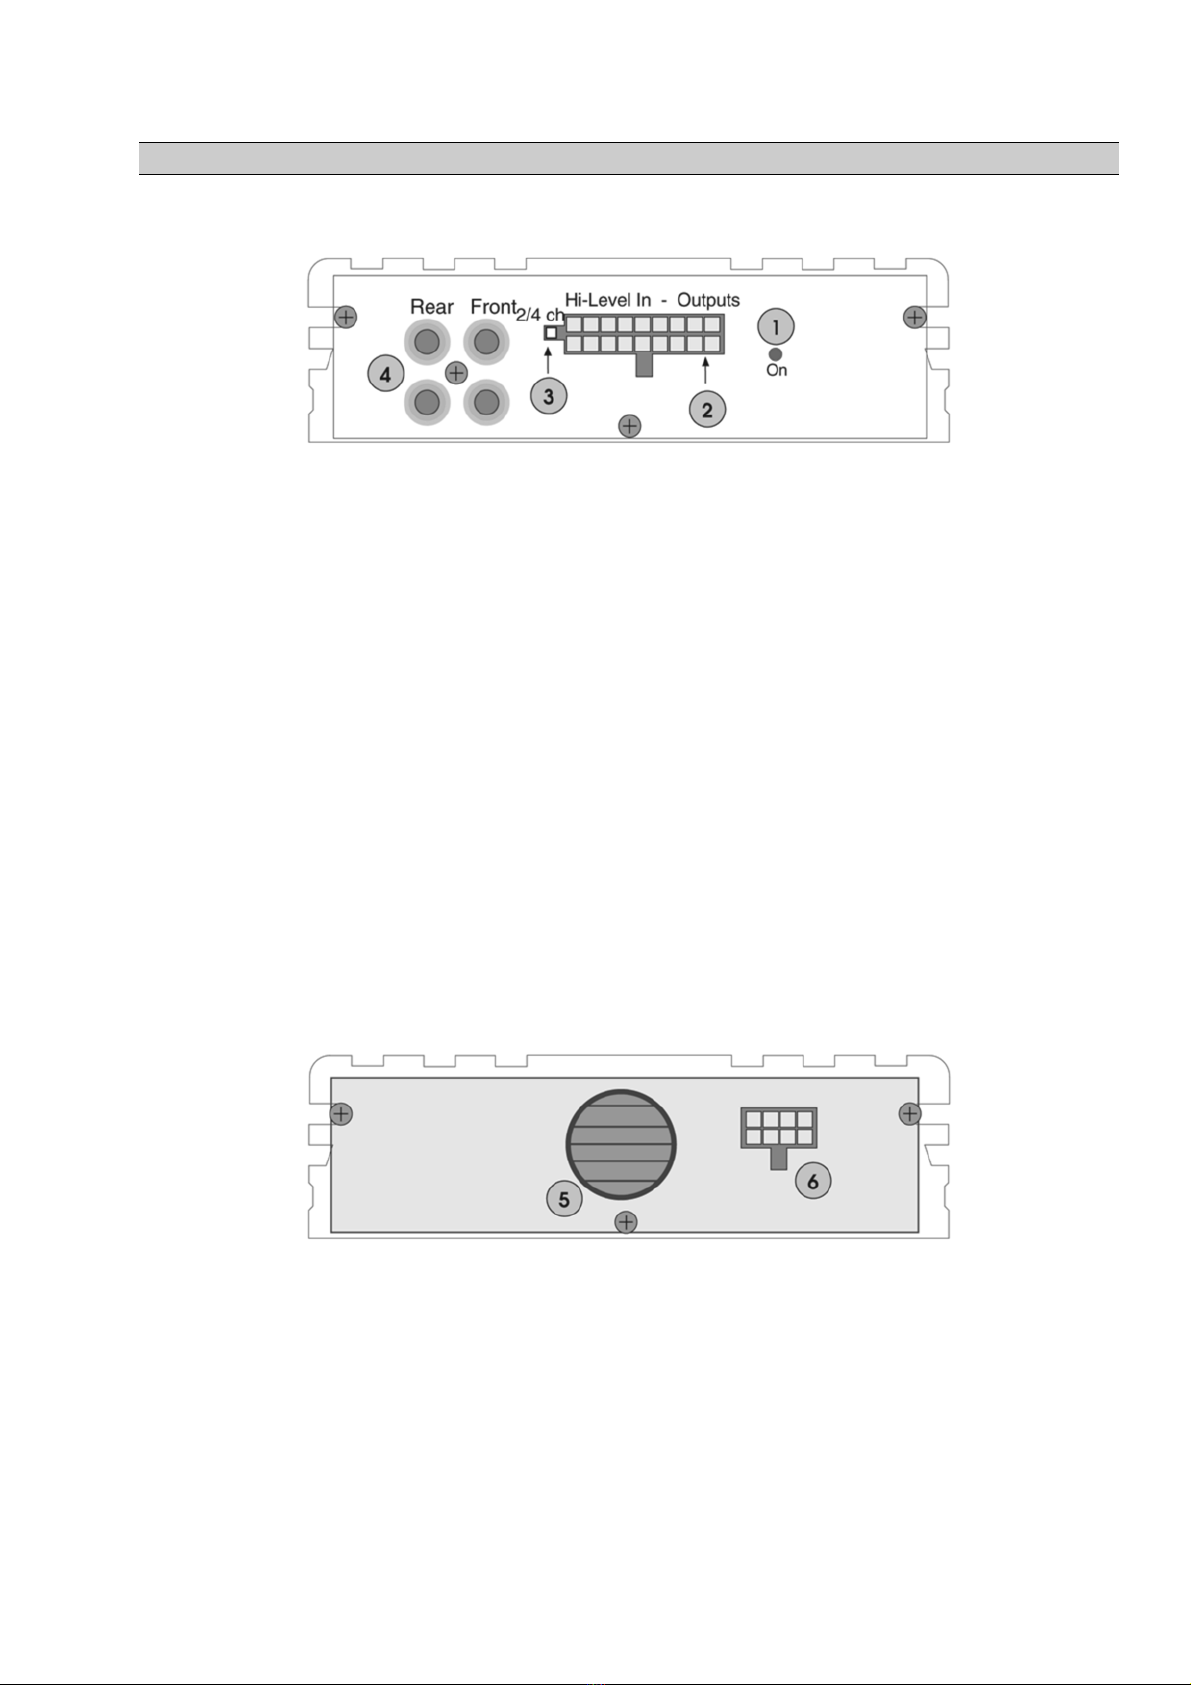
Tips for the power supply MPA 5.420
For the negative line (-), the same cable cross section must be guaranteed as for the positive pole (+),
in order to prevent potential differences as well as mass interference loops. The car body is due to the
high potential differences as negative pole not suitable for this application.
In order to avoid disturbances, all audio equipments must be layed on a central mass point. This mass
point will according to each vehicle type be determined during the testing of the installation. A direct
connection to the negative pole (-) of the battery is due to interruption technical reasons not always
an advantage. Please choose motor block or search the interruption minimum on the car body and
supply from this point all equipments with the negative pole (-).
The same criterion is for the positive pole (+). In order to prevent interference loops the battery cable
must be layed on a distributing cabinet. From this point all audio-equipments (also radio and CD-
player) as well as all memory cables will be supplied with power.
Must the positive line (+) be filtered due to screening reasons, then you only have to fit in a filter
choke with the corresponding total loading capacity in the positive (+) main current (pay attention
for the total power of all devices). Additional filters in the specific devices worsen the interference
filter effect.
In case of high reproduction loudness levels, especially in the woofer area, the amplifier can due to
the potential loss on the long cable clip early. This can be prevented with a large cable cross-section
and a minimizing of the transition resistance on the connecting parts.
Corresponding precautions with low deficiency battery clamps and distributing cabinets can be taken
by the initial installation.
In case of a too small cable cross section or high current supply in the impulse are of the bass
reproduction as well as through active operation of different amplifiers, an improvement of the
clipping can be achieved with an additional buffer capacitor. The buffer capacitor will provide in the
millisecond area with its high capacity (1F/40 V) enough current and achieves an additional
screening and smoothening of the supplying current and the power. The assembly will be effected
directly on the amplifier or on the distributing cabinet.
Determination of the „central mass point“ MPA 5.420
1. Install and check the system completely.
2. Prepare the negative (-) connection of the audio system provisional on the car body negative
(point 1). Lay the equipotential bonding line if not existing from the generator body to point
1.
3. Switch on the system, put in an empty cassette or CD (0dB-track) and adjust the loudness to
minimum.
4. Switch on the engine and take into operation all users, also light, heating for windows and the
fan. In case you hear a whistling after rev up, which will increase or decrease with the speed
in the frequency, than you have to adjust the mass connection.
5. Tear the antenna plug out of the car radio. Has the interference disappeared, then a potential
loss on the antenna base of the battery is existing. If the interference did not disappear, then
continue with the following:
6. Separate the negative pole (-) of the audio system from point 1 and connect to the motor
block.
Check if the interference has removed.

10
7. Should the motor block not remove the interference, then you have to scan the car body with
engine running with the negative pole of the system, as long as there is an obvious
improvement of the interference. Lay this point (=Point 2) bare and remove all dirt from the
underseal.
8. Fix a screw with a large diameter on this point. Blanken the sheet metal around the screw and
protect with car body protection fat.
9. Fix all mass cables on this screw or fit the distributing cabinet on this screw and spread to all
devices (central mass point).
10. Remaining interferences can be eliminated with an LC-filter in the positive line.
The search for the central mass point can also be achieved by means of a minivoltmeter (lowest
potential difference) or by means of milli ohmmeter (lowest resistor). Reference mark should always
be the motor block or point 1.
The digital electronic in the vehicle area provides an unignorable interference spectrum up to the
GHz area (interference in radio and car phone reception). The combinated circuit parts of the
amplifier, digital tuner and CD-player tribute also to the power pollution. All these interference
spectrums can be found again on the supply line and will partly be used in the amplifiers. This results
in a course acoustic pattern with a ballooning on the tweeter area. The amplifiers will already in the
no load operation or in the smallest power range strongly be overheated by high frequent interruption
frequencies. The input preamplifier of the amplifier cannot distinguish between music and
interruption signal and amplifies therefore everything which is in the „pre-in“ entrance or at the
power input. From the factory side everything has been made possible in order to avoid such events.
This will be documented by the EEG-type approval which will check the systems on single beam
interference and on self produced interferences. Only after they keep the EMV-limits, they will be
given an e-number. The frequency response of the amplifiers should therefore drop according to the
stated reasons on at least 30 kHz, in order to prevent an unnecessary heating. For amplifiers in Class
A or with preamplifiers in Class A a heating will also be unavoidable due to the higher zero current
also in the small power range, which should not be mixed up with the described interference
interruptions.
The elimination of the described interferences can only be realized purposeful and requires already
for the installation many installation knowledge in the field of interference suppression technique. In
addition you will find permanently many practical advices in the relevant specialist literatures. If you
observe the fundamental rules for cable laying, central mass point and filtering of the power supply,
you can provide a very good fundamental screening with the use of quality chinch cables.
Special noise suppression problems, which can be different from vehicle to vehicle, must be
removed by the specialist directly on the object.

11
Picture 5: Circuit diagram principle
Main fuse Equipotential bonding conductor generator body
Connection if needed

12
Important operational notice MPA 5.420
The amplifier is provided for the use on a 12 V step-down system or for presentation purpose on a
12-14,3 V / 25 A power supply. The connection on another supply point is not allowed.
In case of a defect fuse, please replace only with the same type. Please pay attention for the
indications on the defect fuse. In case the new fuse should be defect again, than there might be an
error in the system. The opening of the amplifier for the change of components, piece parts or the
function as well as the self-repair is not allowed. In case of non-observance, the guarantee claims
will expire.
Due to safety technical reasons, you should only fix the amplifier with the included sheet metal
screws. In case of other fixing methods, we will not be held liable for.
Safety instructions for the user in order to prevent injuries and accidents:
The products are only suitable for users with the necessary installation knowledge. The relevant
safety regulations for bearing car body parts, instructions on the vehicle safety inside, as well as the
regulations of the competent vehicle manufacturer are necessary to be observed.
Guarantee regulations MPA 5.420
With this user guarantee the Rainbow GmbH in Bad Rappenau guarantees on the product from the
date of the first purchase or the first installation by the authorised specialist dealer a 12 months
guarantee on material and manufacturing.
The guarantee is limited to the replacement of defective components, which have a defect due to
construction- or material fault, as well as to the guarantee repair.
A guarantee claim can not be made, if faults have been caused due to inexpert handling, damaging
during transport, mechanical damaging or due to foreign interferences.
Accidents, acts of god or other causes, which Rainbow is not responsible for, in particular water and
fire are not included in the guarantee.
Edition: MPJ/1.1-09/00
This installation instruction is copyrighted. Each duplication or reprinting, also part of it and each
reproduction of the pictures, also in a different version, is only permitted with a written allowance of
the Rainbow company.
Copyright © 2000 Rainbow GmbH. Rainbow is a registered trademark.
Table of contents
Other Rainbow Amplifier manuals