RainPoint HIS019WRF User manual

HUB USER MANUAL
Email: se[email protected]
WEB:www.rainpointonline.com
WhatsApp: +1 626-780-5952
US Free Hotline(English): +1 833-381-5659
(MON-FRI 9:30 AM-5:30 PM PST)
EU Free Hotline(English Deutsch): +44 800-808-5337
(MON-FRI 9:00 AM-5:00 PM CET )
Welcome to the RAINPOINT sma family! Please read the manual
before using to learn about the features and functions.
Have Questions?
Sma Garden Irrigation System
AM
PM
M
D
D
M
GAL
LAST USAGE
NEXT PLAN
L
SENSOR NO.
INDOOR
TODAY TOMORROW
24H
SMART GARDEN ZONE.
+

CONTENTS
1. WI-FI DISPLAY HUB HIS019WRF
1.1 Product Oveiew
1.2 Button Introduction
1.3 LCD Screen Oveiew
1.4 Specication
2. WORK ON APP
2.1 APP Installation
2.1.1 Download
2.1.2 Before Connection
2.2 Connection
2.2.1 Sma Connection Mode
2.2.2 AP Connection Mode
2.3 APP Oveiew
2.3.1 APP Home Page
2.3.2 Plan Page
2.3.3 Event Page
2.3.4 Me and Basic Settings
2.3.5 Device Page
2.3.6 Device Settings
3. BASIC SUB-DEVICES
3.1 How to Connect
3.2 HTV113FRF
3.3 HTV213FRF
3.4 HCS014ARF
3.5 HCS021FRF Soil Moisture Sensor
3.6 HCS008FRF Water Flow Meter
4. TROUBLESHOOTING
5. NOTICE
6. WARRANTY POLICY
7. FCC STATEMENT
8. CUSTOMER SUPPORT
01
01
01
02
03
04
04
04
05
06
06
10
14
15
16
16
17
18
19
20
20
21
22
23
24
25
26
27
27
28
29

1.WI-FI DISPLAY HUB HIS019WRF-V2
1.1 Product Overview
1.2 Button Introduction
Wi-Fi
•Hold the button for 5 sec to sta Sma Connection Mode
•When the device is already in connecting mode, release
and then hold the button again for 2 sec to enter
AP connection mode
•Press to adjust the LCD screen backlight brightness
•Press to check each sma garden zone(water timer outlet)
•Hold for 2 sec in the chosen zone to manually sta
watering for 10 mins
•Press to switch the sensor channels
Light
ZONE
SENSOR
AM
PM
M
D
D
M
GAL
LAST USAGE
NEXT PLAN
L
SENSOR NO.
INDOOR
TODAY TOMORROW
24H
SMART GARDEN ZONE.
Note: WIFI connection
will consume a lot of
batte, please use DC
power supply, batte
is only used as backup
power.
Batte Cover
WIFI
WIFI
LIGHT
LIGHT
ZONE
ZONE
SENSOR
SENSOR
Buttons Functions
- 01 -
Cable Po
(Always keep the
cable powered when
pairing and remote control)

1.3 LCD Screen Overview
1. Weather forecast for reference
2. Freezing point ale
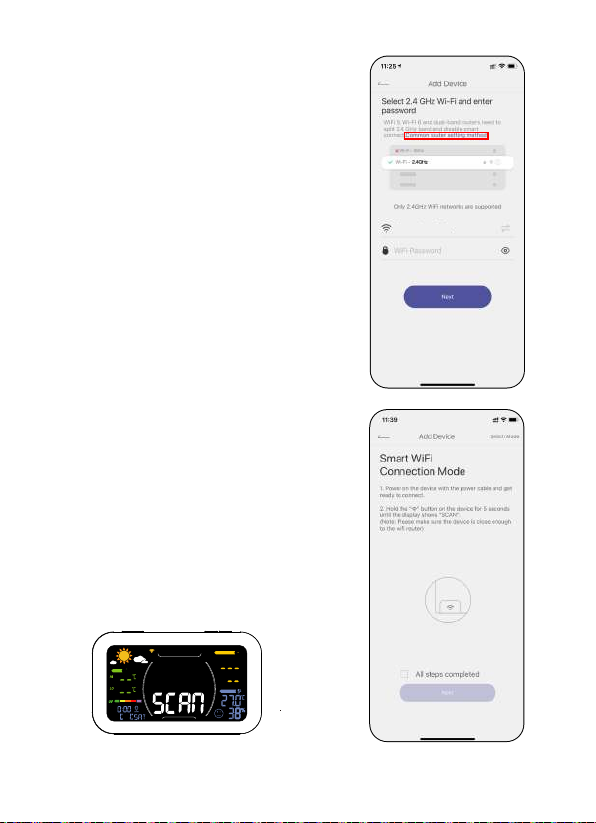
3. Failed to connect
4. WIFI signal indication
5. Next watering plan time/
Watering remaining time
6. Sma garden zones
7. Watering reminder
8. Low batte display of water
timers
9. Indoor thermo-hygrometer
10. Sensor No.
11. Outdoor thermo-hygrometer
12. Soil sensor
13. Low batte display of
sensors
14.Rainfall sensor
15. Data of the sensors (If there is no
sensors connect, the screen will
show the data on the network)
16. Low batte display of hub
17. The temperature detected by hub
18. The humidity detected by hub
19. Indoor comfo level indicator
20. Rain delay
21. Water usage
22. Manual watering
23. Sma backlight mode
24. Calender
25. Current time
26. UV level
27. Lowest temperature for today
28. Highest temperature for today
AM
PM
M
D
D
M
GAL
LAST USAGE
NEXT PLAN
L
SENSOR NO.
INDOOR
TODAY TOMORROW
24H
SMART GARDEN ZONE.
1
2 3 4 5 6 7 8 9 10 11
12
13
14
15
16
17
18
1920212223
24
25
26
27
28
- 02 -

To get accurate displays, please keep the devices away from any a
freezing place, direct sunlight, rain, or any heat place.
1.4 Specification
Detect Indoor Temperature: (9.9ºC~50ºC)-14ºF~122ºF , (±1℃)±3.6°F
Detect Indoor Humidity: 1%RH~99%RH, ±5%RH
UV Index: 0~15
5 Levels Backlight: OFF, 10%, 30%, 50%, 100%
Input: 100-240V~50/60Hz 0.3A
Output: 5V-1.2A
Power Supply: 5V DC adapter (included)
or 3 x AA batteries (not included)
( Note: Please use the batteries for back up ONLY.)
DRY: Humidity ≤40%
COMFORT: 40% ≤Humidity≤ 70%
68°F(20℃) ≤Temperature≤ 82.4 °F(28℃)
WET: Humidity ≥ 70%
- 03 -

TM
•HOMGAR APP downloads:
or scan the QR code to download:
2.1 APP Installation
2.1.1 Download
2.WORK ON APP
•Create an account and log in:
Follow the instructions to sign up account or log in with an existing
account and sta matching devices!
- 04 -

To assure your display hub to connect to Wi-Fi, it will need to meet the
following requirements:
• Please make sure the phone is connecting with 2.4GHz Wi-Fi before
using HOMGAR app. The hub has to keep staying under 2.4GHz
Wi-Fi to work normally.
• When to sta and keep Wi-Fi connection, please keep the power
cable on to make sure the hub works normally. Batte is just for
back up.
• IOS Requirements: Mobile device with iOS 11.0 (or higher) with
cellular or Wi-Fi seice.
• Android Requirements: Mobile device with Android OS 6.0 (or higher)
with cellular or Wi-Fi seice
• Please do not use public Wi-Fi networks.
• The hub and device are better to be within 10 feet (3m) during pairing.
• If you need to change the working Wi-Fi network, press and hold Wi-Fi
button and recenter your new Wi-Fi information on the APP.
2.1.2 Before Connection
- 05 -

•Power on the hub with the power cable and follow the steps below
to connect:
2.2.1 Smart WiFi Connection
2.2 Connection
- 06 -
Tips:
Please scan the QR code or search
the link to access the video to
connect the device quickly and easily.
Setup Video: https://www.you-
tube.com/watch?v=6tNFDQa3N1k

•Select "Display
Hub", then enter the
Wi-Fi information
and go next.
•After register account and get into the APP
page, nd "+" button on the top right
corner of the APP’s Home Page.
- 07 -
Rainpoint_2.4G

•On the device, press and hold the "Wi-Fi"
button for about 5 sec until it shows
"SCAN".
SENSOR NO.
INDOOR
TODAY
- 08 -
Tips: Please select 2.4Ghz WiFi
If your router is a dual-band router, and
you cannot identify the 2.4Ghz or 5Ghz
WiFi, please tap the blue words ''Common
router setting method'' to name the
2.4Ghz WiFi dierently,then you can select
it individually.
Rainpoint_2.4G

•When device found, select to add the
device and enter the name you prefer.
•When "SCAN" appears, check "All steps
completed" box and then select "Next" to
sta searching devices.
- 09 -

If Sma Connection Mode does not work well, you can also t to use AP
Connection Mode.
• Power on the hub with the power cable and follow the steps below to
connect:
2.2.2 AP Connection
•Congratulations! Now you successfully add
the device to your APP.
HIS019WRF-V2
- 10 -

• Select "Display
Hub", then
enter the Wi-Fi
information and
go next.
• After register account and get into the
APP page, nd "+" button on the top
right corner of the APP’s Home Page.
- 11 -

• Click Switch Mode in the upper right
corner to switch to AP Connection.
• On the device, press and hold the "Wi-Fi" button for about 5 sec
until it shows "SCAN ". Hold the "WiFi" button for 2 seconds until the
display shows "AP".
SENSOR NO.
INDOOR
TODAY
- 12 -

• When "AP SCAN"
appears, check "All
steps completed" box
and then select "Go
Connecting" to
connect the phone
with below the hot
spots (HomGar_xxx).
Note: If the phone pops
up with no signal and
need to switch WiFi,
please do not switch to
keep Hot spot of
connected devices.
• Back to the app and
click "Next" to
continue adding
devices automatically.
- 13 -

2.3 APP Overview
• Congratulations! Now
you successfully add the
device to your APP.
- 14 -
Tips:
Please scan the QR code or search
the link to access the video to
operate the device quickly and easily.
Setup Video: http://bit.ly/3WR5kWP

•Home Management: Set home name, location and other information
to manage your garden irrigation system intelligently and accurately.
•All Devices: All added devices will be displayed here.
•Local Weather: the corresponding weather data will be displayed.
•Room System Management: After setting the location of the home,
Show the related devices in dierent rooms.
•Add Devices: Add the Sma + series devices to sta setup your
system management.
•Home: The APP home page.
2.3.1 APP Home Page
Home
Management
All Devices
Plan
Me
Event
Add Decives
Local Weather
Room System
Management
Home
- 15 -

List all of your irrigation plans for water
timers. You can manually turn on or o
the plan by the button on the right.
There is also a manual Rain Delay button
to put o all plans if there is raining.
Review all the events that have occurred.
Learn more about how your sma system
works.
2.3.2 Plan Page
2.3.3 Event Page
Event
- 16 -

Manage your account, home, basic settings, and other options. You can
also nd unit format and notication button in these settings.
Notes: After the hub and sub-devices are connected, the selection of
the sub-devices will be displayed on both the APP home page and the
hub’s device page. You can click the device icons in the "All Devices"
list to enter the device page, or nd them in the "Sub-devices" list on
the hub’s device page.
2.3.4 Me and Basic Settings
Me
- 17 -

1. Device Setting
2. Barometric Pressure
3. Current Temperature and Humidity
4. The Highest and Lowest Temperature
5. The Highest and Lowest Humidity
6. Sub-device Management
7. Device Data Cha
2.3.5 Device Page
1
2
3
45
6 7
- 18 -
Table of contents
Other RainPoint Switch manuals