RAMTONS RM/483 User manual

TOASTER OVEN
INSTRUCTION MANUAL
Model: RM/483
Read this manual thoroughly before using and save it for future reference

1
IMPORTANT SAFEGUARDS
When using electrical appliances, basic safety precautions should always be followed
including the following:
1. Read all instructions.
2. Do not touch hot surface. Use handles or knobs.
3. Before using check that the voltage power corresponds to the one shown on the
appliance nameplate.
4. To protect against electrical shock do not immerse cord, plugs in water or other liquid.
5. The appliance can be used by children aged from 8 years and above and persons with
reduced physical, sensory or mental capabilities or lack of experience and knowledge
if they have been given supervision or instruction concerning use of the appliance in a
safe way and understand the hazards involved. Children shall not play with the
appliance. Cleaning and user maintenance shall not be made by children unless they
are older than 8 and supervised.
6. Keep the appliance and its cord out of reach of children less than 8 years.
7. Unplug from outlet when not in use and before cleaning. Allow to cool before putting
on or taking off parts.
8. Do not operate any appliance with a damaged cord or plug or after the appliance
malfunctions or has been damaged in any manner. Return appliance to the nearest
authorized service facility for examination, repair or adjustment.
9. Use extreme caution when removing tray or disposing of hot grease.
10.Oversize foods or metal utensils must not be inserted in a toaster-oven as they may
create a fire or risk of electric shock.
11.A fire may occur if the toaster oven is covered or touching flammable material,
including curtains, draperies, walls, and the like, when in operation. Do not store any
item on top of the appliance when in operation.
12.Do not clean with metal scouring pads, for finish may break off and the electrical parts
may become touchable which may result a risk of electric shock.
13.Extreme caution should be exercised when using containers whose materials are not

2
metal or glass.
14.Do not store any materials, other than accessories recommended by manufacturers in
this oven when not in use.
15.Do not store any of the following materials in the oven, i.e., paper, cardboard, plastic
and the like.
16.Do not cover crumb tray or any part of the oven with metal foil, for it will cause
overheating.
17.The use of accessories not recommended by the appliance manufacturer may cause
injuries.
18.To disconnect, turn any controls to “OFF”, then remove the plug from wall outlet.
19.Do not let cord hang over edge of table or counter or touch hot surface.
20.Do not place on or near a hot gas or electric burner, or in a heated oven.
21.Do not use outdoors.
22.Do not use the appliance for other than intended use.
23.The appliance is not intended to be operated by means of an external timer or separate
remote-control system.
24.This appliance is intended to be used in household and similar applications such as:
– Staff kitchen areas in shops, offices and other working environments;
– Farm houses;
– By clients in hotels, motels and other residential type environments;
– Bed and breakfast type environments.
25. Save these instructions.

3
DESCRIPTION
CONTROL PANEL
Power indicator: After plug the power outlet, the power indicator will be illuminated
when the timer is in any position except “0” position.
Function knob: This knob could set the operation status of heat element.
Only upper heater energized
Temperature knob
Function konb
Timer
Power in dicator
Housing
Baking pan
Wire rack
Crumb tray
Oven door
Door handle
Control panel

4
1.
Both upper and lower heater energized
2.
Both upper and lower heater energized , hot air motor energized
3.
Both upper and lower heater energized, rotation motor energized
4.
Both upper and lower heater energized, rotation and hot air motor energized
5.
Temperature knob: Turn the knob clockwise to set the temperature. The max temperature
could be set is 230℃, and is suitable for toasting bread, broiling chicken or steak.
Timer: Turn the timer to set the operation time. Max time can be set is 60 minutes. If the
timer has run to “0” position, the toasting process will be stopped and a bell sound can be
heard.
BEFORE THE FIRST USE
Unpack the appliance and place it on a horizontal surface. Remove out any insert card,
poly bag. Then use a damp cloth to carefully wipe the inner cavity wall and housing. Clean
all the detachable parts in hot, sudsy water before using.
NOTE:
1. Initial start-up operation may result in minimal smell and smoke (about 15 minutes).
This is normal. It is due to the protective substance on heating elements which protect
them from salt effects during shipping from factory. So it is recommended to operate
oven dry for about 15 minutes at the first, moreover, Make sure to keep good
ventilation of the room.
2. On the wall of inner cavity there are 2 different height of rack guide (slot).
3. You can place the rack at different height to achieve the best toasting performance
depending on the status of heat element and size of food. If only upper heat element is
energized it is suggest place the rack on the first slot to obtain the heat directly
provided that at least 30mm distance has maintained between top of food and top heat
element.

5
4. When setting the timer for less than 10 minutes, always rotate timer to over 10 minutes
and then rotate back to your chosen time. This will ensure a safe and accurate setting.
5. Always monitor the food during operating to ensure that you are not overcooking.
Caution: when removing the food from oven always use oven mitts to reduce the
possibility of getting scalding.
OPERATION
Toast
1. Rotate the temperature knob clockwise to “230℃”, dial the function knob to the
“ ” position at which both the heating elements will work. Open the oven door and
place the bread on the wire rack up to 6 slices side by side.
Note: 1) if only toasting one slice, place the slice at the center of the wire rack.
Generally toasting color for one slice is darker than that for four slices in the
same time.
2) Before operation, the crumb tray must be placed into position.
2. Choose your crust preference by adjusting the timer. Two minutes shall be needed if
you want to light brownness, 6 minutes for medium brownness, 10 minutes for dark
brownness. After setting timer, the power indicator will be illuminated. When the toast
cycle is finished the bell will ring and the electrical power is automatically turned off.
Remember that the longer the time you select, the darker the bread is.
3. To stop the cycle at any time, turn the timer to “0” position
Note: bread will burn so do not choose too long time, and close supervision is
necessary.
Bake (for baking biscuit, bread, cake, pizza (12’’) and so on
It is recommended to preheat the oven before putting on food. When the temperature of
cavity has reached the preset temperature the heat element will stop heating.
1. Set the operating temperature and time depending on thickness of your food and your
favor.
2. Turn the function knob to the “ ” position (details refer to the control panel on the
above).
3. Put the baking pan on the wire rack and place food on the baking pan after preheating.

6
4. When finished, the timer will return to “0” position, the appliance and indicator will
automatically turn off.
5. Remove the food from the oven.
For broiling function, only the upper heating element will work, the setting is applicable
for browning the top surface of food or broiling the chops or steaks.
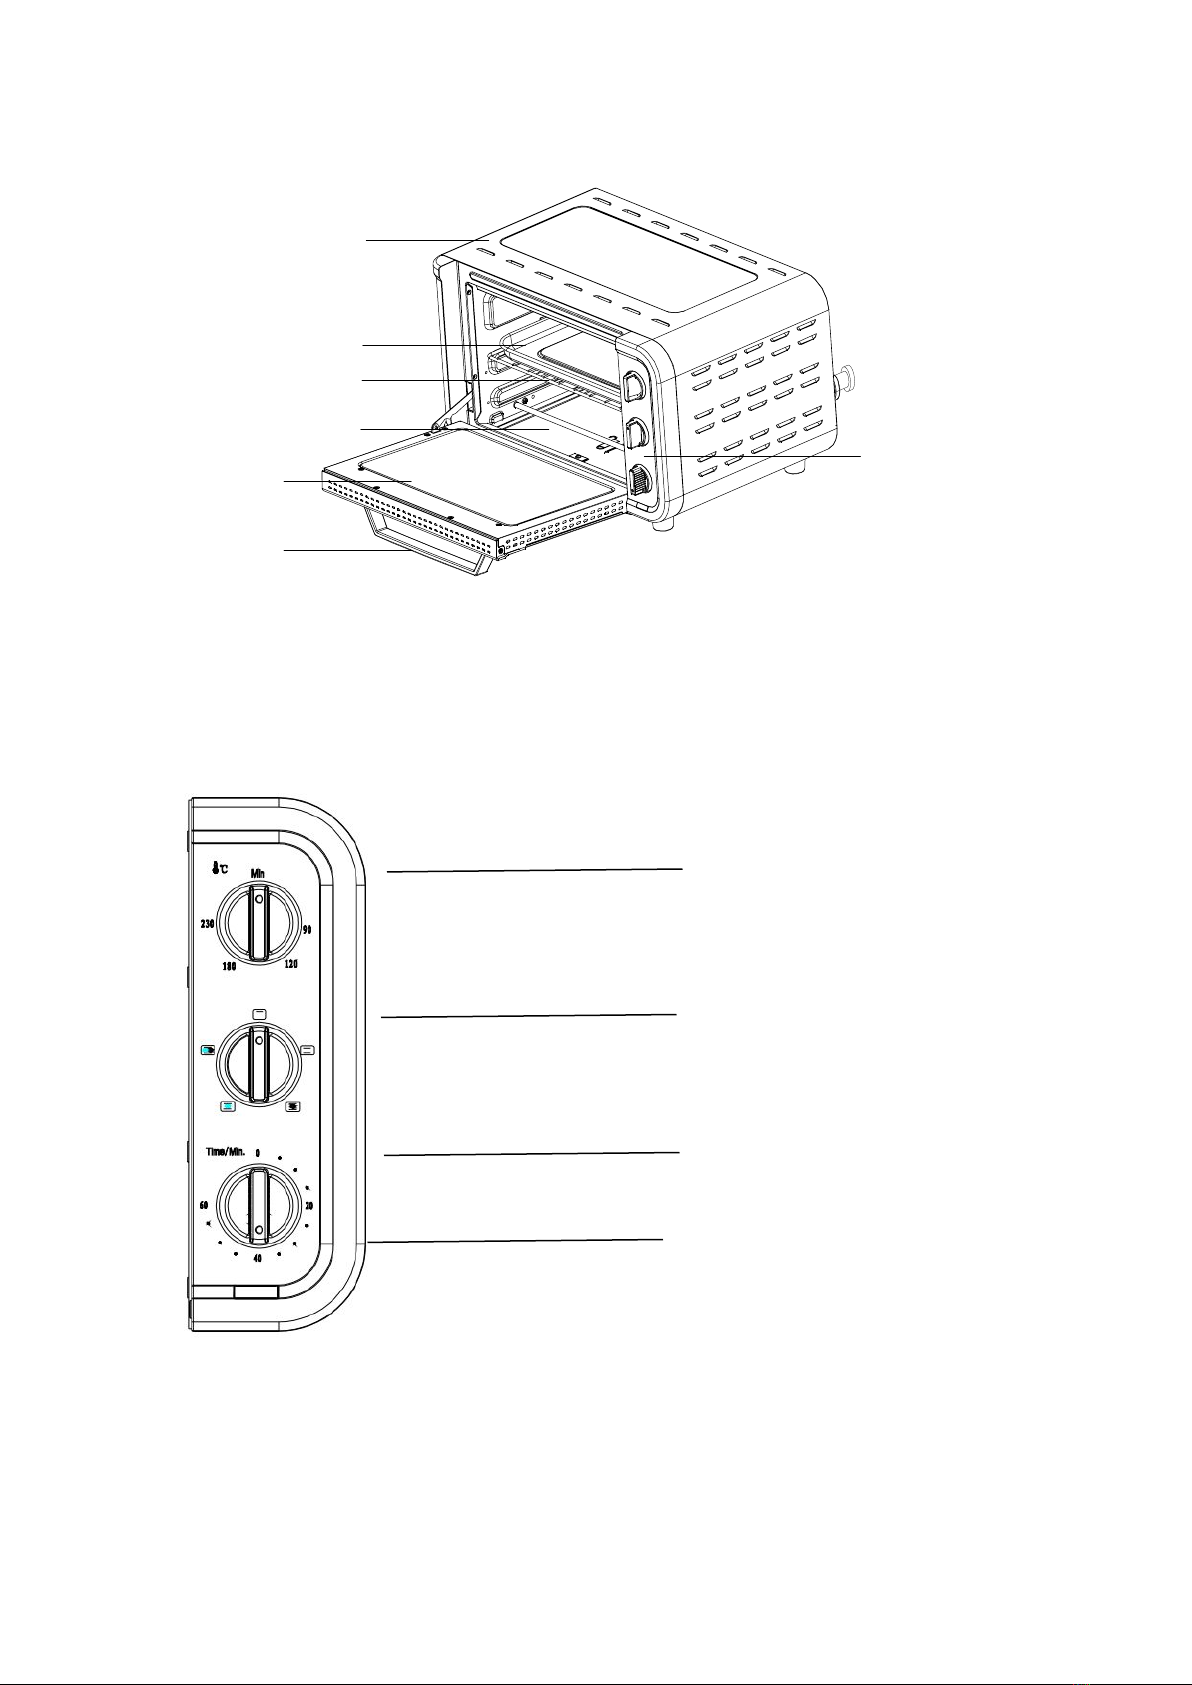
1. Turn the function knob to “Broil” position. And turn the temperature knob to “230℃”.
We recommend preheating 15 minutes with the door closed before broiling food to
achieve satisfactory result.
2. Place food in baking pan for broiling. Always use the baking pan on the wire rack when
broiling. Do not cover the wire rack with aluminum foil.
3. Place the baking pan on the wire rack and close the oven door.
4. Turn the timer again to desired cooking time.
5. When broiling the meat or fish, cook first side just to turn meat color then turn over to
finish second side to desired doneness. Brush each side with melted butter or olive oil.
Tips: For broiling the fish or chicken, it is suggested broiling skin-side down first. It is
unnecessary to turn over the fish fillet or lobster tails during broiling. Broiling one side
is enough. For broiling the lobster tails, cut through back of shell. Spread open. Brush
with melted butter after half of the boiling time.
5. When finished broiling, using oven mitt or pot holder, remove wire rack with baking
pan, and turn the timer knob to “0” position .
USEFUL TIPS
1. Condensation will appear on the oven door for some foods and then disappear. This is
normal.
2. Cook food immediately after defrosting.
3. Frozen foods and thick meat will take longer to cook.
4. When defrosting, place the food on the baking pan.
5. Avoid opening the oven door too frequently to prevent heat loss.
6. When toasting, frozen bread or many slices should be at a darker setting than 1 regular
slice.
7. When baking, smoke will likely appear. Removing excess fat prior to baking can reduce
this.

7
CLEAN AND MAINTENANCE
Caution: Before cleaning the toaster oven unplug it and allow it to cool completely.
1. Wash all the attachments with mild, soaped water.
2. Using a mild cloth to clean the inner of the oven, remember to clean it regularly.
3. To clean the door by using a hot cloth with detergent or soap.
4. Do not immerse the unit in the water to clean the appliance.
5. Press down the tab of crumb tray as red arrow illustrated (see Fig. 1) and push it
towards to the rear wall of toaster oven to open the crumb tray (see Fig. 2). Wipe
interior of crumb tray with a damp cloth. After cleaning, close the crumb tray to the
bottom of oven and then pull it towards to the direction of oven door to lock it.
6. DO NOT use the dishwasher to clean any of the accessories which are included with
this product.
7. DO NOT use any abrasive cleaning products.
8. CLEAN accessories with a soft cloth in hot water with liquid detergent or soap.
9. Do not wipe the heating elements.
10. Do not install the wire rack or baking pan on the lower heating element directly.
11. Do not use any metal pad to clean the surfaces of oven to avoid reducing finish.
Fig.1
Fig.2

8
CAUTION
TO PREVENT COUNTERTOP FROM BEING DAMAGED, THE TOASTER OVEN
MUST BE OPERATED WITH THE CRUMB TRAY IN PLACE, AND CLEANED OF
EXCESS FOOD.
NEVER OPERATE YOUR TOASTER OVEN WITH THE OVEN DOOR OPEN.
NEVER PUT THE BAKING PAN (OR ANY OTHER ACCESSSORY) DIRECTLY ON
THE TOP OF THE LOWER HEATING ELEMENTS.
TROUBLESHOOTING GUIDE
Item
Problem
Solution
1
Unit smokes during bake
function
Initial start up operation may result in minimal smell
and smoke (about 15 min.). This is normal. It is due
to the protective substance on heating. Elements
which protects them from salt effects during
shipping from factory.
Smoke in baking functions often means the multi –
use pan or Interior is dirty.
Smoke almost always appears in baking and is
normal. Cut off excess fat prior to baking to reduce
smoke
Stop using appliance if smoke source is the power
cord. Unplug.
2
The wire rack is stuck and
oven door does not operate
smoothly
Remove wire rack and clean inside the rack grooves
inside oven chamber. Also clean inside of crumb
tray. Check that hooks on oven properly aligned into
wire rack.
3
Toast black and smoking
or too light
Choose a lighter or darker crust setting

9
Environment friendly disposal
You can help protect the environment!
Please remember to respect the local regulations: hand
in the non-working electrical equipments to an
appropriate waste disposal center
Table of contents
Other RAMTONS Oven manuals