Ranger design N5-PS20-8 User manual

INSTALLATION GUIDE
N5-PS20-8 Partskeeper Cabinet ( steel )
Transit High Roof & Medium Roof
Promaster Standard Roof & High Roof
Nissan NV High Roof
Sprinter RWB, LWB, XWB
Box Truck / Trailer

QUICK START GUIDE
REQUIRED ITEMS
2
PERSONS
q1.1 Setup...............................................................................................................................................
q1.2 Shelf Assembly................................................................................................................................
3 - 5
6
Phase 1 - Assembly
Phase 2 - Installation
7
8
9 - 10
11 - 12
13 - 14
q2.1 Attach Wall Brackets To The End Panels........................................................................................
q2.2 Mark Holes For Plus Nuts...............................................................................................................
q2.3 Attach Plus Nut...............................................................................................................................
q2.4 Attach Partskeeper Cabinet To the Floor........................................................................................
q2.5 Attach Wall Brackets......................................................................................................................
qCordless Impact
qCordless Drill
qTape Measure
qMarker
q1/2" Socket
q1/2" Drill Bit w/ Drill Collar ( Set at 1/2" )
q3/8" Driver Bit
qKnife
qPlusnut Tool / Plusnut Gun ( 5/16" )

For technical support, contact us at 1-800-565-5321 N5-PS20-8 Installation Guide |REV. A1 | Page 3
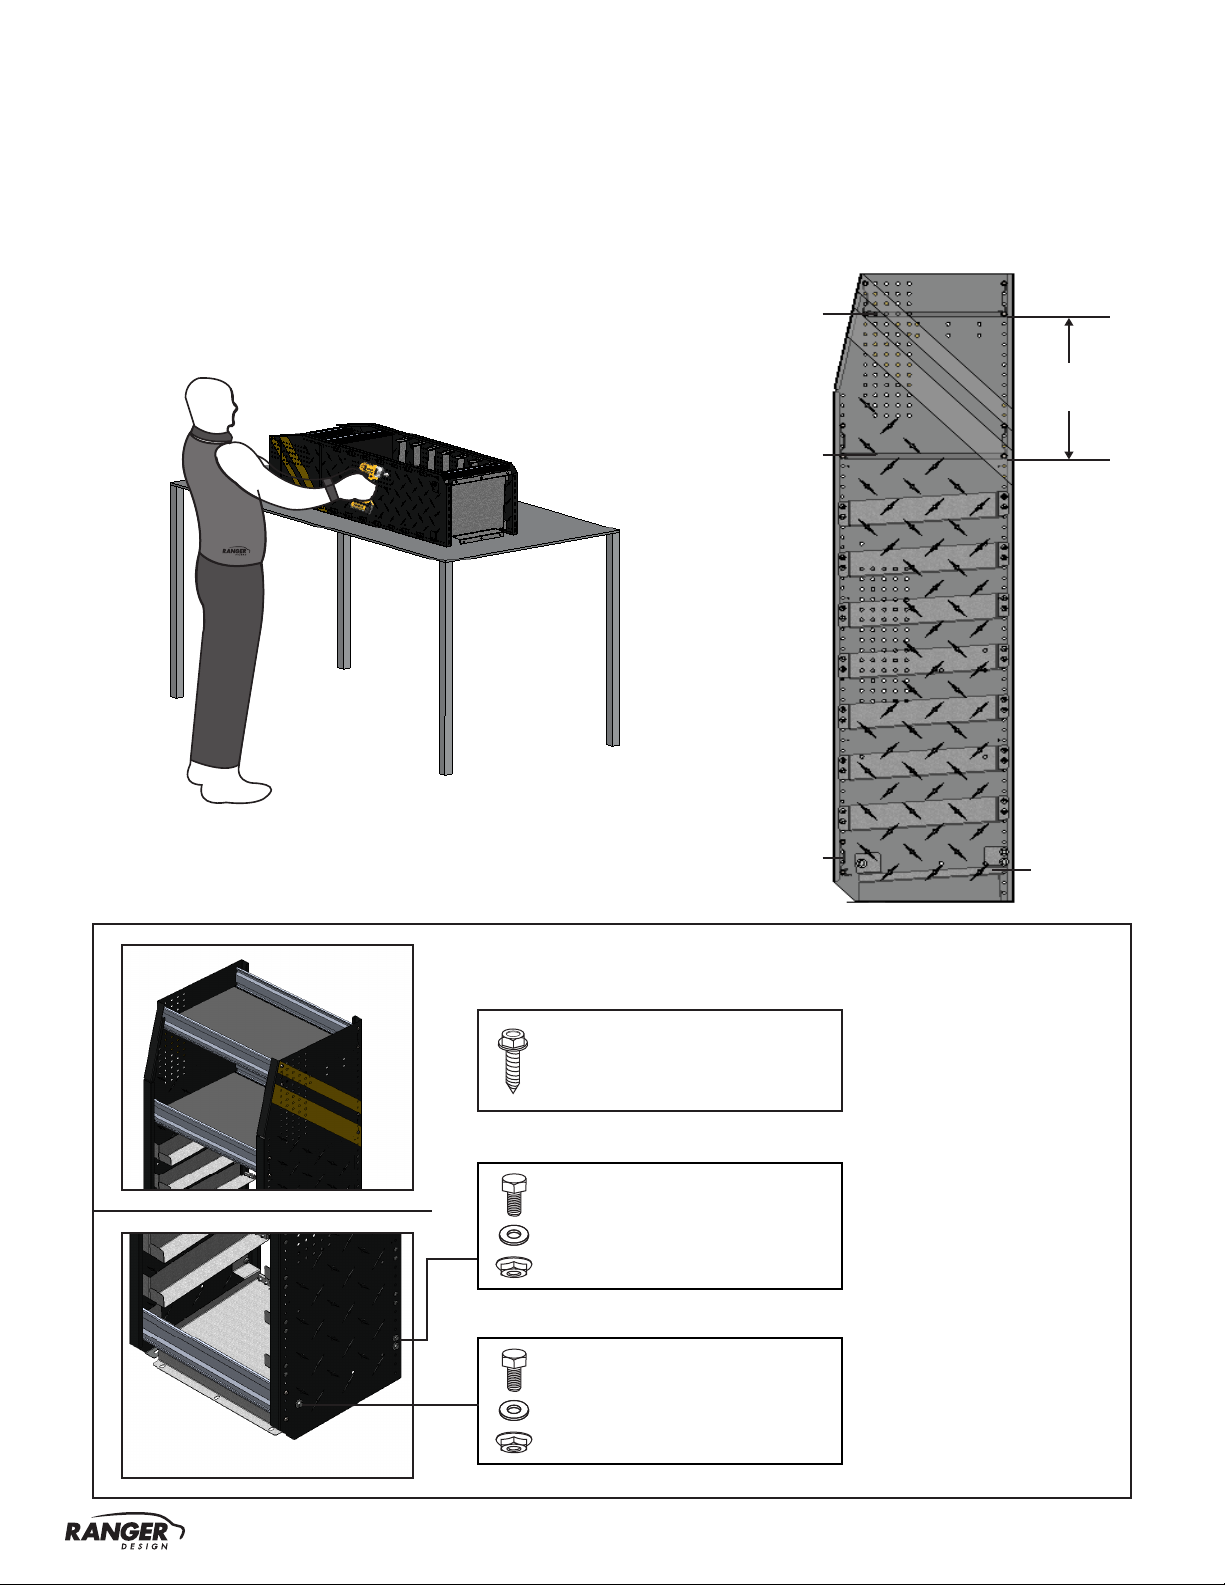
PHASE 1 – ASSEMBLY
1.1 SETUP
1.1.1 Unpack components; compare with the bill of materials.
1.1.2 Verify all parts are present.
Item No. Description Qty.
40 - 707 Short Corner Bracket ( Left ) 1
40 - 708 Short Corner Bracket ( Right ) 1
40 - 709 Long Corner Bracket ( Left ) 1
40 - 710 Long Corner Bracket ( Right ) 1
50 - 7005 End Panel ( Left ) 1
50 - 7006 End Panel ( Right ) 1
50 - 708 N5 Partskeeper Bottom Shelf 1
62-U5079 Plastic Partkeeper Case 8
60 - 11.875 × 19.5 Shelf Tray, Black Plywood, Usable 12" × 19.5" 1
60 - 13.875 × 19.5 Shelf Tray, Black Plywood, Usable 14" × 19.5" 1
EN - 402 × 19.5 - 00 Shelf Extrusion ( 19.5" ) 1
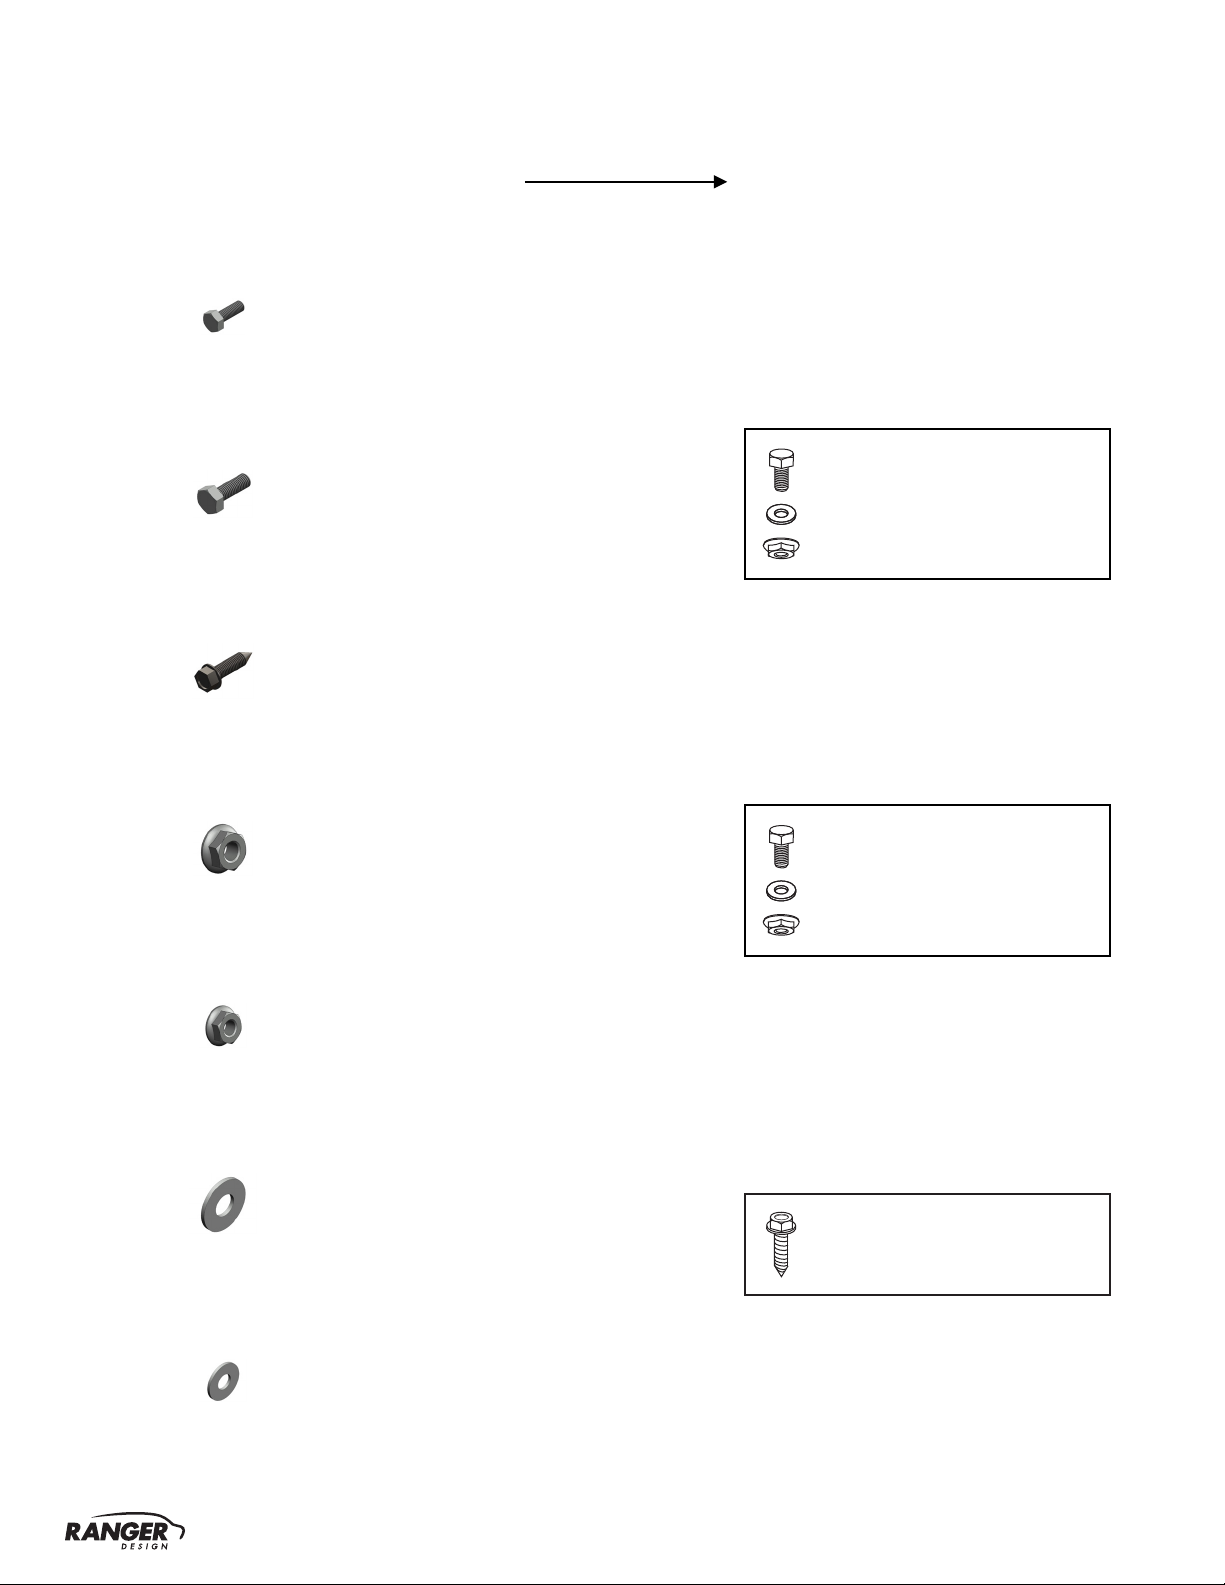
94 - 5014 Assembly Fastener Kit 1
96 - 5014 Install Fastener Kit 1
BILL OF MATERIALS
60 - 11.875 × 19.5
50-708
62-U5079
60 - 13.875 × 19.5
40 - 710
40 - 708
40 - 709
40 - 707
EN-402×19.5-00
50 - 7005 50 - 7006

For technical support, contact us at 1-800-565-5321 N5-PS20-8 Installation Guide |REV. A1 | Page 4
94 - 5014 Fastener Kit Fastener Assembly
1.1.3 Fastener kits.
#90-106 Hex Bolt 1/4" × 1/2"
#98-112 Flat Washer
#94-112 Serrated Nut
4×
#90-200 Hex Bolt 5/16" × 1/2"
#98-116 Flat Washer
#94-116 Serrated Nut
2×
20×
#92-102 Screw #14 × 1"
2×
Hex Bolt
5/16"-18 × 1/2"
GR-5 ZINC
# 90-200
4×
Hex Bolt
1/4"-18 × 1/2"
GR-5 ZINC
# 90-106
# 94-112
Serrated Nut
1/4"-20
ZINC
4×
# 94-116
Serrated Nut
5/16"-18
ZINC
2×
# 92-102
Screw HWH
#14 × 1"
ZINC
20×
2× # 98-116
Flat Washer
5/16"
ZINC
4× # 98-112
Flat Washer
1/4"
ZINC

For technical support, contact us at 1-800-565-5321 N5-PS20-8 Installation Guide |REV. A1 | Page 5
96 - 5014 Fastener Kit Fastener Assembly
12×
Hex Bolt
5/16"-18 × 1-1/4"
GR-5 ZINC
# 90-212
12× Plusnut
# 94-132
12× # 98-122
Lock Washer
5/16"
ZINC
4×
Spacer
0.375" ID, × 1.0" OD × 0.25" LONG
NYLON
# 98-157
20× # 98-116
Flat Washer
5/16", O.D. 7/8"
ZINC
Hex Bolt
5/16"-18 × 3/4"
GR-5 ZINC
# 90-204
8×
# 94-116
Serrated Nut
5/16"-18
ZINC
8×
8×
#90-212 Hex Bolt 5/16" × 1-1/4"
#98-122 Lock Washer
#98-116 Flat Washer
#94-132 5/16" Plusnut
4×
#90-212 Hex Bolt 5/16" × 1-1/4"
#98-122 Lock Washer
#98-116 Flat Washer
#98-157 Spacers
( QTY = Gap beTween floor and end panel )
#90-204 Hex Bolt 5/16" × 3/4"
#98-116 Flat Washer
#94-116 Serrated Nut
8×

For technical support, contact us at 1-800-565-5321 N5-PS20-8 Installation Guide |REV. A1 | Page 6
TOOLS
qCordless Impact
q3/8" Driver Bit
q1/2" Socket
1.2.1 Attach both panels to the shelf trays.
PHASE 1 – ASSEMBLY
1.2 SHELF ASSEMBLY
14"
12" × 19.5"
14" × 19.5"
50-708
IMPORTANT: Assembly the cabinet on a protected clean surface to avoid scratching.
EN-402×19.5-00
#92-102 Screw #14 × 1"
HARDWARE USED
20× 94-5013
2× 94-5013 ( back )
#90-200 Hex Bolt 5/16" × 1/2"
#98-116 Flat Washer
#94-116 Serrated Nut
4× 94-5013 ( front )
#90-106 Hex Bolt 1/4" × 1/2"
#98-112 Flat Washer
#94-112 Serrated Nut

For technical support, contact us at 1-800-565-5321 N5-PS20-8 Installation Guide |REV. A1 | Page 7
PHASE 2 – INSTALLATION
2.1 ATTACH WALL BRACKETS TO THE END PANELS
2.1.1 • Lift the assembled partskeeper cabinet to the vehicle, then put it in place.
• Attach the short and long brackets to the panels aligning the brackets to the horizontal rim of the vehicle.
HORIZONTAL RIM
LONG BRACKET
SHORT BRACKET
NOTE: You can install the brackets
inside or outside the panel.
Attach the short and long brackets to the panels
aligning the brackets to the horizontal rim of the
vehicle.
TOOLS
qCordless Impact
q1/2" Socket
IMPORTANT: For all Box Trucks, make sure that the shelving is securely fastened to the structure of the truck.
NOTE: Handle with care.
HARDWARE USED
8× 96-5014
#90-204 Hex Bolt 5/16" × 3/4"
#98-116 Flat Washer
#94-116 Serrated Nut

For technical support, contact us at 1-800-565-5321 N5-PS20-8 Installation Guide |REV. A1 | Page 8
TOOLS
qMarker
MARK
Mark 2 holes of the short and long
brackets on the vehicle horizontal
rim.
2.2.1 After attaching the brackets mark the holes on the brackets and bottom shelf to the vehicle.
PHASE 2 – INSTALLATION
2.2 MARK HOLES FOR PLUS NUTS
1"
NOTE: The distance between
the two holes should
be no less than 1", to
avoid plus nut overlap
NOTE: If you are using Ranger wall
kits, please go to page 14.
TOOLS
qMarker
MARK
Mark 2 holes of each end panel on the
vehicle oor.
NOTE: If you are using Ranger oor,
please go to page 12.

For technical support, contact us at 1-800-565-5321 N5-PS20-8 Installation Guide |REV. A1 | Page 9
PLUSNUT
PHASE 2 – INSTALLATION
2.3 ATTACH PLUS NUTS
WARNING: Before drilling, ensure that you will not hit any critical parts of the vehicle like the Gas tank,
Wiring Harness and Hose.
NOTE: Use 1/2" drill bit with drill collar to stop drill at 1/2" depth.
2.3.1 • Lift the assembled partskeeper cabinet on the side.
• Drill all the marks using 1/2" drill bit w/ drill collar, then attach plus nuts to the holes.
Drill all the marks then, attach plus nuts to the
holes.
HARDWARE USED
12× 96-5014
#94-132 Plus Nut
DRILL COLLAR
( seT aT 1/2")
TOOLS
qCordless Drill
q1/2" Drill Bit w/ Drill Collar ( Set at 1/2" )
qPlus Nut Tool ( 5/16" )

For technical support, contact us at 1-800-565-5321 N5-PS20-8 Installation Guide |REV. A1 | Page 10
FORWARD REVERSE
STEP: Put the plusnut on the plusnut gun, then attach the plus nut in the hole by turning the gun forward until
the plus nut locks, then remove the gun by turning in reverse.
•using plusnut gun
•using the 6491 plusnut tool
2.3.2 How to attach plus nut.
6491 HARDWARE USED
Flat washer 5/16"
Flat washer 5/16" BS × 7/8" OD
TOOLS
qCordless Impact
q1/2" Socket
q9/16" Wrench
STEP 1:
Assemble the 6491 plusnut tool with the hardware needed, plus
nut and the 9/16" wrench as shown.
FORWARD REVERSE
STEP 2:
Attach the plus nut in the hole by turning
the bolt forward using an impact with a
1/2" socket until the plusnut locks, then
remove the bolt by turning the impact in
reverse.
NOTE: The hardware used for the 6490 plusnut tool is not included in the fastener bag.
The 6490 plusnut tool can be ordered separately upon demand at no charge.

For technical support, contact us at 1-800-565-5321 N5-PS20-8 Installation Guide |REV. A1 | Page 11
2.4.1 Put the assembled partskeeper cabinet back in place aligning the holes to the plusnuts, then install the
bottom shelf to the plus nuts.
PHASE 2 – INSTALLATION
2.4 ATTACH SHELF UNIT TO THE FLOOR
without ranger floor
TOOLS
qCordless Impact
q1/2" Socket
#90-212 Hex Bolt 5/16" × 1-1/4"
#98-122 Lock Washer
#98-116 Flat Washer
#98-157 Spacers
( QTY = Gap beTween floor and end panel )
HARDWARE USED
6× 96-5014
#94-132 5/16" Plusnut
W/ Spacer W/O Spacer
most vehicle use 1 spacer when not over ribs
tips when to use spacer:

For technical support, contact us at 1-800-565-5321 N5-PS20-8 Installation Guide |REV. A1 | Page 12
2.4.2 • Lift the parskeeper cabinet inside the van, then put it in place.
• Install the partskeeper cabinet to the floor mounting track by sliding bolts in the mounting tracks,
and screw the bottom shelf to the floor.
#94-104 Hex Nut
#98-116 Lock Washer
#98-122 Flat Washer
#90-490 Carriage Bolt 5/16" × 1"
HARDWARE USED
2× floor fastener kit
#92-102 Screw 1"
HARDWARE USED
4× floor fastener kit
TOOLS
qCordless Impact q3/8" Driver Bit
q1/2" Socket
with ranger floor

For technical support, contact us at 1-800-565-5321 N5-PS20-8 Installation Guide |REV. A1 | Page 13
2.5.1 Aligned the wall brackets to the plus nuts, then install the wall brackets to the wall.
IMPORTANT: After installation is completed, ensure all bolts are tightened.
TOOLS
qCordless Impact
q1/2" Socket
HARDWARE USED
8× 96-5014
#90-212 Hex Bolt 5/16" × 1-1/4"
#98-122 Lock Washer
#98-116 Flat Washer
#94-132 5/16" Plusnut
NOTE: Tighten the bolts that attach the bracket to the wall or wall rails 1st before
tightening the bolts from the brackets to the end panels.
PHASE 2 – INSTALLATION
2.5 ATTACH WALL BRACKETS
without ranger wall kits

For technical support, contact us at 1-800-565-5321 N5-PS20-8 Installation Guide |REV. A1 | Page 14
NOTE: Tighten the bolts that attach the bracket to the wall or wall rails 1st before
tightening the bolts from the brackets to the end panels.
2.5.2 Aligned the wall brackets to the wall mounting track kits, then install the wall brackets
to the wall mounting track kits using channel nuts.
IMPORTANT: After installation is completed, ensure all bolts are tightened.
TOOLS
qCordless Impact
q1/2" Socket
FASTENERS USED
8× wall kits fastener kit
#90-208 Hex Bolt 5/16" × 1"
#98-122 Lock Washer
#98-116 Flat Washer
#94-150 Channel Nut
with ranger wall kits

For technical support, contact us at 1-800-565-5321 N5-PS20-8 Installation Guide |REV. A1 | Page 15
“You have successfully installed your
N5-PS20-8
Thank you for doing business with us.”
For any feedback or suggestions you may have, please contact: cs@rangerdesign.com
IMPORTANT: After checking all bolts are thightened slide 8 partskeeper case to the cabinet.
Table of contents
Other Ranger design Storage manuals
Popular Storage manuals by other brands

HyLoft
HyLoft TireLoft 01030 Assembly instructions

Alpha ESS
Alpha ESS Storion-SMILE5 Installation, operation & maintenance manual

Closet Maid
Closet Maid SuperSlide 5637 installation instructions

SMART Embedded Computing
SMART Embedded Computing ATCA-7360-HDD Series quick start guide

Quantum
Quantum 6-67057-02 Rev A user guide

Dell
Dell PowerVault DL4000 user guide