Rapid Electronics 400S User manual


. .
..
314
TABLE OF CONTENTS
400SOM 01/05
A. REMOTE TRANSMITTER OPERATION ..............................................5
B. LED DISPLAY..............................................................................6
C. CHIRP INDICATOR.......................................................................6
D. PARKING LIGHT..........................................................................6
E. ALARM OPERATION CONDITION....................................................6
F. ACTIVE ARMING ARM & LOCK ..................................................6 7
Ajar Warning
Silent Arming / Disarming
Shock Sensor By Pass
Noiseless Mode
Hidden Alarm Function
G. PASSIVE ARMING.....................................................................7 8
Passive Door Locking
Passive Arming By Pass
H. ACTIVE DISARMING UNLOCK & DISARM......................................8
Tamper Disarming
Pathway Illumination
Two Steps Door Unlock
Automatic Rearm
I. DISARMING WITHOUT A TRANSMITTER ....................................9 10
Overrides the Alarm without Password Pin Code
Overrides the Alarm With Password Pin Code
J. VALET MODE .............................................................................10
Enter Valet Mode
Exit Valet Mode
Remote Valet Mode
K. CAR FINDER .............................................................................10
L. PANIC FUNCTION .................................................................10 11
M. TRIGGER THE SYSTEM...............................................................11
Clear The Trigger Icons and Melody Sound

. .
..
134
TABLE OF CONTENTS
N. ANTI CAR- JACKING ..................................................................12
Active Car Jacking
Passive Anti Car Jacking
Trigger The Anti Car Jacking Mo e
Overri e The System To Turn Off Anti Car Jacking
O. DOME LIGHT CONVENIENCE DELAY & SUPERVISION......................13
P. IGNITION CONTROL THE DOOR LOCK/UNLOCK .............................13
Q. TRUNK RELEASE (CHANNEL 3) OUTPUT........................................13
R. CHANNEL 4 TIMER CONTROL OUTPUT ..........................................13
S. POWER ON MEMORY..................................................................13
OPERATION
R. CHANNEL 4 TIMER CONTROL OUTPUT
Press the transmitters an buttons at the same time to activate the
Channe 4 function. Channel 4 is a user-programmable timer output.
You may program the built-in timer to sen a groun signal for any time
uration from 1 secon to 120 secon s. For instance, this timer output may
be use to turn on the hea lights, power win ows or sunroof. (The factory
defau t setting is a momentary output.)
S. POWER ON MEMORY:
This security system is equippe with circuitry that will allow the unit to
remember its a arm state if the vehicles battery power is lost then
reconnecte .
O. DOME LIGHT SUPERVISION
The a arm has a unique feature which wi turn on your vehic es
Dome Light as fo ows:
1. Upon isarming, the ome Light will remain on for 30 secon s.
2. If the vehicle is intru e , the ome Light will flash for the same uration
as the siren.
Note: Turning ON the ignition switch or arming the a arm wi turn
off the dome ight.
P. IGNITION CONTROLLED DOOR LOCKING AND UNLOCKING
(See Alarm Feature II-3 Programming.)
1. Turn the ignition switch ON an close all the vehicles oors. After 3
secon s, the system will automatically lock the central locking system.
2. Turn the ignition switch OFF. The system will automatically unlock the
central locking system.
Q. TRUNK RELEASE (CHANNEL 3) OUTPUT.
CHANNEL 3 TIMER CONTROL OUTPUT
(See Alarm Feature III-3 Programming.)
Press an hol the button on the transmitter for (2) sec. to open the
trunk release or any other electric evices that has been a e to this
output.
Channel 3 is user-programmable timer output. You may program the built=in
timer to sen a groun signal for any time interval between 1 secon an
2 minutes. For instance. this timer output may be use to turn on the
hea lights, power win ows or sunroof. NOTE: Factory efault setting at 1
secon pulse groun e for trunk release output.

. .
..
512
WARNINGS:
As with any product that performs automatic functions, there are certain
safety precautions that you must practice and be aware of.
1. Keep ALL transmitters out of the reach of children.
2. The use and operations of this system is the sole responsibility of the
operator.
IMPORTANT NOTICE
OPERATION
A. REMOTE TRANSMITTER OPERATION:
Transmitter
Button System Function or Feature Remark
Lock Doors Arm System
- Arm and Delete The 2 Stage Shock Sensor. Press twice within 3 seconds
- - Arm and Noiseless Mode Press within 3 seconds
- Arm System and Hidden Alarm Function Press within 3 seconds
Car Locator Upon arming
(3-sec.) Panic Function Press and hold for 3 seconds
+ Silent Arming / Disarming Ignition in "off" position
+ (2-sec.) Active Anti Car-Jacking Mode Ignition in "on" position press
and hold for 2 seconds
Unlock Doors Disarm System
- Two Steps Door Unlock Disarm System Press twice within 3 seconds.
(2-sec.) Trunk Release (Channel 3) Press and Hold for 2 seconds
-
Passive Arming By-pass While the system Disarmed.
- -
Remote Control Entry/Exit Valet Mode While the system Disarmed,
Press within 3 seconds
Channel # 4 Timer Output
OPERATION
N. ANTI CAR- JACKING
Warning: If you don't need the car jacking function in this
alarm system, be sure to set car jacking feature to the OFF
setting. his system default setting for car-jacking is OFF.
ACTIVE ANTI CAR-JACKING:
1. Press and hold the transmitters and buttons at the same
time for 2 seconds while the vehicles ignition is ON. The
parking lights will turn ON for 1.5 seconds to indicate the
system is in the Car-jacking Mode.
2. Once the system is in Car-jacking Mode and you are forced
from the vehicle, the system will trigger when the door is opened
and closed while the ignition is in the ON position.
PASSIVE ANTI CAR- JACKING:
1. Turn the ignition switch to the ON position for entering the
Car-
jacking Mode
.
2. Once the system is in
Car-jacking Mode
and you are forced from
the vehicle, the system will trigger when the door is opened and closed
while the ignition is in the ON position.
TRIGGER THE ANTI CAR -JACKING MODE:
a). 50 seconds after the system has been triggered. The siren will start
chirping for 15 seconds.
b). During the 15 second period of chirping, you must push the valet
switch once to turn off the car-jacking feature. If not, it will enter the
second timer Anti
Car-jacking Mode
.
c). 65 seconds after the system has been triggered, the siren will start
alarming and the parking lights will continue flashing
d). 90 seconds after the system has been triggered
1. The siren will continue alarming and the parking lights flashing.
2. The starter disable will activate to prevent the vehicle from starting with
the key.
3. This will remain active until the vehicle's battery power is exhausted.
OVERRIDE THE SYSTEM TO TURN OFF ANTI CAR- JACKING:
Turn the ignition switch from the OFF to ON position, and within 10
seconds push and release the valet/program switch, the siren will stop
and the system is disarmed.
Note: If you use password pin code to double protect the vehicle
security, you will need to use it to completely disarm the system.
OPERATION

. .
..
116
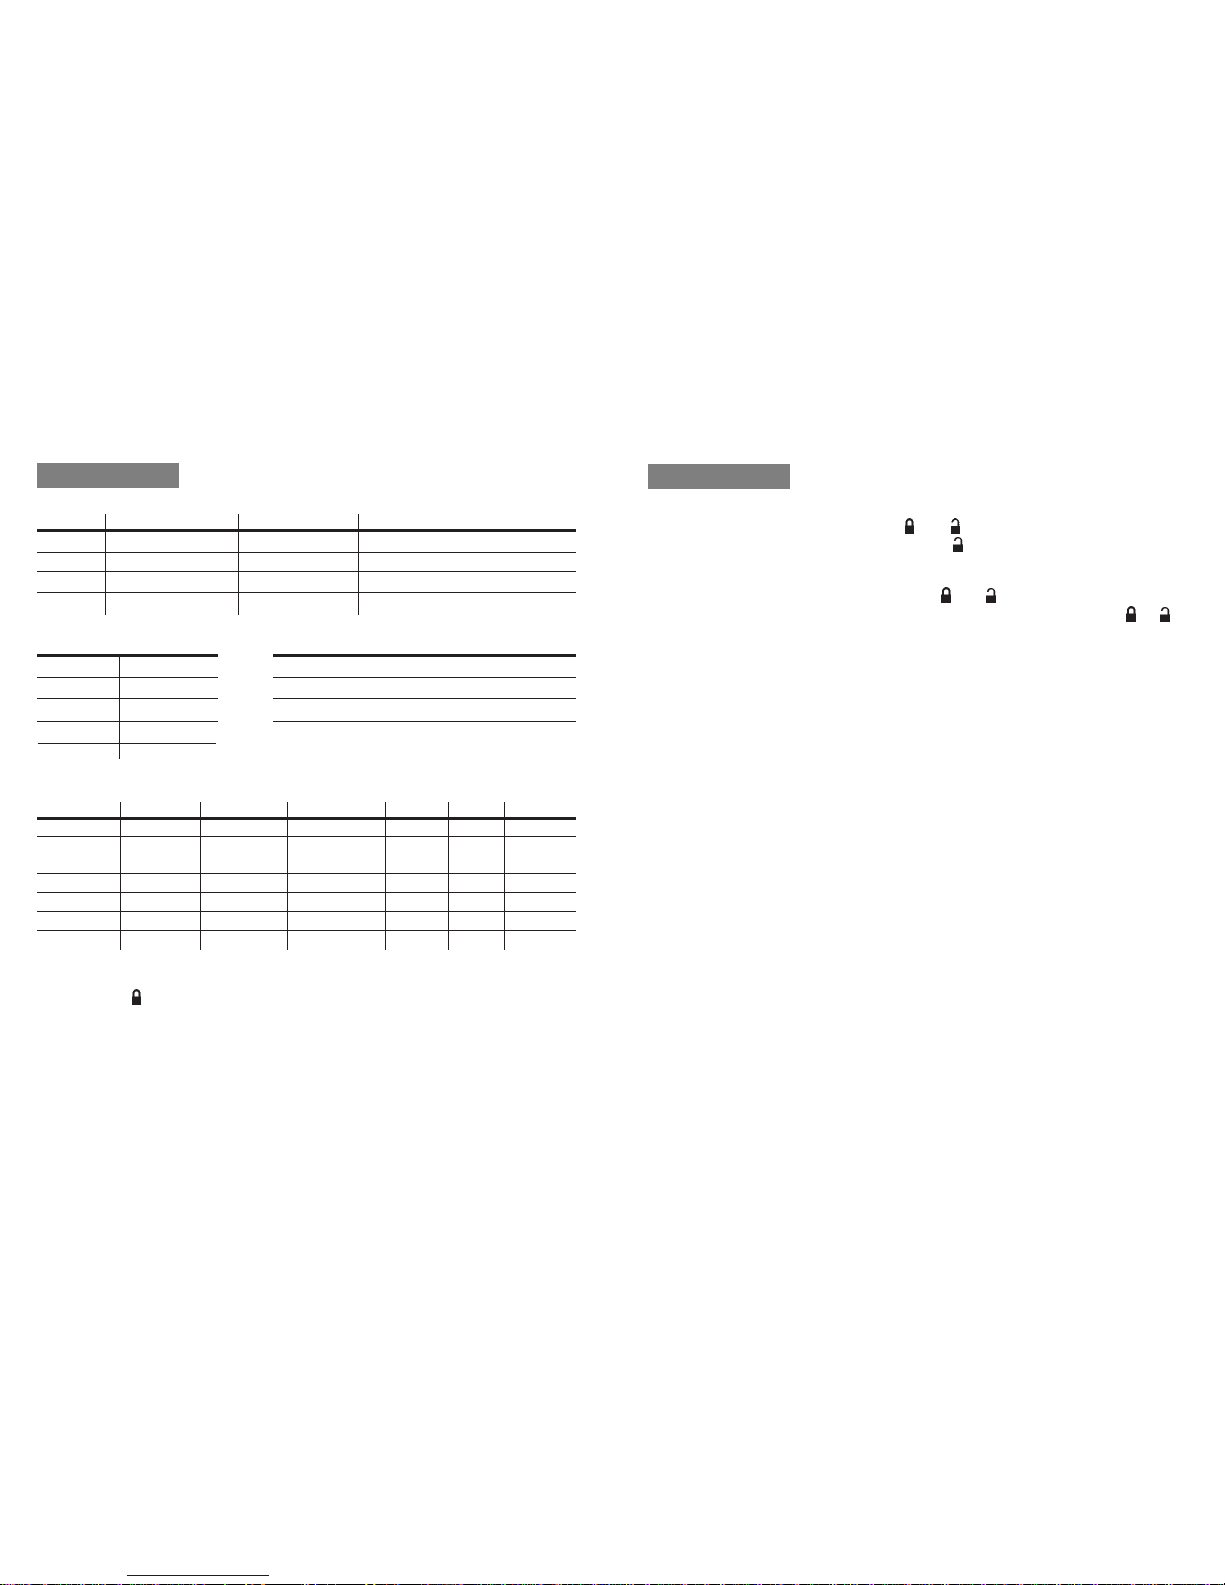
B. LED Status Display Chart:
LED Status LED Status
Off Disarmed 2 flashes... pause Zone 2 / Trigger on Trunk/Hood
Slow flash Armed 3 flashes... pause Zone 3 / Trigger on Door Swi ch
Fas flash Passive arming 4 flashes... pause Zone 4 / Trigger on Shock Sensor
On (solid) Vale mode 5 flashes... pause Zone 5 / Trigger on Igni ion Swi ch
C. Chirp Indicators D. Parkin Li ht Indicator Display Chart:
1 Chirp Arm 1 Flash Arm
2 Chirps Disarm 2 Flashes Disarm
3 Chirps Ajar Warning 3 Flashes Disarm/Triggered
4 Chirps Disarm/Trigger 12 Flashes Car Loca or
6 Chirps Car Loca or
E. SYSTEM OPERATING CONDITION:
Siren, Horn Parking Ligh LED Doors S ar er Dome Ligh
1. Arming 1 or 3 Chirps 1 Flash Slow Flash Locking Disable
2. Disarming 2 or 4 Chirps 2 or 3 Flashes Fas Flash or Off Unlocking Turns on for
30 seconds
3. Trigger Alarming Flashes Slow Flash Disable Flashes
4. Panic Alarming Flashes Flashes
5. Car-Jacking Alarming Flashes Disable Flashes
6. Car Loca or 6 Chirps 12 Flashes
F. ACTIVE ARMING LOCK AND ARM:
1. Press he button on he ransmi er.
2. The siren will chirp (1) time and he parking ligh s will flash (1) time
indica ing ha he sys em is now Armed. The vehicles doors will lock
upon arming when in erfaced wi h he securi y sys ems keyless en ry.
AJAR WARNING: If he siren chirps (3) times, you have lef a door,
runk, or hood lid ajar. (See Alarm Fea ure I-3 Programming.)
2. During Panic Mode, he normal func ion of his ransmi er bu on will
be suspended. The ransmi ers and buttons can be used o lock
and unlock he doors, however once he button is pressed, he vehicles
s ar er disable device, (if ins alled) will enabled he vehicle o be s ar ed
wi h he igni ion key.
3. To s op he alarm, press and hold he and bu ons on he ransmi er
again for 3 seconds. Also, if any ransmi er bu on o her han or
is pressed and released, he panic mode will be urned off immedia ely.
4. If he bu on is no pressed, he alarm will au oma ically s op af er 30
seconds.
M. TRIGGER THE ALARM SYSTEM
When Armed, your vehicle is pro ec ed as follows:
1. Ligh impac will rigger he warn-away si nal. A long chirp from he
siren or horn.
2. Heavy impac s, doors opening, hood opening, runk opening or urning
he igni ion ON will rigger he programmed sequence. The s ar er
disable relay (if ins alled) preven s he vehicles s ar er from cranking.
The siren, horn, parkin li hts, and dome li ht will turn on o aler
an in rusion for 30 seconds. The sys em will hen s op and au oma ic
rese or re-arm. If one of he sensors or de ec ors is ac ive, he alarm
sys em will sound a maximum of 6 imes in 30 seconds cycles.
NOISE ABATEMENT CIRCUIT: Your sys em has a Noise Abatement
Circuit. This fea ure preven s annoying repe i ive rigger sequences due
o a faul y door pin swi ches or environmen al condi ions such as hunder,
jackhammers, airpor noise, e c.
Heres how he Noise Abatement Circuit works: The alarm riggers five
imes. Each ime, he same sensor or swi ch is riggering he alarm, he
Noise Abatement Circuit will in erpre his pa ern of riggers or false
alarms. Af er he fif h rigger, he Noise Abatement Circuit ignores, or
bypasses, ha sensor un il ano her sensor or swi ch is riggered.
The Noise Abatement Circuit covers he doors (doors, hood and runk)
differen ly: If he alarm is riggered by an open door for six full cycles, he
doors will be bypassed un il he rigger ceases.
OPERATION OPERATION

. .
..
710
OPERATION
SILENT ARMING / DISARMING: Pressing the transmitters and buttons
at the same time will arm or disarm your security system. No chirping
sound will be heard and the arm / disarm confirmation will be visible with
the parkin li hts only.
SHOCK SENSOR BY-PASS: Pressing the button on the transmitter (2)
times within 3 seconds will arm the security system and by-pass the
shock sensor. he system will chirp one additional time to confirm the
sensor bypass mode was activated. he sensor bypass feature is programmed
to activate for (1) armin cycle only. he security system will return to
normal operation during the next arming cycle.
NOISELESS MODE: Press the button (1) time to arm the system.
Press the button (2) more times within 3 seconds: he siren will chirp
(1) more time. he system is now in Noiseless Mode. In Noiseless
mode the zone 4 shock sensor timer will be reduced from 30 seconds to 15
seconds. he noiseless feature is programmed to activate for (1) armin
cycle only. he security system will return to normal operation during the
next arming cycle.
HIDDEN ALARM FUNCTION: Press the button first then within 3
seconds, press the button to activate the Hidden Alarm Function.
he security system will arm and be in Hidden Alarm Function. he
siren or horn will be silenced even if the sensor is triggered in the armed
status.
G. PASSIVE ARMING (See Alarm Feature II-2 Programming.)
Active Armin / Disarmin will allow you to operate your security system
with the remote transmitter only. his security system is equipped with
an optional Passive Armin feature, which allows the security system
to automatically arm 30 seconds after the last door is closed.
To enter Passive Armin :
1. urn the ignition to the OFF position and exit the vehicle.
2. After all entrances are closed, the security system LED will flash fast for
30 seconds. If you re-open the doors, hood or trunk, the security system
LED will stop flashing. It will begin flashing again once the vehicles
entrances are closed.
OPERATION
5. urn the ignition switch to the Off position. [4] Chirps from the siren
or horn and [3] flashes from parking lights will indicate the system was
disarmed.
J. VALET MODE: (Disarm or Valet mode)
he valet/pro ram switch allows you to temporarily bypass all alarm
functions, eliminating the need to hand your transmitter to parking
attendants or garage mechanics. When the system is in valet mode, all
alarm functions and remote starter functions are bypassed, however the
remote panic feature and remote door locks will remain operational. o use
the valet mode, the system must first be disarmed either by using you
remote transmitter, or by operating the manual override sequence.
To Enter Valet Mode:
1. urn ignition to the ON position.
2. Press and hold the valet/pro ram switch for 2 seconds or until the
LED turns on. he LED will remain on and solid for as long as the system
is in Valet Mode.
To Exit Valet Mode:
1. Returning to normal operation, turn ignition switch to the ON position.
2. Press and hold the valet/pro ram switch for 2 seconds. he LED will
turn OFF indicating the system is out of Valet Mode.
Remote Valet: ( Disarm or Valet mode)
Press and release the button on the transmitter three times within 3
seconds to enter or exit valet mode. he parking light flash to confirm
you have entered Valet Mode and [2]parking light flashes will
confirm you have exited Valet Mode.
K. CAR FINDER:
With the unit Armed, press the button to activate the Car Finder function.
he siren will chirp 6 times and the parking lights will flash 12 times to
locate your vehicle.
L. PANIC FUNCTION:
he transmitter can be used as a remote panic button to manually trigger
the alarm in case of emer ency.
To enter Panic Mode:
1. Press and hold the button for 3 seconds. he alarm will immediately
sound.

. .
..
98
OPERATION
3. After the 30-second timer has elapsed, the security system will
automatically ARM. The siren will [1] chirp and the parking lights
will flash [1] time and remain ON for 10 seconds.
PASSIVE OOR LOCKING
The vehicle doors will automatically lock after the passive arming cycle
has been completed.
PASSIVE ARMING BY-PASS: While the system is disarmed, press the
button twice, the system will respond with [1] chirp and the LED will
turn ON. The security system will remain in this temporary state until
exited. To exit Passive By-pass, press the transmitters or buttons
and the system will return to normal status.
OPERATION
H. ACTIVE ISARMING UNLOCK AN ISARM:
1. Press the button on the transmitter.
2. The siren will chirp [2] times and the parking lights will flash [2]
times indicating that the security system is now isarmed.
3. The vehicles doors will unlock and the dome light will turn on for 30
seconds upon disarming.
TAMPER ISARMING If the alarm is triggered, upon disarm of the system,
the siren will chirp 4 times and the parking lights will flash 3 times.
PATHWAY ILLUMINATION This feature turns the parking light ON for
30 seconds upon an unlock signal and for 10 seconds for a lock signal.
Two Step oor Unlock: This feature will independently unlock the drivers
door only when disarming the security system. Pressing the
button a
second time within 3 seconds will unlock the other doors.
Automatic Rearm If this feature is selected, the security system will
automatically re-arm itself in 60 seconds after disarming with the remote
transmitter. Automatic Rearm will cancel if any door is opened
before the 60 second timer has elapsed.
I. ISARMING WITHOUT A TRANSMITTER
Overriding the Alarm without a Password Pin Code: (Factory efault
Setting)
The Override function may be used if the remote transmitter is lost or
inoperative.
1. Enter the vehicle and turn the ignition switch to the ON position.
(The alarm will sound.)
2. Within 10 seconds push and release the valet/program switch. The
alarm will stop sounding and enter the disarm mode. You can now start
and operate the vehicle normally.
Override the Alarm with Password Pin Code: (See Alarm Feature IV-
2 Programming.)
Unlike the valet switch easily found and defeated, this security system allows
the consumer to program a password pin code. This feature will offer a
higher level of security protection
To Operate Password Pin Code:
1. Enter the vehicle and turn the ignition switch to the ON position.
(The alarm will sound.)
2. Within 5 seconds, enter your chosen first digit code by pressing and
releasing the valet/program switch.
3. Within 15 seconds of the last digit code enter (the 1st code), turn the
ignition switch OFF and then back to the ON position.
4. Within 15 seconds, enter your chosen second digit code by pressing
and releasing the valet/program switch.
5. Turn the ignition switch to the OFF position. [4] Chirps from the siren
or horn and [3] flashes from the parking lights will indicate the system
was disarmed.
Example: To Override the System with the Password Code 83, you
would;
1. Enter the vehicle and turn the ignition switch to the ON position.
(The alarm will sound.)
2. Within 5 seconds, press and release the valet/program switch 8
times.
3. Within 15 seconds of the last digit code enter, turn the
Ignition switch from Off to ON.
4. Within 15 seconds, press and release the valet/program switch 3
times.
Table of contents
Other Rapid Electronics Car Alarm manuals