Rapid7 Nexpose User manual

Security Console & Scan Engine Appliance Guide: Introduction
© 2009 Rapid7 LLC, Boston, MA | Rapid7 LLC Sales: +1 617-247-1717, Technical Support: +1 857-288-7400, Toll Free (USA): 1-866-390-8113
Your NeXpose Appliance contains the functionality of the two
major NeXpose components:
•The NeXpose Scan Engine (NSE) performs asset discovery,
vulnerability detection, and policy compliance testing.
•The NeXpose Security Console (NSC) communicates with all
NeXpose Scan Engines in your environment to start scans,
retrieve scan information, and store asset data. The
console includes a Web interface for operating and
maintaining your NeXpose system and managing users.
Other console functions include generating reports and
regularly downloading patches and other critical updates
from the Rapid7 central update system.
The NeXpose Appliance features expanded conguration
options and improved performance:
•64-bit architecture
•support for two NICs (Network Interface Cards)
•hardened Linux operating system with a more secure
conguration
•automated software and license updates
•a four-line LCD for easier viewing of menu items
Make sure these items are in the box when you open it. If not,
What’s inside the boxWhat your Appliance does
page 1of 8
NeXpose Appliance
Power cord
Rack mounting kit, including screws
RJ45 Ethernet cable
Phillips screwdriver (if you are mounting the
appliance on a rack)
What else you need for installation:
Optional installation equipment:
v3r0

Legend
Power light
LCD
Left arrow button
Up arrow button
Right arrow button
1
8
9
10
11
12
13
2
3
4
5
6
7
ETH1 Ethernet port
PCI slot cover
Lever for removing PCI slot cover
Cancel/Escape button
Select button
Down arrow button
Power supply unit
ETH0 Ethernet port
BD
GH
D
8
13
12
67
9
Front
Back
Security Console & Scan Engine Appliance Guide: Getting to Know Your Appliance
345
10 11
B
1B
2
page 2of 8
© 2009 Rapid7 LLC, Boston, MA | Rapid7 LLC Sales: +1 617-247-1717, Technical Support: +1 857-288-7400, Toll Free (USA): 1-866-390-8113

page 3of 8
© 2009 Rapid7 LLC, Boston, MA | Rapid7 LLC Sales: +1 617-247-1717, Technical Support: +1 857-288-7400, Toll Free (USA): 1-866-390-8113
Security Console & Scan Engine Appliance Guide: Using the Front Panel Buttons
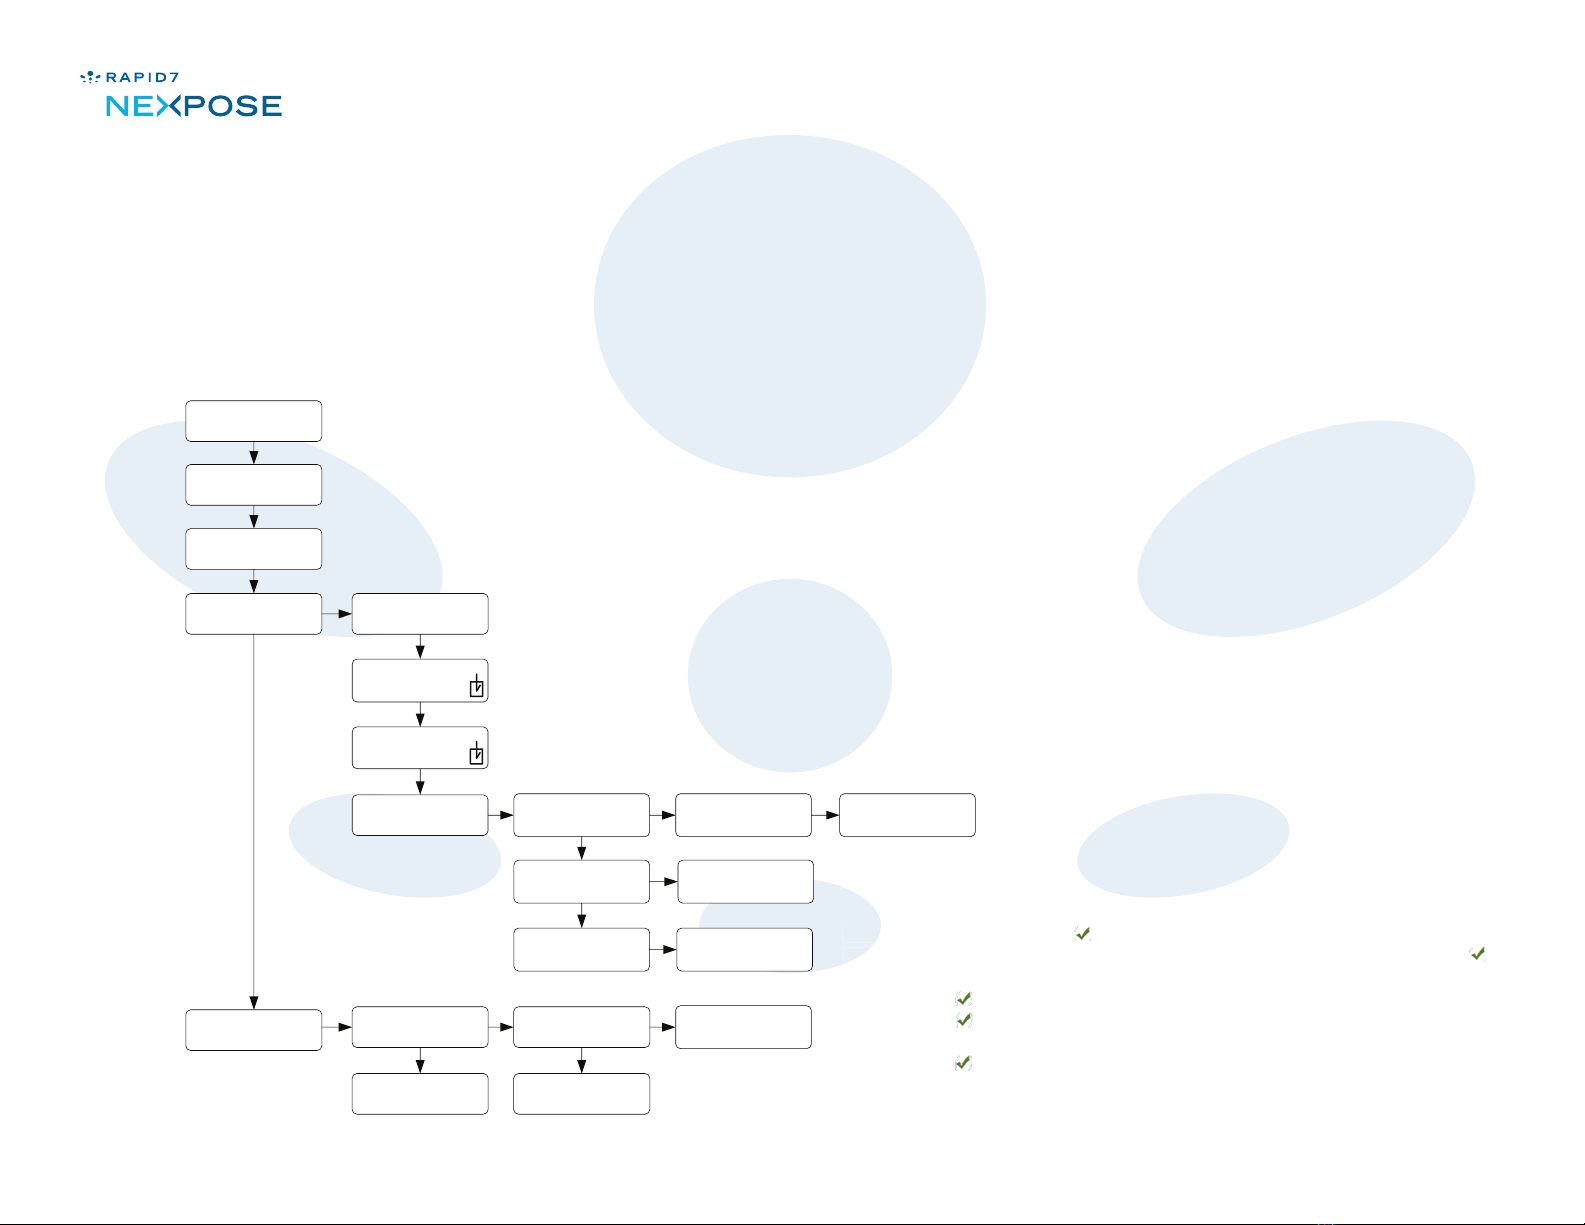
You can congure the Appliance by using the buttons on the front panel to navigate through a set of menus displayed on the LCD.
The menu structure for the appliance appears on pages 7 and 8.
At the top screen level of the LCD, the IP address of the Appliance appears beneath the words Browse To. This alternates with the phrase
Congure followed by Press X to congure.
To access the menus from the top level, press the Cancel/Escape
To toggle between menus, submenus, or options press the Up arrow ( ) and Down arrow ( ) buttons.
To select a menu or option, press the Select button ( ) or the Right arrow ( ) button.
When you are in a menu, press the Cancel/Escape ( ) button to take you out of the menu and back to the top level.
If you are several sub-menus deep, press the Cancel/Escape ( ) button return to the previous menu.
To answer“yes” to a conrmation question, press the Select button ( ). To answer “no”, press the Cancel/Escape ( ) button.
Entering characters
If you are in a conguration menu that requires you to enter characters, such as for setting an e-mail address, press the Up arrow ( )
and Down arrow ( ) buttons to select characters. Pressing the Up arrow ( ) button repeatedly from the beginning will advance you
through the alphabet, followed by a sequence of 29 special characters, including a blank space, and then numerals. Pressing the Down
arrow ( ) repeatedly from the beginning will advance you through special characters, followed by numerals, and then the alphabet.
If you are in a menu that only requires numerals, such as for entering an IP address, pressing the arrow keys will advance you through
numerals only. After you select a character for a given space, press the Right arrow ( ) button to move to the next character space.
Press the Cancel/Escape ( ) button to cancel any unsaved changes and start again. Press the ( ) to save entered characters.
See page 4 for information on manually entering and saving changes for network settings.
Note: Whenever you make and conrm a conguration change, NeXpose restarts. The restart message appears after a few seconds, and only at the top level.
Note: The conguration script does not display a conrmation for every changed setting. For example, it doesn’t request conrmation for changes to date or time settings.
( ) button.
To select a menu or option, press the Select button ( ) or the Right arrow ( ) button.
To answer“yes” to a conrmation question, press the Select button ( ). To answer “no”, press the Cancel/Escape ( ) button.
Press the Cancel/Escape ( ) button to cancel any unsaved changes and start again. Press the ( ) to save entered characters.

Security Console & Scan Engine Appliance Guide: Setting Up Your Appliance
Refer to the illustration on page 2 for Appliance components labeled by numerals.
If you want to mount the Appliance on a rack, assemble each side rail, and attach it to the rack using the screws in the rail kit.
Then, attach the appliance to the rails. You can load the Appliance onto the rack either before or after you complete the following
steps.
Continued on page 5
This diagram shows the sequence for manually conguring
network settings on the Appliance. See Step 6 on page 5.
Note that NIC 1 in the conguration menu corresponds to
the ETH0 physical port on the back of the appliance.
NIC 2 in the conguration menu corresponds to the
ETH1 physical port on the back of appliance.
Conguring network settings
IP Address, Net Mask, and Gateway are sequential. If you make changes to IP Address, the
conguration script proceeds to Net Mask, and then to Gateway. To conrm the changes
for each setting, press the Select ( ) button. For example, to congure IP Address, use the
Up arrow ( ) and Down arrow ( ) buttons as described on page 3. Then press the Select ( )
button. The script automatically proceeds to Net Mask. You can change that setting or simply
press the Select ( ) button to move on to Gateway, where the same options apply. After you
press the Select ( ) button to exit from the Gateway screen, press the Cancel/Escape ( )
button repeatedly until you see a message asking you to save your network setting changes.
Press the Select ( ) button to save changes or the
Cancel/Escape button ( ) to cancel them.
page 4of 8
© 2009 Rapid7 LLC, Boston, MA | Rapid7 LLC Sales: +1 617-247-1717, Technical Support: +1 857-288-7400, Toll Free (USA): 1-866-390-8113
Step 1
Congure
Press X to congure
Network
> NICs
NICs
> NIC 1Link
Congure
> Network
NIC1 (or NIC 2)
Enabled NIC
NIC1 (or NIC 2)
Auto (DHCP )
NeXpose
> Congure
NIC1 (or NIC 2)
> Manual
Manual
> IPAddress
Manual
> Netmask
Manual
> Gateway
Save Settings?
> OK
IP Address
000.000.000.000
Netmask
000.000.000.000
Gateway
000.000.000.000
Network
> Other Settings
Other Settings
> Nameserver
Other Settings
> Domain
Nameserver
000.000.000.000
Domain
server .example.com
Save Settings?
> OK
for each setting, press the Select ( ) button. For example, to congure IP Address, use the
Press the Select ( ) button to save changes or thePress the Select ( ) button to save changes or the
Up arrow ( ) and Down arrow ( ) buttons as described on page 3. Then press the Select ( )Up arrow ( ) and Down arrow ( ) buttons as described on page 3. Then press the Select ( )
press the Select ( ) button to move on to Gateway, where the same options apply. After youpress the Select ( ) button to move on to Gateway, where the same options apply. After you
press the Select ( ) button to exit from the Gateway screen, press the Cancel/Escape ( )press the Select ( ) button to exit from the Gateway screen, press the Cancel/Escape ( )

Step 3
Step 4
Step 5
Step 6
Step 2
Plug one end of the power cord into a power strip and the other end into the appliance power supply unit 9 . The Appliance
switches on automatically.
Note: You also can turn on the appliance on by pressing the Select button ( ).
While NeXpose starts, the message Starting NeXpose appears in the LCD. The rst time you turn on the Appliance, NeXpose
attempts to use DHCP to congure network settings for NIC 1 (ETH0). The start process may take up to three minutes. If NeXpose
successfully congures the Appliance, the words Browse To and the IP address of NIC 1 (ETH0) appear in the LCD, alternating
repeatedly with the word Congure. If you are only using one NIC, you can begin using the Appliance at this point. See Using Your
Appliance on page 6.
If NeXpose is unable to congure the Appliance settings, only the Congure menu heading appears in the LCD. Use this menu to
set the IP address, subnet mask, gateway, DNS server, and domain for the Appliance. See the ow chart on page 4. After you
have congured these settings, the IP address of NIC 1 (ETH0) appears in the LCD.
If you are using two NICs and have already congured NIC 1 (ETH0), use the LCD to congure network settings for NIC 2 (ETH1).
Note: The physical port labeled ETH0 on the back of the Appliance corresponds to NIC 1 in the conguration menu as seen in the LCD.
The physical port labeled ETH1 on the back of the Appliance corresponds to NIC 2 in the conguration menu.
Note: Repeat this step with the ETH1 port if you are using both NICs.Typically, one NIC is sucient to handle all network activity, but you may get a slight performance
boost by using the second NIC as well. If you want to use one NIC only, use ETH0. If you want to use both NICs, it is recommended that you use ETH0 for scanning activity, and
use EITH1 for all management activities that involve the NeXpose Security Console.
Congure ETH0 to run on a subnet with a gateway that connects to the Internet. Then, congure ETH1 to run on an internal subnet.
Note: If you use DHCP to autocongure a NIC and, afterward, manually change the settings and then exit and save the changes, the DHCP option will be unchecked after NeXpose restarts.
Security Console & Scan Engine Appliance Guide: Setting Up Your Appliance
Continued from page 4
Plug one end of an Ethernet cable into a network jack and the other end into the appliance Ethernet port labeled ETH0 10 .
page 5of 8
© 2009 Rapid7 LLC, Boston, MA | Rapid7 LLC Sales: +1 617-247-1717, Technical Support: +1 857-288-7400, Toll Free (USA): 1-866-390-8113

Security Console & Scan Engine Appliance Guide: Using Your Appliance
© 2009 Rapid7 LLC, Boston, MA | Rapid7 LLC Sales: +1 617-247-1717, Technical Support: +1 857-288-7400, Toll Free (USA): 1-866-390-8113
You perform all NeXpose tasks and management functions using the NeXpose Security Console Web interface.
Start a Web browser. See the NeXpose Help site for supported browsers. In the browser navigation bar, enter the IP address of the
appliance, and specify the port. 3780 is the default. Make sure to indicate HTTPS protocol when entering the URL.
Example: https://192.168.1.1:3780
Click the Help link at the top of any page of the interface to view the Help site. Use the Contents and Search tabs in the left navigation
pane of the Help site to nd information on any specic task. It is recommended that you browse the section titled Running scans and
viewing assets rst.
I'm not seeing a valid IP address in the LCD.
The most likely reason is that the Appliance is unable to use DHCP to congure itself. Verify that the DHCP server is available to give
IP addresses to new network hosts and that the Appliance is able to connect to the DHCP server. If DHCP is unavailable, congure the
network settings manually. See page 4.
My browser can't display to the NeXpose Security Console Web interface.
Make sure to specify an HTTPS connection and the correct port number when entering the IP address of your appliance.
The default port number is 3780. Example: https://192.168.1.1:3780.
If you have properly entered the address and still cannot connect, it's possible that a rewall may be blocking you from reaching NeXpose.
Note: For security reasons, the Appliance no longer responds to ICMP echo requests. You cannot ping an Appliance.
I am unable to log on to the NeXpose console, or I have lost my password.
NeXpose passwords are case sensitive, so make sure that you are using the proper capitalization and that Caps Lock is not enabled on
your keyboard. If you enter your password correctly and still can't log on, your may have exceeded the lockout threshold, which is three
invalid attempts. Restart the appliance to clear the lockout.
I have tried everything, but I can't get the Appliance to work properly.
Connecting to your NeXpose Security Console through your browser
Troubleshooting
page 6of 8

Security Console & Scan Engine Appliance Guide: Navigating the LCD Menu
© 2009 Rapid7 LLC, Boston, MA | Rapid7 LLC Sales: +1 617-247-1717, Technical Support: +1 857-288-7400, Toll Free (USA): 1-866-390-8113
Menu or Submenu Description
Congure Congure the appliance.
NIC 1: link (or no link) Congure NIC 1 (ETH0).
Enabled NIC [checkbox] Enable NIC 1 (ETH0) by pressing the Select button.
Auto (DHCP) [checkbox] Enable autoconguration with DHCP by pressing the Select button.
Manual Congure NIC 1 (ETH0) manually.
IP address Set the IP address of NIC 1 (ETH0).
Netmask Set the subnet mask of NIC 1 (ETH0).
Gateway Set the default gateway for NIC 1 (ETH0).
Date (YYYYMMDD) Set the date using YYYYMMDD format (example: 20090101).
NIC 2: link (or no link) Congure NIC 2 (ETH1).
Enabled NIC [checkbox] Enable NIC 2 (ETH1) by pressing the Select button.
Auto (DHCP) [checkbox] Enable autoconguration with DHCP by pressing the Select button.
Manual Congure NIC 2 (ETH1) manually.
IP address Set the IP address of NIC 2 (ETH1).
Subnet mask Set the subnet mask of NIC 2 (ETH1).
Network Congure network settings.
NICs Congure one of the NICs.
Gateway Set the default gateway for NIC 2 (ETH1).
Other settings Congure other network settings for the Appliance.
Nameserver Set the DNS server for the Appliance.
Domain Set the domain of the Appliance.
Date/Time Congure date and time settings.
Time (HHMM) Set the time using 24-hour HHMM format (example: 2359).
Timezone Select the time zone.
page 7of 8

Security Console & Scan Engine Appliance Guide: Navigating the LCD Menu
© 2009 Rapid7 LLC, Boston, MA | Rapid7 LLC Sales: +1 617-247-1717, Technical Support: +1 857-288-7400, Toll Free (USA): 1-866-390-8113
Menu or Submenu Description
Restart Restart the Appliance. This operation may take a few minutes.
Ver: View the version of NeXpose currently installed on the Appliance.
Upd: View the date of the most recent NeXpose update.
SN: View the NeXpose serial number.
Send Logs Send diagnostics information and log les to Rapid7 Technical Support.
From Email Specify the sender’s e-mail address. Support will send any replies to this address.
Mail Relay (opt) Specify a mail relay server if direct Internet access is not available (optional setting).
Advanced Perform advanced NeXpose functions. Note: You can perform most of these functions by
using the NeXpose Web interface or the command prompt. See NeXpose Help.
Stop Nexpose Stop the NeXpose service without shutting down the Appliance.
Start Nexpose Start the NeXpose service.
Nexpose Port Change the port on which NeXpose service listens for https connections. The default value
is 3780.
Set Update Proxy Change the host name or IP address of the NeXpose update server. The default value is
updates.rapid7.com.
Shutdown Shut down the Appliance. This operation may take a few minutes.
Support View and send information required by Rapid7 Technical Support.
Update Now Download and install NeXpose updates immediately.
NeXpose Command Run a NeXpose command using a command prompt.
Reset All Reset the following settings to factory defaults if they were changed:
•3780 for the NeXpose port
•updates.rapid7.com for the update server proxy
Note: In order for Reset All to take eect, you must restart the Appliance, not just NeXpose.
page 8of 8
Table of contents